Winform窗体半透明,控件不透明,及皮肤美化效果
来源:互联网 发布:ubuntu 16 开机自启动 编辑:程序博客网 时间:2024/04/29 11:37
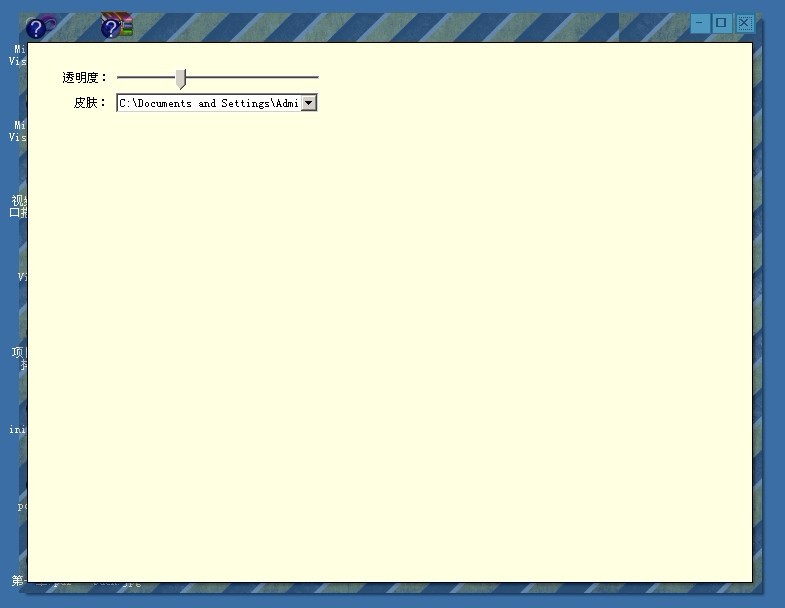
先看效果图:
其实网上实现窗体半透明,控件不透明的方法很多,能用微软的API做出效果固然很好,然而其实现方法上有点点复杂,我个人没怎么去深究这个问题,因为我只想实现这个效果而已,选择一个简单的方法是最好的,这样学友们也能够容易理解,那就我简单的介绍下我个人的一个窗体透明实现流程。
1:新建一个窗体,我命名为Form2
上面有几个窗体缩小,最大化,及关闭的按钮,自己随便定义下。
这个窗体是主窗体,接下来在主窗体写相关的代码:
using System;using System.Collections.Generic;using System.ComponentModel;using System.Data;using System.Drawing;using System.Linq;using System.Text;using System.Windows.Forms;using System.Runtime.InteropServices;namespace WindowsFormsApplication1{ public partial class Form2 : Form { //窗体移动API函数 //public const int WM_NCLBUTTONDOWN = 0xA1; //public const int HT_CAPTION = 0x2; //[DllImportAttribute("user32.dll")] //public static extern int SendMessage(IntPtr hWnd, int Msg, int wParam, int lParam); //[DllImportAttribute("user32.dll")] //public static extern bool ReleaseCapture(); private HalfTransparentChildForm childForm;//此为副窗体 public Form2() { InitializeComponent(); this.BackgroundImage = new Bitmap(AppDomain.CurrentDomain.BaseDirectory + "backgroundPic\\25.jpg"); this.Opacity = 0.3; // 窗体透明度 this.childForm =new HalfTransparentChildForm(this); this.childForm.Owner = this; // 这支所属窗体 this.childForm.Dock = DockStyle.Fill; this.childForm.Show(); this.childForm.BringToFront(); childForm.Location = new Point(this.Location.X+8,this.Location.Y+29); this.childForm.Size = new Size(this.Size.Width - 17, this.Height - 39); //mouseControl(); SetStyle(ControlStyles.AllPaintingInWmPaint | ControlStyles.OptimizedDoubleBuffer | ControlStyles.ResizeRedraw | ControlStyles.UserPaint, true); UpdateStyles(); } //此代码也是能实现窗体移动效果的,调用微软API函数 //void mouseControl() //{ // this.MouseDown += (sender, e) => { // //if (e.Button == MouseButtons.Left) //{ // ReleaseCapture(); // SendMessage(this.Handle, WM_NCLBUTTONDOWN, HT_CAPTION, 0); //} // }; //}
// <summary> // 窗体四个角圆角化 // </summary> // <param name="e"></param> protected override void OnResize(EventArgs e) {
base.OnResize(e); int Rgn = Win32.CreateRoundRectRgn(3, 3, this.Width - 1, this.Height - 1, 5, 5); Win32.SetWindowRgn(this.Handle, Rgn, true);
if (this.childForm != null) this.childForm.Size = new Size(this.Size.Width - 17, this.Height - 39); }
//也可以实现圆角化效果,任选一种
//private void Form2_Paint(object sender, PaintEventArgs e) //{ //List<Point> list = new List<Point>(); //int width = this.Width; //int height = this.Height;
////左上 //list.Add(new Point(0, 5)); //list.Add(new Point(1, 5)); //list.Add(new Point(1, 3)); //list.Add(new Point(2, 3)); //list.Add(new Point(2, 2)); //list.Add(new Point(3, 2)); //list.Add(new Point(3, 1)); //list.Add(new Point(5, 1)); //list.Add(new Point(5, 0)); ////右上 //list.Add(new Point(width - 5, 0)); //list.Add(new Point(width - 5, 1)); //list.Add(new Point(width - 3, 1)); //list.Add(new Point(width - 3, 2)); //list.Add(new Point(width - 2, 2)); //list.Add(new Point(width - 2, 3)); //list.Add(new Point(width - 1, 3)); //list.Add(new Point(width - 1, 5)); //list.Add(new Point(width - 0, 5)); ////右下 //list.Add(new Point(width - 0, height - 5)); //list.Add(new Point(width - 1, height - 5)); //list.Add(new Point(width - 1, height - 3)); //list.Add(new Point(width - 2, height - 3)); //list.Add(new Point(width - 2, height - 2)); //list.Add(new Point(width - 3, height - 2)); //list.Add(new Point(width - 3, height - 1)); //list.Add(new Point(width - 5, height - 1)); //list.Add(new Point(width - 5, height - 0)); ////左下 //list.Add(new Point(5, height - 0)); //list.Add(new Point(5, height - 1)); //list.Add(new Point(3, height - 1)); //list.Add(new Point(3, height - 2)); //list.Add(new Point(2, height - 2)); //list.Add(new Point(2, height - 3)); //list.Add(new Point(1, height - 3)); //list.Add(new Point(1, height - 5)); //list.Add(new Point(0, height - 5));
//Point[] points = list.ToArray();
//GraphicsPath shape = new GraphicsPath(); //shape.AddPolygon(points);
////将窗体的显示区域设为GraphicsPath的实例 //this.Region = new System.Drawing.Region(shape);
//}
private const int WM_NCHITTEST = 0x84; private const int HTCLIENT = 0x1; private const int HTCAPTION = 0x2; //实现移动主窗体,并可放大,缩小 protected override void WndProc(ref Message message) { base.WndProc(ref message); if (message.Msg == WM_NCHITTEST && (int)message.Result == HTCLIENT) { message.Result = (IntPtr)HTCAPTION; } if (this.WindowState == FormWindowState.Maximized) { button2.Text = "▣"; } if (this.WindowState == FormWindowState.Normal) { button2.Text = "□"; } } //窗体边框阴影化 protected override CreateParams CreateParams { get { CreateParams createParams = base.CreateParams; createParams.ClassStyle |= 0x20000; return createParams; } } //副窗体随主窗体变化 private void Form2_Resize(object sender, EventArgs e) { if (this.childForm != null) this.childForm.Size = new Size(this.Size.Width-17,this.Height-39); } //副窗体随主窗体位置移动 private void Form2_LocationChanged(object sender, EventArgs e) { if (this.childForm != null) childForm.Location = new Point(this.Location.X+8, this.Location.Y+29); } //窗体关闭,及相关线程也关闭 private void button1_Click(object sender, EventArgs e) { Application.Exit(); System.Diagnostics.Process pro = System.Diagnostics.Process.GetCurrentProcess(); pro.Kill(); } //最大化及一般化 private void button2_Click(object sender, EventArgs e) { if (button2.Text == "□") { this.WindowState = FormWindowState.Maximized; button2.Text="▣"; } else { this.WindowState = FormWindowState.Normal; button2.Text = "□"; } } //最小化 private void button3_Click(object sender, EventArgs e) { this.WindowState = FormWindowState.Minimized; } }}
2.新建副窗体命名为:HalfTransparentChildForm
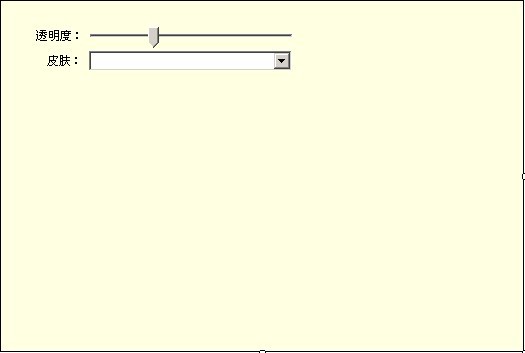
我加了2个控件,方便你们调节的时候,能够更清晰的看出半透明效果
using System;using System.Collections.Generic;using System.ComponentModel;using System.Data;using System.Drawing;using System.Linq;using System.Text;using System.Windows.Forms;using System.Runtime.InteropServices;namespace WindowsFormsApplication1{ public partial class HalfTransparentChildForm : Form { Form2 f2; public HalfTransparentChildForm(Form2 f) { InitializeComponent(); f2 = f; string skin1 = AppDomain.CurrentDomain.BaseDirectory + "backgroundPic\\25.jpg"; string skin2 = AppDomain.CurrentDomain.BaseDirectory + "backgroundPic\\Garden.jpg"; string skin3 = AppDomain.CurrentDomain.BaseDirectory + "backgroundPic\\back.jpg"; string skin4 = AppDomain.CurrentDomain.BaseDirectory + "backgroundPic\\Autumn.jpg"; comboBox1.Items.AddRange(new string[] { skin1, skin2,skin3,skin4}); comboBox1.SelectedItem=skin1; this.trackBar1.Scroll += new EventHandler(trackBar1_Scroll); SetStyle(ControlStyles.AllPaintingInWmPaint | ControlStyles.OptimizedDoubleBuffer | ControlStyles.ResizeRedraw | ControlStyles.UserPaint, true); UpdateStyles(); } void trackBar1_Scroll(object sender, EventArgs e) { f2.Opacity = (double)trackBar1.Value / 100.0; } /// <summary> /// 边框阴影 /// </summary> protected override CreateParams CreateParams { get { CreateParams createParams = base.CreateParams; createParams.ClassStyle |= 0x20000; return createParams; } } private void comboBox1_SelectedIndexChanged(object sender, EventArgs e) { f2.BackgroundImage = new Bitmap(comboBox1.SelectedItem.ToString()); } }}
3.Win32 API函数类
新建一个类名为Win32的类:
using System;using System.Runtime.InteropServices;using System.ComponentModel;using System.Text;using System.Drawing;using System.Drawing.Drawing2D;using System.Drawing.Imaging;using System.Windows.Forms;using System.Collections;/// <summary>/// Wind32API声明/// </summary>internal class Win32{ [StructLayout(LayoutKind.Sequential)] public struct Size { public Int32 cx; public Int32 cy; public Size(Int32 x, Int32 y) { cx = x; cy = y; } } [StructLayout(LayoutKind.Sequential, Pack = 1)] public struct BLENDFUNCTION { public byte BlendOp; public byte BlendFlags; public byte SourceConstantAlpha; public byte AlphaFormat; } [StructLayout(LayoutKind.Sequential)] public struct Point { public Int32 x; public Int32 y; public Point(Int32 x, Int32 y) { this.x = x; this.y = y; } } public const byte AC_SRC_OVER = 0; public const Int32 ULW_ALPHA = 2; public const byte AC_SRC_ALPHA = 1; [DllImport("gdi32.dll", ExactSpelling = true, SetLastError = true)] public static extern IntPtr CreateCompatibleDC(IntPtr hDC); [DllImport("user32.dll", ExactSpelling = true, SetLastError = true)] public static extern IntPtr GetDC(IntPtr hWnd); [DllImport("gdi32.dll", ExactSpelling = true)] public static extern IntPtr SelectObject(IntPtr hDC, IntPtr hObj); [DllImport("user32.dll", ExactSpelling = true)] public static extern int ReleaseDC(IntPtr hWnd, IntPtr hDC); [DllImport("gdi32.dll", ExactSpelling = true, SetLastError = true)] public static extern int DeleteDC(IntPtr hDC); [DllImport("gdi32.dll", ExactSpelling = true, SetLastError = true)] public static extern int DeleteObject(IntPtr hObj); [DllImport("user32.dll", ExactSpelling = true, SetLastError = true)] public static extern int UpdateLayeredWindow(IntPtr hwnd, IntPtr hdcDst, ref Point pptDst, ref Size psize, IntPtr hdcSrc, ref Point pptSrc, Int32 crKey, ref BLENDFUNCTION pblend, Int32 dwFlags); [DllImport("gdi32.dll", ExactSpelling = true, SetLastError = true)] public static extern IntPtr ExtCreateRegion(IntPtr lpXform, uint nCount, IntPtr rgnData); /// <summary> /// 设置边窗圆角 /// </summary> /// <param name="x">左</param> /// <param name="y">上</param> /// <param name="z">右</param> /// <param name="a">下</param> /// <param name="b">宽</param> /// <param name="c">高</param> /// <returns></returns> [DllImport("gdi32.dll", ExactSpelling = true, SetLastError = true)] public static extern int CreateRoundRectRgn(int Left,int Top,int Right,int Bottom,int Width,int Height); [DllImport("user32.dll", ExactSpelling = true, SetLastError = true)] public static extern int SetWindowRgn(IntPtr hWnd,int handle,bool b);}
好了,效果已完成,大致上就是这么实现的,主要原理还是采用了最普通的,也是最简单的方法:2个窗体相叠加的原理,相信大家也能够理解的。还有边框的四个角实现圆角效果我调用了的微软的API函数来实现的。当然还可以用GDI+画出来,比较繁琐而已,方法也已经在上面给大家写出来了,你们哪种方便就用哪种吧。
窗体半透明,控件不透明
- Winform窗体半透明,控件不透明,及皮肤美化效果
- 利用IrisSkin2.dll皮肤控件美化WINFORM窗体!
- C#绘制半透明窗体,只让窗体背景半透明,而窗体里面的控件不透明
- 关于C#窗体的半透明,控件不透明的解决方案
- mfc中如何实现窗体半透明 但是控件不透明
- vb 窗体透明效果(控件不透明)
- Skin控件 C# Winform窗体美化控件
- C#WinForm窗体美化(IrisSkin皮肤插件的使用)
- C# winform 半透明窗体
- Winform窗体皮肤
- 循序渐进实现仿QQ界面(五):半透明窗体与不透明控件
- 循序渐进实现仿QQ界面(五):半透明窗体与不透明控件
- vc循序渐进实现仿QQ界面(五):半透明窗体与不透明控件
- C# Winform 窗体美化(七、Win7 Aero 毛玻璃效果)
- winform窗体美化
- C#中winform窗体的美化控件 iriskin(一)
- C#中winform窗体的美化控件 iriskin(二)
- c# WinForm 窗体美化(二)--关于东日skinbuilder软件生成皮肤的使用
- 设计模式之python版(五)--工厂方法
- Kerberos Key Distribution Center
- 深入了解HDMI接口
- CTI 基础知识
- android手电筒
- Winform窗体半透明,控件不透明,及皮肤美化效果
- 关于iPhone和iPad的图标
- struts2之防止表单重复提交 token
- 三种地理参考信息模型:WMS,WFS,WCS
- 黑马程序员——交通灯管理系统
- 冒泡排序
- 关于Const指针的一点补充
- DirectShow学习笔记
- checkstyple