IOS成长之路-导航栏的实现
来源:互联网 发布:网购联盟和淘宝联盟 编辑:程序博客网 时间:2024/05/17 23:18
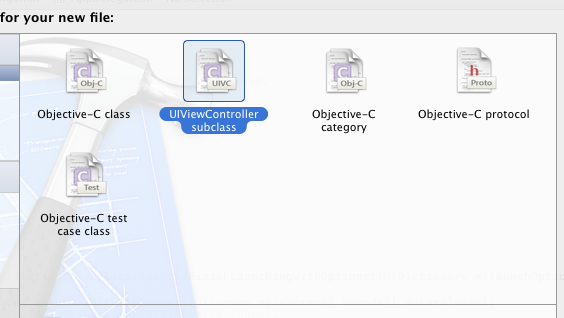
创建这样一个项目:

在Model中创建一个简单的 view 界面,而 ViewController 类是一个表格的界面
创建表格的界面:
第一步:
第二步:
注意: Subclass of 的选项要选择 UITableViewController
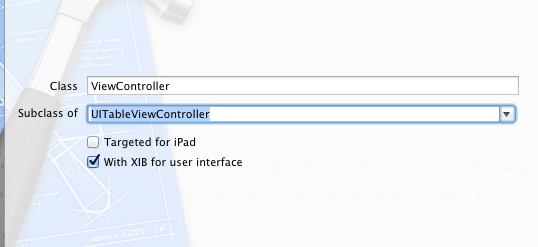
然后下一步,最后点击create就可以了
=-=-=-=-=-=-=-=-=-=-=-=-=-=-=-=-=-=-=-=-=-=-=-=-=-=-=-=-=-=-=-=-=-=-=-=-=-=-=
在ViewController这个界面中创建导航添加进去
/*AppDelegate.h*/#import <UIKit/UIKit.h>@class ViewController;@interface AppDelegate : UIResponder <UIApplicationDelegate>@property (strong, nonatomic) UIWindow *window;//添加导航控制器@property (strong,nonatomic) UINavigationController *iNav;//添加ViewController界面,添加这个界面的目的是为了把导航加入到这个界面中@property (strong,nonatomic) ViewController *viewController;@end
/*AppDelegate.m*/#import "AppDelegate.h"#import "ViewController.h"@implementation AppDelegate@synthesize window = _window;//-----------------@synthesize iNav = _iNav;@synthesize viewController = _viewController;//------------------ (void)dealloc{ [_iNav release]; [_viewController release]; [_window release]; [super dealloc];}- (BOOL)application:(UIApplication *)application didFinishLaunchingWithOptions:(NSDictionary *)launchOptions{ self.window = [[[UIWindow alloc] initWithFrame:[[UIScreen mainScreen] bounds]] autorelease]; // Override point for customization after application launch. self.window.backgroundColor = [UIColor whiteColor]; [self.window makeKeyAndVisible]; /*---------------添加的内容----------------*/ self.viewController = [[ViewController alloc]initWithNibName:@"ViewController" bundle:nil]; //initWithRootViewController 基于哪个页面导航(就是把导航加到哪个页面中) self.iNav = [[UINavigationController alloc]initWithRootViewController:self.viewController]; //添加到window中 [self.window addSubview:self.iNav.view]; //或下面这种方法 //self.window.rootViewController = self.iNav; return YES;}然后在 ViewController.m 类中为导航栏写一个title
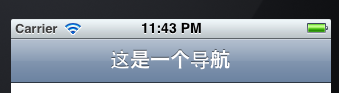
在 - (void)viewDidLoad 这个方法中添加:
self.title = @"这是一个导航";
到这里就实现了在这个界面中添加一个导航栏。
如图:
=-=-=-=-=-=-=-=-=-=-=-=-=-=-=-=-=-=-=-=-=-=-=-=-=-=-=-=-=-=-=-=-=
但是到这里并没有体现出导航的作用,所以,我们进行下面的操作:
这个界面是一个表格界面,在这个界面中添加内容,然后通过它切换到另外一个界面中,从而实现导航的作用:通过导航返回第一个界面中
还是在 ViewController.m 这个类中:
在 - (NSInteger)tableView:(UITableView *)tableView numberOfRowsInSection:(NSInteger)section 方法中的
return cell; 前加入这样一段代码:
//输入内容 cell.textLabel.text = @"helloworld"; //得到每一行的索引值 int num = indexPath.row;
在这个类中有这样两个方法,分别是设置有几块区域和每块区域有几行
- (NSInteger)numberOfSectionsInTableView:(UITableView *)tableView{ // Return the number of sections. // 返回有几块区域 return 1;}- (NSInteger)tableView:(UITableView *)tableView numberOfRowsInSection:(NSInteger)section{ // Return the number of rows in the section. return 2;// 返回一个区域有几行}这个时候的界面是:
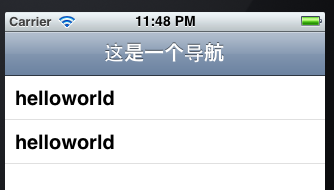
点击 helloworld 进入下一个界面,就是 UiViewController.xib 界面中,在这个界面中有一个 label 控件
还是在ViewController.m这个类中实现切换界面的操作:
- (void)tableView:(UITableView *)tableView didSelectRowAtIndexPath:(NSIndexPath *)indexPath{ UiViewController *viewController = [[UiViewController alloc]initWithNibName:@"UIViewController" bundle:nil]; //navigationController 是从 UIViewController 中继承下来的属性,通过这个属性来调用它的压栈方法,来实现界面的切换 /* @property(nonatomic,readonly,retain) UINavigationController *navigationController; // If this view controller has been pushed onto a navigation controller, return it. */ [self.navigationController pushViewController:viewController animated:YES]; // Navigation logic may go here. Create and push another view controller. /* <#DetailViewController#> *detailViewController = [[<#DetailViewController#> alloc] initWithNibName:@"<#Nib name#>" bundle:nil]; // ... // Pass the selected object to the new view controller. [self.navigationController pushViewController:detailViewController animated:YES]; [detailViewController release]; */}注意:不要忘记添加头文件 :
#import"UiViewController.h"
=-=-=-=-=-=-=-=-=-=-=-=-=-=-=-=-=-=-=-=-=-=-=-=-=-=-=-=-=-=-=-=-=-=-=-=-=-=
好了,这样就实现了导航的作用了
点击helloworld 进入下一个界面。
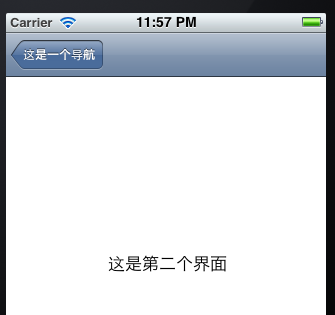
进入到第二个界面中可以看到,导航栏的位置上有一个返回的按钮,点击就可以返回第一个界面了
- IOS成长之路-导航栏的实现
- IOS成长之路-导航栏的实现
- IOS成长之路
- NSFileManager 的用法-iOS成长之路
- ****iOS小狮子的成长之路****
- IOS成长之路-用NSXMLParser实现XML解析
- IOS成长之路-ASIFormDataRequest实现上传图片
- IOS成长之路-NSMutableURLRequest实现Post请求
- IOS成长之路-ASIFormDataRequest实现上传图片
- IOS成长之路-ASIFormDataRequest实现上传图片
- IOS成长之路-ASIFormDataRequest实现上传图片
- IOS成长之路-ASIFormDataRequest实现上传图片
- IOS成长之路-实现界面切换和数据的传递
- IOS成长之路-实现界面切换和数据的传递
- IOS成长之路-实现界面切换和数据的传递
- iOS开发之导航栏的定制
- IOS成长之路-NSDate
- IOS成长之路-NSDate
- Project——Activity之间的数据传递(关闭Actiity时返回数据)
- 递归求解分解因式
- 240多个jQuey插件
- VC之内联汇编代码...
- Project——意图(隐式意图)
- IOS成长之路-导航栏的实现
- 每一个成功的问题背后都有一个美丽的假设
- 最大公约最小公倍数
- C语言排序与查找实例
- 进制转换
- My New ADT Stack 数组实现[修改]
- struts1.2验证
- 内存堆栈(5.11)
- 转换CLOB字段类型为VARCHAR2