Unity: Scaling the GUI based on the screen resolution
来源:互联网 发布:阿里云虚拟主机搭建ss 编辑:程序博客网 时间:2024/05/19 12:36
Unity: Scaling the GUI based on the screen resolution
Posted by DimasTheDriver | Filed under Featured, Programming

As hinted by other posts, here, you will find how to properly scale the GUI elements based on screen resolution. As one may have noticed, Unity doesn’t scale the GUI elements based on the screen resolution, requiring a script to do the job, which is explained in this post. I will assume that the reader already knows how to create and render GUI elements in Unity using the MonoBehaviour’s OnGUI() function and GUISkin objects.
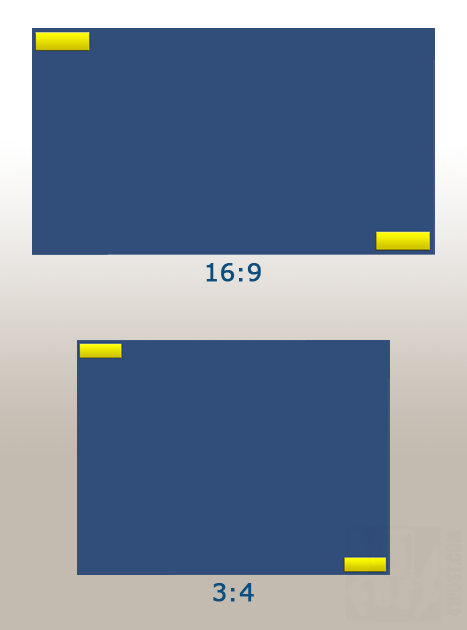
The best way to explain how to properly scale a GUI element is through an example. That said, for this post, let’s assume that we wanted a yellow rectangle to be rendered at the top left and bottom right corners of the screen, like this:

Yellow rectangles at the edges of the screen.
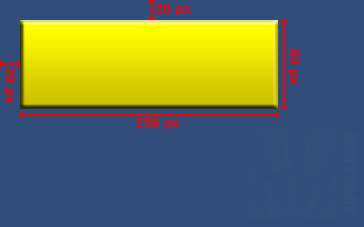
The first thing to have in mind when creating a GUI for multiple resolutions is that there are no absolute pixel values, only relative ones. This means that all GUI elements must be positioned at a certain distance from one (or more) screen edge(s). Since it’s not possible to create relative positions in a graphical editing software, there is the need to define a target distance from the screen edges when it has a specific resolution . In this example, we will define that the two GUI elements must have a distance of 20 pixels from the screen’s edges when the resolution is 1920×1080. This could have been any other distance for any other resolution, it’s just a place to start.

The image must be 20px from the edges. The width and height of the GUI element are going to play an important role in the script.
Finally, here’s the code that properly scales and positions the GUI based on the screen resolution:
using UnityEngine;using System.Collections;public class GUIScaleExample : MonoBehaviour{//a GUISkin object to draw the GUI imagepublic GUISkin guiSkin;//the GUI scale ratioprivate float guiRatio;//the screen widthprivate float sWidth;//create a scale Vector3 with the above ratioprivate Vector3 GUIsF;//At this script initializationvoid Awake(){//get the screen's widthsWidth = Screen.width;//calculate the scale ratioguiRatio = sWidth/1920;//create a scale Vector3 with the above ratioGUIsF = new Vector3(guiRatio,guiRatio,1);}//Draws GUI elementsvoid OnGUI(){//scale and position the GUI element to draw it at the screen's top left cornerGUI.matrix = Matrix4x4.TRS(new Vector3(GUIsF.x,GUIsF.y,0),Quaternion.identity,GUIsF);//draw GUI on the top leftGUI.Label(new Rect(20,20,258,89),"",guiSkin.customStyles[0]);//scale and position the GUI element to draw it at the screen's bottom right cornerGUI.matrix = Matrix4x4.TRS(new Vector3(Screen.width - 258*GUIsF.x,Screen.height - 89*GUIsF.y,0),Quaternion.identity,GUIsF);//draw GUI on the bottom rightGUI.Label(new Rect(-20,-20,258,89),"",guiSkin.customStyles[0]);}}Right at the beginning of the code, a GUISkin object is declared at line 7, to render the yellow square as a GUI element. ThefloatguiRatio variable is where the ratio between the screen’s width and the expected width is stored (line 10). The variablesWidth at line 13 stores the screen’s width. TheGUIsFvector will be created using the above ratio, and later on, it’s going to be used to properly scale the GUI elements (line 16).
Inside the Awake() method, all these declared variables are initialized. Line 24 is definitively the most important one. It divides the screen width by the assumed width (in our case1920) and stores it at the guiRatio variable. After that, theGUIsF scale vector is created. Again,1920 is just a value that was determined as an example, it could have been set as any other. Alternatively, the height of the screen could be divided by 1080 if that made more sense, as a result, all GUI elements would have been scaled according to the screen’s height.
Moving on to the OnGUI() method, a“GUI.matrix = Matrix4x4.TRS “ line can be seen before each of the draw calls. These lines scale and position the wholeGUI system, changing it’s origin and scale by replacing it with a custom4×4 matrix. TheMatrix4x4.TRS creates a Transform,Rotate andTranslate 4×4 matrix, taking a Vector3, a Quaternion and another Vector3 as parameters.
The first time the GUI’s 4×4 Matrix is redefined (line 33), the GUI system origin is placed at(GUIsF.x,GUIsF.y,0), without any rotation(Quaternion.identity) and the elements below this line are scaled byGUIsF – aVector3 composed by(guiRatio,guiRatio,1). Then, the GUI element is drawn in line 35 using this new matrix as origin, placing it near the top left corner of the screen.
For anything that is placed near the bottom and/or right edges of the screen, there’s an additional calculation that needs to be done to correctly modify the GUI system matrix. This calculation takes in consideration the width and height of the screen, so as the GUI element’s width and height. Line 38 is a good example. The origin is first translated to the bottom right of the screen and then, it’s is brought upwards and left just enough to draw the rescaled GUI element. Right after this compensation, line 40 draws the element, -20 pixels away from the origin.
The code described above scales the GUI elements and their distances from the screen edge. Therefore, the distance from the screen’s edge will be only 20px when the screen is at 1920x1080px. Smaller resolutions will result in smaller distances. Below, some screenshots of this script in action:

The same script repositioning and resizing the GUI elements at a 4:3 and a 16:9 screen.
Here’s a Unity project with everything explained above, both inJavaScript andC#:
Download
- guiresize.zip
- Unity: Scaling the GUI based on the screen resolution
- 在Unity中通过The touch screen implements the rotation and scaling of the model
- sikuli core: Finding GUI Patterns on the Screen
- Get the screen size (screen resolution) in SmartGWT
- pushbutton on the select-screen
- Rendering views on the screen
- Get the F4 help of a field based on the value of another field in the selction screen(联动的搜索帮助)
- Scaling the NetScaler
- Tap anywhere on the screen to continue
- select the appropriate stylesheet according to the user's screen resolution
- The promise of MOM based on XMPP
- Unity3D File Based Assetbundles on the iPhone
- The linux-- function hijacking -- Based on LD_PRELOAD
- move the ur robot based on urscript
- Grab the color of the pixel on screen
- view slide as the user slides finger on the screen?
- print numbers on the screen.(show_str and dtoc function)
- Let the label display variable values on screen
- dsp gpio控制
- Js获取当前日期时间及其它操作
- XCode各版本对应的Mac OS操作系统版本
- oracle 函数处理IP地址的一个办法
- svn merge
- Unity: Scaling the GUI based on the screen resolution
- iPhone开发之深入浅出
- SqlDataReader的合适关闭方法?
- 《Windows程序设计》之对话框
- 图解数据库的内联接与外联接
- SQLite Database Browser – 轻量数据库编辑
- 最新收藏
- 在地图计算圆的外接正方形,并返回左上顶点和右下顶点
- linux常用系统变量


