AndroidWidget实践 --- EverydayTips开发(4)
来源:互联网 发布:淘宝跑跑卡丁车账号 编辑:程序博客网 时间:2024/05/04 09:35
接下来就是刷新了.刷新操作的话目测有几种方式(目测 --!)
1.在widget创建线程刷新
2.使用timer刷新(其实也是线程吧?)
3.widget连接Service 在Service创建线程刷新
4.widget连接Service 在Service中使用AlarmManager刷新
Thread比较简单,修改widget代码如下
package com.su.tipeveryday;import android.app.PendingIntent;import android.appwidget.AppWidgetManager;import android.appwidget.AppWidgetProvider;import android.content.ComponentName;import android.content.Context;import android.content.Intent;import android.provider.ContactsContract.CommonDataKinds.Note;import android.util.Log;import android.widget.RemoteViews;import android.widget.TextView;import android.widget.Toast;public class TipEveryDayWidget extends AppWidgetProvider {private Context mContext;@Overridepublic void onDeleted(Context context, int[] appWidgetIds) {// TODO Auto-generated method stubsuper.onDeleted(context, appWidgetIds);}@Overridepublic void onUpdate(Context context, AppWidgetManager appWidgetManager,int[] appWidgetIds) {// widget更新执行的方法// TODO Auto-generated method stubsuper.onUpdate(context, appWidgetManager, appWidgetIds);// final int N = appWidgetIds.length;//实现单个widget更新的方法,暂时不用// Log.d("app", "onUpdate--->Ids===" + String.valueOf(N));// for (int i = 0; i < N; i++) {// 如果有很多同类widget是需要遍历的(他们的id是不同的)// int appWidgetId = appWidgetIds[i];// updateAppWidget(context, appWidgetManager, appWidgetId);//// 更新widget的方法// }mContext = context;updateAppWidget(context, appWidgetManager, appWidgetIds);// 更新widget的方法Thread myThread = new Thread() {//开启线程public void run() {while (true) {try {Thread.sleep(1000);} catch (InterruptedException e) {e.printStackTrace();}mContext.sendBroadcast(new Intent("com.su.ontiprefresh"));// 通知刷新,其实相当于中午说的那个click,同样要在manifest注册Log.i("SSSSSSS", "Time");}};};myThread.start();}private void updateAppWidget(Context context,AppWidgetManager appWidgetManager, int[] appWidgetIds) {// 1.1,增加跳转用activity相关 intentRemoteViews remoteViews = new RemoteViews(context.getPackageName(),R.layout.widget_layout);String tip = Tips.getTips();// 从Tips.java 获取警句remoteViews.setTextViewText(R.id.textViewWidget, tip);// 设置Intent intent = new Intent(context, TipEveryDayActivity.class);// 一下三句就可以启动Activity了intent.putExtra("TIP", tip);PendingIntent pendingIntent = PendingIntent.getActivity(context, 0,intent, PendingIntent.FLAG_CANCEL_CURRENT);/** * 传值说明 * ①若该Intent带有数据,则需要将最后一个参数的值设为:FLAG_CANCEL_CURRENT eg: * PendingIntent Pfullintent=PendingIntent.getActivity(this, 0, * fullIntent,PendingIntent.FLAG_CANCEL_CURRENT); * ②若该Intent不带数据,则最后一个参数设为0 eg: PendingIntent * Pfullintent=PendingIntent.getActivity(this, 0, fullIntent, 0); */remoteViews.setOnClickPendingIntent(R.id.textViewWidget, pendingIntent);Intent intent2 = new Intent("com.su.ontipclick");// 这三句就可以注册按钮事件了,确实比较麻烦PendingIntent pendingIntent2 = PendingIntent.getBroadcast(context, 0,intent2, 0);remoteViews.setOnClickPendingIntent(R.id.buttonChange, pendingIntent2);appWidgetManager.updateAppWidget(appWidgetIds, remoteViews);// 把widget的内容更新}public void onReceive(Context context, Intent intent) {if (intent.getAction().equals("com.su.ontipclick")) {Toast.makeText(context, "通过点击刷新", Toast.LENGTH_LONG).show();// 点击按钮会触发的事件refreshWidget(context);}if (intent.getAction().equals("com.su.ontiprefresh")) {refreshWidget(context);}super.onReceive(context, intent);}private void refreshWidget(Context context) {//抽取了刷新widget的方法RemoteViews remoteViews = new RemoteViews(context.getPackageName(),R.layout.widget_layout);// 只能通过远程对象来设置appwidget中的控件状态String tip = Tips.getTips();// 从Tips.java 获取警句remoteViews.setTextViewText(R.id.textViewWidget, tip);Intent intent = new Intent(context, TipEveryDayActivity.class);// 重新注册一边开启Activity的事件,因为要获取刷新后的警句intent.putExtra("TIP", tip);PendingIntent pendingIntent = PendingIntent.getActivity(context, 0,intent, PendingIntent.FLAG_CANCEL_CURRENT);remoteViews.setOnClickPendingIntent(R.id.textViewWidget, pendingIntent);AppWidgetManager appWidgetManager = AppWidgetManager.getInstance(context);// 获得appwidget管理实例,用于管理appwidget以便进行更新操作ComponentName componentName = new ComponentName(context,TipEveryDayWidget.class);// 相当于获得所有本程序创建的appwidgetappWidgetManager.updateAppWidget(componentName, remoteViews);}}不要忘了注册
<receiver android:name=".TipEveryDayWidget" android:label="AAAAAAAATip"> <intent-filter > <action android:name="android.appwidget.action.APPWIDGET_UPDATE" /> <action android:name="com.su.ontipclick"></action><!-- 单击事件 --> <action android:name="com.su.ontiprefresh"></action><!-- 刷新事件 --> </intent-filter> <meta-data android:name="android.appwidget.provider" android:resource="@xml/widget_config" /><!-- 这个是widget的配置文件,出来这个之外其他的不用管直接copy --> </receiver>
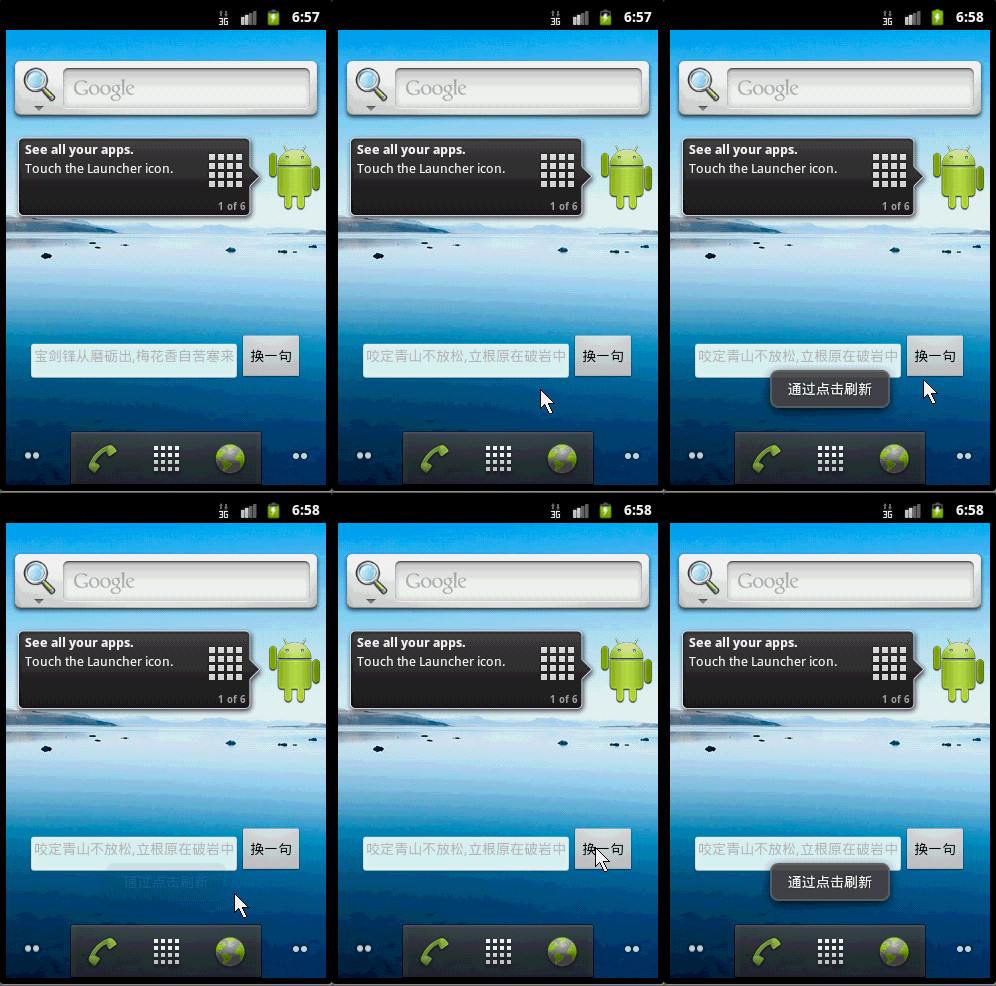
这样就可以在桌面每一秒刷换一次警句了
然后我们看看第四种方法(第三种和第一种差不多,就不赘述)
我们需要Service
package com.su.tipeveryday;import android.app.AlarmManager;import android.app.PendingIntent;import android.app.Service;import android.appwidget.AppWidgetManager;import android.content.ComponentName;import android.content.Context;import android.content.Intent;import android.os.IBinder;import android.util.Log;import android.widget.RemoteViews;public class TipService extends Service {private static final String TAG = "TipService";@Overridepublic IBinder onBind(Intent intent) {return null;}@Overridepublic void onCreate() {super.onCreate();}@Overridepublic void onDestroy() {super.onDestroy();}@Overridepublic void onRebind(Intent intent) {super.onRebind(intent);}@Overridepublic void onStart(Intent intent, int startId) {super.onStart(intent, startId);Log.i(TAG, "start service Time update");TipEveryDayWidget.refreshWidget(this);// 设置下次执行时间,每秒刷新一次long now = System.currentTimeMillis();long updateMilis = 2000;PendingIntent pendingIntent = PendingIntent.getService(this, 0, intent,0);AlarmManager alarmManager = (AlarmManager) getSystemService(Context.ALARM_SERVICE);alarmManager.set(AlarmManager.RTC_WAKEUP, now + updateMilis,pendingIntent);//now + updateMilis其实是一个死循环stopSelf();}@Overridepublic boolean onUnbind(Intent intent) {return super.onUnbind(intent);}}然后我们把refreshWidget做了修改 改成public static了,这是不是很喜欢的 感觉有点耦合..同时这里我也罢以前的烂代码精简了一下XD
package com.su.tipeveryday;import android.app.PendingIntent;import android.appwidget.AppWidgetManager;import android.appwidget.AppWidgetProvider;import android.content.ComponentName;import android.content.Context;import android.content.Intent;import android.provider.ContactsContract.CommonDataKinds.Note;import android.util.Log;import android.widget.RemoteViews;import android.widget.TextView;import android.widget.Toast;public class TipEveryDayWidget extends AppWidgetProvider {@Overridepublic void onDeleted(Context context, int[] appWidgetIds) {// TODO Auto-generated method stubsuper.onDeleted(context, appWidgetIds);}@Overridepublic void onUpdate(Context context, AppWidgetManager appWidgetManager,int[] appWidgetIds) {// widget更新执行的方法// TODO Auto-generated method stubsuper.onUpdate(context, appWidgetManager, appWidgetIds);refreshWidget(context);// 更新widget的方法context.startService(new Intent(context, TipService.class));}public void onReceive(Context context, Intent intent) {if (intent.getAction().equals("com.su.ontipclick")) {Toast.makeText(context, "通过点击刷新", Toast.LENGTH_LONG).show();// 点击按钮会触发的事件refreshWidget(context);}if (intent.getAction().equals("com.su.ontiprefresh")) {refreshWidget(context);}super.onReceive(context, intent);}public static void refreshWidget(Context context) {// 抽取了刷新widget的方法RemoteViews remoteViews = new RemoteViews(context.getPackageName(),R.layout.widget_layout);// 只能通过远程对象来设置appwidget中的控件状态String tip = Tips.getTips();// 从Tips.java 获取警句remoteViews.setTextViewText(R.id.textViewWidget, tip);Intent intent = new Intent(context, TipEveryDayActivity.class);// 重新注册一边开启Activity的事件,因为要获取刷新后的警句intent.putExtra("TIP", tip);PendingIntent pendingIntent = PendingIntent.getActivity(context, 0,intent, PendingIntent.FLAG_CANCEL_CURRENT);remoteViews.setOnClickPendingIntent(R.id.textViewWidget, pendingIntent);/** * 传值说明 ①若该Intent带有数据,则需要将最后一个参数的值设为:FLAG_CANCEL_CURRENT eg: * PendingIntent Pfullintent=PendingIntent.getActivity(this, 0, * fullIntent,PendingIntent.FLAG_CANCEL_CURRENT); * ②若该Intent不带数据,则最后一个参数设为0 eg: PendingIntent * Pfullintent=PendingIntent.getActivity(this, 0, fullIntent, 0); */Intent intent2 = new Intent("com.su.ontipclick");// 这三句就可以注册按钮事件了,确实比较麻烦PendingIntent pendingIntent2 = PendingIntent.getBroadcast(context, 0,intent2, 0);remoteViews.setOnClickPendingIntent(R.id.buttonChange, pendingIntent2);AppWidgetManager appWidgetManager = AppWidgetManager.getInstance(context);// 获得appwidget管理实例,用于管理appwidget以便进行更新操作ComponentName componentName = new ComponentName(context,TipEveryDayWidget.class);// 相当于获得所有本程序创建的appwidgetappWidgetManager.updateAppWidget(componentName, remoteViews);}}效果和以前一样只不过是2s刷新

- AndroidWidget实践 --- EverydayTips开发(4)
- AndroidWidget实践 --- EverydayTips开发
- AndroidWidget实践 --- EverydayTips开发(2)
- AndroidWidget实践 --- EverydayTips开发(3)
- AndroidWidget实践 --- EverydayTips开发(5)
- AndroidWidget实践 --- EverydayTips开发(6)
- AndroidWidget控件开发教程-2
- AndroidWidget基础知识
- AndroidWidget基本用法
- flex 4开发实践问题
- 极限编程系列4-开发实践-计划
- 极限编程系列4-开发实践-编程
- 极限编程系列4-开发实践-集成
- 【项目4 - GUI应用程序开发实践】
- ASP.NET-FineUI开发实践-4
- ASP.NET-FineUI开发实践-4(二)
- Spring Boot实践应用开发(4)
- WEB前端开发最佳实践(4)
- WinForm票据套打重定位
- 基于openSER 的 sip register 注册过程
- Busybox init进程启动过程分析
- Android 签名的应用 ,此文涉及内容比较全面。
- Android软件开发之获取通讯录联系人信息 + android联系人信息的存储结构 + Android联系人读取操作笔记
- AndroidWidget实践 --- EverydayTips开发(4)
- Openshift源码与运作方式初步分析
- C语言里的位域
- Android布局属性大全
- 小玩OpenSURF图像识别
- 中山大学后花园
- 虚拟语气回忆
- fedora14 15 16 apache mysql php yum安装
- CSS滚动条颜色(IE支持,火狐不支持)


