iOS开发之在地图上绘制出你运动的轨迹
来源:互联网 发布:mac系统我的所有文件 编辑:程序博客网 时间:2024/05/01 00:05
iOS中的MapKit集成了google地图api的很多功能加上iOS的定位的功能,我们就可以实现将你运行的轨迹绘制到地图上面。这个功能非常有用,比如快递追踪、汽车的gprs追踪、人员追踪等等。这篇文章我们将使用Map Kit和iOS的定位功能,将你的运行轨迹绘制在地图上面。
实现
在之前的一篇文章:iOS开发之在google地图上显示自己的位置中描述了如何在地图上显示自己的位置,如果我们将这些位置先保存起来,然后串联起来绘制到地图上面,那就是我们的运行轨迹了。
首先我们看下如何在地图上绘制曲线。在Map Kit中提供了一个叫MKPolyline的类,我们可以利用它来绘制曲线,先看个简单的例子。
使用下面代码从一个文件中读取出经纬度,然后创建一个路径:MKPolyline实例。
- -(void) loadRoute
- {
- NSString* filePath = [[NSBundle mainBundle] pathForResource:@”route” ofType:@”csv”];
- NSString* fileContents = [NSString stringWithContentsOfFile:filePath encoding:NSUTF8StringEncoding error:nil];
- NSArray* pointStrings = [fileContents componentsSeparatedByCharactersInSet:[NSCharacterSet whitespaceAndNewlineCharacterSet]];
- // while we create the route points, we will also be calculating the bounding box of our route
- // so we can easily zoom in on it.
- MKMapPoint northEastPoint;
- MKMapPoint southWestPoint;
- // create a c array of points.
- MKMapPoint* pointArr = malloc(sizeof(CLLocationCoordinate2D) * pointStrings.count);
- for(int idx = 0; idx < pointStrings.count; idx++)
- {
- // break the string down even further to latitude and longitude fields.
- NSString* currentPointString = [pointStrings objectAtIndex:idx];
- NSArray* latLonArr = [currentPointString componentsSeparatedByCharactersInSet:[NSCharacterSet characterSetWithCharactersInString:@","]];
- CLLocationDegrees latitude = [[latLonArr objectAtIndex:0] doubleValue];
- CLLocationDegrees longitude = [[latLonArr objectAtIndex:1] doubleValue];
- // create our coordinate and add it to the correct spot in the array
- CLLocationCoordinate2D coordinate = CLLocationCoordinate2DMake(latitude, longitude);
- MKMapPoint point = MKMapPointForCoordinate(coordinate);
- //
- // adjust the bounding box
- //
- // if it is the first point, just use them, since we have nothing to compare to yet.
- if (idx == 0) {
- northEastPoint = point;
- southWestPoint = point;
- }
- else
- {
- if (point.x > northEastPoint.x)
- northEastPoint.x = point.x;
- if(point.y > northEastPoint.y)
- northEastPoint.y = point.y;
- if (point.x < southWestPoint.x)
- southWestPoint.x = point.x;
- if (point.y < southWestPoint.y)
- southWestPoint.y = point.y;
- }
- pointArr[idx] = point;
- }
- // create the polyline based on the array of points.
- self.routeLine = [MKPolyline polylineWithPoints:pointArr count:pointStrings.count];
- _routeRect = MKMapRectMake(southWestPoint.x, southWestPoint.y, northEastPoint.x - southWestPoint.x, northEastPoint.y - southWestPoint.y);
- // clear the memory allocated earlier for the points
- free(pointArr);
- }
将这个路径添加到地图上
- [self.mapView addOverlay:self.routeLine];
显示在地图上:
- - (MKOverlayView *)mapView:(MKMapView *)mapView viewForOverlay:(id )overlay
- {
- MKOverlayView* overlayView = nil;
- if(overlay == self.routeLine)
- {
- //if we have not yet created an overlay view for this overlay, create it now.
- if(nil == self.routeLineView)
- {
- self.routeLineView = [[[MKPolylineView alloc] initWithPolyline:self.routeLine] autorelease];
- self.routeLineView.fillColor = [UIColor redColor];
- self.routeLineView.strokeColor = [UIColor redColor];
- self.routeLineView.lineWidth = 3;
- }
- overlayView = self.routeLineView;
- }
- return overlayView;
- }
效果: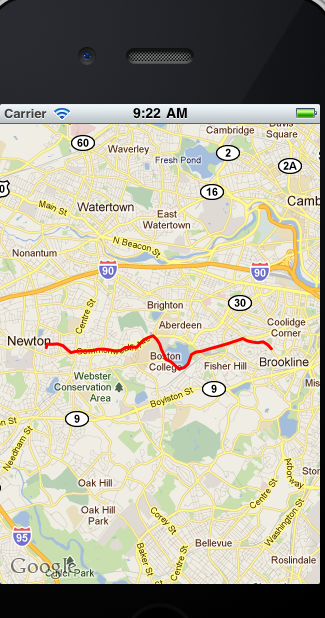
然后我们在从文件中读取位置的方法改成从用gprs等方法获取当前位置。
第一步:创建一个CLLocationManager实例
第二步:设置CLLocationManager实例委托和精度
第三步:设置距离筛选器distanceFilter
第四步:启动请求
代码如下:
- - (void)viewDidLoad {
- [super viewDidLoad];
- noUpdates = 0;
- locations = [[NSMutableArray alloc] init];
- locationMgr = [[CLLocationManager alloc] init];
- locationMgr.delegate = self;
- locationMgr.desiredAccuracy =kCLLocationAccuracyBest;
- locationMgr.distanceFilter = 1.0f;
- [locationMgr startUpdatingLocation];
- }
上面的代码我定义了一个数组,用于保存运行轨迹的经纬度。
每次通知更新当前位置的时候,我们将当前位置的经纬度放到这个数组中,并重新绘制路径,代码如下:
- - (void)locationManager:(CLLocationManager *)manager
- didUpdateToLocation:(CLLocation *)newLocation
- fromLocation:(CLLocation *)oldLocation{
- noUpdates++;
- [locations addObject: [NSString stringWithFormat:@"%f,%f",[newLocation coordinate].latitude, [newLocation coordinate].longitude]];
- [self updateLocation];
- if (self.routeLine!=nil) {
- self.routeLine =nil;
- }
- if(self.routeLine!=nil)
- [self.mapView removeOverlay:self.routeLine];
- self.routeLine =nil;
- // create the overlay
- [self loadRoute];
- // add the overlay to the map
- if (nil != self.routeLine) {
- [self.mapView addOverlay:self.routeLine];
- }
- // zoom in on the route.
- [self zoomInOnRoute];
- }
我们将前面从文件获取经纬度创建轨迹的代码修改成从这个数组中取值就行了:
- // creates the route (MKPolyline) overlay
- -(void) loadRoute
- {
- // while we create the route points, we will also be calculating the bounding box of our route
- // so we can easily zoom in on it.
- MKMapPoint northEastPoint;
- MKMapPoint southWestPoint;
- // create a c array of points.
- MKMapPoint* pointArr = malloc(sizeof(CLLocationCoordinate2D) * locations.count);
- for(int idx = 0; idx < locations.count; idx++)
- {
- // break the string down even further to latitude and longitude fields.
- NSString* currentPointString = [locations objectAtIndex:idx];
- NSArray* latLonArr = [currentPointString componentsSeparatedByCharactersInSet:[NSCharacterSet characterSetWithCharactersInString:@","]];
- CLLocationDegrees latitude = [[latLonArr objectAtIndex:0] doubleValue];
- CLLocationDegrees longitude = [[latLonArr objectAtIndex:1] doubleValue];
- CLLocationCoordinate2D coordinate = CLLocationCoordinate2DMake(latitude, longitude);
- MKMapPoint point = MKMapPointForCoordinate(coordinate);
- if (idx == 0) {
- northEastPoint = point;
- southWestPoint = point;
- }
- else
- {
- if (point.x > northEastPoint.x)
- northEastPoint.x = point.x;
- if(point.y > northEastPoint.y)
- northEastPoint.y = point.y;
- if (point.x < southWestPoint.x)
- southWestPoint.x = point.x;
- if (point.y < southWestPoint.y)
- southWestPoint.y = point.y;
- }
- pointArr[idx] = point;
- }
- self.routeLine = [MKPolyline polylineWithPoints:pointArr count:locations.count];
- _routeRect = MKMapRectMake(southWestPoint.x, southWestPoint.y, northEastPoint.x - southWestPoint.x, northEastPoint.y - southWestPoint.y);
- free(pointArr);
- }
这样我们就将我们运行得轨迹绘制google地图上面了。
扩展:
如果你想使用其他的地图,比如百度地图,其实也很方便。可以将百度地图放置到UIWebView中间,通过iOS开发之Objective-C与JavaScript的交互 这篇文章的方法,用js去绘制轨迹。
总结:这篇文章我们介绍了一种常见的技术实现:在地图上绘制出你运行的轨迹。
- iOS开发之在地图上绘制出你运动的轨迹
- iOS开发之在地图上绘制出你运动的轨迹
- iOS开发之在地图上绘制出你运动的轨迹
- iOS开发之在地图上绘制出你运动的轨迹
- iOS开发之在地图上绘制出你运动的轨迹
- iOS开发之在地图上绘制出你运动的轨迹
- iOS开发之在地图上绘制出你运动的轨迹
- iOS开发之在地图上绘制出你运动的轨迹
- iOS开发之在地图上绘制出你运动的轨迹
- iOS 在地图上绘制出你运动的轨迹
- iOS开发之在地图上绘制出你运行的轨迹
- iOS开发之在地图上绘制出你运行的轨迹
- 在地图上绘制你运动的轨迹 ios
- iOS 在地图上绘制运动轨迹
- iOS 之地图上绘制运动轨迹
- iOS开发之在地图上绘制出你运行的…
- 安卓开发:怎样实时在百度地图上绘制运动轨迹?
- iOS之地图的使用和实时描绘运动轨迹
- 析构函数的显示调用测试
- 分布式搜索elasticsearch java API 之(六)------批量添加删除索引
- HDU 1124 Factorial
- Linux编写新的系统调用(内核版本3.2.18)
- 字符编码笔记:ASCII,Unicode和UTF-8
- iOS开发之在地图上绘制出你运动的轨迹
- 自适应的网格布局-砌墙效果
- 图像及动画处理三:WaitingBar
- Win7 :用户账户自动登录方法
- 在tableview索引中显示搜索符号的方法
- 做RAID 5,最多多少块硬盘合适?
- Xcode 4.1/4.2/4.3 免证书(iDP)开发+真机调试+生成IPA全攻略(99美金省了)
- iOS本地通知和远程通知
- 动态输出文字(加水印),验证码二种方法