使用Spring MVC3构建Web应用详细教程
来源:互联网 发布:吉诺比利04奥运会数据 编辑:程序博客网 时间:2024/06/03 16:08
在动手之前,我们先准备好我们的环境,需要的是JDK 1.5以上以及Eclipse IDE,当然还要下载最新版本的Spring 3,本文还要下载最新版本的ant,以便我们学习如何通过ant去构建应用。
Spring MVC3构建Web应用第一步
首先在Eclipse中利用新建菜单,建立一个Dynamic Web Project(动态Web工程),命名为SampleSpringMVC,接下来,我们要建立一个ant.xml的文件,这个文件会方便我们把做好的程序打包成war文件,这个可以有如下几步去实现:
1、点文件—新建—文件,如下图:
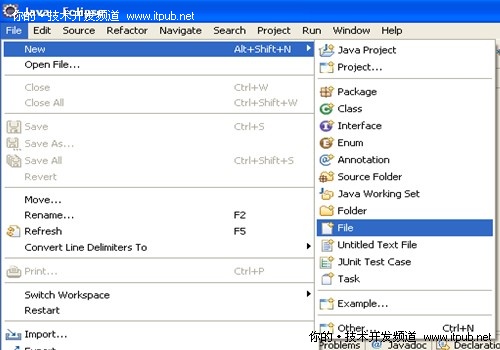
2、输入ant.xml作为文件名,并点完成。如下图:
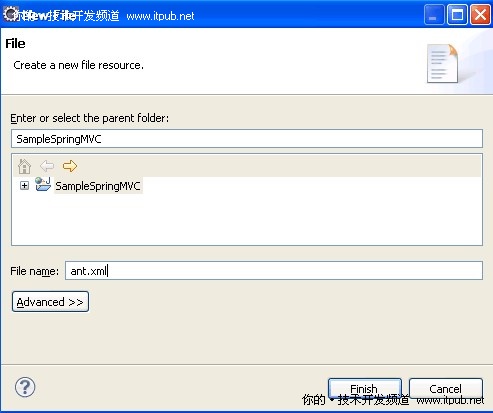
3、打开ant.xml文件,编辑内容如下:
 <?xml version="1.0"?>
 2
3
<!-- Copyright : adobocode.com , 2010 -->4
5
<project name="SampleSpringMVC" basedir="." default="build"> 6
<property file="ant.properties"/> 7
<property name="src.dir" value="src"/> 8
<property name="war.dir" value="war"/> 9
<property name="build.dir" value="${war.dir}/WEB-INF/classes"/> 10
<property name="deploy.path" value="${tomcat.home}/webapps"/> 11
<property name="name" value="SampleSpringMVC"/> 12
13
<path id="master-classpath"> 14
<fileset dir="${war.dir}/WEB-INF/lib"> 15
<include name="*.jar"/> 16
</fileset> 17
18
<fileset dir="${tomcat.home}/lib"> 19
<include name="servlet*.jar"/> 20
</fileset> 21
<pathelement path="${build.dir}"/> 22
</path> 23
24
<target name="build" description="Compile main source tree java files"> 25
<echo>Building...</echo> 26
<mkdir dir="${build.dir}"/> 27
<javac destdir="${build.dir}" failonerror="true"> 28
<src path="${src.dir}"/> 29
<classpath refid="master-classpath"/> 30
</javac> 31
</target> 32
33
<target name="war-archiving"> 34
<echo>Archiving...</echo> 35
<war destfile="${name}.war" webxml="${war.dir}/WEB-INF/web.xml"> 36
<fileset dir="${war.dir}"> 37
<include name="**/*.*"/> 38
</fileset> 39
</war> 40
</target> 41
42
<target name="deploy" depends="build"> 43
<echo>Deploying...</echo> 44
<copy todir="${deploy.path}"> 45
<fileset dir="."> 46
<include name="*.war"/> 47
</fileset> 48
</copy> 49
</target> 50
51
</project>Spring MVC3构建Web应用第二步
建立一个ant.properties文件,该文件会存放一些值的属性,并且这些值也会是ant.xml中用到的。请按如下步骤实现:
1)点文件—新建-文件
2) 将文件命名为ant.properties,并点完成,如下图:
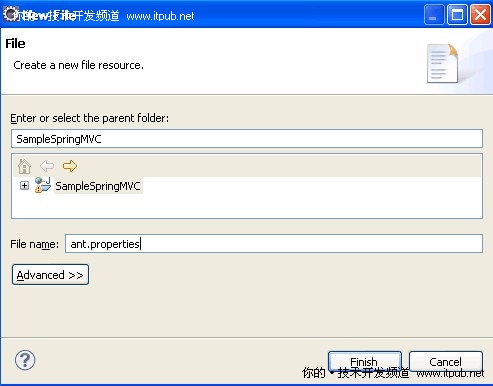
3)打开ant.properties,修改tomcat.home的目录为你安装tomcat的实际目录。
tomcat.home=C:/Tools/apache-tomcat-6.0.2 2
 tomcat.lib=${tomcat.home}/lib
下载下面列表的.jar文件,并放到SampleSpringMVC/war/WEB-INF/lib下。
commons-logging.jar2
jstl-api-1.2.jar3
jstl.jar4
org.springframework.asm-3.0.5.RELEASE.jar5
org.springframework.beans-3.0.5.RELEASE.jar6
org.springframework.context-3.0.5.RELEASE.jar7
org.springframework.core-3.0.5.RELEASE.jar8
org.springframework.expression-3.0.5.RELEASE.jar9
org.springframework.web-3.0.5.RELEASE.jar10
org.springframework.web.servlet-3.0.5.RELEASE.jar11
standard.jar
按如下修改web.xml:
<!-- Copyright : adobocode.com , 2010 -->2
3
<web-app id="WebApp_ID" version="2.4"4
xmlns="http://java.sun.com/xml/ns/j2ee" xmlns:xsi="http://www.w3.org/2001/XMLSchema-instance"5
xsi:schemaLocation="http://java.sun.com/xml/ns/j2ee http://java.sun.com/xml/ns/j2ee/web-app_2_4.xsd"> 6
7
<display-name>SampleSpringMVC</display-name> 8
9
<servlet> 10
<servlet-name>SampleSpringMVC</servlet-name> 11
<servlet-class>org.springframework.web.servlet.DispatcherServlet</servlet-class> 12
<load-on-startup>1</load-on-startup> 13
</servlet> 14
15
<servlet-mapping> 16
<servlet-name>SampleSpringMVC</servlet-name> 17
<url-pattern>*.htm</url-pattern> 18
</servlet-mapping> 19
20
<welcome-file-list> 21
<welcome-file>index.jsp</welcome-file> 22
</welcome-file-list> 23
24
</web-app>
创建index.jsp,这个只需要在war/WEB-INF下建立即可,并且将内容设置为如下:
<%@ page language="java" session="false" contentType="text/html; charset=UTF-8"%> 2
<%@ taglib prefix="c" uri="http://java.sun.com/jsp/jstl/core" %> 3
<html> 4
<head> 5
<title>Adobocode : Sample Spring MVC</title> 6
</head> 7
<body> 8
<h2>Adobocode : Hello World</h2> 9
<br/> 10
<a href="<c:url value="personDisplay.htm"/>">Person List</a> 11
</body> 12
</html>Spring MVC3构建Web应用第三步
在SampleSpringMVC/war/WEB-INF中建立文件SampleSpringMVC-servlet.xml,并将内容修改如下:
<?xml version="1.0" encoding="UTF-8"?> 2
3
<!-- Copyright : adobocode.com , 2010 -->4
5
<beans xmlns="http://www.springframework.org/schema/beans"6
xmlns:xsi="http://www.w3.org/2001/XMLSchema-instance"7
xmlns:p="http://www.springframework.org/schema/p"8
xmlns:context="http://www.springframework.org/schema/context"9
xsi:schemaLocation=" 10
11
http://www.springframework.org/schema/beans 12
13
http://www.springframework.org/schema/beans/spring-beans-3.0.xsd 14
15
http://www.springframework.org/schema/context 16
17
http://www.springframework.org/schema/context/spring-context-3.0.xsd"> 18
19
<bean class="org.springframework.web.servlet.mvc.annotation.DefaultAnnotationHandlerMapping"/> 20
21
<bean class="org.springframework.web.servlet.mvc.annotation.AnnotationMethodHandlerAdapter"/> 22
23
<context:component-scan base-package="paul.sydney.controller"/> 24
25
<context:component-scan base-package="paul.sydney.service"/> 26
27
<bean id="viewResolver" class="org.springframework.web.servlet.view.InternalResourceViewResolver"> 28
<property name="viewClass"><value>org.springframework.web.servlet.view.JstlView</value></property> 29
<property name="prefix"><value>/WEB-INF/jsp/</value></property> 30
<property name="suffix"><value>.jsp</value></property> 31
</bean> 32
33
</beans>
这里,我们利用了spring 3 mvc的新特性,自动扫描,通过context:component-scan base-package,设置了paul.syney.controller和paul.sydney.service两个包下的文件只要使用spring 3的标准注释都可以被扫描到。
在SampleSpringMVC/war/WEB-INF下建立目录jsp;
在SampleSpringMVC/war/WEB-INF下建立目录classes;
在SampleSpringMVC/war/WEB-INF/jsp下建立一个新的jsp文件叫personDisplay,并写入如下代码:
<!-- Copyright : adobocode.com , 2010 -->2
3
<%@ page language="java" session="false" 4
contentType="text/html; charset=UTF-8"%> 5
<%@ taglib uri="http://java.sun.com/jsp/jstl/core" prefix="c"%> 6
7
<jsp:useBean id="personList" scope="request" type="java.util.List" /> 8
<html> 9
<head> 10
<title>Adobocode : Sample Spring MVC using JSTL iteration</title> 11
</head> 12
<body> 13
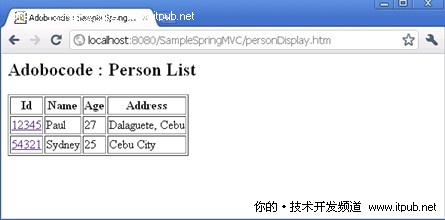
<h2>Adobocode : Person List</h2> 14
<table border="1"> 15
<tr> 16
<th>Id</th> 17
<th>Name</th> 18
<th>Age</th> 19
<th>Address</th> 20
</tr> 21
<c:forEach var="p" items="${personList}"> 22
<tr> 23
<td> 24
<c:url var="editUrl" value="personForm.htm"> 25
<c:param name="personId" value="${p.id}" /> 26
</c:url> 27
<a href='<c:out value="${editUrl}"/>'>${p.id}</a> 28
</td> 29
<td>${p.name}</td> 30
<td>${p.age}</td> 31
<td>${p.address}</td> 32
</tr> 33
</c:forEach> 34
</table> 35
</body>
在SampleSpringMVC/war/WEB-INF/jsp下建立一个新的jsp文件叫personForm,修改代码如下:
<!-- Copyright : adobocode.com , 2010 -->2
3
<%@ page language="java" session="false" contentType="text/html; charset=UTF-8"%> 4
<%@ taglib prefix="spring" uri="http://www.springframework.org/tags"%> 5
<%@ taglib prefix="form" uri="http://www.springframework.org/tags/form"%> 6
<html> 7
<head> 8
<title>Adobocode : Sample Spring MVC using Forms</title> 9
</head> 10
11
<body> 12
<h2>Adobocode : Person Form</h2> 13
<form:form modelAttribute="person"> 14
<form:hidden path="id" /> 15
<fieldset> 16
<table> 17
<tr> 18
<td>Name</td> 19
<td><form:input path="name" /></td> 20
</tr> 21
<tr> 22
<td>Age</td> 23
<td><form:input path="age" /></td> 24
</tr> 25
<tr> 26
<td>Address</td> 27
<td><form:input path="address" /></td> 28
</tr> 29
<tr> 30
<td></td> 31
<td> 32
<input type="submit" id="save" name="_eventId_save" value="Save" /> 33
<input type="submit" onClick="history.go(-1);" name="_eventId_cancel" value="Cancel" /> 34
</td> 35
</tr> 36
</table> 37
</fieldset> 38
</form:form> 39
</body> 40
</html>Spring MVC3构建Web应用第四步
现在我们开始设计控制器,鼠标右击src目录,选择新建-包,如下图:
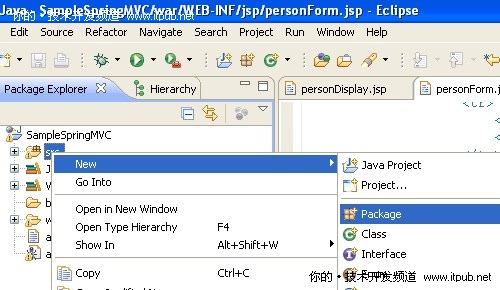
并将包的名命名为paul.sydney.controller,在这个包中,新建立一个类,命名为PersonDisplay,将代码修改如下:
package paul.sydney.controller; 2
3
import org.springframework.beans.factory.annotation.Autowired; 4
import org.springframework.stereotype.Controller; 5
import org.springframework.ui.ModelMap; 6
import org.springframework.web.bind.annotation.RequestMapping; 7
import org.springframework.web.bind.annotation.RequestParam; 8
9
import paul.sydney.service.DummyService; 10
11
/** 12
 * PersonDisplay class, display controller for the 'personDisplay.jsp'
 13
* Copyright : adobocode.com , 2010 14
* @author Paul Sydney Orozco xtrycatchx@gmail.com 15
* 16
 */
*/17
@Controller18
public class PersonDisplay { 19
20
private final DummyService dummyService; 21
22
@Autowired23
 public PersonDisplay(DummyService dummyService) {
 24
this.dummyService = dummyService; 25
 }
} 26
27
@RequestMapping("/personDisplay.htm") 28
public ModelMap defaultHandler() { 29
return new ModelMap("personList", this.dummyService.getDummyList()); 30
} 31
}
这里,使用注解@Controller表示这个是一个控制器,而 @RequestMapping("/personDisplay.htm")则表示对于personDisplay.htm这样的请求,使用defaultHandler这个方法去处理。而在defaultHandler中,又调用了逻辑服务层的
dummyService.getDummyList()方法获得人员列表,最后把列表存放到一个ModelMap中去(可以先理解为Map的一种数据结构)。
同样地,在paul.sydney.controller包中,新建一个类PersonForm,并将代码修改如下:
package paul.sydney.controller; 2
3
import org.springframework.beans.factory.annotation.Autowired; 4
import org.springframework.stereotype.Controller; 5
import org.springframework.ui.ModelMap; 6
import org.springframework.validation.BindingResult; 7
import org.springframework.web.bind.annotation.ModelAttribute; 8
import org.springframework.web.bind.annotation.RequestMapping; 9
import org.springframework.web.bind.annotation.RequestMethod; 10
import org.springframework.web.bind.annotation.RequestParam; 11
import org.springframework.web.bind.annotation.SessionAttributes; 12
import org.springframework.web.bind.support.SessionStatus; 13
14
import paul.sydney.model.Person; 15
import paul.sydney.service.DummyService; 16
@Controller17
@RequestMapping("/personForm.htm") 18
@SessionAttributes("person") 19
public class PersonForm { 20
21
private final DummyService dummyService; 22
23
@Autowired24
public PersonForm(DummyService dummyService) { 25
this.dummyService = dummyService; 26
} 27
28
@RequestMapping(method = RequestMethod.GET) 29
public String setupForm(@RequestParam("personId") int id, ModelMap model) { 30
Person person = this.dummyService.retrievePerson(id); 31
model.addAttribute("person", person); 32
return "personForm"; 33
} 34
35
@RequestMapping(method = RequestMethod.POST) 36
public String processSubmit(@ModelAttribute("person") Person person, BindingResult result, SessionStatus status) { 37
this.dummyService.savePerson(person); 38
status.setComplete(); 39
return "redirect:personDisplay.htm"; 40
} 41
}
这里,首先通过依赖注入,注入了服务层逻辑dummyService,然后在setupForm中,根据传入的参数personId,通过服务层逻辑dummyService找出这个人,然后将其保存到一个Model中去,返回给视图层personForm.jsp显示;而processSubmit是调用服务层逻辑保存用户的资料(通过this.dummyService.savePerson(person)实现),最后使用redirect跳转到personDisplay.htm。
Spring MVC3构建Web应用第五步
构建业务实体模型。在src目录中,新建包命名为paul.sydney.model,在这个包下,再新建一个实体类,命名为Person,修改代码如下:
package paul.sydney.model; 2
3
/** 4
* Copyright : adobocode.com , 2010 5
* @author Paul Sydney Orozco xtrycatchx@gmail.com 6
*/7
public class Person { 8
9
private int id; 10
private String name; 11
private int age; 12
private String address; 13
14
public int getId() { 15
return id; 16
} 17
public void setId(int id) { 18
this.id = id; 19
} 20
21
public String getName() { 22
return name; 23
} 24
public void setName(String name) { 25
this.name = name; 26
} 27
public int getAge() { 28
return age; 29
} 30
public void setAge(int age) { 31
this.age = age; 32
} 33
public String getAddress() { 34
return address; 35
} 36
public void setAddress(String address) { 37
this.address = address; 38
} 39
40
@Override41
public String toString(){ 42
StringBuilder sb = new StringBuilder(); 43
sb.append("\nname : " + this.name); 44
sb.append("\nage : " + this.age); 45
sb.append("\naddress : " + this.address); 46
return sb.toString(); 47
48
} 49
50
}
构建业务逻辑层。同样在src目录下新建一个包,命名为paul.sydney.service,并且新建一个类DummyService,代码如下:
paul.sydney.service; 2
3
import java.util.ArrayList; 4
5
import paul.sydney.model.Person; 6
7
import java.util.List; 8
9
import org.springframework.stereotype.Service; 10
11
/** 12
* Copyright : adobocode.com , 2010 13
* @author Paul Sydney Orozco xtrycatchx@gmail.com 14
*/15
@Service16
public class DummyService { 17
18
/** 19
* This method supposed to be returning a Collection of Person objects from a DAO layer 20
* For this tutorial, let us just hard-code this List of Person objects 21
*/22
public List<Person> getDummyList() { 23
List<Person> list = new ArrayList<Person>(); 24
Person p1 = new Person(); 25
p1.setId(12345); 26
p1.setName("Paul"); 27
p1.setAge(27); 28
p1.setAddress("Dalaguete, Cebu"); 29
30
Person p2 = new Person(); 31
p2.setId(54321); 32
p2.setName("Sydney"); 33
p2.setAge(25); 34
p2.setAddress("Cebu City"); 35
36
list.add(p1); 37
list.add(p2); 38
return list; 39
} 40
41
/** 42
* This method supposed to be returning Person object from a DAO layer 43
* For this tutorial, let us just hard-code the Person instance 44
*/45
public Person retrievePerson(int id) { 46
Person person = new Person(); 47
person.setId(56789); 48
person.setName("Nikki"); 49
person.setAge(63); 50
person.setAddress("Dalaguete, Cebu"); 51
return person; 52
} 53
54
/** 55
* This method supposed to be persisting the passed Person object 56
* For this tutorial, let us include the persisting DAO layer 57
* and assume the method successful saved or updated the Person object 58
*/59
public void savePerson(Person person) { 60
System.out.println("\n\nSaving" + person); 61
} 62
}
在这里,只是简单的在一个List中存放了多个person对象而已。
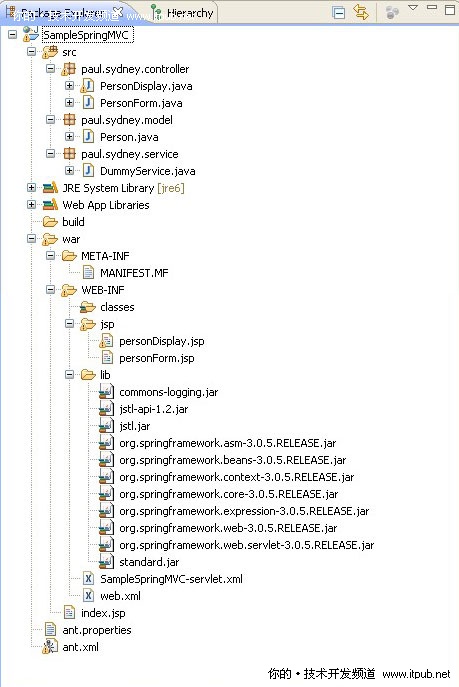
最后,项目的结构如下图:
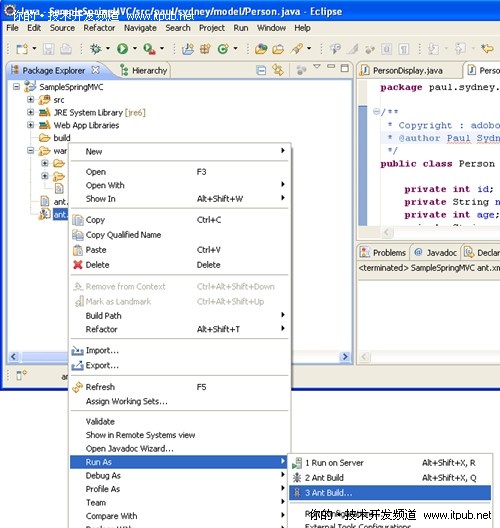
接着,我们右击ant.xml,选择Run As->Ant Build,如下图:
Spring MVC3构建Web应用第六步
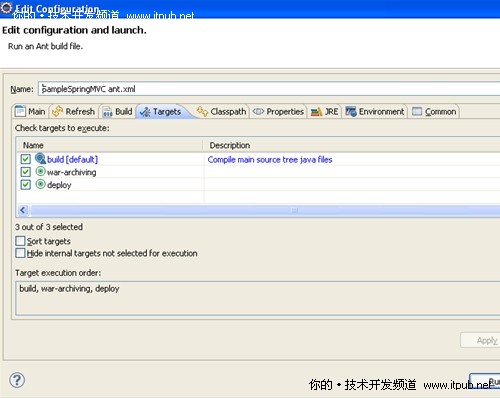
接着在编辑对话菜单中,记得选择build,war-archiving及deploy,如下图:
最后点RUN,运行脚本,然后我们就可以在浏览器中运行了,如下图:
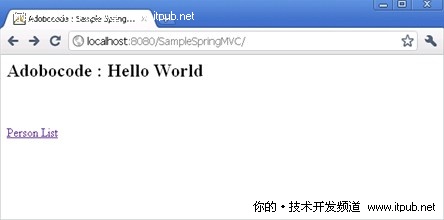
点Person List,可以看到如下的人员列表:
点其中的一个ID,可以进入如下页面:
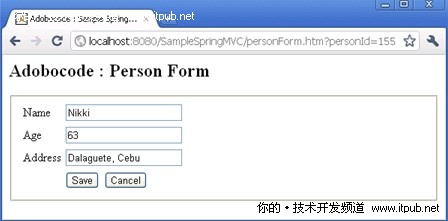
这里可以修改个人信息,并点保存,跳转到人员列表页面,并可以看到所做的更改。
- 使用Spring MVC3构建Web应用详细教程
- 使用Spring MVC3构建Web应用详细教程
- 使用Spring MVC3构建Web应用详细教程
- 使用Spring MVC3构建Web应用详细教程
- 使用Spring MVC3构建Web应用详细教程
- Spring官方教程:使用WebSocket构建交互web应用
- SPRING MVC3.2案例讲解--使用 Spring 3 MVC HttpMessageConverter 功能构建 RESTful web 服务
- SPRING MVC3.2案例讲解--使用 Spring 3 MVC HttpMessageConverter 功能构建 RESTful web 服务
- Spring MVC3配置教程
- 使用XFire+Spring构建Web Service 【JAVA应用.WebService】
- 使用Spring MVC构建REST风格WEB应用
- 使用Spring MVC构建REST风格WEB应用
- 使用Spring 构建多个moudle的web应用
- Spring Boot示例 - 4. 使用Spring Boot和Spring Security构建安全的Web应用
- 使用Lineman构建web应用
- 使用Maven构建Web应用
- SSM框架使用Maven构建环境详细整合教程(Spring+SpringMVC+MyBatis)
- Spring(一) 构建简单Web应用
- TIME
- codeblock c++开发利器
- 计算机学习心得
- 判断生日是星期几
- 未指定类型(void*)的两个数交换
- 使用Spring MVC3构建Web应用详细教程
- 排序
- windows Server 2003 IIS 网站发布说明书
- 设计模式纵谈-Decarator,Facade,FlyWeight,Template Method,Command
- The 12th Zhejiang University Programming Contest
- c++初始化列表及构造函数调用构造函数
- 三个数比较大小
- 计算机学习心得
- 对随机数据排序