keepalived+lvs+mysql cluster架构实现负载均衡
来源:互联网 发布:java 网络拓扑图开发 编辑:程序博客网 时间:2024/04/30 05:07
一、环境
在调度器172.16.48.204电脑上,用route add default dev eth1
命令添加路由,使得172.16.48.204节点有对100网段的访问权限。
二、架构图
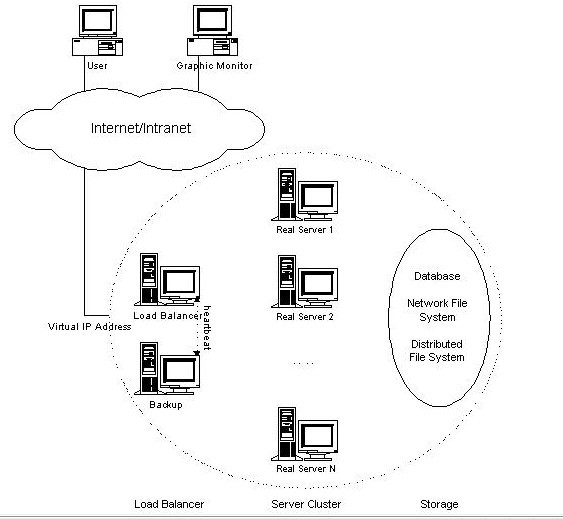
这里调度器只用了一个节点,没有设置Backup
三、软件下载
lvs: http://www.linuxvirtualserver.org/software/kernel-2.6/ipvsadm-1.24.tar.gz
keepalived: http://www.keepalived.org/download.html
四、软件安装
编辑lvs的时候需要操作系统的内核,不然会报错
configure: error:
!!! OpenSSL is not properly installed on your system. !!!
!!! Can not include OpenSSL headers files. !!!
解决方法:yum install openssl*
可能 还会报错:libipvs.c:253: 错误:提领指向不完全类型的指针
解决方法:yum -y install kernel-devel 可参考:http://692344.blog.51cto.com/blog/682344/804278
如果还是不行,可能是由于lvs keepalived的版本过高
1.在调度器172.16.48.204上安装lvs
ln -s /usr/src/kernels/2.6.18-164.el5-i686/ /usr/src/linux
tar zxvf ipvsadm-1.24.tar.gz
cd ipvsadm-1.24
make && make install
2.在调度器172.16.48.204上安装keepalived
tar zxvf keepalived-1.1.19.tar.gz
cd keepalived-1.1.19
./configure --prefix=/usr/local/keepalived
make
make install
cp /usr/local/keepalived/sbin/keepalived /usr/sbin/
cp /usr/local/keepalived/etc/sysconfig/keepalived /etc/sysconfig/
cp /usr/local/keepalived/etc/rc.d/init.d/keepalived /etc/init.d/
mkdir /etc/keepalived
3.配置keepalived.conf
vi /etc/keepalived/keepalived.conf
添加如下内容:
global_defs { router_id HaMySQL_1}vrrp_sync_group VGM { group { VI_MYSQL }}vrrp_instance VI_MYSQL { state MASTER interface eth1 virtual_router_id 100 priority 100 advert_int 1 authentication { auth_type PASS auth_pass 1111 } virtual_ipaddress { 172.100.100.251/24 etho label eth0:1 }}virtual_server 172.100.100.251 3306 { delay_loop 6 lb_algo rr lb_kind DR # nat_mask 255.255.0.0#persistence_timeout 50 protocol TCP real_server 172.16.48.206 3306 { weight 3 TCP_CHECK { connect_timeout 3 nb_get_retry 3 delay_before_retry 3 connect_port 3306 } } real_server 172.16.48.207 3306 { weight 3 TCP_CHECK { connect_timeout 3 nb_get_retry 3 delay_before_retry 3 connect_port 3306 } } real_server 172.16.48.208 3306 { weight 3 TCP_CHECK { connect_timeout 3 nb_get_retry 3 delay_before_retry 3 connect_port 3306 } } real_server 172.16.48.211 3306 { weight 3 TCP_CHECK { connect_timeout 3 nb_get_retry 3 delay_before_retry 3 connect_port 3306 } }}4.sql服务节点的配置
vi /etc/rc.d/init.d/realserver.sh 添加如下配置:
#!/bin/bash# description: Config realserver lo and apply noarpSNS_VIP=172.100.100.251/etc/rc.d/init.d/functionscase "$1" instart) ifconfig lo:0 $SNS_VIP netmask 255.255.255.255 broadcast $SNS_VIP /sbin/route add -host $SNS_VIP dev lo:0 echo "1" >/proc/sys/net/ipv4/conf/lo/arp_ignore echo "2" >/proc/sys/net/ipv4/conf/lo/arp_announce echo "1" >/proc/sys/net/ipv4/conf/all/arp_ignore echo "2" >/proc/sys/net/ipv4/conf/all/arp_announce sysctl -p >/dev/null 2>&1 echo "RealServer Start OK" ;;stop) ifconfig lo:0 down route del $SNS_VIP >/dev/null 2>&1 echo "0" >/proc/sys/net/ipv4/conf/lo/arp_ignore echo "0" >/proc/sys/net/ipv4/conf/lo/arp_announce echo "0" >/proc/sys/net/ipv4/conf/all/arp_ignore echo "0" >/proc/sys/net/ipv4/conf/all/arp_announce echo "RealServer Stoped" ;;*) echo "Usage: $0 {start|stop}" exit 1esacexit 0添加加可执行的权限chmod +x /etc/rc.d/init.d/realserver.sh
注:四台sql节点都要进行此步操作
五、启动LVS节点(mysql cluster中的sql节点)
/etc/rc.d/init.d/realserver.sh start
六、启动调度器(keepalived的服务器端启动)
/etc/rc.d/init.d/keepalived start
启动后可以用命令 tail -f /var/log/messages 进行查看
若看到如下提示,则表示配置成功。
[root@sg204 mysql-cluster]# tail -f /var/log/messagesMay 29 17:21:01 sg204 Keepalived_vrrp: Opening file '/etc/keepalived/keepalived.conf'. May 29 17:21:01 sg204 Keepalived_vrrp: Configuration is using : 63921 BytesMay 29 17:21:01 sg204 Keepalived_healthcheckers: Using LinkWatch kernel netlink reflector...May 29 17:21:01 sg204 Keepalived_vrrp: Using LinkWatch kernel netlink reflector...May 29 17:21:01 sg204 Keepalived_healthcheckers: Activating healtchecker for service [172.16.48.206:3306]May 29 17:21:01 sg204 Keepalived_healthcheckers: Activating healtchecker for service [172.16.48.207:3306]May 29 17:21:01 sg204 Keepalived_healthcheckers: Activating healtchecker for service [172.16.48.208:3306]May 29 17:21:01 sg204 Keepalived_healthcheckers: Activating healtchecker for service [172.16.48.211:3306]May 29 17:21:01 sg204 Keepalived_vrrp: VRRP sockpool: [ifindex(3), proto(112), fd(10,11)]May 29 17:21:02 sg204 Keepalived_vrrp: VRRP_Instance(VI_MYSQL) Transition to MASTER STATEMay 29 17:21:03 sg204 Keepalived_vrrp: VRRP_Instance(VI_MYSQL) Entering MASTER STATEMay 29 17:21:03 sg204 Keepalived_vrrp: VRRP_Instance(VI_MYSQL) setting protocol VIPs.May 29 17:21:03 sg204 Keepalived_healthcheckers: Netlink reflector reports IP 172.100.100.251 addedMay 29 17:21:03 sg204 Keepalived_vrrp: VRRP_Instance(VI_MYSQL) Sending gratuitous ARPs on eth1 for 172.100.100.251May 29 17:21:03 sg204 Keepalived_vrrp: VRRP_Group(VGM) Syncing instances to MASTER stateMay 29 17:21:03 sg204 avahi-daemon[4768]: Registering new address record for 172.100.100.251 on eth1.May 29 17:21:03 sg204 Keepalived_vrrp: Netlink reflector reports IP 172.100.100.251 addedMay 29 17:21:08 sg204 Keepalived_vrrp: VRRP_Instance(VI_MYSQL) Sending gratuitous ARPs on eth1 for 172.100.100.251
在调度器上用ipvsadm命令查看,可以看到如下信息
[root@sg204 mysql-cluster]# ipvsadmIP Virtual Server version 1.2.1 (size=4096)Prot LocalAddress:Port Scheduler Flags -> RemoteAddress:Port Forward Weight ActiveConn InActConnTCP 172.100.100.251:mysql rr -> 172.16.48.211:mysql Route 3 0 0 -> 172.16.48.208:mysql Route 3 0 0 -> 172.16.48.207:mysql Route 3 0 0 -> 172.16.48.206:mysql Route 3 0 0
七、远程应用通过vip访问mysql数据库
要远程应用程序访问mysql数据库,还需要一个远程访问的账号和密码,在mysql刚创建后,mysql是没有远程访问账号的,
在sql节点上增加远程认证客户:
grant 权限1,权限2,…权限n on 数据库名称.表名称 to 用户名@用户地址 identified by ‘连接口令’
Mysql>:select user,host,password from mysql.user; Mysql>: grant all privileges on *.* to admin@"%" identified by '111111' with grant option;
八、测试
在其他 节点上(调度器和sql节点之外的电脑),ping 172.100.100.251发现可以ping通
这里选用的是172.16.48.201节点:
[root@sg201 ~]# ping 172.100.100.251PING 172.100.100.251 (172.100.100.251) 56(84) bytes of data.64 bytes from 172.100.100.251: icmp_seq=1 ttl=64 time=0.093 ms64 bytes from 172.100.100.251: icmp_seq=2 ttl=64 time=0.164 ms64 bytes from 172.100.100.251: icmp_seq=3 ttl=64 time=0.162 ms
在172.16.48.201上安装mysql客户端后,用命令 mysql -u admin -p -h 172.100.100.251测试发现可以 连接数据库,
将172.16.48.208上的mysql服务停掉后,这时在高度器上tail -f var/log/messages会看到调度器自动将无效sql节点移除lvs了
May 30 11:04:11 sg204 Keepalived_healthcheckers: TCP connection to [172.16.48.208:3306] failed !!!May 30 11:04:11 sg204 Keepalived_healthcheckers: Removing service [172.16.48.208:3306] from VS [172.100.100.251:3306]
再将172.16.48.208上的mysql服务启动起来,这时
May 30 11:06:53 sg204 Keepalived_healthcheckers: TCP connection to [172.16.48.208:3306] success.May 30 11:06:53 sg204 Keepalived_healthcheckers: Adding service [172.16.48.208:3306] to VS [172.100.100.251:3306]
哈哈!成功搞定
- keepalived+lvs+mysql cluster架构实现负载均衡
- lvs+keepalived+mysql cluster实现负载均衡
- keepalived+lvs+mysql实现负载均衡
- LVS+Keepalived实现mysql的负载均衡
- MySQL CLUSTER 集群方案+LVS+keepalived负载均衡
- LVS + keepalived 实现负载均衡
- LVS+Keepalived实现负载均衡
- LVS+Keepalived实现负载均衡
- LVS+keepalived 实现负载均衡
- lvs+keepalived实现负载均衡
- keepalived+lvs实现负载均衡
- lvs+keepalived 实现负载均衡
- LVS+Keepalived实现MySQL从库读操作负载均衡
- LVS+Keepalived实现MySQL从库读操作负载均衡
- LVS+Keepalived实现MySQL从库读操作负载均衡
- centos7 LVS+Keepalived实现mysql的负载均衡
- LVS+Keepalived负载均衡架构搭建
- Lvs+Keepalived+MySQL Cluster架设高可用负载均衡Mysql集群
- 关于地图的操作的代码片段
- Ubuntu下配置NFS服务器和客户端
- SQL中两个关联表批量更新数据的方法
- VB学习小技巧(一)
- Java 线程池学习
- keepalived+lvs+mysql cluster架构实现负载均衡
- zend studio格式化代码
- ARM中汇编调用c语言
- latex中引用.eps图片遇到的问题
- 把apk装进system/app并禁止强制停止
- bind 和live
- 如何做好中层管理?
- 虚拟机lspci工具包安装步骤
- cTex——cls文件的使用方法