Windows Phone开发(45):推送通知大结局——Raw通知
来源:互联网 发布:java酒店管理系统源码 编辑:程序博客网 时间:2024/04/30 15:56
为什么叫大结局呢?因为推送通知服务就只有三种,前面扯了两种,就剩下一种——Raw通知。
前面我们通过两节的动手实验,相信大家都知道了,推送通知其实并不复杂,为什么呢?你看到了的,不管是哪种方式,使用方法基本一样,如果你不愿意写代码的话,完全可以把代码Copy几下就完事了,三种推送通知的实现代码是一样的,而仅仅是发送的内容不同罢了。
Raw推送通知比起前面两种更简单,因为它没有规范的格式,只要你向指定URI POST一个字节流数组就OK,也就是说,只要能变成byte[]的东西都可以发送。不过,不应该发送过大的数据,一般用于发送一些简短的文本信息就行了,别想着用来发送文件!!
严重提醒:要接收Raw通知,你的WP应用程序必须在前台运行,不然是收不到的,之与Toast通知可不一样,如果你的程序不在前台运行,推送的通知就会被XX掉。
好了,F话就不说了,开始操练吧。
先做发送通知的服务器端,这回就用WPF来做吧,界面我先截个TU。
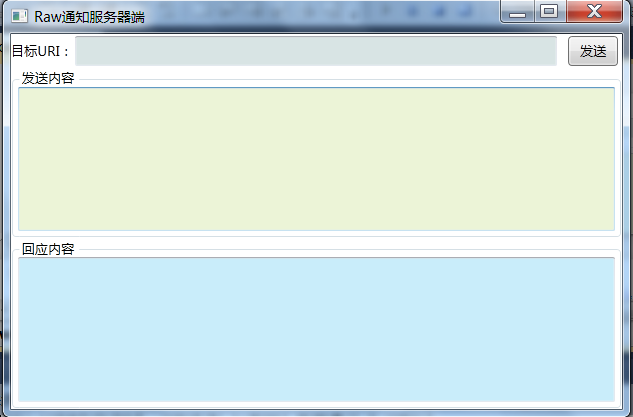
这就是用WPF的好处,截图中大家未必能看到窗口上用到哪些控件,设置了哪些属性,但是,如果我把XAML一贴,我想大家就懂了。
<Window x:Class="RawNtfServer.MainWindow" xmlns="http://schemas.microsoft.com/winfx/2006/xaml/presentation" xmlns:x="http://schemas.microsoft.com/winfx/2006/xaml" Title="Raw通知服务器端" Height="350" Width="525"> <Grid> <Grid.RowDefinitions> <RowDefinition Height="Auto" /> <RowDefinition /> <RowDefinition /> </Grid.RowDefinitions> <Grid Grid.Row="0"> <Grid.ColumnDefinitions> <ColumnDefinition Width="auto"/> <ColumnDefinition Width="*"/> <ColumnDefinition Width="auto"/> </Grid.ColumnDefinitions> <TextBlock Grid.Column="0" Text="目标URI:" VerticalAlignment="Center"/> <TextBox Name="txtUri" Grid.Column="1" Margin="2" Background="#FFD8E4E4"/> <Button Grid.Column="2" Padding="8,3,8,3" Margin="7,2,3,2" Content="发送" Click="OnSend"/> </Grid> <GroupBox Grid.Row="1" Header="发送内容"> <TextBox VerticalScrollBarVisibility="Auto" TextWrapping="Wrap" Name="txtMsg" Background="#FFECF4D7" /> </GroupBox> <GroupBox Grid.Row="2" Header="回应内容"> <TextBox Name="txtResp" VerticalScrollBarVisibility="Auto" TextWrapping="Wrap" Background="#FFC9EDFA" /> </GroupBox> </Grid></Window>
好,前台干好了,去搞搞后台吧。
using System;using System.Collections.Generic;using System.Linq;using System.Text;using System.Windows;using System.Windows.Controls;using System.Windows.Data;using System.Windows.Documents;using System.Windows.Input;using System.Windows.Media;using System.Windows.Media.Imaging;using System.Windows.Navigation;using System.Windows.Shapes;using System.Net;using System.IO;using System.Net.Mime;namespace RawNtfServer{ /// <summary> /// MainWindow.xaml 的交互逻辑 /// </summary> public partial class MainWindow : Window { public MainWindow() { InitializeComponent(); } private void OnSend(object sender, RoutedEventArgs e) { if (txtUri.Text==""||txtMsg.Text=="") { MessageBox.Show("请输入必备的参数。"); return; } HttpWebRequest request = (HttpWebRequest)WebRequest.Create(txtUri.Text); request.Method = WebRequestMethods.Http.Post; request.ContentType = MediaTypeNames.Text.Plain; // HTTP标头: // X-NotificationClass:3 // 3:立即发送 // 13:450秒后发送 // 23:900秒后发送 request.Headers.Add("X-NotificationClass", "3"); byte[] buffer = Encoding.UTF8.GetBytes(txtMsg.Text); request.ContentLength = buffer.Length; using (Stream s = request.GetRequestStream()) { s.Write(buffer, 0, buffer.Length); } // 接收响应 HttpWebResponse response = (HttpWebResponse)request.GetResponse(); string hds = ""; foreach (string key in response.Headers.AllKeys) { hds += key + " : " + response.Headers.Get(key) + "\r\n"; } txtResp.Text = hds; } }}
有没有觉得代码很熟悉?和前两节中的例子像不?
好了,服务器端Done,下面轮到WP客户端了。
布局不用TU了,放心,无图有真相。上XAML。
<!--ContentPanel - 在此处放置其他内容--> <Grid x:Name="ContentPanel" Grid.Row="1" Margin="12,0,12,0"> <ListBox Name="lbMsg"/> </Grid>
简单吧,就一个控件——ListBox,待会儿我们接受到的通知,就扔到它里面。
OK,看看后台的C#代码。
using System;using System.Collections.Generic;using System.Linq;using System.Net;using System.Windows;using System.Windows.Controls;using System.Windows.Documents;using System.Windows.Input;using System.Windows.Media;using System.Windows.Media.Animation;using System.Windows.Shapes;using Microsoft.Phone.Controls;using Microsoft.Phone.Notification;namespace WPClient{ public partial class MainPage : PhoneApplicationPage { // 构造函数 public MainPage() { InitializeComponent(); HttpNotificationChannel Channel = null; string ChannelName = "raw"; Channel = HttpNotificationChannel.Find(ChannelName); if (Channel==null) { Channel = new HttpNotificationChannel(ChannelName); Channel.ChannelUriUpdated += new EventHandler<NotificationChannelUriEventArgs>(Channel_ChannelUriUpdated); Channel.ErrorOccurred += new EventHandler<NotificationChannelErrorEventArgs>(Channel_ErrorOccurred); Channel.HttpNotificationReceived += new EventHandler<HttpNotificationEventArgs>(Channel_HttpNotificationReceived); Channel.Open(); } else { Channel.ChannelUriUpdated += new EventHandler<NotificationChannelUriEventArgs>(Channel_ChannelUriUpdated); Channel.ErrorOccurred += new EventHandler<NotificationChannelErrorEventArgs>(Channel_ErrorOccurred); Channel.HttpNotificationReceived += new EventHandler<HttpNotificationEventArgs>(Channel_HttpNotificationReceived); System.Diagnostics.Debug.WriteLine("URI: {0}", Channel.ChannelUri.ToString()); } } void Channel_HttpNotificationReceived(object sender, HttpNotificationEventArgs e) { string msg = ""; using (System.IO.Stream stream=e.Notification.Body) { System.IO.StreamReader rd = new System.IO.StreamReader(stream, System.Text.Encoding.UTF8); msg = rd.ReadToEnd(); } Dispatcher.BeginInvoke(() => { this.lbMsg.Items.Add(DateTime.Now.ToLongTimeString() + " " + msg); }); } void Channel_ErrorOccurred(object sender, NotificationChannelErrorEventArgs e) { Dispatcher.BeginInvoke(() => { MessageBox.Show(e.Message); }); } void Channel_ChannelUriUpdated(object sender, NotificationChannelUriEventArgs e) { Dispatcher.BeginInvoke(() => { System.Diagnostics.Debug.WriteLine("URI: {0}",e.ChannelUri.ToString()); }); } }}
避免有朋友说代码看不懂,这回我是Ctrl + A后再贴出来的。
下面来执行一下,首先运行WP端,可以同时运行,随你喜欢。 ,但至少要让WP模拟器或手机收到云服务器分配的URI。

把这个URI复制,填到服务器端的窗口中,然后输入你要发送的东东,点击“发送”。
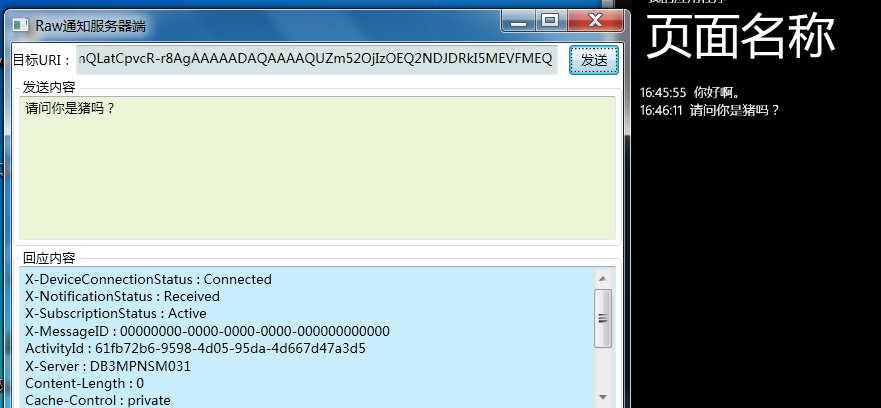
嗯,就是这样用,应该不复杂吧?
在收发消息的过程中,编码时建议使用UTF-8,貌似这个不会有乱码。
哈,牛就吹到这了,下一节我们玩一玩比较恐怖的东西——Socket。
- Windows Phone开发(45):推送通知大结局——Raw通知
- Windows Phone开发(44):推送通知第二集——磁贴通知
- Windows Phone开发(43):推送通知第一集——Toast推送
- Windows Phone 7 开发 31 日谈——第19日:推送通知
- Windows Phone 7 开发 31 日谈——第19日:推送通知
- Windows Phone 7 不温不火学习之《推送通知服务》
- iOS 通知——推送通知
- [IOS 开发] 推送通知
- 快牙网传——推送通知
- ios开发-推送通知(转)
- 本地通知和推送通知 - iOS开发
- windows phone开发学习--本地实现toast通知提醒
- Windows Phone开发学习--本地实现toast通知提醒
- 推送通知(远程推送)
- iOS开发 - ANPs推送通知
- iOS开发推送本地通知
- iOS开发:本地通知(推送)
- iOS开发 - ANPs推送通知
- 经典智力题 from qiusheng
- QWT使用总结
- sqlserver链接超时
- 算法复习之:N^2排序
- 临时表和表变量,转载自博客园
- Windows Phone开发(45):推送通知大结局——Raw通知
- ESI 动态缓存技术
- map-file
- 学习Javascript闭包
- 创建更新物化视图的Job
- 如何在 Linux 服务器上安装 Red5?
- vs2008 ALT + G解释
- HAXE --- One language, everywhere
- java排序算法汇总