MVC Techniques with jQuery, JSON, Knockout, and C#
来源:互联网 发布:mac重装系统下载慢 编辑:程序博客网 时间:2024/06/01 23:16
Introduction
“Change will not come if we wait for some other person, or if we wait for some other time. We are the ones we've been waiting for. We are the change that we seek.” - Barack Obama. Regardless of your political beliefs, change is all around us. Changes in politics, changes in the global economy, changes in the climate. This is also true with software development. If you are a software developer, change is good. Change puts money in our pockets and keeps us busy. The challenge is trying to keep up with the pace of change in software development technology. This article focuses on Microsoft's MVC framework for web development that incorporates development techniques using the latest JavaScript libraries of jQuery and Knockout while incorporating the JSON object notation for data-interchange.
Sample Application
The sample web application for this article uses the latest version of Microsoft's MVC ASP.NET framework, MVC 4. This article will walk through a sample Order Entry application that uses the world famous Northwind SQL-Server database (the script for creating the database is included in the downloadable source for this article).
Architectural Goals
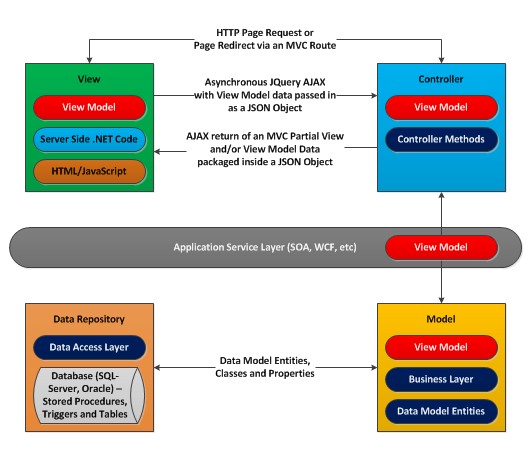
The architectural goal of this sample application is to separate the Model from the rest of the MVC (Model-View-Controller) web application. This sample MVC web application will consist of just Views and Controllers. The Controllers and the Views will communicate with each other through View Model classes (discussed later). The Model will reside behind an application service layer. The application service layer may optionally be implemented using a web service technology such as Windows Communication Foundation (WCF). This is useful if you wish to design a Service-Oriented Architecture (SOA) where you may have several different front-end applications needing access to the same business components.
Button Clicks
Most of the button clicks for this application will make jQuery AJAX calls that return JSON objects that will contain one or more MVC Partial Views and a View Model object.
Thin Controllers
The Controllers for this application will be thin. Thin being that the Controller class will be nothing more than a pass-through or a middleman between the View and the application service layer. The Controller will just receive posted form data from the View and bind it to a View Model.
The Controller will then pass the View Model into the application service layer and execute business components that will reside outside of the MVC project. The Controller will then simply return a View Model back to the View. Thin Controllers increase application testability, application reuse, and promotes the separation of concerns.
MVC Temptation – Rolling your own DataGrid Control
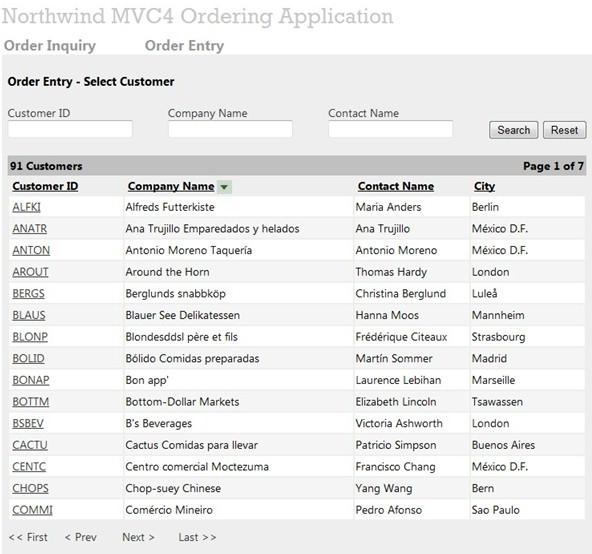
The first step in the Northwind Order Entry application is to select a customer from a data grid. There are various useful data grid controls available on the market place for MVC including data grids from Telerik, jQuery, and other Open Source libraries. But one of the powers of the MVC framework is that it gives you full control over what gets rendered on a web page through its powerful view engine.
MVC comes with a built-in view engine called Razor. The Razor View Engine is a precise, useful, light language that enables you to create Views for MVC projects in ASP.NET while still keeping a separation of concerns, ability to test, and pattern based development.
As you become more familiar with MVC and the control it gives you, temptation will build up inside you to roll a few controls yourself. Basically, data grids just need to render an HTML table and inject some JavaScript with a few hidden HTML controls. The data grid in this sample application is a custom built data grid that supports paging and sorting, and the selection of data.
Customer Inquiry View – Paging, Sorting, and Selecting
When the Customer Inquiry View shown above loads, a JavaScript function CustomerInquiry inside the page is called that makes a jQuery AJAX call to an MVC Controller method that returns a partial view that renders a data grid back to the page.
<script language="javascript" type="text/javascript"> function CustomerInquiryRequest() { this.CurrentPageNumber; this.PageSize; this.CustomerID; this.CompanyName; this.ContactName; this.SortDirection; this.SortExpression; }; function CustomerInquiry(currentPageNumber, sortExpression, sortDirection) { var url = "/Orders/CustomerInquiry"; var customerInquiryRequest = new CustomerInquiryRequest(); customerInquiryRequest.CustomerID = $("#CustomerID").val(); customerInquiryRequest.CompanyName = $("#CompanyName").val(); customerInquiryRequest.ContactName = $("#ContactName").val(); customerInquiryRequest.CurrentPageNumber = currentPageNumber; customerInquiryRequest.SortDirection = sortDirection; customerInquiryRequest.SortExpression = sortExpression; customerInquiryRequest.PageSize = 15; $.post(url, customerInquiryRequest, function (data, textStatus) { CustomerInquiryComplete(data); }); }; function CustomerInquiryComplete(result) { if (result.ReturnStatus == true) { $("#CustomerResults").html(result.CustomerInquiryView); $("#MessageBox").html(""); } else { $("#MessageBox").html(result.MessageBoxView); } } </script>Customer Inquiry Controller Method
When coding the signature for a Controller method, you have several options. You can define each parameter separately and let MVC automatically populate the values of each parameter by explicit name. The Controller method below uses a different approach. In the example below, I chose to use a FormCollection array that I can parse. Since the days of classic ASP, the Form collection has been the basis for all HTTP Form posts. Using a Form collection array will allow MVC to always find your method, even in the case where your posted form data doesn't match the Controller method signature.
/// <summary> /// Customer Inquiry /// </summary> /// <param name="postedFormData"></param> /// <returns></returns> public ActionResult CustomerInquiry(FormCollection postedFormData){ CustomerApplicationService customerApplicationService = new CustomerApplicationService(); CustomerViewModel customerViewModel = new CustomerViewModel(); customerViewModel.PageSize = Convert.ToInt32(postedFormData["PageSize"]); customerViewModel.SortExpression = Convert.ToString(postedFormData["SortExpression"]); customerViewModel.SortDirection = Convert.ToString(postedFormData["SortDirection"]); customerViewModel.CurrentPageNumber = Convert.ToInt32(postedFormData["PageNumber"]); customerViewModel.Customer.CustomerID = Convert.ToString(postedFormData["CustomerID"]); customerViewModel.Customer.CompanyName = Convert.ToString(postedFormData["CompanyName"]) customerViewModel.Customer.ContactName = Convert.ToString(postedFormData["ContactName"]); customerViewModel = customerApplicationService.CustomerInquiry(customerViewModel); return Json(new { ReturnStatus = customerViewModel.ReturnStatus, ViewModel = customerViewModel, MessageBoxView = RenderPartialView(this,"_MessageBox", customerViewModel), CustomerInquiryView = RenderPartialView(this, "CustomerInquiryGrid", customerViewModel) });}View Models
The Customer Inquiry Controller method makes a call to an application service that returns a Customer View Model of customer data. In MVC, the Model is defined as a collection of classes that define your back-end data. Views in MVC often need information from various pieces of back-end data. To collect all this information, a separate View Model class is needed. The View Model class is a single front-end class that can communicate with the user interface.
/// <summary>/// Customer View Model /// </summary> public class CustomerViewModel : ViewInformation{ public List<Customer> Customers; public Customer Customer; public int TotalCustomers { get; set; } public CustomerViewModel() { Customer = new Customer(); Customers = new List<Customer>(); ReturnMessage = new List<String>(); ValidationErrors = new Hashtable(); TotalCustomers = 0; } } /// <summary> /// Order View Model /// </summary> public class OrderViewModel : ViewInformation{ public Orders Order; public OrderDetails OrderDetail; public List<Orders> Orders; public List<OrdersCustomer> OrderCustomer; public List<OrderDetailsProducts> OrderDetailsProducts; public OrderDetailsProducts OrderLineItem; public List<OrderDetails> OrderDetails; public List<Shippers> Shippers; public Customer Customer; public int TotalOrders { get; set; } public OrderViewModel() { Customer = new Customer(); Order = new Orders(); OrderDetail = new OrderDetails(); Orders = new List<Orders>(); OrderDetails = new List<OrderDetails>(); OrderCustomer = new List<OrdersCustomer>(); Shippers = new List<Shippers>(); OrderDetailsProducts = new List<OrderDetailsProducts>(); OrderLineItem = new OrderDetailsProducts(); ReturnMessage = new List<String>(); ValidationErrors = new Hashtable(); TotalOrders = 0; } }Paging Data in SQL-Server
On the back end in SQL code, using the ROW_NUMBER OVER syntax and specifying a beginning and ending record number can accomplish returning one page of data from SQL-Server. This is more efficient than returning a large recordset back through the application tiers.
SELECT * FROM ( SELECT (ROW_NUMBER() OVER (ORDER BY CompanyName ASC)) as record_number,CustomerID, CompanyName, ContactName, ContactTitle, City, Region FROM Customers ) Rows where record_number between 16 and 30The Power of JSON and Partial Views
JSON (JavaScript Object Notation) is a lightweight data-interchange format. After the Customer Inquiry controller method gets data back from the application service layer in the form of a View Model, the Controller method will return to the client web page, a JSON object that contains both the View Model data and the rendered HTML of the data grid from a partial view. The real power of MVC is the ability to render small chucks of HTML that reside in partial views.
Render Partial View Helper
The ASP.NET MVC framework includes several helper methods that provide an easy way to render HTML in a View for such things as creating buttons, textboxes, links, and forms. You can extend the existing helper functions built into MVC or you can create your own helper functions for various needs you might have.
The custom RenderPartialView helper function below executes partial views and returns the output of the partial view as a string. The generated string can then be packaged in a JSON object that can be returned back to an AJAX call. This helper function calls the Razor View Engine to execute a partial view on the server side. This is very helpful when you want to return HTML back to an AJAX call.
public static string RenderPartialView(this Controller controller, string viewName, object model) { if (string.IsNullOrEmpty(viewName)) return null; controller.ViewData.Model = model; using (var sw = new StringWriter()) { ViewEngineResult viewResult = ViewEngines.Engines.FindPartialView( controller.ControllerContext, viewName); var viewContext = new ViewContext(controller.ControllerContext, viewResult.View, controller.ViewData, controller.TempData, sw); viewResult.View.Render(viewContext, sw); return sw.GetStringBuilder().ToString(); } }Customer Inquiry Grid Partial View
Both Views and Partial Views can have both server side and client side code inside them. Views and Partial Views have the look and feel of the old classic ASP functionality. The Customer Inquiry Grid Partial View below just has server side code in it that builds and renders my custom homegrown data grid.
@model NorthwindViewModel.CustomerViewModel@using NorthwindWebApplication.Helpers;@{ NorthwindDataGrid pagedDataGrid = new NorthwindDataGrid("CustomerInquirGrid"); pagedDataGrid.Title = "Customers"; pagedDataGrid.TotalPages = Model.TotalPages; pagedDataGrid.TotalRecords = Model.TotalCustomers; pagedDataGrid.CurrentPageNumber = Model.CurrentPageNumber; pagedDataGrid.SortDirection = Model.SortDirection; pagedDataGrid.SortExpression = Model.SortExpression; pagedDataGrid.RowSelectionFunction = "CustomerSelected"; pagedDataGrid.AjaxFunction = "CustomerInquiry"; pagedDataGrid.AddColumn("CustomerID", "Customer ID", "20%", "left"); pagedDataGrid.AddColumn("CompanyName", "Company Name", "40%", "left"); pagedDataGrid.AddColumn("ContactName", "Contact Name", "20%", "left"); pagedDataGrid.AddColumn("City", "City", "20%", "left"); foreach (var item in Model.Customers) { pagedDataGrid.AddRow(); pagedDataGrid.PopulateRow("CustomerID", item.CustomerID , true); pagedDataGrid.PopulateRow("CompanyName", item.CompanyName, false); pagedDataGrid.PopulateRow("ContactName", item.ContactName, false); pagedDataGrid.PopulateRow("City", item.City, false); pagedDataGrid.InsertRow(); }} @Html.RenderNorthwindDataGrid(pagedDataGrid)The RenderNorthwindDataGrid function uses the MVCHtmlHelper object to create anMvcHtmlString so that the grid can be rendered like any other HTML control.
public static MvcHtmlString RenderNorthwindDataGrid(this HtmlHelper html, NorthwindWebControls.NorthwindDataGrid dataGrid){ string control = dataGrid.CreateControl(); return MvcHtmlString.Create(control); }Below is a MessageBox Partial View that contains both server side and client side code that uses the Razor View Engine syntax. ThisMessageBox Partial View will be used through out the sample application for rendering status and error information back to the client.
@model NorthwindViewModel.ViewInformation@{ ViewInformation viewInformation = new NorthwindViewModel.ViewInformation(); viewInformation.ReturnMessage = Model.ReturnMessage; viewInformation.ReturnStatus = Model.ReturnStatus; if (viewInformation.ReturnMessage.Count() > 0) { <div style="padding: 10px 10px 10px 0px; width:90%"> @if (viewInformation.ReturnStatus == true) { <div style="background-color: Scrollbar; border: solid 1px black; color: black; padding: 15px 15px 15px 15px"> @foreach (var message in viewInformation.ReturnMessage) { <text>@Html.Raw(message)</text> <br /> } </div> } else { // ====== an error has occurred - Display the message box in red ====== <div style="background-color: #f4eded; border: solid 1px #d19090; color: #762933; padding: 15px 15px 15px 15px"> @foreach (var message in viewInformation.ReturnMessage) { <text>@Html.Raw(message)</text> <br /> } </div> } </div> } }Customer Inquiry DataGrid Rendering
When the CustomerInquiry Controller method completes, theCustomerInquiryComplete client side JavaScript function will execute and parse the JSON object returned from the Controller, checking for the return status and using jQuery to update aDIV tag with the returned data grid.
If an error occurs on the server, then the message box partial view is rendered on the page. This functionality is the essence of executing AJAX calls and rendering partial page content and having full control in MVC.
function CustomerInquiryComplete(result) { if (result.ReturnStatus == true) { $("#CustomerResults").html(result.CustomerInquiryView); $("#MessageBox").html(""); } else { $("#MessageBox").html(result.MessageBoxView); } }Selecting a Customer
When selecting a customer (Customer ID field on the Customer Inquiry grid) to place an order for, theCustomerSelected JavaScript function will execute, passing the customer ID selected into a form object that is then submitted to the server using the form POST method. Using the POST method instead of the GET method for all your controller calls will allow you to protect and secure your controller methods from being accessed directly.
<script language="javascript" type="text/javascript"> function CustomerSelected(customerID) { $("#OrderEntry #CustomerID").val(customerID); $("#OrderEntry").submit(); }</script><form id="OrderEntry" method="post" action="/Orders/OrderEntry"> <input id="CustomerID" name="CustomerID" type="hidden" /> </form>Order Entry Header View
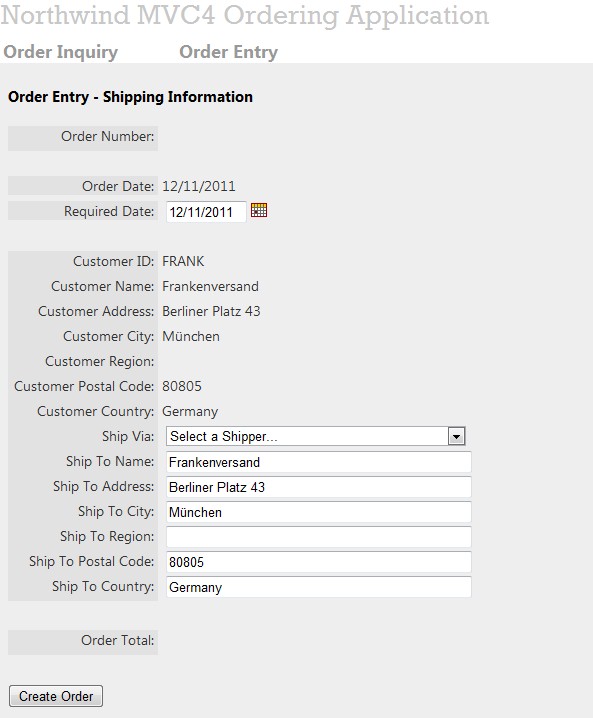
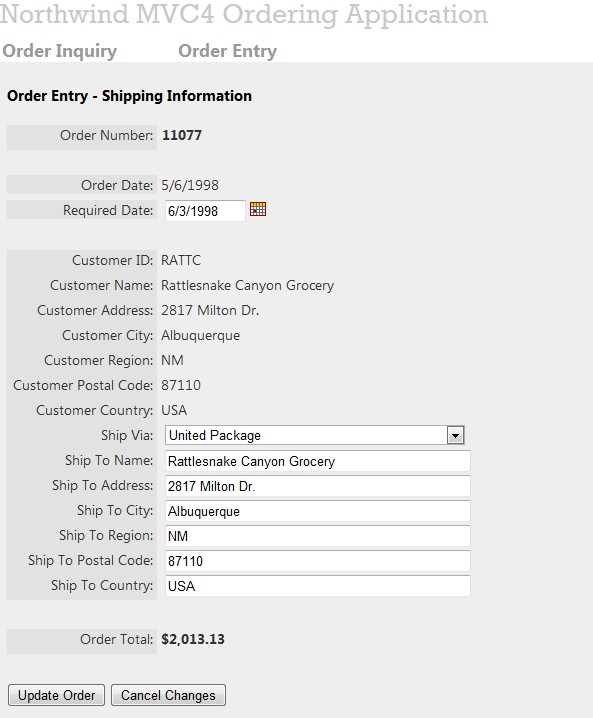
After selecting the customer, the OrderEntryHeader View will be rendered and will allow you to enter shipping information for your order. TheOrderEntryHeader View uses Knockout to control page functionality.
Knockout – MVC Meets MVVM
Knockout (a.k.a. Knockout.js and KnockoutJS) is an Open-Source JavaScript library available atwww.knockoutjs.com that allows you to easily associate DOM elements with Model data using a concise, readable syntax and automatically refresh your UI when your data model's state changes. Knockout follows the Model-View-View-Model (MVVM) design pattern to simplify dynamic JavaScript User Interfaces. What you end up getting is a separation of concerns between your JavaScript and the UI HTML presentation. With Knockout, you can write JavaScript that makes no direct reference to UI elements and the document object model (DOM) in your web page.
Knockout is designed to allow you to use arbitrary JavaScript objects as View Models. As long as your View Model's properties are observables, you can use Knockout to bind them to your UI, and the UI will be updated automatically whenever the observable properties change.
Order Entry Header - Edit Mode and Display Mode
The key piece of functionality implemented in the Order Header page is the ability to put the page in edit mode or display mode without reposting the entire page. In the ASP.NET post-back model, it is often the case that the page is posted back to the server when a user presses an Edit button with the page being completely redisplayed. With Knockout and its MVVM data-binding functionality, this is not needed. All you have to do is bind to the View Model that is created through JavaScript.
Data-Bind Tags
To create an MVC View that can switch between display-only and edit modes, you create separateDIV and SPAN tags for each element on the page, one to contain theINPUT HTML control and one for displaying just text. Adding the Knockoutdata-bind tag to your objects will make it easy to control when the elements automatically are displayed or hidden to the user. In the example below,ShipName contains a data bind tag for the value of the ship name and a boolean data bind tag to determine whether the element is in display-only mode or in edit-mode.
<div style="float:left; width:150px; height:25px; text-align:right;" class="field-label">Ship To Name: </div> <div style="float:left; width:300px; height:25px;"> <span data-bind="visible:EditFields"> @Html.TextBox("ShipName", @Model.Order.ShipName, new Dictionary<string, object> { { "data-bind", "value: ShipName" }, { "style", "width:300px" } }) </span> <span data-bind="visible: ReadOnlyMode, text: OriginalShipName"></span></div>Order Entry Display Mode
When initially selecting an order to edit, the page is in display-only mode. Setting up Knockout to automatically bind to your HTML objects, you must set-up a View Model object in JavaScript that creates observable bindings for Knockout so it can listen to and automatically update the UI.
// Overall viewmodel for this screen, along with initial state var viewModel = { EditFields: ko.observable(false), ReadOnlyMode: ko.observable(false), DisplayCreateOrderButton: ko.observable(false), DisplayEditOrderButton: ko.observable(false), DisplayUpdateOrderButton: ko.observable(false), DisplayOrderDetailsButton: ko.observable(false), DisplayCancelChangesButton: ko.observable(true), SelectedShipVia: ko.observable($("#OriginalShipVia").val()), Shippers: ko.observableArray(shippers), OrderID: ko.observable($("#OrderID").val()), ShipperName: ko.observable($("#ShipperName").val()), CustomerID: ko.observable($("#CustomerID").val()), OriginalShipName: ko.observable($("#OriginalShipName").val()), OriginalShipAddress: ko.observable($("#OriginalShipAddress").val()), OriginalShipCity: ko.observable($("#OriginalShipCity").val()), OriginalShipRegion: ko.observable($("#OriginalShipRegion").val()), OriginalShipPostalCode: ko.observable($("#OriginalShipPostalCode").val()), OriginalShipCountry: ko.observable($("#OriginalShipCountry").val()), OriginalRequiredDate: ko.observable($("#OriginalRequiredDate").val()), OriginalShipVia: ko.observable($("#OriginalShipVia").val()), ShipName: ko.observable($("#OriginalShipName").val()), ShipAddress: ko.observable($("#OriginalShipAddress").val()), ShipCity: ko.observable($("#OriginalShipCity").val()), ShipRegion: ko.observable($("#OriginalShipRegion").val()), ShipPostalCode: ko.observable($("#OriginalShipPostalCode").val()), ShipCountry: ko.observable($("#OriginalShipCountry").val()), RequiredDate: ko.observable($("#OriginalRequiredDate").val()), MessageBox: ko.observable("") } ko.applyBindings(viewModel);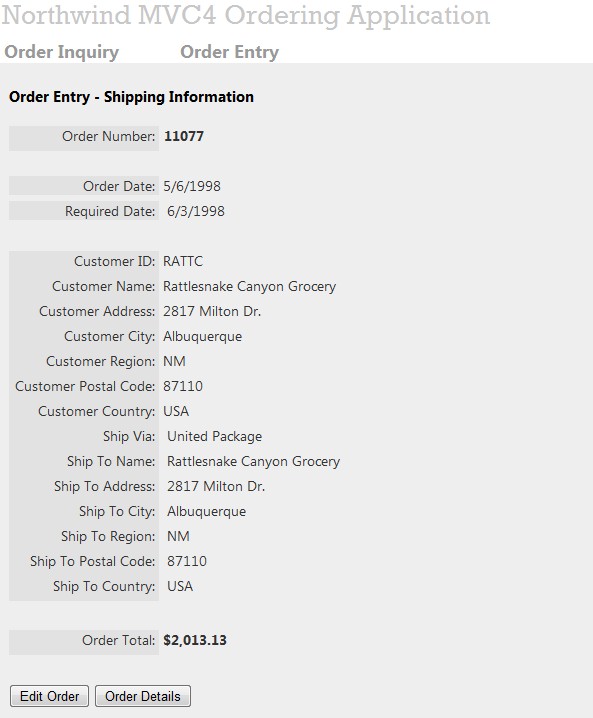
When the user presses the Edit Order button, we can put the page in edit mode by creating a function for the Edit Order click event as follows:
$("#btnEditOrder").click(function () { viewModel.DisplayEditOrderButton(false); viewModel.DisplayUpdateOrderButton(true); viewModel.DisplayOrderDetailsButton(false); viewModel.DisplayCancelChangesButton(true); viewModel.EditFields(true); viewModel.ReadOnlyMode(false);});The above example uses Unobtrusive JavaScript to set the edit button click event to change the boolean settings of the View Model which Knockout listens to and automatically changes the mode of the page. Unobtrusive JavaScript is an emerging technique for separating JavaScript from the web page’s structure/content and presentation.
Pressing the Update Order button will execute the UpdateOrder function. TheUpdateOrder function will simply grab the values of the View Model and create a shipping information JavaScript object that will be submitted to theUpdateOrder Controller method by making a jQuery AJAX call.
function UpdateOrder() { var shippingInformation = new ShippingInformation(); shippingInformation.OrderID = viewModel.OrderID(); shippingInformation.CustomerID = viewModel.CustomerID(); shippingInformation.ShipName = viewModel.ShipName(); shippingInformation.ShipAddress = viewModel.ShipAddress(); shippingInformation.ShipCity = viewModel.ShipCity(); shippingInformation.ShipRegion = viewModel.ShipRegion(); shippingInformation.ShipPostalCode = viewModel.ShipPostalCode(); shippingInformation.ShipCountry = viewModel.ShipCountry(); shippingInformation.RequiredDate = viewModel.RequiredDate(); shippingInformation.Shipper = viewModel.SelectedShipVia(); var url = "/Orders/UpdateOrder"; $(':input').removeClass('validation-error'); $.post(url, shippingInformation, function (data, textStatus) { UpdateOrderComplete(data); }); }function UpdateOrderComplete(result) { if (result.ReturnStatus == true) { viewModel.MessageBox(result.MessageBoxView); viewModel.OrderID(result.ViewModel.Order.OrderID); viewModel.ShipperName(result.ViewModel.Order.ShipperName); viewModel.DisplayEditOrderButton(true); viewModel.DisplayUpdateOrderButton(false); viewModel.DisplayOrderDetailsButton(true); viewModel.DisplayCancelChangesButton(false); viewModel.DisplayCreateOrderButton(false); viewModel.EditFields(false); viewModel.ReadOnlyMode(true); viewModel.OriginalShipName(result.ViewModel.Order.ShipName); viewModel.OriginalShipAddress(result.ViewModel.Order.ShipAddress); viewModel.OriginalShipCity(result.ViewModel.Order.ShipCity); viewModel.OriginalShipRegion(result.ViewModel.Order.ShipRegion); viewModel.OriginalShipPostalCode(result.ViewModel.Order.ShipPostalCode); viewModel.OriginalShipCountry(result.ViewModel.Order.ShipCountry); viewModel.OriginalRequiredDate(result.ViewModel.Order.RequiredDateFormatted); viewModel.OriginalShipVia(viewModel.SelectedShipVia()); } else { viewModel.MessageBox(result.MessageBoxView); } for (var val in result.ValidationErrors) { var element = "#" + val; $(element).addClass('validation-error'); } }Validation Errors
Additionally, you can display validation errors using a CSS class that can highlight in red which elements have errors by looping through a collection of objects (that contain matching names of yourINPUT controls) that is returned in the JSON request as follows:
for (var val in result.ValidationErrors) { var element = "#" + val; $(element).addClass('validation-error');}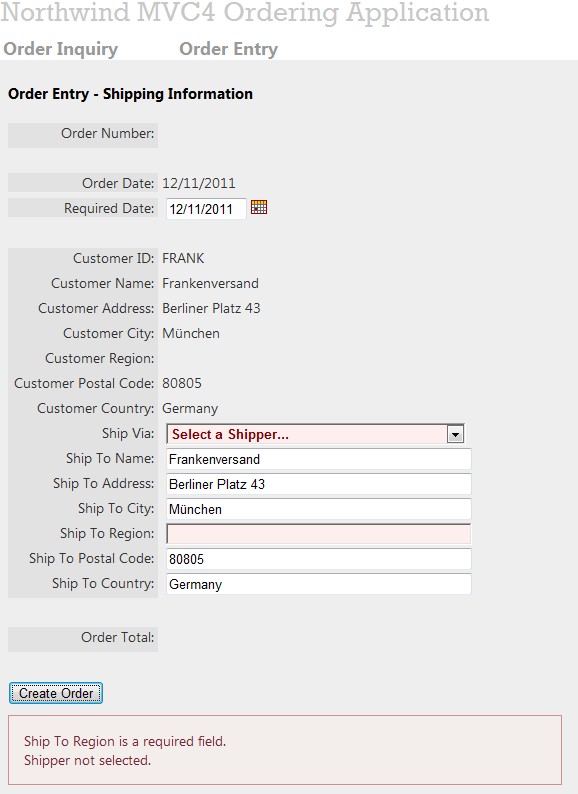
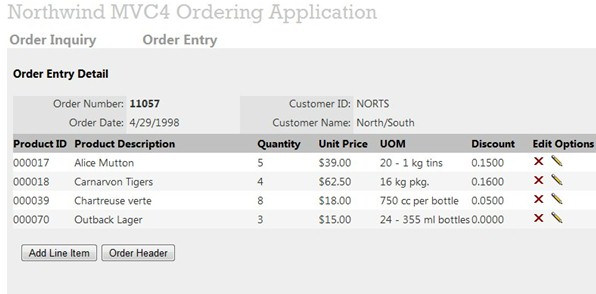
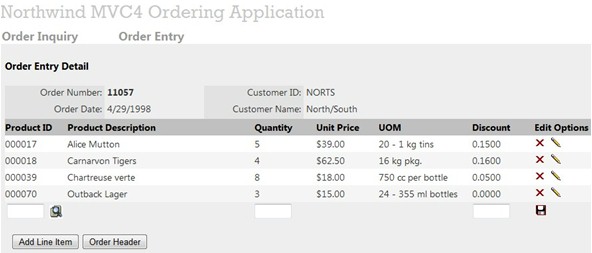
Order Entry Details View – Knockout Templates
After editing Order Shipping Information, the user can now go into the order details and add products to the order. The Order Details View below uses the Knockout template functionality to allow the in-line editing of line items without a post-back.
Knockout templates are a simple and convenient way to build sophisticated UI structures - with repeating or nested blocks - as a function of your View Model data. The template binding populates the associated DOM element with the results of rendering a template.
Pre-rendering and Formatting Data
Most often when dealing with data from your back-end data structures and models, the data needs to be reformatted (dates and money fields, etc.) before presenting the data to the user. In traditional ASP.NET Web Forms, most controls implement a pre-render or data bind event that allows you to reformat the data before it gets rendered to the user. In MVC, you can grab your View Model data and use server side coding at the beginning of the View as a way to perform pre-render tasks. In the below example, a list of order details is getting created with reformatted data.
@model NorthwindViewModel.OrderViewModel@{ ViewBag.Title = "Order Entry Detail"; ArrayList orderDetails = new ArrayList(); foreach (var item in Model.OrderDetailsProducts) { var orderDetail = new { ProductID = item.OrderDetails.ProductIDFormatted, ProductName = item.Products.ProductName, Quantity = item.OrderDetails.Quantity, UnitPrice = item.OrderDetails.UnitPriceFormatted, QuantityPerUnit = item.Products.QuantityPerUnit, Discount = item.OrderDetails.DiscountFormatted }; orderDetails.Add(orderDetail); } }Once your is data is reformatted, you can load a DIV tag in the View with an encoded JSON object that will be accessed by JavaScript to bind the data to the knockout template.
<div id="OrderDetailsData" style="visibility: hidden; display: none"> @Html.Raw(Json.Encode(orderDetails)); </div>You can set up a Knockout template by including your content and data-binding tags inside a script tag with a type oftext/html.
<!--====== Template ======--> <script type="text/html" id="OrderDetailTemplate"> <tr data-bind="style: { background: viewModel.SetBackgroundColor($data) }"> <td style="height:25px"><div data-bind="text:ProductID"></div></td> <td><div data-bind="text: ProductName"></div></td> <td> <div data-bind="text: Quantity, visible:DisplayMode "></div> <div data-bind="visible: EditMode" > <input type="text" data-bind="value: Quantity" style="width: 50px" /> </div> </td><td><div data-bind="text:UnitPrice"></div></td> <td><div data-bind="text: QuantityPerUnit"></div></td> <td><div data-bind="text: Discount, visible:DisplayMode "></div> <div data-bind="visible: EditMode" > <input type="text" data-bind="value:Discount" style="width:50px" /> </div> </td> <td> <div data-bind="visible:DisplayDeleteEditButtons"> <div style="width:25px;float:left"><img alt="delete" data-bind="click:function() { viewModel.DeleteLineItem($data) }" title="Delete item" src="@Url.Content("~/Content/Images/icon-delete.gif")"/> </div> <div style="width:25px;float:left"><img alt="edit" data-bind="click:function() { viewModel.EditLineItem($data) }" title="Edit item" src="@Url.Content("~/Content/Images/icon-pencil.gif")"/> </div> </div> <div data-bind="visible:DisplayCancelSaveButtons"> <div style="width:25px;float:left"><img alt="save" data-bind="click: function() {viewModel.UpdateLineItem($data) }" title="Save item" src="@Url.Content("~/Content/Images/icon-floppy.gif")"/> </div> <div style="width:25px;float:left"><img alt="cancel edit" data-bind="click:function() { viewModel.CancelLineItem($data) }" title="Cancel Edit" src="@Url.Content("~/Content/Images/icon-pencil-x.gif")"/> </div> </div></td> </tr> </script>Linking the Knockout template to your HTML is a matter of using the data-bind template tag and using aforeach statement.
<!--====== Container ======--> <table border="0" cellpadding="0" cellspacing="0" style="width:100%"> <tr class="DataGridHeader"> <td style="width:10%; height:25px">Product ID</td> <td style="width:30%">Product Description</td> <td style="width:10%">Quantity</td> <td style="width:10%">Unit Price</td> <td style="width:15%">UOM</td> <td style="width:10%">Discount</td> <td style="width:15%">Edit Options</td> </tr> <tbody data-bind='template: {name: "OrderDetailTemplate", foreach:LineItems}'> </tbody> </table>The JavaScript eval function can be used to parse a JSON object. However, it can compile and execute any JavaScript program, so there can be security issues. It is much safer to use a JSON parser. A JSON parser will recognize only JSON text, rejecting all scripts that might be considered unsafe or malicious. There are a number of JSON parsers in JavaScript atjson.org.
You can use a JSON parser that parses your initially loaded order detail data so that it can be data-bound to the Knockout View Model. Knockout needs you to create an observable array when creating an array of detail line items.
<script language="javascript" type="text/javascript"> initialLineItems = jsonParse($("#OrderDetailsData").text()); var viewModel = { LineItems: ko.observableArray() } ko.applyBindings(viewModel); for (i = 0; i < initialLineItems.length; i++) { var newLineItem = CreateLineItem(initialLineItems[i]); viewModel.LineItems.push(newLineItem); } var lineItemDisplay = function () { this.ProductID; this.ProductName; this.Quantity; this.UnitPrice; this.QuantityPerUnit; this.Discount; this.OriginalQuantity; this.OriginalDiscount; this.EditMode; this.DisplayMode; this.DisplayDeleteEditButtons; this.DisplayCancelSaveButtons; }; function CreateLineItem(LineItem) { var lineItem = new lineItemDisplay(); lineItem.ProductID = ko.observable(LineItem.ProductID); lineItem.ProductName = ko.observable(LineItem.ProductName); lineItem.Quantity = ko.observable(LineItem.Quantity); lineItem.OriginalQuantity = ko.observable(LineItem.Quantity); lineItem.OriginalDiscount = ko.observable(LineItem.Discount); lineItem.UnitPrice = ko.observable(LineItem.UnitPrice); lineItem.QuantityPerUnit = ko.observable(LineItem.QuantityPerUnit); lineItem.Discount = ko.observable(LineItem.Discount); lineItem.BackgroundColor = ko.observable(LineItem.BackgroundColor); lineItem.EditMode = ko.observable(false); lineItem.DisplayMode = ko.observable(true); lineItem.DisplayDeleteEditButtons = ko.observable(true); lineItem.DisplayCancelSaveButtons = ko.observable(false); return lineItem; }</script>Knockout Mapping Plug-in
In the example above, I manually wrote my own JavaScript code to construct the View Model. Alternatively, you can use Knockout's mapping plug-in that gives you a straightforward way to map a JavaScript object into a View Model with the appropriate observables.
Edit, Update, and Delete Template Items
The complete Knockout View Model for this page includes functions for editing, updating, and deleting line items.
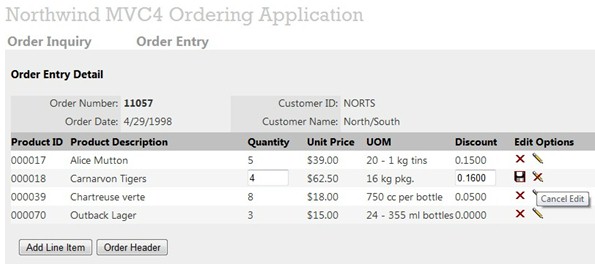
<script language="javascript" type="text/javascript"> var viewModel = { LineItems: ko.observableArray(), MessageBox: ko.observable(), AddNewLineItem: ko.observable(false), SetBackgroundColor: function (currentLineItemData) { var rowIndex = this.LineItems.indexOf(currentLineItemData); var colorCode = rowIndex % 2 == 0 ? "White" : "WhiteSmoke"; return colorCode; }, EditLineItem: function (currentLineItemData) { var currentLineItem = this.LineItems.indexOf(currentLineItemData); this.LineItems()[currentLineItem].DisplayMode(false); this.LineItems()[currentLineItem].EditMode(true); this.LineItems()[currentLineItem].DisplayDeleteEditButtons(false); this.LineItems()[currentLineItem].DisplayCancelSaveButtons(true); }, DeleteLineItem: function (currentLineItemData) { var currentLineItem = this.LineItems.indexOf(currentLineItemData); var productName = this.LineItems()[currentLineItem].ProductName(); var productID = this.LineItems()[currentLineItem].ProductID(); ConfirmDeleteLineItem(productID, productName, currentLineItem); }, DeleteLineItemConfirmed: function (currentLineItem) { var row = this.LineItems()[currentLineItem]; this.LineItems.remove(row); }, CancelLineItem: function (currentLineItemData) { currentLineItem = this.LineItems.indexOf(currentLineItemData); this.LineItems()[currentLineItem].DisplayMode(true); this.LineItems()[currentLineItem].EditMode(false); this.LineItems()[currentLineItem].DisplayDeleteEditButtons(true); this.LineItems()[currentLineItem].DisplayCancelSaveButtons(false); this.LineItems()[currentLineItem].Quantity(this.LineItems() [currentLineItem].OriginalQuantity()); this.LineItems()[currentLineItem].Discount(this.LineItems() [currentLineItem].OriginalDiscount()); }, UpdateLineItem: function (currentLineItemData) { currentLineItem = this.LineItems.indexOf(currentLineItemData); var lineItem = this.LineItems()[currentLineItem]; UpdateOrderDetail(lineItem, currentLineItem); }, UpdateOrderDetailComplete: function (currentLineItem, discount) { this.LineItems()[currentLineItem].DisplayMode(true); this.LineItems()[currentLineItem].EditMode(false); this.LineItems()[currentLineItem].DisplayDeleteEditButtons(true); this.LineItems()[currentLineItem].DisplayCancelSaveButtons(false); this.LineItems()[currentLineItem].OriginalQuantity(this.LineItems() [currentLineItem].Quantity()); this.LineItems()[currentLineItem].OriginalDiscount(discount); this.LineItems()[currentLineItem].Discount(discount); }}Pressing the pencil edit icon on a line item puts the line item in edit mode when theEditLineItem function executes on theonclick event as follows:
EditLineItem: function (currentLineItemData) { var currentLineItem = this.LineItems.indexOf(currentLineItemData); this.LineItems()[currentLineItem].DisplayMode(false); this.LineItems()[currentLineItem].EditMode(true); this.LineItems()[currentLineItem].DisplayDeleteEditButtons(false); this.LineItems()[currentLineItem].DisplayCancelSaveButtons(true); },With Knockout templates and its data-binding technology, you can create a full in-line editable grid similar to the ASP.NET Web FormsDataGrid control.
Pressing the Add Line Item button opens a line item to allow an item to be added to the order.
Searching for a product item can be accomplished with a modal popup window. Pressing the search button on the new line item displays the product search window.
The Modal Popup Product Search Window
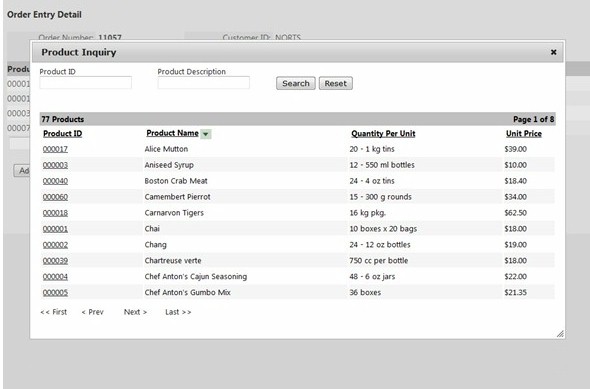
The modal popup window is a combination of an AJAX call and a partial view. The AJAX request calls a Product Inquiry partial view and returns the product search content. The content is then populated in aDIV tag.
<div id="dialog-modal" title="Product Inquiry"> <div id="ProductInquiryModalDiv"> </div> </div>The modal popup window is a jQuery plug-in and is displayed by calling the jQuerydialog function.
function ShowProductInquiryModal() { var url = "/Products/BeginProductInquiry"; $.post(url, null, function (html, textStatus) { ShowProductInquiryModalComplete(html); }); } function ShowProductInquiryModalComplete(productInquiryHtml) { $("#ProductInquiryModalDiv").html(productInquiryHtml); $("#dialog-modal").dialog({ height: 500, width: 900, modal: true }); // // execute Product Inquiry query after the initial page content has been loaded // setTimeout("ProductInquiryInitializeGrid()", 1000); }Product Inquiry Search Window - Unique ID Generation
The Product Inquiry Search window is a partial view. Since this window will be loaded into the same browser DOM in the Order Details page, all the HTML controls and the dynamically created JavaScript functions and variables need to have unique names. This partial view instantiates a homemade PageIDGeneration class and calls aGenerateID method to generate a unique control ID for each HTML control and generates unique JavaScript function names and variables prior to rendering the content. Basically, thePageIDGeneration class generates a unique ID by setting a unique GUID number. Using a GUID number guarantees uniqueness.
@model NorthwindViewModel.ProductViewModel @using NorthwindWebApplication.Helpers; @{ NorthwindWebControls.PageIDGeneration webControls = new NorthwindWebControls.PageIDGeneration(); string txtProductID = webControls.GenerateID("ProductID"); string txtProductDescription = webControls.GenerateID("ProductName"); string btnSearch = webControls.GenerateID("BtnSearch"); string btnReset = webControls.GenerateID("BtnReset"); string messageBox = webControls.GenerateID("MessageBox"); string productResults = webControls.GenerateID("ProductResults"); } <div class="SearchBar"> <div style="float:left; width:200px"> Product ID </div> <div style="float:left; width:200px"> Product Description </div> <div style="clear:both;"></div> <div style="float:left; width:200px"> <input id="@txtProductID" type="text" value="" style = "width:150px" /> </div> <div style="float:left; width:200px "> <input id="@txtProductDescription" type="text" value="" style = "width:150px" /> </div> <input id="@btnSearch" type="button" value="Search" /> <input id="@btnReset" type="button" value="Reset"/> </div> <div style="clear:both;"></div> <div id="@productResults"></div> <div id="@messageBox"></div> @Html.RenderJavascript(webControls.RenderJavascriptVariables("ProductInquiry_"))<script language="javascript" type="text/javascript"> $(ProductInquiry_BtnSearch).click(function() { ProductInquiryInitializeGrid(); }); $(ProductInquiry_BtnReset).click(function() { $(ProductInquiry_ProductID).val(""); $(ProductInquiry_ProductName).val(""); ProductInquiryInitializeGrid(); }); function ProductInquiryRequest() { this.CurrentPageNumber; this.PageSize; this.ProductID; this.ProductName; this.SortDirection; this.SortExpression; this.PageID; }; function ProductInquiry(currentPageNumber, sortExpression, sortDirection) { var url = "/Products/ProductInquiry"; var productInquiryRequest = new ProductInquiryRequest(); productInquiryRequest.ProductID = $(ProductInquiry_ProductID).val(); productInquiryRequest.ProductName = $(ProductInquiry_ProductName).val(); productInquiryRequest.CurrentPageNumber = currentPageNumber; productInquiryRequest.SortDirection = sortDirection; productInquiryRequest.SortExpression = sortExpression; productInquiryRequest.PageSize = 10; productInquiryRequest.PageID = $(ProductInquiry_PageID).val(); $.post(url, productInquiryRequest, function (data, textStatus) { ProductInquiryComplete(data); }); }; function ProductInquiryComplete(result) { if (result.ReturnStatus == true) { $(ProductInquiry_ProductResults).html(""); $(ProductInquiry_ProductResults).html(result.ProductInquiryView); $(ProductInquiry_MessageBox).html(""); } else { $(ProductInquiry_MessageBox).html(result.MessageBoxView); } } function ProductInquiryInitializeGrid() { ProductInquiry(1, "ProductName", "ASC"); } function ProductSelected(productID) { GetProductInformation(productID); }</script>Conclusion
ASP.NET MVC is an ever-growing framework for building scalable, standards-based web applications. Due to its separation-of-concerns architecture, MVC comes with a learning curve which requires a different way of thinking about developing a web application with some trial and error and some discovery. It is a departure from the way we all have been developing web applications with ASP.NET Web Forms (the COBOL of web development) and the Web Form post-back model. Moving forward, the MVC developer will need to pay close attention to other emerging frameworks and Open-Source libraries that complement and enhance MVC development. This article focused on the Open-Source JavaScript libraries Knockout and jQuery with JSON for exchanging data between the View and the Controller. Other emerging developer tools and frameworks, particularly Backbone and JavaScriptMVC, should also be considered. For comparison purposes, perhaps a follow-up article to this sample Northwind application will incorporate Backbone and/or JavaScriptMVC.
License
- MVC Techniques with jQuery, JSON, Knockout, and C#
- Learning JQuery: Better Interaction Design and Web Development with Simple Javascript Techniques
- Test-Driven C# Improve the Design and Flexibility of Your Project with Extreme Programming Techniques
- Test-Driven C# Improve the Design and Flexibility of Your Project with Extreme Programming Techniques
- Using jQuery Mobile with MVC and Netduino for Home Automation
- Twitter style paging with ASP.NET MVC and jQuery
- jquery knockout
- Upload files in ASP.NET MVC with JavaScript and C#
- Character Modeling with Maya and ZBrush: Professional polygonal modeling techniques
- Cross Domain JSONP ( Json with padding ) with Jquery and Servlet or JAX-WS
- ASP.NET MVC – Create easy REST API with JSON and XML(转)
- Spring MVC with jQuery Demo
- IE parseerror with JSON&jQuery
- Atlas MVC Jquery Json Xml
- spring mvc json ajax jquery
- C#与Jquery Json
- Working with JSON in C#
- MVC ,C# datatable转Json
- Hibernate入门BLOG [三、session的常用方法和hibernate对象的3种状态]
- VSTS-TF54000错误解决
- 支持向量机多分类libSVM
- qml的focus问题
- QTimer类参考
- MVC Techniques with jQuery, JSON, Knockout, and C#
- mollac使用小例,随机输出字符串
- ArcGIS API for Silverlight开发入门(3):Widgets
- J2EE全面简介
- Android 修改HOSTS解决办法
- linux unzip命令参数及用法详解--linux解压zip文件命令
- 导入EXCEL2007报错"外部表不是预期的格式错误"的解决方法
- 设计模式-静态代理模式
- ArcGIS API for Silverlight开发入门(4):用户与地理信息之间的桥梁--GraphicsLayer