iPhone开发之UIActionSheet
来源:互联网 发布:安卓基于linux还是unix 编辑:程序博客网 时间:2024/06/03 14:51
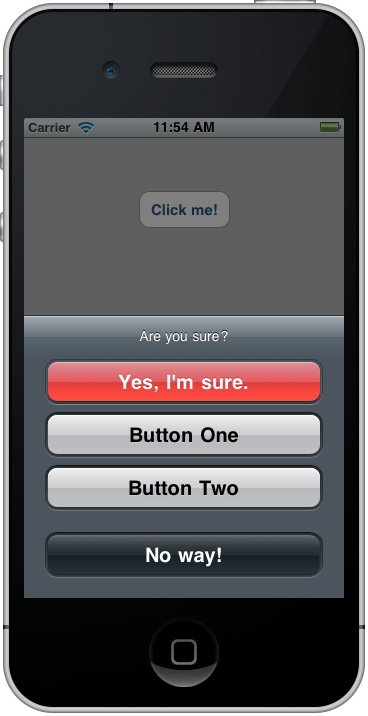
UIActionSheet是iOS开发中实现警告框的重要的类,在很多情况下都要用到,先来一睹其芳容:
实现步骤如下:
一、为了让控制器类充当操作表的委托,控制器类需要遵从UIActionSheetDelegate协议。
- @interface UIActionSheetDemoViewController : UIViewController <UIActionSheetDelegate>{
- }
二、生成UIActionSheet并显示。
- UIActionSheet *actionSheet = [[UIActionSheet alloc] initWithTitle:@"Are you sure?"
- delegate:self
- cancelButtonTitle:@"No way!"
- destructiveButtonTitle:@"Yes, I'm sure."
- otherButtonTitles:@"Button One", @"Button Two", nil];
- [actionSheet showInView:self.view];
- [actionSheet release];
三、点击按钮后的事件。
- - (void)actionSheet:(UIActionSheet *)actionSheet clickedButtonAtIndex:(NSInteger)buttonIndex {
- NSLog(@"%i", buttonIndex);
- if (buttonIndex == actionSheet.cancelButtonIndex) {
- return;
- }
- switch (buttonIndex) {
- case 0: {
- NSLog(@"Item 1 Selected");
- break;
- }
- case 1: {
- NSLog(@"Item 2 Selected");
- break;
- }
- case 2: {
- NSLog(@"Item 3 Selected");
- break;
- }
- }
- }
代码样例请下载:http://download.csdn.net/detail/flyter/4274695
下面说说如何动态地添加UIActionSheet按钮。
一、UIActionSheet的通常实现方法:
- - (void)testActionSheetStatic {
- UIActionSheet *sheet = [[UIActionSheet alloc] initWithTitle:@"Static UIActionSheet"
- delegate:self
- cancelButtonTitle:@"Cancel"
- destructiveButtonTitle:nil
- otherButtonTitles:@"Item A", @"Item B", @"Item C", nil];
- [sheet showFromRect:view.bounds inView:view animated:YES];
- [sheet release];
- }

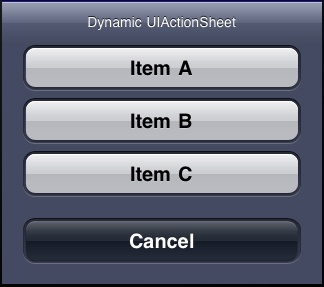
二、 如果事先知道各个按钮并且再也不会改变的情况下,这样的实现是OK的。但如果我要在运行时改变应该怎么办呢?动态添加按钮看起来应该也很简单,不要init函数中指定而在之后添加可以了,如下代码就展示了这点。
- - (void)testActionSheetDynamic {
- // 创建时仅指定取消按钮
- UIActionSheet *sheet = [[UIActionSheet alloc] initWithTitle:@"Dynamic UIActionSheet"
- delegate:self
- cancelButtonTitle:@"Cancel"
- destructiveButtonTitle:nil
- otherButtonTitles:nil];
- // 逐个添加按钮(比如可以是数组循环)
- [sheet addButtonWithTitle:@"Item A"];
- [sheet addButtonWithTitle:@"Item B"];
- [sheet addButtonWithTitle:@"Item C"];
- [sheet showFromRect:view.bounds inView:view animated:YES];
- [sheet release];
- }

运行下就发现问题很明显——取消按钮是在视图的顶部,而标准做法是显示在底部。怎么解决呢?如果在init函数中添加取消按钮就无法解决了。最后找到了一种将取消按钮也动态添加。
- - (void)testActionSheetDynamic {
- // 创建时不指定按钮
- UIActionSheet *sheet = [[UIActionSheet alloc] initWithTitle:@"Dynamic UIActionSheet"
- delegate:self
- cancelButtonTitle:nil
- destructiveButtonTitle:nil
- otherButtonTitles:nil];
- // 逐个添加按钮(比如可以是数组循环)
- [sheet addButtonWithTitle:@"Item A"];
- [sheet addButtonWithTitle:@"Item B"];
- [sheet addButtonWithTitle:@"Item C"];
- // 同时添加一个取消按钮
- [sheet addButtonWithTitle:@"Cancel"];
- // 将取消按钮的index设置成我们刚添加的那个按钮,这样在delegate中就可以知道是那个按钮
- sheet.cancelButtonIndex = sheet.numberOfButtons-1;
- [sheet showFromRect:view.bounds inView:view animated:YES];
- [sheet release];
- }
这样取消按钮就显示在底部并且行为也符合预期了。
对我来说现在剩下的最大一个疑问就是destructive按钮到底是什么(Apple文档也没有清晰地说明这点)?一些实验结果也表明它实际上和 取消按钮并无区别,只不过它有一个红色背景而不是黑色的。所有如果在上例中改变destructiveButtonIndex而不是 cancelButtonIndex,就可以看到标有“取消”的按钮有红色背景了。
三、出于完整性的考虑,和上述代码相匹配的delegate代码如下:
- - (void)actionSheet:(UIActionSheet *)actionSheet clickedButtonAtIndex:(NSInteger)buttonIndex
- {
- if (buttonIndex == actionSheet.cancelButtonIndex) {
- return;
- }
- switch (buttonIndex)
- {
- case 0: {
- NSLog(@"Item A Selected");
- break;
- }
- case 1: {
- NSLog(@"Item B Selected");
- break;
- }
- case 2: {
- NSLog(@"Item C Selected");
- break;
- }
- }
- }
最后说说如何自定义一个UIActionSheet类。
一、自定义CustomActionSheet类。
CustomActionSheet类继承UIActionSheet,具体的实现如下所示:
(1)CustomActionSheet.h头文件:
- #import <UIKit/UIKit.h>
- @interface CustomActionSheet : UIActionSheet {
- UIToolbar* toolBar;
- UIView* view;
- }
- @property(nonatomic,retain)UIView* view;
- @property(nonatomic,retain)UIToolbar* toolBar;
- -(id)initWithHeight:(float)height WithSheetTitle:(NSString*)title;
- @end
(2)CustomActionSheet.m实现文件:
- #import "CustomActionSheet.h"
- @implementation CustomActionSheet
- @synthesize view;
- @synthesize toolBar;
- -(id)initWithHeight:(float)height WithSheetTitle:(NSString*)title{
- self = [super init];
- if (self) {
- int theight = height - 40;
- int btnnum = theight/50;
- for(int i=0; i<btnnum; i++){
- [self addButtonWithTitle:@" "];
- }
- toolBar = [[UIToolbar alloc] initWithFrame:CGRectMake(0, 0, 320, 44)];
- toolBar.barStyle = UIBarStyleBlackOpaque;
- UIBarButtonItem *titleButton = [[UIBarButtonItem alloc] initWithTitle:title
- style:UIBarButtonItemStylePlain
- target:nil
- action:nil];
- UIBarButtonItem *rightButton = [[UIBarButtonItem alloc] initWithTitle:@"Done"
- style:UIBarButtonItemStyleDone
- target:self
- action:@selector(done)];
- UIBarButtonItem *leftButton = [[UIBarButtonItem alloc] initWithTitle:@"Cancel"
- style:UIBarButtonItemStyleBordered
- target:self
- action:@selector(docancel)];
- UIBarButtonItem *fixedButton =
- [[UIBarButtonItem alloc] initWithBarButtonSystemItem:UIBarButtonSystemItemFlexibleSpace
- target:nil
- action:nil];
- NSArray *array =
- [[NSArray alloc] initWithObjects:leftButton,fixedButton,titleButton,fixedButton,rightButton,nil];
- [toolBar setItems: array];
- [titleButton release];
- [leftButton release];
- [rightButton release];
- [fixedButton release];
- [array release];
- [self addSubview:toolBar];
- view = [[UIView alloc] initWithFrame:CGRectMake(0, 44, 320, height-44)];
- view.backgroundColor = [UIColor groupTableViewBackgroundColor];
- [self addSubview:view];
- }
- return self;
- }
- -(void)done{
- [self dismissWithClickedButtonIndex:0 animated:YES];
- }
- -(void)docancel{
- [self dismissWithClickedButtonIndex:0 animated:YES];
- }
- -(void)dealloc{
- [view release];
- [super dealloc];
- }
- @end
二、利用自定义的CustomActionSheet类显示提示框。
- -(IBAction)doClick:(id)sender{
- CustomActionSheet* sheet = [[CustomActionSheet alloc] initWithHeight:284.0f
- WithSheetTitle:@"自定义ActionSheet"];
- UILabel* label = [[UILabel alloc] initWithFrame:CGRectMake(0,50, 320, 50)];
- label.text = @"这里是要自定义放的控制";
- label.backgroundColor = [UIColor clearColor];
- label.textAlignment = UITextAlignmentCenter;
- [sheet.view addSubview:label];
- [sheet showInView:self.view];
- [sheet release];
- }
演示:

- iPhone开发之UIActionSheet
- iPhone开发之UIActionSheet
- iPhone开发之自定义UIActionSheet
- iPhone开发之UIActionSheet的使用
- iPhone开发之动态添加UIActionSheet按钮
- iPhone开发之动态添加UIActionSheet按钮
- Iphone之UIAlertView和UIActionSheet
- iPhone开发--UIActionSheet的按钮不灵敏
- iPhone开发--UIActionSheet的按钮不灵敏
- iPhone开发--UIActionSheet的按钮不灵敏
- IOS开发之自定义UIActionSheet
- IOS开发之自定义UIActionSheet
- IPHONE应用开发 - 开发常用控件:UIActionSheet和UIAlertView学习
- IPHONE应用开发 - 开发常用控件:UIActionSheet和UIAlertView学习
- [iPhone开发之控件的使用]UIActionSheet的各种属性、方法及代理的使用
- [iPhone开发之控件的使用]UIActionSheet的各种属性、方法及代理的使用
- iphone开发 UIActionSheet(操作表) 和UIAlertView(警告)的用法
- iPhone开发--UIActionSheet设置delegate为self时出现警告
- 谈谈对Java中Unicode、编码的理解
- 多态 继承 虚函数总结
- 表达式部分的笔记
- break语句
- C# winform对话框用法大全收藏
- iPhone开发之UIActionSheet
- Happy 2004&&http://acm.hdu.edu.cn/showproblem.php?pid=1452
- Prism应用开发(七)——导航
- “Oracle.DataAccess.Client.OracleClientFactory”未实现 IServiceProvider 接口
- 关于 RMAN 备份 数据块 一致性的讨论
- window service 学习之路(一)【学习笔记】
- 关于@property及@synthesize以两Demo简单说明 对于新手
- android虚拟设备怎么老是提示 “谷歌拼音输入法”已停止运行
- 学习UKK后缀树构造算法