仿新浪微博的ListView下拉更新功能
来源:互联网 发布:淘宝印度药品代购 编辑:程序博客网 时间:2024/05/17 04:48
由于最近做的项目中也用到了这个功能,今天刚好实现了下,就趁现在有时间写篇博客分享下。在做的时候也参考了下别人的代码,毕竟站在巨人的肩膀上才会是自己更加强大。哈哈!先看看新浪的下拉更新是什么样的吧!
接下来是main.xml布局:
最后在MainActivity中添加内容:
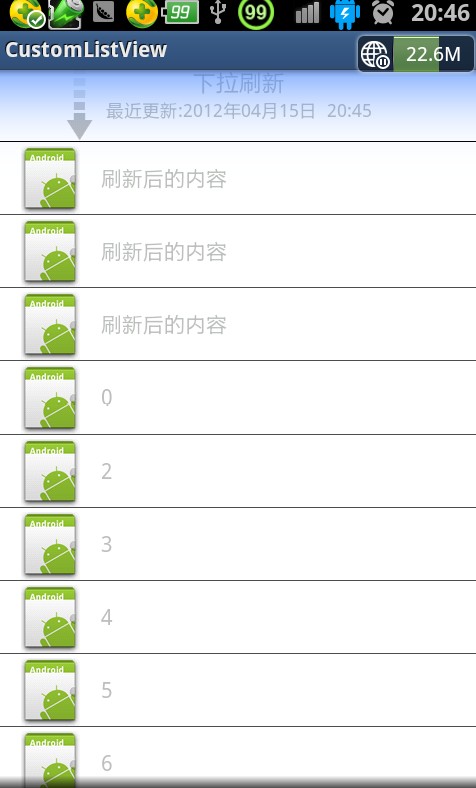
运行效果:

OK,今天我们要实现的就是上面的下拉刷新功能。
首先实现下拉刷新的布局文件 layout/head.xml
<?xml version="1.0" encoding="utf-8"?><!-- ListView的头部 --><LinearLayout xmlns:android="http://schemas.android.com/apk/res/android" android:layout_width="fill_parent" android:layout_height="wrap_content" android:background="#ffffff" > <!-- 内容 --> <RelativeLayout android:layout_width="fill_parent" android:layout_height="wrap_content" android:id="@+id/head_contentLayout" android:paddingLeft="30dp" > <!-- 箭头图像、进度条 --> <FrameLayout android:layout_width="wrap_content" android:layout_height="wrap_content" android:layout_alignParentLeft="true" android:layout_centerVertical="true" > <!-- 箭头 --> <ImageView android:layout_width="wrap_content" android:layout_height="wrap_content" android:layout_gravity="center" android:src="@drawable/arrow_down" android:id="@+id/head_arrowImageView" /> <!-- 进度条 --> <ProgressBar android:layout_width="wrap_content" android:layout_height="wrap_content" style="?android:attr/progressBarStyleSmall" android:layout_gravity="center" android:id="@+id/head_progressBar" android:visibility="gone" /> </FrameLayout> <!-- 提示、最近更新 --> <LinearLayout android:layout_width="wrap_content" android:layout_height="wrap_content" android:layout_centerHorizontal="true" android:orientation="vertical" android:gravity="center_horizontal" > <!-- 提示 --> <TextView android:layout_width="wrap_content" android:layout_height="wrap_content" android:text="下拉刷新" android:textSize="15dp" android:id="@+id/head_tipsTextView" /> <!-- 最近更新 --> <TextView android:layout_width="wrap_content" android:layout_height="wrap_content" android:id="@+id/head_lastUpdatedTextView" android:text="上次更新" android:textSize="12dp" /> </LinearLayout> </RelativeLayout> </LinearLayout>
然后设置item的布局模板item.xml:
<?xml version="1.0" encoding="utf-8"?><LinearLayout xmlns:android="http://schemas.android.com/apk/res/android" android:layout_width="match_parent" android:layout_height="wrap_content" android:gravity="center_vertical" android:background="#ffffff" android:orientation="horizontal" > <ImageView android:id="@+id/imageView_item" android:layout_width="wrap_content" android:layout_height="wrap_content" android:layout_marginLeft="10dp" android:src="@drawable/ic_launcher" /> <TextView android:id="@+id/textView_item" android:layout_width="wrap_content" android:layout_height="wrap_content" android:layout_marginLeft="10dp" android:text="TextView" /></LinearLayout>
接下来是main.xml布局:
<?xml version="1.0" encoding="utf-8"?><LinearLayout xmlns:android="http://schemas.android.com/apk/res/android" android:layout_width="fill_parent" android:layout_height="fill_parent" android:orientation="vertical" > <cn.com.karl.list.MyListView android:layout_width="fill_parent" android:layout_height="fill_parent" android:id="@+id/listView" /> </LinearLayout>
这里的MyListView是我们自定义的ListView,因为顶部的下拉刷新系统的ListView不能够实现,所以我们需要自定义ListView。 布局文件搞定,下面看下自定义的MyListView:
package cn.com.karl.list;import java.text.SimpleDateFormat;import java.util.Date;import android.content.Context;import android.util.AttributeSet;import android.util.Log;import android.view.LayoutInflater;import android.view.MotionEvent;import android.view.View;import android.view.ViewGroup;import android.view.animation.LinearInterpolator;import android.view.animation.RotateAnimation;import android.widget.AbsListView;import android.widget.BaseAdapter;import android.widget.ImageView;import android.widget.LinearLayout;import android.widget.ListView;import android.widget.AbsListView.OnScrollListener;import android.widget.ProgressBar;import android.widget.TextView;public class MyListView extends ListView implements OnScrollListener {private static final String TAG = "listview";private final static int RELEASE_To_REFRESH = 0;private final static int PULL_To_REFRESH = 1;private final static int REFRESHING = 2;private final static int DONE = 3;private final static int LOADING = 4;// 实际的padding的距离与界面上偏移距离的比例private final static int RATIO = 3;private LayoutInflater inflater;private LinearLayout headView;private TextView tipsTextview;private TextView lastUpdatedTextView;private ImageView arrowImageView;private ProgressBar progressBar;private RotateAnimation animation;private RotateAnimation reverseAnimation;// 用于保证startY的值在一个完整的touch事件中只被记录一次private boolean isRecored;private int headContentWidth;private int headContentHeight;private int startY;private int firstItemIndex;private int state;private boolean isBack;private OnRefreshListener refreshListener;private boolean isRefreshable;public MyListView(Context context) {super(context);init(context);}public MyListView(Context context, AttributeSet attrs) {super(context, attrs);init(context);}private void init(Context context) {//setCacheColorHint(context.getResources().getColor(R.color.transparent));inflater = LayoutInflater.from(context);headView = (LinearLayout) inflater.inflate(R.layout.head, null);arrowImageView = (ImageView) headView.findViewById(R.id.head_arrowImageView);arrowImageView.setMinimumWidth(70);arrowImageView.setMinimumHeight(50);progressBar = (ProgressBar) headView.findViewById(R.id.head_progressBar);tipsTextview = (TextView) headView.findViewById(R.id.head_tipsTextView);lastUpdatedTextView = (TextView) headView.findViewById(R.id.head_lastUpdatedTextView);measureView(headView);headContentHeight = headView.getMeasuredHeight();headContentWidth = headView.getMeasuredWidth();headView.setPadding(0, -1 * headContentHeight, 0, 0);headView.invalidate();Log.v("size", "width:" + headContentWidth + " height:"+ headContentHeight);addHeaderView(headView, null, false);setOnScrollListener(this);animation = new RotateAnimation(0, -180,RotateAnimation.RELATIVE_TO_SELF, 0.5f,RotateAnimation.RELATIVE_TO_SELF, 0.5f);animation.setInterpolator(new LinearInterpolator());animation.setDuration(250);animation.setFillAfter(true);reverseAnimation = new RotateAnimation(-180, 0,RotateAnimation.RELATIVE_TO_SELF, 0.5f,RotateAnimation.RELATIVE_TO_SELF, 0.5f);reverseAnimation.setInterpolator(new LinearInterpolator());reverseAnimation.setDuration(200);reverseAnimation.setFillAfter(true);state = DONE;isRefreshable = false;}public void onScroll(AbsListView arg0, int firstVisiableItem, int arg2,int arg3) {firstItemIndex = firstVisiableItem;}public void onScrollStateChanged(AbsListView arg0, int arg1) {}public boolean onTouchEvent(MotionEvent event) {if (isRefreshable) {switch (event.getAction()) {case MotionEvent.ACTION_DOWN:if (firstItemIndex == 0 && !isRecored) {isRecored = true;startY = (int) event.getY();Log.v(TAG, "在down时候记录当前位置‘");}break;case MotionEvent.ACTION_UP:if (state != REFRESHING && state != LOADING) {if (state == DONE) {// 什么都不做}if (state == PULL_To_REFRESH) {state = DONE;changeHeaderViewByState();Log.v(TAG, "由下拉刷新状态,到done状态");}if (state == RELEASE_To_REFRESH) {state = REFRESHING;changeHeaderViewByState();onRefresh();Log.v(TAG, "由松开刷新状态,到done状态");}}isRecored = false;isBack = false;break;case MotionEvent.ACTION_MOVE:int tempY = (int) event.getY();if (!isRecored && firstItemIndex == 0) {Log.v(TAG, "在move时候记录下位置");isRecored = true;startY = tempY;}if (state != REFRESHING && isRecored && state != LOADING) {// 保证在设置padding的过程中,当前的位置一直是在head,否则如果当列表超出屏幕的话,当在上推的时候,列表会同时进行滚动// 可以松手去刷新了if (state == RELEASE_To_REFRESH) {setSelection(0);// 往上推了,推到了屏幕足够掩盖head的程度,但是还没有推到全部掩盖的地步if (((tempY - startY) / RATIO < headContentHeight)&& (tempY - startY) > 0) {state = PULL_To_REFRESH;changeHeaderViewByState();Log.v(TAG, "由松开刷新状态转变到下拉刷新状态");}// 一下子推到顶了else if (tempY - startY <= 0) {state = DONE;changeHeaderViewByState();Log.v(TAG, "由松开刷新状态转变到done状态");}// 往下拉了,或者还没有上推到屏幕顶部掩盖head的地步else {// 不用进行特别的操作,只用更新paddingTop的值就行了}}// 还没有到达显示松开刷新的时候,DONE或者是PULL_To_REFRESH状态if (state == PULL_To_REFRESH) {setSelection(0);// 下拉到可以进入RELEASE_TO_REFRESH的状态if ((tempY - startY) / RATIO >= headContentHeight) {state = RELEASE_To_REFRESH;isBack = true;changeHeaderViewByState();Log.v(TAG, "由done或者下拉刷新状态转变到松开刷新");}// 上推到顶了else if (tempY - startY <= 0) {state = DONE;changeHeaderViewByState();Log.v(TAG, "由DOne或者下拉刷新状态转变到done状态");}}// done状态下if (state == DONE) {if (tempY - startY > 0) {state = PULL_To_REFRESH;changeHeaderViewByState();}}// 更新headView的sizeif (state == PULL_To_REFRESH) {headView.setPadding(0, -1 * headContentHeight+ (tempY - startY) / RATIO, 0, 0);}// 更新headView的paddingTopif (state == RELEASE_To_REFRESH) {headView.setPadding(0, (tempY - startY) / RATIO- headContentHeight, 0, 0);}}break;}}return super.onTouchEvent(event);}// 当状态改变时候,调用该方法,以更新界面private void changeHeaderViewByState() {switch (state) {case RELEASE_To_REFRESH:arrowImageView.setVisibility(View.VISIBLE);progressBar.setVisibility(View.GONE);tipsTextview.setVisibility(View.VISIBLE);lastUpdatedTextView.setVisibility(View.VISIBLE);arrowImageView.clearAnimation();arrowImageView.startAnimation(animation);tipsTextview.setText("松开刷新");Log.v(TAG, "当前状态,松开刷新");break;case PULL_To_REFRESH:progressBar.setVisibility(View.GONE);tipsTextview.setVisibility(View.VISIBLE);lastUpdatedTextView.setVisibility(View.VISIBLE);arrowImageView.clearAnimation();arrowImageView.setVisibility(View.VISIBLE);// 是由RELEASE_To_REFRESH状态转变来的if (isBack) {isBack = false;arrowImageView.clearAnimation();arrowImageView.startAnimation(reverseAnimation);tipsTextview.setText("下拉刷新");} else {tipsTextview.setText("下拉刷新");}Log.v(TAG, "当前状态,下拉刷新");break;case REFRESHING:headView.setPadding(0, 0, 0, 0);progressBar.setVisibility(View.VISIBLE);arrowImageView.clearAnimation();arrowImageView.setVisibility(View.GONE);tipsTextview.setText("正在刷新...");lastUpdatedTextView.setVisibility(View.VISIBLE);Log.v(TAG, "当前状态,正在刷新...");break;case DONE:headView.setPadding(0, -1 * headContentHeight, 0, 0);progressBar.setVisibility(View.GONE);arrowImageView.clearAnimation();arrowImageView.setImageResource(R.drawable.arrow_down);tipsTextview.setText("下拉刷新");lastUpdatedTextView.setVisibility(View.VISIBLE);Log.v(TAG, "当前状态,done");break;}}public void setonRefreshListener(OnRefreshListener refreshListener) {this.refreshListener = refreshListener;isRefreshable = true;}public interface OnRefreshListener {public void onRefresh();}public void onRefreshComplete() {state = DONE;SimpleDateFormat format=new SimpleDateFormat("yyyy年MM月dd日 HH:mm");String date=format.format(new Date());lastUpdatedTextView.setText("最近更新:" + date);changeHeaderViewByState();}private void onRefresh() {if (refreshListener != null) {refreshListener.onRefresh();}}// 此方法直接照搬自网络上的一个下拉刷新的demo,此处是“估计”headView的width以及heightprivate void measureView(View child) { ViewGroup.LayoutParams p = child.getLayoutParams(); if (p == null) { p = new ViewGroup.LayoutParams( ViewGroup.LayoutParams.FILL_PARENT, ViewGroup.LayoutParams.WRAP_CONTENT); } int childWidthSpec = ViewGroup.getChildMeasureSpec(0, 0 + 0, p.width); int lpHeight = p.height; int childHeightSpec; if (lpHeight > 0) { childHeightSpec = MeasureSpec.makeMeasureSpec(lpHeight, MeasureSpec.EXACTLY); } else { childHeightSpec = MeasureSpec.makeMeasureSpec(0, MeasureSpec.UNSPECIFIED); } child.measure(childWidthSpec, childHeightSpec);}public void setAdapter(BaseAdapter adapter) {SimpleDateFormat format=new SimpleDateFormat("yyyy年MM月dd日 HH:mm");String date=format.format(new Date());lastUpdatedTextView.setText("最近更新:" + date);super.setAdapter(adapter);}}最后在MainActivity中添加内容:
public class MainActivity extends Activity {private LinkedList<String> data;private BaseAdapter adapter;public void onCreate(Bundle savedInstanceState) {super.onCreate(savedInstanceState);setContentView(R.layout.main);data = new LinkedList<String>(); for(int i=0;i<10;i++){ data.add(String.valueOf(i)); }final MyListView listView = (MyListView) findViewById(R.id.listView);adapter = new BaseAdapter() {public View getView(int position, View convertView, ViewGroup parent) { convertView=LayoutInflater.from(getApplicationContext()).inflate(R.layout.item, null);TextView textView = (TextView) convertView.findViewById(R.id.textView_item);textView.setText(data.get(position));return convertView;}public long getItemId(int position) {return position;}public Object getItem(int position) {return data.get(position);}public int getCount() {return data.size();}};listView.setAdapter(adapter);listView.setonRefreshListener(new OnRefreshListener() {public void onRefresh() {new AsyncTask<Void, Void, Void>() {protected Void doInBackground(Void... params) {try {Thread.sleep(1000);} catch (Exception e) {e.printStackTrace();}data.addFirst("刷新后的内容");return null;}@Overrideprotected void onPostExecute(Void result) {adapter.notifyDataSetChanged();listView.onRefreshComplete();}}.execute(null);}});}}运行效果:

源码下载地址:仿新浪微博的ListView下拉更新功能
来源:http://blog.csdn.net/wangkuifeng0118/article/details/7463594- 仿新浪微博的ListView下拉更新功能
- 仿新浪微博的ListView下拉更新功能
- 仿新浪微博的ListView下拉更新功能
- 仿新浪微博的ListView下拉更新功能
- 仿新浪微博的ListView下拉更新功能
- 仿新浪微博的ListView下拉更新功能
- 仿新浪微博的ListView下拉更新功能
- 仿新浪微博的ListView下拉更新功能
- 仿新浪微博的ListView下拉更新功能
- 仿新浪微博的ListView下拉更新功能
- 仿iphone的listview下拉更新
- Android仿新浪微博ListView效果
- android-pulltorefresh-类似新浪微博下拉更新的实现
- 新浪微博下拉刷新功能的实现
- Android自定义控制(五)仿新浪微博的下拉刷新
- 仿新浪微博IOS客户端(v5.2.8)——下拉菜单栏的实现
- Android自定义控制(五)仿新浪微博的下拉刷新
- iOS: 仿新浪微博 OC (持续更新ing)
- HDOJ 2276 - Kiki & Little Kiki 2
- flash与php 交互
- 【hadoop】streaming 文件分发与打包
- PS批量处理:转格式、压缩图片的方法
- MySQL清除查询缓存
- 仿新浪微博的ListView下拉更新功能
- What is a Digital Signature? (数字签名是什么?)
- 编译原理及实践(Compiler Construction Principles and Practice)——简单的递归下降程序计算器
- hdu2119
- for循环 消耗时间计算
- 手动部署 Web Pages 应用程序
- Mother's Milk
- Mastering Debugging in Visual Studio 2010 - A Beginner's Guide Step by Step
- 土豆开放API客户端SDK(Java版)-非官方