android 腾讯微博分享功能实现及自定义webview认证
来源:互联网 发布:比价网源码 编辑:程序博客网 时间:2024/05/16 15:04
最近腾讯微博官方网站API有的更新,不过也好久了.网上想找些案例,可是都没有介绍,好是郁闷,不过现在解决了,如果有类似问题的同学们,可以参考下,
这次的比较简单,对我们开发应用的程序员比较不错.下面我简单介绍下微博API的应用。
官方网址
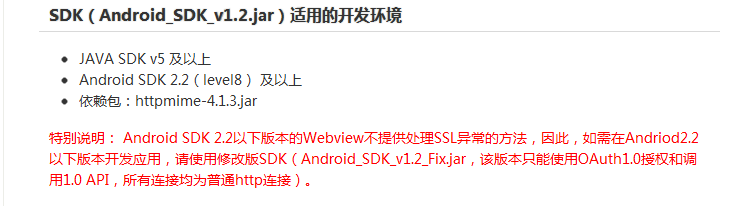
为了顾全所有版本,我们就就用括号里面的jar包.
这里我就不详细介绍了,不懂的可以参考官方文档,很详细的.
下面这个是发表一条微博的接口参数:
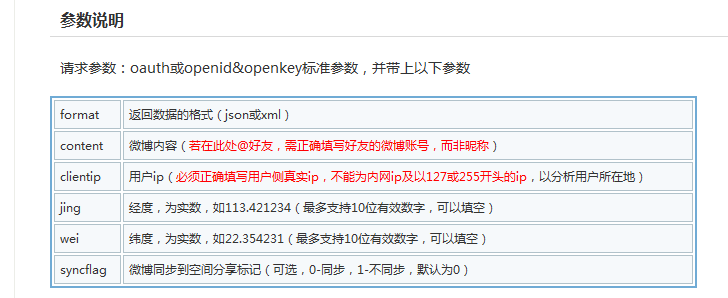
首先我们就要获取Oauth或者是openid&openkey,但是我研究了好久没有弄出来,官方文档说,在请求时候callback不为空,在授权后redirect_url中会包含这两个值,但我看了官方给出例子的源码,他们根本就没有运用openid和openkey,他们用的是Oauth对象.所以我也跟着用Oauth对象请求.
不明白的可以参考源码.(其实官方已经给出很好的例子.)
不想看官方的我在这里简单演示一下:
我们首先创建OAuthV1对象.很简单,就是将oauthConsumeKey,oauthConsumerSecret设置进去.
@Overridepublic void onCreate(Bundle savedInstanceState) {super.onCreate(savedInstanceState);setContentView(R.layout.main);button = (Button) findViewById(R.id.button);editText = (EditText) findViewById(R.id.edit);but_send = (Button) findViewById(R.id.but_send);but_logout = (Button) findViewById(R.id.but_logout);but_custom = (Button) findViewById(R.id.but_custom);button.setOnClickListener(this);but_logout.setOnClickListener(this);but_send.setOnClickListener(this);but_custom.setOnClickListener(this);preferences = getSharedPreferences(file, 0);token = preferences.getString(TOKEN_KEY, "");token_secret = preferences.getString(TOKEN_SECRET_KEY, "");oAuth = new OAuthV1(oauthCallback);oAuth.setOauthConsumerKey(oauthConsumeKey);oAuth.setOauthConsumerSecret(oauthConsumerSecret);if (token != null && !token.equals("") && !token_secret.equals("")&& token_secret != null) {button.setVisibility(View.GONE);but_custom.setVisibility(View.GONE);// 将认证后的值set进去就可以调用了.oAuth.setOauthToken(token);oAuth.setOauthTokenSecret(token_secret);System.out.println("token=" + token);System.out.println("token_secret=" + token_secret);}}// 向腾讯微博开放平台请求获得未授权的Request_Tokentry {oAuth = OAuthV1Client.requestToken(oAuth);} catch (Exception e) {e.printStackTrace();}// 创建Intent,使用WebView让用户授权intent = new Intent(MainActivity.this,OAuthV1AuthorizeWebView.class);intent.putExtra("oauth", oAuth);startActivityForResult(intent, 1);这一点也很好理解,就是将获取到的未授权的oauth传到OAuthV1AuthorizeWebView.java中.这里我不过多解释,一会我们自定义webview在解释.最后我们要重写onActivityResult来接收OAuth对象.
protected void onActivityResult(int requestCode, int resultCode, Intent data) {if (requestCode == 1) {if (resultCode == OAuthV1AuthorizeWebView.RESULT_CODE) {button.setVisibility(View.GONE);but_custom.setVisibility(View.GONE);// 从返回的Intent中获取验证码oAuth = (OAuthV1) data.getExtras().getSerializable("oauth");/* * 注意:此时oauth中的Oauth_token和Oauth_token_secret将发生变化,用新获取到的 * 已授权的access_token和access_token_secret替换之前存储的未授权的request_token * 和request_token_secret. */// 在这里要保存access_token,access_token_secrettry {oAuth = OAuthV1Client.accessToken(oAuth);token = oAuth.getOauthToken();token_secret = oAuth.getOauthTokenSecret();editor = preferences.edit();editor.putString(TOKEN_KEY, token);editor.putString(TOKEN_SECRET_KEY, token_secret);editor.commit();} catch (Exception e) {e.printStackTrace();}}}}我写的有点小乱,不过相信你也看的明白.我们将返回的Oauth执行:oAuth = OAuthV1Client.accessToken(oAuth);这个时候我们需要保存token = oAuth.getOauthToken();
token_secret = oAuth.getOauthTokenSecret(); 这样以后我们就不用每次认证,只需要将这两个值set进去就可以直接调用相应接口,简单吧。
效果图:


不过这样有几点小不爽,打开认证页面不够友好,还有认证页面不能够很好控制,比如我想让他融入到我的项目里面,等等,所以我们需要对Oauth认证页面自定义,因此我们就用到了自定义webview.
我简单说明下自定义webview认证.其实简单,把官方代码copy下来,稍做变动就ok了.
package com.jj.tencent;import android.app.Activity;import android.content.Intent;import android.graphics.Bitmap;import android.os.Bundle;import android.util.Log;import android.view.View;import android.view.Window;import android.view.ViewGroup.LayoutParams;import android.webkit.WebSettings;import android.webkit.WebView;import android.webkit.WebViewClient;import android.widget.LinearLayout;import com.tencent.weibo.constants.OAuthConstants;import com.tencent.weibo.oauthv1.OAuthV1;/*** * 腾讯微webview 认证 * * @author zhangjia * */public class MyTencentWebViewActivity extends Activity {public final static int RESULT_CODE = 1;private static final String TAG = "OAuthV1AuthorizeWebView";private OAuthV1 oAuth;private LinearLayout linearLayout;// 进度条private WebView mWebView;/*** * 初始化 webview */public void InitWebView() {linearLayout = (LinearLayout) findViewById(R.id.ll_webview);mWebView = (WebView) findViewById(R.id.mywebview);mWebView.setVerticalScrollBarEnabled(false);mWebView.setHorizontalScrollBarEnabled(false);mWebView.getSettings().setJavaScriptEnabled(true);mWebView.getSettings().setSupportZoom(true);mWebView.requestFocus();Intent intent = this.getIntent();oAuth = (OAuthV1) intent.getExtras().getSerializable("oauth");String urlStr = OAuthConstants.OAUTH_V1_AUTHORIZE_URL + "?oauth_token="+ oAuth.getOauthToken();mWebView.loadUrl(urlStr);mWebView.setWebViewClient(client);}@Overridepublic void onCreate(Bundle savedInstanceState) {super.onCreate(savedInstanceState);requestWindowFeature(Window.FEATURE_NO_TITLE);setContentView(R.layout.mywebview);InitWebView();}WebViewClient client = new WebViewClient() {@Overridepublic void onPageStarted(WebView view, String url, Bitmap favicon) {Log.i(TAG, "WebView onPageStarted...");Log.i(TAG, "URL = " + url);if (url.indexOf("checkType=verifycode") != -1) {int start = url.indexOf("checkType=verifycode&v=") + 23;String verifyCode = url.substring(start, start + 6);oAuth.setOauthVerifier(verifyCode);Intent intent = new Intent();intent.putExtra("oauth", oAuth);setResult(RESULT_CODE, intent);view.destroyDrawingCache();finish();}super.onPageStarted(view, url, favicon);}@Overridepublic void onPageFinished(WebView view, String url) {super.onPageFinished(view, url);linearLayout.setVisibility(View.GONE);}};}实现效果:


这是演示效果,也许你看不出来有什么不同,下面请看这种情况:


(这是我正在开发的项目.)如果你单纯引用他给的webview是无法实现这种效果吧。就介绍这么多了,至于一些接口调用,发送,分享,获取好友等等只要参考API就好了.
如有不足之处,请您吉言指出,大家一起学习.感激直至. 如果不想敲了,请留下邮箱,我将尽快给你发过去.
由于比较忙,现将源码上传网上.如有问题,请留言.
Thanks for you ! ! !
源码下载
- android 腾讯微博分享功能实现及自定义webview认证
- Android实现自定义分享功能
- HttpClient4模拟登录腾讯微博及分享功能
- HttpClient4模拟登录腾讯微博及分享功能
- 基于Android SDK腾讯微博授权认证实现
- 基于Android SDK腾讯微博授权认证实现
- android 新浪微博Oauth2.0认证以及自定义webview认证
- 使用WebView实现新浪微博Oauth2.0认证(android)
- 使用WebView实现新浪微博Oauth2.0认证(android)
- OAuth认证介绍及腾讯微博OAuth认证示例
- webview加载腾讯视频功能的实现
- Android 实现微博分享功能
- android 新浪微博分享功能实现
- android 新浪微博实现分享功能
- android 调用系统分享功能以及实现自定义分享
- android webview自定义标签!(实现打电话的功能);
- JS 实现 腾讯、新浪、网易、搜狐微博,开心网,人人网转帖分享功能
- JS 实现 腾讯、新浪、网易、搜狐微博,开心网,人人网转帖分享功能
- Measurement Studio简介
- MongoDB笔记
- 给大家介绍一个方便,好用的网络收藏夹
- Android程序打开和关闭输入法,this.getCurrentFocus()有时为空,加try catch
- DirectFB Console Bug调查
- android 腾讯微博分享功能实现及自定义webview认证
- USACO Party Lamps
- sharepoint2010隐藏site workflows
- TabActivity横向布局
- Keil MDK error :L6031U
- 用JQuery解析Json
- zoj 1002 FireNet
- jQuery使用JSON的例子
- IPMI详细介绍