C#将RGB图像转换为8位灰度图像
来源:互联网 发布:特征匹配算法 labview 编辑:程序博客网 时间:2024/05/21 08:59
项目需要将RGB图像转换为8位灰度图像,之前不了解图像格式,以为只要对像素进行灰度化就能获得灰度图像,以下代码使用System.Drawing.Imaging.ColorMatrix类配合System.Drawing.Imaging.ImageAttributes类对组成一个5 x 5的线性转换,转换 ARGB 单色值,再使用GDI+获得新图像。
/// <summary>/// 将源图像灰度化,但是没有转化为8位灰度图像。/// http://www.bobpowell.net/grayscale.htm/// </summary>/// <param name="original"> 源图像。 </param>/// <returns> 灰度RGB图像。 </returns>public static Bitmap MakeGrayScale(Bitmap original){ //create a blank bitmap the same size as original Bitmap newBitmap = new Bitmap(original.Width, original.Height, PixelFormat.Format24bppRgb); //get a graphics object from the new image Graphics g = Graphics.FromImage(newBitmap); //create the grayscale ColorMatrix ColorMatrix colorMatrix = new ColorMatrix( new float[][] { new float[] { .3f, .3f, .3f, 0, 0 }, new float[] { .59f, .59f, .59f, 0, 0 }, new float[] { .11f, .11f, .11f, 0, 0 }, new float[] { 0, 0, 0, 1, 0 }, new float[] { 0, 0, 0, 0, 1 } }); /* * * * * * * * * * * * * * * * * * * * * * * * * * * * * ┌ ┐ │ 0.3 0.3 0.3 0 0 │ │ 0.59 0.59 0.59 0 0 │ │ 0.11 0.11 0.11 0 0 │ │ 0 0 0 1 0 │ │ 0 0 0 0 1 │ └ ┘ * * * * * * * * * * * * * * * * * * * * * * * * * * * * */ //create some image attributes ImageAttributes attributes = new ImageAttributes(); //set the color matrix attribute attributes.SetColorMatrix(colorMatrix); //draw the original image on the new image //using the grayscale color matrix g.DrawImage(original, new Rectangle(0, 0, original.Width, original.Height), 0, 0, original.Width, original.Height, GraphicsUnit.Pixel, attributes); //dispose the Graphics object g.Dispose(); return newBitmap;}这种方法无需手动操作图像数据,也不用考虑图像扫描宽度等因素,能非常高效、鲁棒的进行灰度化,但是,灰度化后依旧是RGB图像,PixelFormat值依旧为Format24bppRgb。只不过三个通道的值都变成了T = 0.3R + 0.59G + 0.11B。

图1. 灰度化后依旧是RGB图像,PixelFormat值
需要的8位灰度图像的PixelFormat值为Format8bppIndexed,该格式指定每像素8位,因此不方便将RGB图像直接修改成8位灰度图像,需要创建一个新的8位灰度图像。

图2. DotNet中灰度图像参数值
Format8bppIndexed为索引格式,已经创建索引。因此颜色表中有 256 种颜色。实际是伪彩颜色。可以看到灰度图像的调色板是灰度的,即Palette.Entries中每个项的RGB值都相等。因此,创建一个新的8位灰度图像是不够的,还需要修改灰度位图的索引表。
不修改索引表的话,有些操作后图像可能出现类似红外图像那样色彩斑斓的伪彩图像。如下面的实例所示:
(1)随便在桌面截取一幅任意尺寸的图像,先进行灰度化,然后用画图程序将灰度化后的RGB图像(Format24bppRgb,256灰度)直接转化为256色灰度图像。
图3.用画图程序将一幅灰度化后的RGB图像转化为256色灰度
转化后参数如下图所示,可以发现图像格式已变为Format8bppIndexed索引格式,但是图像的索引表中每项的RGB值不相同。

图4. 用画图程序转化为256色灰度后图像的参数值
(2)用转化后的图像进行直方图均衡化,可以看到出现了伪彩色。因为转化后“灰度”图像的Format8bppIndexed的索引表并非灰度,而是伪彩的。
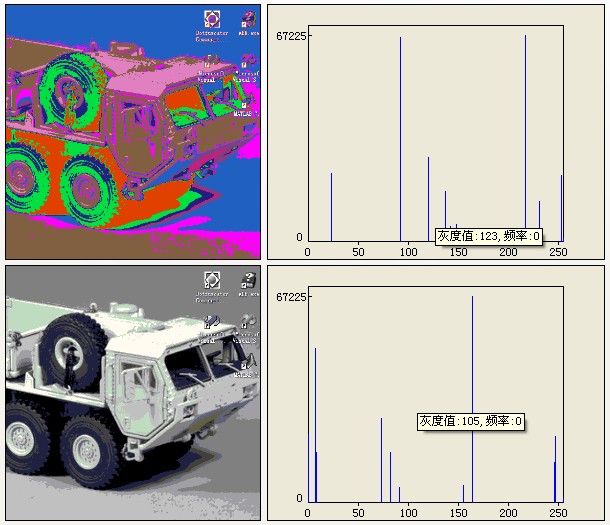
图5. 均衡化后出现伪彩色
以下算法先将RGB(以Format24bppRgb为例)图像灰度化,然后得到灰度图像的灰度数组,最后构建一个8位灰度图像。
/// <summary>/// 将源图像灰度化,并转化为8位灰度图像。/// </summary>/// <param name="original"> 源图像。 </param>/// <returns> 8位灰度图像。 </returns>public static Bitmap RgbToGrayScale(Bitmap original){ if (original != null) { // 将源图像内存区域锁定 Rectangle rect = new Rectangle(0, 0, original.Width, original.Height); BitmapData bmpData = original.LockBits(rect, ImageLockMode.ReadOnly, original.PixelFormat); // 获取图像参数 int width = bmpData.Width; int height = bmpData.Height; int stride = bmpData.Stride; // 扫描线的宽度 int offset = stride - width * 3; // 显示宽度与扫描线宽度的间隙 IntPtr ptr = bmpData.Scan0; // 获取bmpData的内存起始位置 int scanBytes = stride * height; // 用stride宽度,表示这是内存区域的大小 // 分别设置两个位置指针,指向源数组和目标数组 int posScan = 0, posDst = 0; byte[] rgbValues = new byte[scanBytes]; // 为目标数组分配内存 Marshal.Copy(ptr, rgbValues, 0, scanBytes); // 将图像数据拷贝到rgbValues中 // 分配灰度数组 byte[] grayValues = new byte[width * height]; // 不含未用空间。 // 计算灰度数组 for (int i = 0; i < height; i++) { for (int j = 0; j < width; j++) { double temp = rgbValues[posScan++] * 0.11 + rgbValues[posScan++] * 0.59 + rgbValues[posScan++] * 0.3; grayValues[posDst++] = (byte)temp; } // 跳过图像数据每行未用空间的字节,length = stride - width * bytePerPixel posScan += offset; } // 内存解锁 Marshal.Copy(rgbValues, 0, ptr, scanBytes); original.UnlockBits(bmpData); // 解锁内存区域 // 构建8位灰度位图 Bitmap retBitmap = BuiltGrayBitmap(grayValues, width, height); return retBitmap; } else { return null; }}/// <summary>/// 用灰度数组新建一个8位灰度图像。/// http://www.cnblogs.com/spadeq/archive/2009/03/17/1414428.html/// </summary>/// <param name="rawValues"> 灰度数组(length = width * height)。 </param>/// <param name="width"> 图像宽度。 </param>/// <param name="height"> 图像高度。 </param>/// <returns> 新建的8位灰度位图。 </returns>private static Bitmap BuiltGrayBitmap(byte[] rawValues, int width, int height){ // 新建一个8位灰度位图,并锁定内存区域操作 Bitmap bitmap = new Bitmap(width, height, PixelFormat.Format8bppIndexed); BitmapData bmpData = bitmap.LockBits(new Rectangle(0, 0, width, height), ImageLockMode.WriteOnly, PixelFormat.Format8bppIndexed); // 计算图像参数 int offset = bmpData.Stride - bmpData.Width; // 计算每行未用空间字节数 IntPtr ptr = bmpData.Scan0; // 获取首地址 int scanBytes = bmpData.Stride * bmpData.Height; // 图像字节数 = 扫描字节数 * 高度 byte[] grayValues = new byte[scanBytes]; // 为图像数据分配内存 // 为图像数据赋值 int posSrc = 0, posScan = 0; // rawValues和grayValues的索引 for (int i = 0; i < height; i++) { for (int j = 0; j < width; j++) { grayValues[posScan++] = rawValues[posSrc++]; } // 跳过图像数据每行未用空间的字节,length = stride - width * bytePerPixel posScan += offset; } // 内存解锁 Marshal.Copy(grayValues, 0, ptr, scanBytes); bitmap.UnlockBits(bmpData); // 解锁内存区域 // 修改生成位图的索引表,从伪彩修改为灰度 ColorPalette palette; // 获取一个Format8bppIndexed格式图像的Palette对象 using (Bitmap bmp = new Bitmap(1, 1, PixelFormat.Format8bppIndexed)) { palette = bmp.Palette; } for (int i = 0; i < 256; i++) { palette.Entries[i] = Color.FromArgb(i, i, i); } // 修改生成位图的索引表 bitmap.Palette = palette; return bitmap;}用上面算法将数字图像处理常用测试图像之一的PeppersRGB.bmp图像转换为8位灰度图像,并与PeppersRGB.bmp对应的灰度图像Peppers.bmp进行比对。

图6. 重构的8位灰度图像(上)和Peppers.bmp(下)对比

图7. Matlab中使用rgb2gray函数转换的8位灰度图像(上)和Peppers.bmp(下)对比
Matlab中使用rgb2gray函数进行格式转换,源码见rgb2gray.m。rgb2gray的算法原理是将RGB色彩模型转为YIQ模型(北美NTSC彩色制式,灰度信息与彩色信息分离)。YIQ模型中,Y代表亮度、I代表色调、Q代表饱和度。转换后的Y分量即为灰度。
转换公式为:

图8. Matlab.rgb2gray的转换矩阵T
可以看到转换矩阵T的第一行就是灰度转换公式的系数。
- C#将RGB图像转换为8位灰度图像
- C#将RGB图像转换为8位灰度图像
- C#将RGB图像转换为8位灰度图像
- 使用GDI+将24位真彩色图像转换为8位灰度图像
- 使用CImage类将RGB图像转化为灰度图像
- OpenCV 原始RGB图像转换为灰度图像
- opencv将灰度图转化为RGB三通道图像
- 毕业课题---RGB图像转换为灰度图
- C#中将byte数组转换为8bit灰度图像
- C#中将byte数组转换为8bit灰度图像
- 将各种格式的图像转换为灰度图像
- vc将彩色图像转换为灰度图像
- 【Matlab】将彩色图像转换为灰度图像
- 将各种格式的图像转换为灰度图像
- 怎样将图像转换为RGB图像模式
- 利用OpenCV的imread将RGB图像转化为灰度图像!
- BMP--24位真彩色转换为灰度图像
- -01-RGB彩色图像转换为灰度图像【ARM NEON加速】
- Intent机制学习笔记
- 前言:Android源码编译-翻译
- 【PB】有关日期函数
- C++静态成员函数小结
- SGU489
- C#将RGB图像转换为8位灰度图像
- Add One Bool Field to Player Extra Field
- Java动态代理详解
- STL系列之一 deque双向队列
- 使用Eclipse或myEclipse的工作目录(workspace)
- 初始化一个构建环境
- 生成ipa文件的方法总结
- 找到数组平衡索引使得左半部分等于右半部分
- STL系列之二 stack栈