XCode4.3.3/4.2/4.3 + iOS5.1 无证书开发 、真机调试、生成IPA
来源:互联网 发布:linux搜索历史命令 编辑:程序博客网 时间:2024/04/29 06:03
环境:
Mac OS X 10.7.4+XCode4.3.3+ iPad3
特别说明:
Xcode4.3.2 , Xcode4.3.3 都是免安装的,打开dmg后,只有一个Xcode.app文件。安装方法是直接将Xcode.app拖放到“应用程序”(Applications)的目录即可使用。安装后没有Developer目录,所以以下的制作方法也是Xcode.app的安装包中进行的。
而xcode4.1/xcode4.2,则是安装到/Developer/目录下,从该目录下去找相应的文件。
另外,你的iPhone或iPad必须越狱的。
1、生成iPhone Developer证书
在“使用工具”中使用 “钥匙串访问” 工具,“钥匙串访问->证书助理->创建证书”名称必须写成 “iPhone Developer”其他全部默认,直至证书生成完成。

2、修改XCode系统文件
(2.1) 运行命令:
cd /Applications/Xcode.app/Contents/Developer/Platforms/iPhoneOS.platform/Developer/SDKs/iPhoneOS5.1.sdk
sudo vim SDKSettings.plist
此时进入vim文件编辑状态(会提示password 输入Mac登陆密码后回车)
其它版本,进入:
(Xcode4.5请执行)cd /Applications/Xcode.app/Contents/Developer/Platforms/iPhoneOS.platform/Developer/SDKs/iPhoneOS6.0.sdk
(注:i 进入Insert状态,修改完成后按ESC键退回到命令状态,Q退出 :w 保存 :q 退出)
将下面两个字段修改为NO
<key>CODE_SIGNING_REQUIRED</key>
<string>YES</string>
<key>ENTITLEMENTS_REQUIRED</key>
<string>YES</string>
其它版本该文件所在的位置:
(Xcode4.1) cd /Developer/Platforms/iPhoneOS.platform/Developer/SDKs/iPhoneOS4.3.sdk/
(Xcode4.2)cd /Developer/Platforms/iPhoneOS.platform/Developer/SDKs/iPhoneOS5.0.sdk/
(Xcode4.3)cd /Applications/Xcode.app/Contents/Developer/Platforms/iPhoneOS.platform/Developer/SDKs/
(Xcode4.3.2)cd /Applications/Xcode.app/Contents/Developer/Platforms/iPhoneOS.platform/Developer/SDKs/iPhoneOS5.1.sdk
(2.2) 进入另外一个目录
cd /Applications/Xcode.app/Contents/Developer/Platforms/iPhoneOS.platform
进行编辑:
sudo vim Info.plist
将全部的XCiPhoneOSCodeSignContext 修改成 XCCodeSignContext。保存退出即可。
(提示:在vim中输入/要搜索的内容来搜索,按n键是搜索下一处。)
其它版本该文件所在的目录:
(Xcode4.1/4.2)cd /Developer/Platforms/iPhoneOS.platform/
(Xcode4.3/4.3.2)cd /Applications/Xcode.app/Contents/Developer/Platforms/iPhoneOS.platform
3、增加文件gen_entitlements.py
cd /Applications/Xcode.app/Contents/Developer/
mkdir iphoneentitlements(如果创建失败可直接通过Finder 前往 /Applications/Xcode.app/Contents/Developer/手动去创建此文件夹)
cd iphoneentitlements
curl -O http://www.alexwhittemore.com/iphone/gen_entitlements.txt(通过网站下载了一个文件)
mv gen_entitlements.txt gen_entitlements.py
chmod 777 gen_entitlements.py
如果没有连接网络的,那么请在相应目录手动创建gen_entitlements.py并授予其执行权限,这个文件的内容为:
#!/usr/bin/env python
import sys
import struct
if len(sys.argv) != 3:
print "Usage: %s appname dest_file.xcent" % sys.argv[0]
sys.exit(-1)
APPNAME = sys.argv[1]
DEST = sys.argv[2]
if not DEST.endswith('.xml') and not DEST.endswith('.xcent'):
print "Dest must be .xml (for ldid) or .xcent (for codesign)"
sys.exit(-1)
entitlements = """
<?xml version="1.0" encoding="UTF-8"?>
<!DOCTYPE plist PUBLIC "-//Apple//DTD PLIST 1.0//EN" "http://www.apple.com/DTDs/PropertyList-1.0.dtd">
<plist version="1.0">
<dict>
<key>application-identifier</key>
<string>%s</string>
<key>get-task-allow</key>
<true/>
</dict>
</plist>
""" % APPNAME
f = open(DEST,'w')
if DEST.endswith('.xcent'):
f.write("\xfa\xde\x71\x71")
f.write(struct.pack('>L', len(entitlements) + 8))
f.write(entitlements)
f.close()
4、配置XCode项目
特别注意:本阶段之前的修改配置文件、准备脚本等,只需要做一次。
但本阶段的操作,对每个需要真机调试的工程都要做一遍。
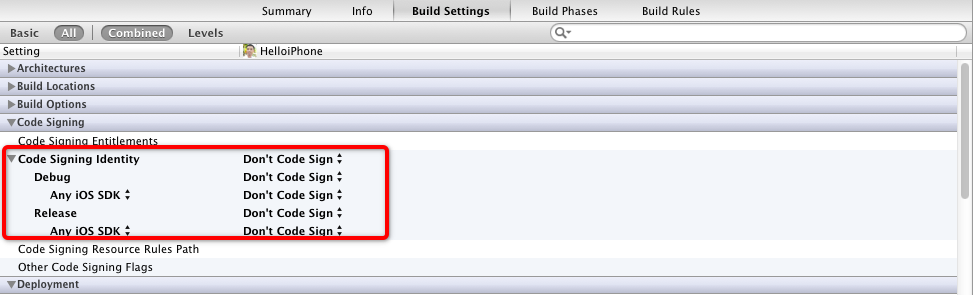
(1)禁用Xcode自动的签名操作
将工程配置中所有的Code Signing选项全部设为Don't Code Sign,如图。可能需要先点击“All”让这个选项显示出来。如下:
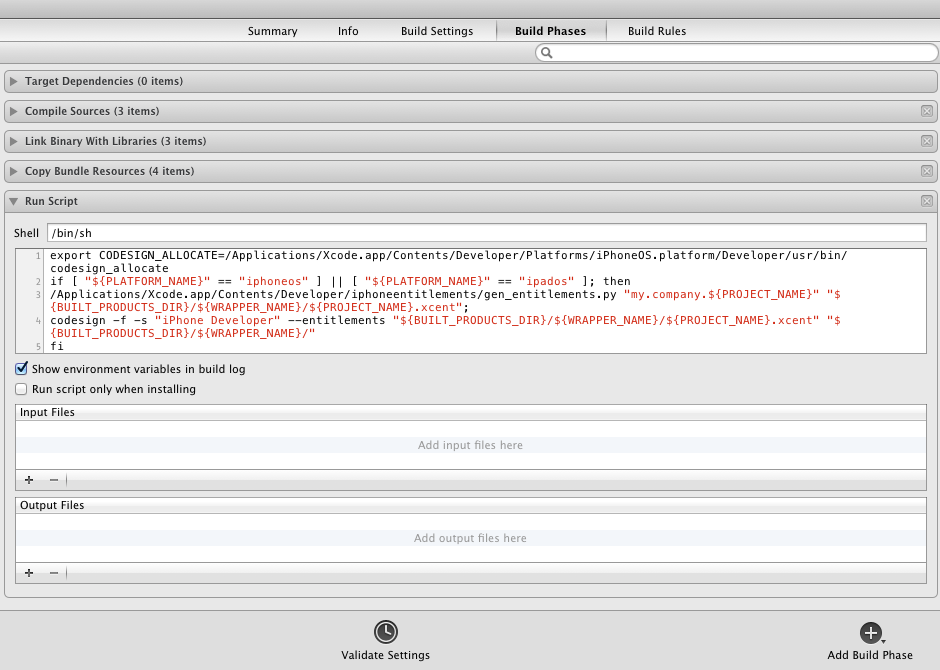
(2)添加自定义的生成后脚本
(对于Xcode 4.3/4.3.2)
export CODESIGN_ALLOCATE=/Applications/Xcode.app/Contents/Developer/Platforms/iPhoneOS.platform/Developer/usr/bin/codesign_allocate
if [ "${PLATFORM_NAME}" == "iphoneos" ] || [ "${PLATFORM_NAME}" == "ipados" ]; then
/Applications/Xcode.app/Contents/Developer/iphoneentitlements/gen_entitlements.py "my.company.${PROJECT_NAME}" "${BUILT_PRODUCTS_DIR}/${WRAPPER_NAME}/${PROJECT_NAME}.xcent";
codesign -f -s "iPhone Developer" --entitlements "${BUILT_PRODUCTS_DIR}/${WRAPPER_NAME}/${PROJECT_NAME}.xcent" "${BUILT_PRODUCTS_DIR}/${WRAPPER_NAME}/"
fi
(对于Xcode 4.6.2)
export
CODESIGN_ALLOCATE=/Applications/Xcode.app/Contents/Developer/Platforms/iPhoneOS.platform/Developer/usr/bin/codesign_allocate
if [ "${PLATFORM_NAME}" =="iphoneos" ] || [ "${PLATFORM_NAME}" == "ipados"]; then
/Applications/Xcode.app/Contents/Developer/iphoneentitlements/gen_entitlements.py "my.company.${PROJECT_NAME}" "${BUILT_PRODUCTS_DIR}/${WRAPPER_NAME}/${PROJECT_NAME}.xcent";
codesign -f -s "iPhone Developer" --entitlements "${BUILT_PRODUCTS_DIR}/${WRAPPER_NAME}/${PROJECT_NAME}.xcent" "${BUILT_PRODUCTS_DIR}/${WRAPPER_NAME}/"
fi
如下:
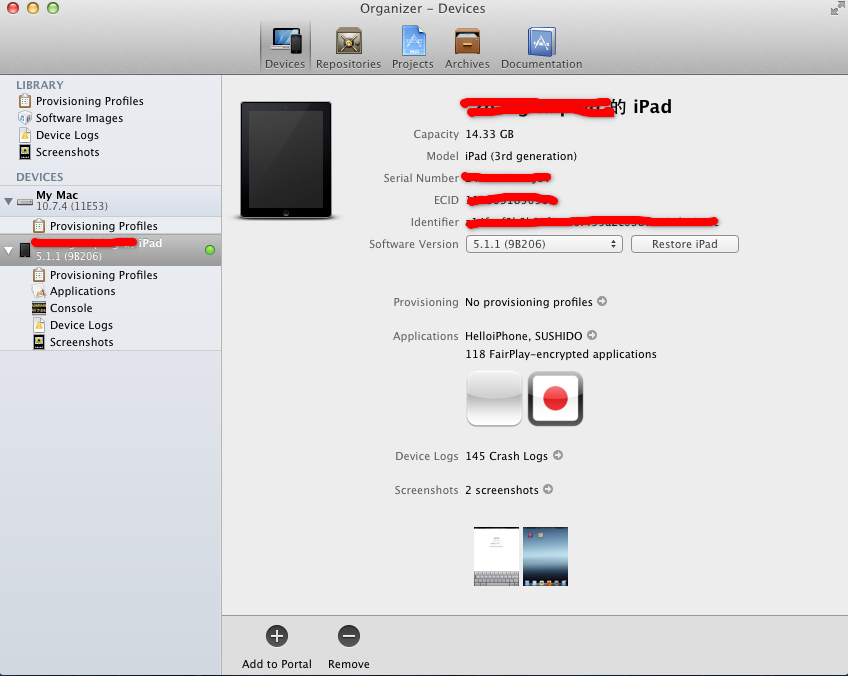
至此配置全部完成,下面就可以插上iPhone或iPad,重新选择生成目标来测试一下在线调试了!如果是第一次使用该设备调试,请先在Organizer中将设备切换为开发模式。
从Xcode工具栏右上角打开Organizer,如下图:
5、生成IPA文件
正常情况下IPA文件是从Xcode的Organizer中输出的,但是我们没有证书,这样输出会产生错误。我们只能用个小trick来完成这个操作了。
先将代码生成为Release目标,然后打开工程的输出文件夹,通常情况下这个目录是
/Users/你的用户名/Library/Developer/Xcode/DerivedData/以工程名打头的文件夹/Build/Products/Release-iphoneos
很纠结吧~这个目录下有个.app的文件,就是生成的程序了。把这个.app拖到iTunes中,它会出现在应用程序那个列表中,然后再把它从iTunes的那个列表中拖出来(比如拖到桌面),发生了什么?哈哈,它就这样变成.ipa了!
最后感谢各位前辈门的参考文档,他们也也很辛苦。学习了很多,希望这个文章对学习的朋友们有用。
http://blog.csdn.net/wangchenggggdn/article/details/8601484
- XCode4.3.3/4.2/4.3 + iOS5.1 无证书开发 、真机调试、生成IPA
- XCode4.3.3/4.2/4.3 + iOS5.1 无证书开发 、真机调试、生成IPA
- XCode4.3.3/4.2/4.3 + iOS5.1 无证书开发 、真机调试、生成IPA
- XCode4.3.3/4.2/4.3 + iOS5.1 无证件开发 、真机调试、生成IPA
- XCode4.3.3 + iOS5.1 无证书开发并生成app、ipa文件
- ios 5.1.1完美越狱+xcode4.1/4.2/4.3免证书(iDP)开发+真机调试+生成ipa文件+破解详细步骤
- Xcode 4.1/4.2/4.3 免证书(iDP)开发+真机调试+生成IPA全攻略
- Xcode 4.1/4.2/4.3 免证书(iDP)开发+真机调试+生成IPA全攻略
- Xcode 4.1/4.2/4.3 免证书(iDP)开发+真机调试+生成IPA全攻略
- Xcode 4.1/4.2/4.3 免证书(iDP)开发+真机调试+生成IPA全攻略
- Xcode 4.1/4.2/4.3 免证书(iDP)开发+真机调试+生成IPA全攻略
- Xcode 4.1/4.2/4.2.1 免证书(iDP)开发+真机调试+生成IPA全攻略
- Xcode 4.1/4.2/4.2.1 免证书(iDP)开发+真机调试+生成IPA全攻略
- Xcode 4.1/4.2/4.2.1 免证书(iDP)开发+真机调试+生成IPA全攻略
- Xcode 4.1/4.2/4.2.1 免证书(iDP)开发+真机调试+生成IPA全攻略
- Xcode 4.1/4.2/4.2.1 免证书(iDP)开发+真机调试+生成IPA全攻略
- Xcode 4.1/4.2/4.3/4.3.2 + iOS 5.1.1免证书(iDP)开发+真机调试+生成IPA全攻略
- Xcode 4.1/4.2/4.3/4.3.2 + iOS 5.1.1免证书(iDP)开发+真机调试+生成IPA全攻略
- C++沉思录上提到的一道练习题及其源码实现
- C语言程序100例之C#版-019
- 使用選擇器在頁面中插入內容
- 魅族M9如何设置铃声
- traceroute
- XCode4.3.3/4.2/4.3 + iOS5.1 无证书开发 、真机调试、生成IPA
- C语言程序100例之C#版-020
- C语言入门教程 (十) 函数的定义和调用
- (CUDA 编程5).CUDA编程接口(一)------一十八般武器
- Notification使用详解之三:通过服务更新进度通知&在Activity中监听服务进度
- java 实现批量文件重命名
- javascript原型和原型链
- C语言入门教程 (十一) 函数参数的传递和值返回
- C语言入门教程 (十二) 变量的作用域和存储类型