Linux设备模型——设备驱动模型和sysfs文件系统解读
来源:互联网 发布:8月中国经济数据 编辑:程序博客网 时间:2024/05/22 14:56
本文将对Linux系统中的sysfs进行简单的分析,要分析sysfs就必须分析内核的driver-model(驱动模型),两者是紧密联系的。在分析过程中,本文将以platform总线和spi主控制器的platform驱动为例来进行讲解。其实,platform机制是基于driver-model的,通过本文,也会对platform机制有个简单的了解。
内核版本:2.6.30
1. What is sysfs?
个人理解:sysfs向用户空间展示了驱动设备的层次结构。我们都知道设备和对应的驱动都是由内核管理的,这些对于用户空间是不可见的。现在通过sysfs,可以在用户空间直观的了解设备驱动的层次结构。
我们来看看sysfs的文件结构:
[root@yj423 /sys]#ls
block class devices fs module
bus dev firmware kernel power
block:块设备
bus:系统中的总线
class: 设备类型,比如输入设备
dev:系统中已注册的设备节点的视图,有两个子目录char和block。
devices:系统中所有设备拓扑结构视图
fireware:固件
fs:文件系统
kernel:内核配置选项和状态信息
module:模块
power:系统的电源管理数据
2. kobject ,kset和ktype
要分析sysfs,首先就要分析kobject和kset,因为驱动设备的层次结构的构成就是由这两个东东来完成的。
2.1 kobject
kobject是一个对象的抽象,它用于管理对象。每个kobject对应着sysfs中的一个目录。
kobject用struct kobject来描述。
struct kobject { const char *name; /*在sysfs建立目录的名字*/ struct list_head entry; /*用于连接到所属kset的链表中*/ struct kobject *parent; /*父对象*/ struct kset *kset; /*属于哪个kset*/ struct kobj_type *ktype; /*类型*/ struct sysfs_dirent *sd; /*sysfs中与该对象对应的文件节点*/ struct kref kref; /*对象的应用计数*/ unsigned int state_initialized:1; unsigned int state_in_sysfs:1; unsigned int state_add_uevent_sent:1; unsigned int state_remove_uevent_sent:1; unsigned int uevent_suppress:1;};2.2 kset
kset是一些kobject的集合,这些kobject可以有相同的ktype,也可以不同。同时,kset自己也包含一个kobject。在sysfs中,kset也是对应这一个目录,但是目录下面包含着其他的kojbect。
kset使用struct kset来描述。
/** * struct kset - a set of kobjects of a specific type, belonging to a specific subsystem. * * A kset defines a group of kobjects. They can be individually * different "types" but overall these kobjects all want to be grouped * together and operated on in the same manner. ksets are used to * define the attribute callbacks and other common events that happen to * a kobject. * * @list: the list of all kobjects for this kset * @list_lock: a lock for iterating over the kobjects * @kobj: the embedded kobject for this kset (recursion, isn't it fun...) * @uevent_ops: the set of uevent operations for this kset. These are * called whenever a kobject has something happen to it so that the kset * can add new environment variables, or filter out the uevents if so * desired. */struct kset {struct list_head list;/*属于该kset的kobject链表*/spinlock_t list_lock;struct kobject kobj;/*该kset内嵌的kobj*/struct kset_uevent_ops *uevent_ops;};2.3 ktype
每个kobject对象都内嵌有一个ktype,该结构定义了kobject在创建和删除时所采取的行为。
struct kobj_type { void (*release)(struct kobject *kobj); struct sysfs_ops *sysfs_ops; struct attribute **default_attrs;};struct sysfs_ops { ssize_t (*show)(struct kobject *, struct attribute *,char *); ssize_t (*store)(struct kobject *,struct attribute *,const char *, size_t);};/* FIXME * The *owner field is no longer used. * x86 tree has been cleaned up. The owner * attribute is still left for other arches. */struct attribute { const char *name; struct module *owner; mode_t mode;};当kobject的引用计数为0时,通过release方法来释放相关的资源。attribute为属性,每个属性在sysfs中都有对应的属性文件。
sysfs_op的两个方法用于实现读取和写入属性文件时应该采取的行为。
2.4 kobject与kset的关系
下面这张图非常经典。最下面的kobj都属于一个kset,同时这些kobj的父对象就是kset内嵌的kobj。通过链表,kset可以获取所有属于它的kobj。
从sysfs角度而言,kset代表一个文件夹,而下面的kobj就是这个文件夹里面的内容,而内容有可能是文件也有可能是文件夹。

3.举例
在上一节中,我们知道sys下有一个bus目录,这一将分析如何通过kobject创建bus目录。
下面代码位于drivers/base/bus.c
int __init buses_init(void){bus_kset = kset_create_and_add("bus", &bus_uevent_ops, NULL);if (!bus_kset)return -ENOMEM;return 0;}static struct kset_uevent_ops bus_uevent_ops = { .filter = bus_uevent_filter,};static int bus_uevent_filter(struct kset *kset, struct kobject *kobj){ struct kobj_type *ktype = get_ktype(kobj); if (ktype == &bus_ktype) return 1; return 0;}这里直接调用kset_create_and_add,第一个参数为要创建的目录的名字,而第三个参数表示没有父对象。下面代码位于drivers/base/kobject.c
/** * kset_create_and_add - create a struct kset dynamically and add it to sysfs * * @name: the name for the kset * @uevent_ops: a struct kset_uevent_ops for the kset * @parent_kobj: the parent kobject of this kset, if any. * * This function creates a kset structure dynamically and registers it * with sysfs. When you are finished with this structure, call * kset_unregister() and the structure will be dynamically freed when it * is no longer being used. * * If the kset was not able to be created, NULL will be returned. */struct kset *kset_create_and_add(const char *name, struct kset_uevent_ops *uevent_ops, struct kobject *parent_kobj){struct kset *kset;int error;kset = kset_create(name, uevent_ops, parent_kobj);/*建立kset,设置某些字段*/if (!kset)return NULL;error = kset_register(kset);/*添加kset到sysfs*/if (error) {kfree(kset);return NULL;}return kset;}这里主要调用了两个函数,接下分别来看下。
3.1 kset_create函数
下面代码位于drivers/base/kobject.c
/** * kset_create - create a struct kset dynamically * * @name: the name for the kset * @uevent_ops: a struct kset_uevent_ops for the kset * @parent_kobj: the parent kobject of this kset, if any. * * This function creates a kset structure dynamically. This structure can * then be registered with the system and show up in sysfs with a call to * kset_register(). When you are finished with this structure, if * kset_register() has been called, call kset_unregister() and the * structure will be dynamically freed when it is no longer being used. * * If the kset was not able to be created, NULL will be returned. */static struct kset *kset_create(const char *name,struct kset_uevent_ops *uevent_ops,struct kobject *parent_kobj){struct kset *kset;kset = kzalloc(sizeof(*kset), GFP_KERNEL);/*分配kset*/if (!kset)return NULL;kobject_set_name(&kset->kobj, name);/*设置kobj->name*/kset->uevent_ops = uevent_ops;kset->kobj.parent = parent_kobj;/*设置父对象*//* * The kobject of this kset will have a type of kset_ktype and belong to * no kset itself. That way we can properly free it when it is * finished being used. */kset->kobj.ktype = &kset_ktype;kset->kobj.kset = NULL;/*本keset不属于任何kset*/return kset;}这个函数中,动态分配了kset结构,调用kobject_set_name设置kset->kobj->name为bus,也就是我们要创建的目录bus。同时这里kset->kobj.parent为NULL,
也就是没有父对象。因为要创建的bus目录是在sysfs所在的根目录创建的,自然没有父对象。
随后简要看下由kobject_set_name函数调用引发的一系列调用。
/** * kobject_set_name - Set the name of a kobject * @kobj: struct kobject to set the name of * @fmt: format string used to build the name * * This sets the name of the kobject. If you have already added the * kobject to the system, you must call kobject_rename() in order to * change the name of the kobject. */int kobject_set_name(struct kobject *kobj, const char *fmt, ...){va_list vargs;int retval;va_start(vargs, fmt);retval = kobject_set_name_vargs(kobj, fmt, vargs);va_end(vargs);return retval;}/** * kobject_set_name_vargs - Set the name of an kobject * @kobj: struct kobject to set the name of * @fmt: format string used to build the name * @vargs: vargs to format the string. */int kobject_set_name_vargs(struct kobject *kobj, const char *fmt, va_list vargs){ const char *old_name = kobj->name; char *s; if (kobj->name && !fmt) return 0; kobj->name = kvasprintf(GFP_KERNEL, fmt, vargs); if (!kobj->name) return -ENOMEM; /* ewww... some of these buggers have '/' in the name ... */ while ((s = strchr(kobj->name, '/'))) s[0] = '!'; kfree(old_name); return 0;}/* Simplified asprintf. */char *kvasprintf(gfp_t gfp, const char *fmt, va_list ap){ unsigned int len; char *p; va_list aq; va_copy(aq, ap); len = vsnprintf(NULL, 0, fmt, aq); va_end(aq); p = kmalloc(len+1, gfp); if (!p) return NULL; vsnprintf(p, len+1, fmt, ap); return p;}3.2 kset_register
下面代码位于drivers/base/kobject.c。
/** * kset_register - initialize and add a kset. * @k: kset. */int kset_register(struct kset *k){int err;if (!k)return -EINVAL;kset_init(k); /*初始化kset*/err = kobject_add_internal(&k->kobj); /*在sysfs中建立目录*/if (err)return err;kobject_uevent(&k->kobj, KOBJ_ADD);return 0;}这里面调用了3个函数。这里先介绍前两个函数。
3.2.1 kset_init
该函数用于初始化kset。
下面代码位于drivers/base/kobject.c。
/** * kset_init - initialize a kset for use * @k: kset */void kset_init(struct kset *k){kobject_init_internal(&k->kobj);/*初始化kobject的某些字段*/INIT_LIST_HEAD(&k->list);/*初始化链表头*/spin_lock_init(&k->list_lock);/*初始化自旋锁*/}static void kobject_init_internal(struct kobject *kobj){ if (!kobj) return; kref_init(&kobj->kref); /*初始化引用基计数*/ INIT_LIST_HEAD(&kobj->entry); /*初始化链表头*/ kobj->state_in_sysfs = 0; kobj->state_add_uevent_sent = 0; kobj->state_remove_uevent_sent = 0; kobj->state_initialized = 1;}3.2.2 kobject_add_internal
该函数将在sysfs中建立目录。
下面代码位于drivers/base/kobject.c。
static int kobject_add_internal(struct kobject *kobj){int error = 0;struct kobject *parent;if (!kobj)return -ENOENT;/*检查name字段是否存在*/if (!kobj->name || !kobj->name[0]) {WARN(1, "kobject: (%p): attempted to be registered with empty " "name!\n", kobj);return -EINVAL;}parent = kobject_get(kobj->parent);/*有父对象则增加父对象引用计数*//* join kset if set, use it as parent if we do not already have one */if (kobj->kset) {if (!parent)/*kobj属于某个kset,但是该kobj没有父对象,则以kset的kobj作为父对象*/parent = kobject_get(&kobj->kset->kobj);kobj_kset_join(kobj);/*将kojbect添加到kset结构中的链表当中*/kobj->parent = parent;}pr_debug("kobject: '%s' (%p): %s: parent: '%s', set: '%s'\n", kobject_name(kobj), kobj, __func__, parent ? kobject_name(parent) : "<NULL>", kobj->kset ? kobject_name(&kobj->kset->kobj) : "<NULL>");error = create_dir(kobj);/*根据kobj->name在sys中建立目录*/if (error) {kobj_kset_leave(kobj);/*删除链表项*/kobject_put(parent);/*减少引用计数*/kobj->parent = NULL;/* be noisy on error issues */if (error == -EEXIST)printk(KERN_ERR "%s failed for %s with " "-EEXIST, don't try to register things with " "the same name in the same directory.\n", __func__, kobject_name(kobj));elseprintk(KERN_ERR "%s failed for %s (%d)\n", __func__, kobject_name(kobj), error);dump_stack();} elsekobj->state_in_sysfs = 1;return error;}在上面的kset_create中有kset->kobj.kset = NULL,因此if (kobj->kset)条件不满足。因此在这个函数中,对name进行了必要的检查之后,调用了create_dir在sysfs中创建目录。
在create_dir执行完成以后会在sysfs的根目录(/sys/)建立文件夹bus。该函数的详细分析将在后面给出。
至此,对bus目录的建立有了简单而直观的了解。我们可以看出kset其实就是表示一个文件夹,而kset本身也含有一个kobject,而该kobject的name字段即为该目录的名字,本例中为bus。
4. driver model
第2节所介绍的是最底层,最核心的内容。下面开始将描述较为高层的内容。
Linux设备模型使用了三个数据结构分别来描述总线、设备和驱动。所有的设备和对应的驱动都必须挂载在某一个总线上,通过总线,可以绑定设备和驱动。
这个属于分离的思想,将设备和驱动分开管理。
同时驱动程序可以了解到所有它所支持的设备,同样的,设备也能知道它对应驱动程序。
4.1 bus
总线是处理器与一个设备或者多个设备之间的通道。在设备模型中,所有的设备都挂载在某一个总线上。总线使用struct bus_type来表述。
下列代码位于include/linux/device.h。
struct bus_type { const char *name; struct bus_attribute *bus_attrs; struct device_attribute *dev_attrs; struct driver_attribute *drv_attrs; int (*match)(struct device *dev, struct device_driver *drv); int (*uevent)(struct device *dev, struct kobj_uevent_env *env); int (*probe)(struct device *dev); int (*remove)(struct device *dev); void (*shutdown)(struct device *dev); int (*suspend)(struct device *dev, pm_message_t state); int (*suspend_late)(struct device *dev, pm_message_t state); int (*resume_early)(struct device *dev); int (*resume)(struct device *dev); struct dev_pm_ops *pm; struct bus_type_private *p;};/** * struct bus_type_private - structure to hold the private to the driver core portions of the bus_type structure. * * @subsys - the struct kset that defines this bus. This is the main kobject * @drivers_kset - the list of drivers associated with this bus * @devices_kset - the list of devices associated with this bus * @klist_devices - the klist to iterate over the @devices_kset * @klist_drivers - the klist to iterate over the @drivers_kset * @bus_notifier - the bus notifier list for anything that cares about things * on this bus. * @bus - pointer back to the struct bus_type that this structure is associated * with. * * This structure is the one that is the actual kobject allowing struct * bus_type to be statically allocated safely. Nothing outside of the driver * core should ever touch these fields. */struct bus_type_private { struct kset subsys; struct kset *drivers_kset; struct kset *devices_kset; struct klist klist_devices; struct klist klist_drivers; struct blocking_notifier_head bus_notifier; unsigned int drivers_autoprobe:1; struct bus_type *bus;};我们看到每个bus_type都包含一个kset对象subsys,该kset在/sys/bus/目录下有着对应的一个目录,目录名即为字段name。后面我们将看到platform总线的建立。drivers_kset和devices_kset对应着两个目录,该两个目录下将包含该总线上的设备和相应的驱动程序。
同时总线上的设备和驱动将分别保存在两个链表中:klist_devices和klist_drivers。
4.2 device
设备对象在driver-model中使用struct device来表示。
下列代码位于include/linux/device.h。struct device {struct device*parent;struct device_private*p;struct kobject kobj;const char*init_name; /* initial name of the device */struct device_type*type;struct semaphoresem;/* semaphore to synchronize calls to * its driver. */struct bus_type*bus;/* type of bus device is on */struct device_driver *driver;/* which driver has allocated this device */void*driver_data;/* data private to the driver */void*platform_data;/* Platform specific data, device core doesn't touch it */struct dev_pm_infopower;#ifdef CONFIG_NUMAintnuma_node;/* NUMA node this device is close to */#endifu64*dma_mask;/* dma mask (if dma'able device) */u64coherent_dma_mask;/* Like dma_mask, but for alloc_coherent mappings as not all hardware supports 64 bit addresses for consistent allocations such descriptors. */struct device_dma_parameters *dma_parms;struct list_headdma_pools;/* dma pools (if dma'ble) */struct dma_coherent_mem*dma_mem; /* internal for coherent mem override *//* arch specific additions */struct dev_archdataarchdata;dev_tdevt;/* dev_t, creates the sysfs "dev" */spinlock_tdevres_lock;struct list_headdevres_head;struct klist_nodeknode_class;struct class*class;struct attribute_group**groups;/* optional groups */void(*release)(struct device *dev);};/** * struct device_private - structure to hold the private to the driver core portions of the device structure. * * @klist_children - klist containing all children of this device * @knode_parent - node in sibling list * @knode_driver - node in driver list * @knode_bus - node in bus list * @device - pointer back to the struct class that this structure is * associated with. * * Nothing outside of the driver core should ever touch these fields. */struct device_private { struct klist klist_children; struct klist_node knode_parent; struct klist_node knode_driver; struct klist_node knode_bus; struct device *device;};device本身包含一个kobject,也就是说这个device在sysfs的某个地方有着一个对应的目录。
该device所挂载的bus由knode_bus指定。
该device所对应的设备驱动由knode_driver指定。
4.3 driver
设备设备对象在driver-model中使用struct device_driver来表示。
下列代码位于include/linux/device.h。
struct device_driver {const char*name;struct bus_type*bus;struct module*owner;const char *mod_name;/* used for built-in modules */int (*probe) (struct device *dev);int (*remove) (struct device *dev);void (*shutdown) (struct device *dev);int (*suspend) (struct device *dev, pm_message_t state);int (*resume) (struct device *dev);struct attribute_group **groups;struct dev_pm_ops *pm;struct driver_private *p;};struct driver_private { struct kobject kobj; struct klist klist_devices; struct klist_node knode_bus; struct module_kobject *mkobj; struct device_driver *driver;}; device_driver本身包含一个kobject,也就是说这个device_driver在sysfs的某个地方有着一个对应的目录。该设备驱动所支持的设备由klist_devices指定。
该设备驱动所挂载的总线由knode_bus制定。
5. Bus举例
本节我们将以platform总线为例,来看看,/sys/bus/platform是如何建立的。
platform总线的注册是由platform_bus_init函数完成的。该函数在内核启动阶段被调用,我们来简单看下调用过程:
start_kernel() -> rest_init() ->kernel_init() -> do_basic_setup() -> driver_init() -> platform_bus_init()。
注:kernel_init()是在rest_init函数中创建内核线程来执行的。
int __init platform_bus_init(void){ int error; early_platform_cleanup(); error = device_register(&platform_bus); if (error) return error; error = bus_register(&platform_bus_type); if (error) device_unregister(&platform_bus); return error;}struct bus_type platform_bus_type = {.name= "platform",.dev_attrs= platform_dev_attrs,.match= platform_match,.uevent= platform_uevent,.pm= PLATFORM_PM_OPS_PTR,};EXPORT_SYMBOL_GPL(platform_bus_type);从bus_type,我们看到该总线的名字为platform。调用了两个函数,我们只关注bus_register函数。
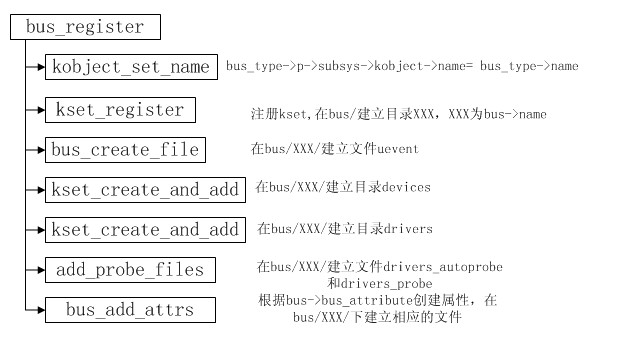
/** * bus_register - register a bus with the system. * @bus: bus. * * Once we have that, we registered the bus with the kobject * infrastructure, then register the children subsystems it has: * the devices and drivers that belong to the bus. */int bus_register(struct bus_type *bus){int retval;struct bus_type_private *priv;priv = kzalloc(sizeof(struct bus_type_private), GFP_KERNEL);if (!priv)return -ENOMEM;/*互相保存*/priv->bus = bus;bus->p = priv;BLOCKING_INIT_NOTIFIER_HEAD(&priv->bus_notifier);/*设定kobject->name*/retval = kobject_set_name(&priv->subsys.kobj, "%s", bus->name);if (retval)goto out;priv->subsys.kobj.kset = bus_kset;priv->subsys.kobj.ktype = &bus_ktype;priv->drivers_autoprobe = 1;/*注册kset,在bus/建立目录XXX,XXX为bus->name*/retval = kset_register(&priv->subsys);if (retval)goto out;/*创建属性,在bus/XXX/建立文件uevent*/retval = bus_create_file(bus, &bus_attr_uevent);if (retval)goto bus_uevent_fail;/*创建kset,在bus/XXX/建立目录devices*/priv->devices_kset = kset_create_and_add("devices", NULL, &priv->subsys.kobj);if (!priv->devices_kset) {retval = -ENOMEM;goto bus_devices_fail;}/*创建kset,在bus/XXX/建立目录drivers*/priv->drivers_kset = kset_create_and_add("drivers", NULL, &priv->subsys.kobj);if (!priv->drivers_kset) {retval = -ENOMEM;goto bus_drivers_fail;}/*初始化2个内核链表,*/klist_init(&priv->klist_devices, klist_devices_get, klist_devices_put);klist_init(&priv->klist_drivers, NULL, NULL);/*创建属性,在bus/XXX/建立文件drivers_autoprobe和drivers_probe*/retval = add_probe_files(bus);if (retval)goto bus_probe_files_fail;/*根据bus->bus_attribute创建属性,在bus/XXX/下建立相应的文件d*/retval = bus_add_attrs(bus);if (retval)goto bus_attrs_fail;pr_debug("bus: '%s': registered\n", bus->name);return 0;bus_attrs_fail:remove_probe_files(bus);bus_probe_files_fail:kset_unregister(bus->p->drivers_kset);bus_drivers_fail:kset_unregister(bus->p->devices_kset);bus_devices_fail:bus_remove_file(bus, &bus_attr_uevent);bus_uevent_fail:kset_unregister(&bus->p->subsys);kfree(bus->p);out:bus->p = NULL;return retval;}EXPORT_SYMBOL_GPL(bus_register);函数中,首先调用kobject_set_name设置了bus对象的subsys.kobject->name 为 platform,也就是说会建立一个名为platform的目录。kobject_set_name函数在3.1小节中已经给出。
在这里还用到了bus_kset这个变量,这个变量就是在第3节buses_init函数中建立bus目录所对应的kset对象。
接着,priv->subsys.kobj.kset = bus_kset,设置subsys的kobj在bus_kset对象包含的集合中,也就是说bus目录下将包含subsys对象所对应的目录,即platform。
紧接着调用了kset_register,参数为&priv->subsys。该函数在3.2节中以给出。在该函数的调用过程中,将调用kobj_kset_join函数,该函数将kobject添加到kobject->kset的链表中。
/* add the kobject to its kset's list */static void kobj_kset_join(struct kobject *kobj){if (!kobj->kset)return;kset_get(kobj->kset);/*增加kset引用计数*/spin_lock(&kobj->kset->list_lock);list_add_tail(&kobj->entry, &kobj->kset->list);/*将kojbect添加到kset结构中的链表当中*/spin_unlock(&kobj->kset->list_lock);}kset_register函数执行完成后,将在/sys/bus/下建立目录platform。此刻,我们先来看下kset和kobject之间的关系。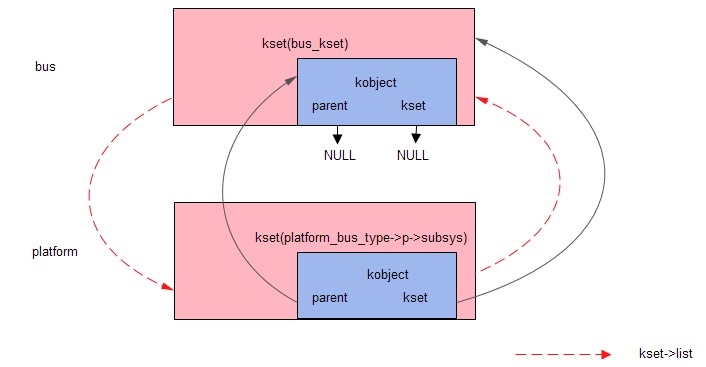
然后,调用了bus_create_file函数在/sys/bus/platform/下建立文件uevent。
int bus_create_file(struct bus_type *bus, struct bus_attribute *attr){int error;if (bus_get(bus)) {error = sysfs_create_file(&bus->p->subsys.kobj, &attr->attr);bus_put(bus);} elseerror = -EINVAL;return error;}EXPORT_SYMBOL_GPL(bus_create_file);有关底层的sysfs将在后面叙述,这里只要关注参数&bus->p->subsys.kobj,表示在该kset下建立文件,也就是platform下建立。接着调用了2次kset_create_and_add,分别在/sys/bus/platform/下建立了文件夹devices和drivers。该函数位于第3节开始处。
这里和第3节调用kset_create_and_add时的最主要一个区别就是:此时的parent参数不为NULL,而是&priv->subsys.kobj。
也就是说,将要创建的kset的kobject->parent = &priv->subsys.kobj,也即新建的kset被包含在platform文件夹对应的kset中。
我们来看下关系图:

随后,调用了add_probe_files创建了属性文件drivers_autoprobe和drivers_probe。
static int add_probe_files(struct bus_type *bus){int retval;retval = bus_create_file(bus, &bus_attr_drivers_probe);if (retval)goto out;retval = bus_create_file(bus, &bus_attr_drivers_autoprobe);if (retval)bus_remove_file(bus, &bus_attr_drivers_probe);out:return retval;}该函数只是简单的调用了两次bus_create_file,该函数已在前面叙述过。最后调用bus_add_attrs创建总线相关的属性文件。
/** * bus_add_attrs - Add default attributes for this bus. * @bus: Bus that has just been registered. */static int bus_add_attrs(struct bus_type *bus){int error = 0;int i;if (bus->bus_attrs) {for (i = 0; attr_name(bus->bus_attrs[i]); i++) {error = bus_create_file(bus, &bus->bus_attrs[i]);if (error)goto err;}}done:return error;err:while (--i >= 0)bus_remove_file(bus, &bus->bus_attrs[i]);goto done;}我们可以看到这个函数将根据bus_type->bus_arrts来创建属性文件。不过,在本例中,bus_arrts从未给出定义,因此次函数不做任何工作。好了,整个bus_register调用完成了,我们来看下sysfs中实际的情况。
[root@yj423 platform]#pwd
/sys/bus/platform
[root@yj423 platform]#ls
devices drivers drivers_autoprobe drivers_probe uevent
最后,我们对整个bus_register的过程进行一个小结。
6. device举例
本节将首先讲述如何在/sys/devices下建立虚拟的platform设备,然后再讲述如何在/sys/devices/platform/下建立子设备。
6.1 虚拟的platform设备
之所以叫虚拟是因为这个platform并不代表任何实际存在的设备,但是platform将是所有具体设备的父设备。
在第5节,platform_bus_init函数中还调用了device_register,现在对其做出分析。
int __init platform_bus_init(void){int error;early_platform_cleanup();error = device_register(&platform_bus);if (error)return error;error = bus_register(&platform_bus_type);if (error)device_unregister(&platform_bus);return error;}struct device platform_bus = { .init_name = "platform",};EXPORT_SYMBOL_GPL(platform_bus)下列函数位于drivers/base/core.c。/** * device_register - register a device with the system. * @dev: pointer to the device structure * * This happens in two clean steps - initialize the device * and add it to the system. The two steps can be called * separately, but this is the easiest and most common. * I.e. you should only call the two helpers separately if * have a clearly defined need to use and refcount the device * before it is added to the hierarchy. * * NOTE: _Never_ directly free @dev after calling this function, even * if it returned an error! Always use put_device() to give up the * reference initialized in this function instead. */int device_register(struct device *dev){device_initialize(dev);/*初始化dev的某些字段*/return device_add(dev); /*将设备添加到系统中*/}一个设备的注册分成两部,每步通过调用一个函数函数。首先先看第一步:
下列函数位于drivers/base/core.c。/** * device_initialize - init device structure. * @dev: device. * * This prepares the device for use by other layers by initializing * its fields. * It is the first half of device_register(), if called by * that function, though it can also be called separately, so one * may use @dev's fields. In particular, get_device()/put_device() * may be used for reference counting of @dev after calling this * function. * * NOTE: Use put_device() to give up your reference instead of freeing * @dev directly once you have called this function. */void device_initialize(struct device *dev){ dev->kobj.kset = devices_kset; /*设置kobj属于哪个kset,/sys/devices/*/ kobject_init(&dev->kobj, &device_ktype);/*初始化dev->kobj*/ INIT_LIST_HEAD(&dev->dma_pools); /*初始化链表头*/ init_MUTEX(&dev->sem); /*初始化互斥体*/ spin_lock_init(&dev->devres_lock); /*初始化自旋锁*/ INIT_LIST_HEAD(&dev->devres_head); /*初始化链表头*/ device_init_wakeup(dev, 0); /*设置该device不能唤醒*/ device_pm_init(dev); /*设置该device可操作*/ set_dev_node(dev, -1); /*设置NUMA节点*/}6.1.1 有关devices_kset
首先其中用到了devices_kset对象,这个对象和第3节当中的bus_kset是同样的性质,也就是说该对象表示一个目录。
该对象的建立是在devices_init函数中完成的。
int __init devices_init(void){devices_kset = kset_create_and_add("devices", &device_uevent_ops, NULL);if (!devices_kset)return -ENOMEM;dev_kobj = kobject_create_and_add("dev", NULL);if (!dev_kobj)goto dev_kobj_err;sysfs_dev_block_kobj = kobject_create_and_add("block", dev_kobj);if (!sysfs_dev_block_kobj)goto block_kobj_err;sysfs_dev_char_kobj = kobject_create_and_add("char", dev_kobj);if (!sysfs_dev_char_kobj)goto char_kobj_err;return 0; char_kobj_err:kobject_put(sysfs_dev_block_kobj); block_kobj_err:kobject_put(dev_kobj); dev_kobj_err:kset_unregister(devices_kset);return -ENOMEM;}由此可见,devices_kset对象表示的目录为/sys下的devices目录。6.1.2 kobject_init
下列函数位于lib/kojbect.c。
/** * kobject_init - initialize a kobject structure * @kobj: pointer to the kobject to initialize * @ktype: pointer to the ktype for this kobject. * * This function will properly initialize a kobject such that it can then * be passed to the kobject_add() call. * * After this function is called, the kobject MUST be cleaned up by a call * to kobject_put(), not by a call to kfree directly to ensure that all of * the memory is cleaned up properly. */void kobject_init(struct kobject *kobj, struct kobj_type *ktype){char *err_str;if (!kobj) {err_str = "invalid kobject pointer!";goto error;}if (!ktype) {err_str = "must have a ktype to be initialized properly!\n";goto error;}if (kobj->state_initialized) {/* do not error out as sometimes we can recover */printk(KERN_ERR "kobject (%p): tried to init an initialized " "object, something is seriously wrong.\n", kobj);dump_stack();}kobject_init_internal(kobj);kobj->ktype = ktype;return;error:printk(KERN_ERR "kobject (%p): %s\n", kobj, err_str);dump_stack();}EXPORT_SYMBOL(kobject_init);static void kobject_init_internal(struct kobject *kobj){ if (!kobj) return; kref_init(&kobj->kref); /*初始化引用基计数*/ INIT_LIST_HEAD(&kobj->entry); /*初始化链表头*/ kobj->state_in_sysfs = 0; kobj->state_add_uevent_sent = 0; kobj->state_remove_uevent_sent = 0; kobj->state_initialized = 1;}该函数在做了一系列的必要检查后,调用kobject_init_internal初始化了kobject的某些字段。6.1.3 device_init_wakeup
参数val为0,设置该device不能够唤醒。
#ifdef CONFIG_PM/* changes to device_may_wakeup take effect on the next pm state change. * by default, devices should wakeup if they can. */static inline void device_init_wakeup(struct device *dev, int val){dev->power.can_wakeup = dev->power.should_wakeup = !!val;}。。。。。。#else /* !CONFIG_PM *//* For some reason the next two routines work even without CONFIG_PM */static inline void device_init_wakeup(struct device *dev, int val){ dev->power.can_wakeup = !!val;}。。。。。。#endif6.1.4 device_pm_init
设置电源的状态。
static inline void device_pm_init(struct device *dev){dev->power.status = DPM_ON; /*该device被认为可操作*/}6.1.5 set_dev_node
如果使用NUMA,则设置NUMA节点。
#ifdef CONFIG_NUMA。。。。。。static inline void set_dev_node(struct device *dev, int node){dev->numa_node = node;}#else。。。。。。static inline void set_dev_node(struct device *dev, int node){}#endif6.2 device_add
接下来是注册的第二步:调用device_add。
/** * device_add - add device to device hierarchy. * @dev: device. * * This is part 2 of device_register(), though may be called * separately _iff_ device_initialize() has been called separately. * * This adds @dev to the kobject hierarchy via kobject_add(), adds it * to the global and sibling lists for the device, then * adds it to the other relevant subsystems of the driver model. * * NOTE: _Never_ directly free @dev after calling this function, even * if it returned an error! Always use put_device() to give up your * reference instead. */int device_add(struct device *dev){struct device *parent = NULL;struct class_interface *class_intf;int error = -EINVAL;dev = get_device(dev);/*增加引用计数*/if (!dev)goto done;dev->p = kzalloc(sizeof(*dev->p), GFP_KERNEL);/*分配device_private结构*/if (!dev->p) {error = -ENOMEM;goto done;}dev->p->device = dev;/*保存dev*/klist_init(&dev->p->klist_children, klist_children_get,/*初始化内核链表*/ klist_children_put);/* * for statically allocated devices, which should all be converted * some day, we need to initialize the name. We prevent reading back * the name, and force the use of dev_name() */if (dev->init_name) {dev_set_name(dev, dev->init_name); /*dev->kobject->name = dev->init_name*/dev->init_name = NULL;}if (!dev_name(dev))/*检查dev->kobject->name*/goto name_error;pr_debug("device: '%s': %s\n", dev_name(dev), __func__);parent = get_device(dev->parent);/*增加父设备引用计数*/setup_parent(dev, parent);/*设置dev->kobject->parent*//* use parent numa_node */if (parent)set_dev_node(dev, dev_to_node(parent));/* first, register with generic layer. *//* we require the name to be set before, and pass NULL *//* 执行完以后,将在/sys/devices/下建立目录XXX,目录名XXX为dev->kobj->name*/error = kobject_add(&dev->kobj, dev->kobj.parent, NULL);if (error)goto Error;/* notify platform of device entry */if (platform_notify)platform_notify(dev);/*在XXX下建立文件uevent*/error = device_create_file(dev, &uevent_attr);if (error)goto attrError;if (MAJOR(dev->devt)) {/*主设备号不为0*/error = device_create_file(dev, &devt_attr);/*创建属性文件dev*/if (error)goto ueventattrError;/* 在sys/dev/char/下建立symlink,名字为主设备号:次设备号,该链接指向XXX */error = device_create_sys_dev_entry(dev); if (error)goto devtattrError;}error = device_add_class_symlinks(dev);if (error)goto SymlinkError;error = device_add_attrs(dev);/*添加类设备属型文件和属性组*/if (error)goto AttrsError;error = bus_add_device(dev);/*添加3个symlink*/if (error)goto BusError;error = dpm_sysfs_add(dev);/*创建power子目录,并在其下添加电源管理的属性组文件*/if (error)goto DPMError;device_pm_add(dev);/*将该device添加到电源管理链表中*//* Notify clients of device addition. This call must come * after dpm_sysf_add() and before kobject_uevent(). */if (dev->bus)blocking_notifier_call_chain(&dev->bus->p->bus_notifier, BUS_NOTIFY_ADD_DEVICE, dev);kobject_uevent(&dev->kobj, KOBJ_ADD);/*通知用户层*/bus_attach_device(dev);/*将设备添加到总线的设备链表中,并尝试获取驱动*/if (parent)klist_add_tail(&dev->p->knode_parent,/*有父设备,则将该设备添加到父设备的儿子链表中*/ &parent->p->klist_children);if (dev->class) {/*该设备属于某个设备类*/mutex_lock(&dev->class->p->class_mutex);/* tie the class to the device */klist_add_tail(&dev->knode_class,/*将device添加到class的类设备链表中*/ &dev->class->p->class_devices);/* notify any interfaces that the device is here */list_for_each_entry(class_intf, &dev->class->p->class_interfaces, node)if (class_intf->add_dev)class_intf->add_dev(dev, class_intf);mutex_unlock(&dev->class->p->class_mutex);}done:put_device(dev);return error; DPMError:bus_remove_device(dev); BusError:device_remove_attrs(dev); AttrsError:device_remove_class_symlinks(dev); SymlinkError:if (MAJOR(dev->devt))device_remove_sys_dev_entry(dev); devtattrError:if (MAJOR(dev->devt))device_remove_file(dev, &devt_attr); ueventattrError:device_remove_file(dev, &uevent_attr); attrError:kobject_uevent(&dev->kobj, KOBJ_REMOVE);kobject_del(&dev->kobj); Error:cleanup_device_parent(dev);if (parent)put_device(parent);name_error:kfree(dev->p);dev->p = NULL;goto done;}该函数调用了非常多的其他函数,接下来对主要的函数做出分析。
6.2.1 setup_parent函数
下列代码位于drivers/base/core.c。
static void setup_parent(struct device *dev, struct device *parent){struct kobject *kobj;kobj = get_device_parent(dev, parent);if (kobj)dev->kobj.parent = kobj;}static struct kobject *get_device_parent(struct device *dev, struct device *parent){ /* class devices without a parent live in /sys/class/<classname>/ */ if (dev->class && (!parent || parent->class != dev->class)) return &dev->class->p->class_subsys.kobj; /* all other devices keep their parent */ else if (parent) return &parent->kobj; return NULL;}该函数将设置dev对象的parent。在这里实际传入的parent为NULL,同时dev->class也没有定义过。因此这个函数什么都没有做。6.2.2 kobject_add函数
下列代码位于lib/kobject.c。
/** * kobject_add - the main kobject add function * @kobj: the kobject to add * @parent: pointer to the parent of the kobject. * @fmt: format to name the kobject with. * * The kobject name is set and added to the kobject hierarchy in this * function. * * If @parent is set, then the parent of the @kobj will be set to it. * If @parent is NULL, then the parent of the @kobj will be set to the * kobject associted with the kset assigned to this kobject. If no kset * is assigned to the kobject, then the kobject will be located in the * root of the sysfs tree. * * If this function returns an error, kobject_put() must be called to * properly clean up the memory associated with the object. * Under no instance should the kobject that is passed to this function * be directly freed with a call to kfree(), that can leak memory. * * Note, no "add" uevent will be created with this call, the caller should set * up all of the necessary sysfs files for the object and then call * kobject_uevent() with the UEVENT_ADD parameter to ensure that * userspace is properly notified of this kobject's creation. */int kobject_add(struct kobject *kobj, struct kobject *parent,const char *fmt, ...){va_list args;int retval;if (!kobj)return -EINVAL;if (!kobj->state_initialized) {printk(KERN_ERR "kobject '%s' (%p): tried to add an " "uninitialized object, something is seriously wrong.\n", kobject_name(kobj), kobj);dump_stack();return -EINVAL;}va_start(args, fmt);retval = kobject_add_varg(kobj, parent, fmt, args);va_end(args);return retval;}EXPORT_SYMBOL(kobject_add);static int kobject_add_varg(struct kobject *kobj, struct kobject *parent, const char *fmt, va_list vargs){ int retval; retval = kobject_set_name_vargs(kobj, fmt, vargs); if (retval) { printk(KERN_ERR "kobject: can not set name properly!\n"); return retval; } kobj->parent = parent; return kobject_add_internal(kobj);}static int kobject_add_internal(struct kobject *kobj){ int error = 0; struct kobject *parent; if (!kobj) return -ENOENT; /*检查name字段是否存在*/ if (!kobj->name || !kobj->name[0]) { WARN(1, "kobject: (%p): attempted to be registered with empty " "name!\n", kobj); return -EINVAL; } parent = kobject_get(kobj->parent); /*有父对象则增加父对象引用计数*/ /* join kset if set, use it as parent if we do not already have one */ if (kobj->kset) { if (!parent) /*kobj属于某个kset,但是该kobj没有父对象,则以kset的kobj作为父对象*/ parent = kobject_get(&kobj->kset->kobj); kobj_kset_join(kobj); /*将kojbect添加到kset结构中的链表当中*/ kobj->parent = parent; } pr_debug("kobject: '%s' (%p): %s: parent: '%s', set: '%s'\n", kobject_name(kobj), kobj, __func__, parent ? kobject_name(parent) : "<NULL>", kobj->kset ? kobject_name(&kobj->kset->kobj) : "<NULL>"); error = create_dir(kobj); /*根据kobj->name在sys中建立目录*/ if (error) { kobj_kset_leave(kobj); /*删除链表项*/ kobject_put(parent); /*减少引用计数*/ kobj->parent = NULL; /* be noisy on error issues */ if (error == -EEXIST) printk(KERN_ERR "%s failed for %s with " "-EEXIST, don't try to register things with " "the same name in the same directory.\n", __func__, kobject_name(kobj)); else printk(KERN_ERR "%s failed for %s (%d)\n", __func__, kobject_name(kobj), error); dump_stack(); } else kobj->state_in_sysfs = 1; return error;}在调用时,参数parent为NULL,且dev->kobj.kset在6.1节device_initialize函数中设置为devices_kset。而devices_kset对应着/sys/devices目录,因此该函数调用完成后将在/sys/devices目录下生成目录platform。
但是这里比较奇怪的是,为什么platform目录没有对应的kset对象???
6.2.3 device_create_sys_dev_entry函数
在调用该函数之前,会在/sys/devices/platform/下生成属性文件。接着如果该device的设备号不为0,则创建属性文件dev,并调用本函数。但是,在本例中设备号devt从未设置过,显然为0,那么本函数实际并未执行。
下列代码位于drivers/base/core.c。
static int device_create_sys_dev_entry(struct device *dev){struct kobject *kobj = device_to_dev_kobj(dev);int error = 0;char devt_str[15];if (kobj) {format_dev_t(devt_str, dev->devt);error = sysfs_create_link(kobj, &dev->kobj, devt_str);}return error;}/** * device_to_dev_kobj - select a /sys/dev/ directory for the device * @dev: device * * By default we select char/ for new entries. Setting class->dev_obj * to NULL prevents an entry from being created. class->dev_kobj must * be set (or cleared) before any devices are registered to the class * otherwise device_create_sys_dev_entry() and * device_remove_sys_dev_entry() will disagree about the the presence * of the link. */static struct kobject *device_to_dev_kobj(struct device *dev){ struct kobject *kobj; if (dev->class) kobj = dev->class->dev_kobj; else kobj = sysfs_dev_char_kobj; return kobj;}6.2.4 device_add_class_symlinks函数
由于dev->class为NULL,本函数其实没做任何工作。
下列代码位于drivers/base/core.c。
static int device_add_class_symlinks(struct device *dev){int error;if (!dev->class)return 0;error = sysfs_create_link(&dev->kobj, &dev->class->p->class_subsys.kobj, "subsystem");if (error)goto out;#ifdef CONFIG_SYSFS_DEPRECATED/* stacked class devices need a symlink in the class directory */if (dev->kobj.parent != &dev->class->p->class_subsys.kobj && device_is_not_partition(dev)) {error = sysfs_create_link(&dev->class->p->class_subsys.kobj, &dev->kobj, dev_name(dev));if (error)goto out_subsys;}if (dev->parent && device_is_not_partition(dev)) {struct device *parent = dev->parent;char *class_name;/* * stacked class devices have the 'device' link * pointing to the bus device instead of the parent */while (parent->class && !parent->bus && parent->parent)parent = parent->parent;error = sysfs_create_link(&dev->kobj, &parent->kobj, "device");if (error)goto out_busid;class_name = make_class_name(dev->class->name,&dev->kobj);if (class_name)error = sysfs_create_link(&dev->parent->kobj,&dev->kobj, class_name);kfree(class_name);if (error)goto out_device;}return 0;out_device:if (dev->parent && device_is_not_partition(dev))sysfs_remove_link(&dev->kobj, "device");out_busid:if (dev->kobj.parent != &dev->class->p->class_subsys.kobj && device_is_not_partition(dev))sysfs_remove_link(&dev->class->p->class_subsys.kobj, dev_name(dev));#else/* link in the class directory pointing to the device */error = sysfs_create_link(&dev->class->p->class_subsys.kobj, &dev->kobj, dev_name(dev));if (error)goto out_subsys;if (dev->parent && device_is_not_partition(dev)) {error = sysfs_create_link(&dev->kobj, &dev->parent->kobj, "device");if (error)goto out_busid;}return 0;out_busid:sysfs_remove_link(&dev->class->p->class_subsys.kobj, dev_name(dev));#endifout_subsys:sysfs_remove_link(&dev->kobj, "subsystem");out:return error;}6.2.5 device_add_attrs函数
同样dev->class为空,什么都没干。下列代码位于drivers/base/core.c。
static int device_add_attrs(struct device *dev){struct class *class = dev->class;struct device_type *type = dev->type;int error;if (class) {error = device_add_attributes(dev, class->dev_attrs);if (error)return error;}if (type) {error = device_add_groups(dev, type->groups);if (error)goto err_remove_class_attrs;}error = device_add_groups(dev, dev->groups);if (error)goto err_remove_type_groups;return 0; err_remove_type_groups:if (type)device_remove_groups(dev, type->groups); err_remove_class_attrs:if (class)device_remove_attributes(dev, class->dev_attrs);return error;}6.2.6 bus_add_device函数
由于dev->bus未指定,因此这个函数什么都没干。
该函数将创建三个symlink,在sysfs中建立总线和设备间的关系。
下列代码位于drivers/base/bus.c。
/** * bus_add_device - add device to bus * @dev: device being added * * - Add the device to its bus's list of devices. * - Create link to device's bus. */int bus_add_device(struct device *dev){struct bus_type *bus = bus_get(dev->bus);int error = 0;if (bus) {pr_debug("bus: '%s': add device %s\n", bus->name, dev_name(dev));error = device_add_attrs(bus, dev);if (error)goto out_put;/*在sys/bus/XXX/devices下建立symlink,名字为设备名,该链接指向/sys/devices/下的某个目录*/error = sysfs_create_link(&bus->p->devices_kset->kobj,&dev->kobj, dev_name(dev));if (error)goto out_id;/*在sys/devices/的某个目录下建立symlink,名字为subsystem,该链接指向/sys/bus/下的某个目录*/error = sysfs_create_link(&dev->kobj,&dev->bus->p->subsys.kobj, "subsystem");if (error)goto out_subsys;/*在sys/devices/的某个目录下建立symlink,名字为bus,该链接指向/sys/bus/下的某个目录*/error = make_deprecated_bus_links(dev);if (error)goto out_deprecated;}return 0;out_deprecated:sysfs_remove_link(&dev->kobj, "subsystem");out_subsys:sysfs_remove_link(&bus->p->devices_kset->kobj, dev_name(dev));out_id:device_remove_attrs(bus, dev);out_put:bus_put(dev->bus);return error;}6.2.7 dpm_sysfs_add函数
下列代码位于drivers/base/power/sysfs.c。
int dpm_sysfs_add(struct device * dev){return sysfs_create_group(&dev->kobj, &pm_attr_group);}static DEVICE_ATTR(wakeup, 0644, wake_show, wake_store);static struct attribute * power_attrs[] = { &dev_attr_wakeup.attr, NULL,};static struct attribute_group pm_attr_group = { .name = "power", .attrs = power_attrs,};该函数将在XXX目录下建立power子目录,并在该子目录下建立属性文件wakeup。
在本例中,将在/sys/bus/platform下建立子目录power并在子目录下建立wakeup文件。
6.2.8 device_pm_add函数
下列代码位于drivers/base/power/main.c。
/** *device_pm_add - add a device to the list of active devices *@dev:Device to be added to the list */void device_pm_add(struct device *dev){pr_debug("PM: Adding info for %s:%s\n", dev->bus ? dev->bus->name : "No Bus", kobject_name(&dev->kobj));mutex_lock(&dpm_list_mtx);if (dev->parent) {if (dev->parent->power.status >= DPM_SUSPENDING)dev_warn(dev, "parent %s should not be sleeping\n", dev_name(dev->parent));} else if (transition_started) {/* * We refuse to register parentless devices while a PM * transition is in progress in order to avoid leaving them * unhandled down the road */dev_WARN(dev, "Parentless device registered during a PM transaction\n");}list_add_tail(&dev->power.entry, &dpm_list); /*将该设备添加到链表中*/mutex_unlock(&dpm_list_mtx);}该函数只是将设备添加到电源管理链表中。
6.2.9 bus_attach_device函数
在本例中,由于bus未指定,该函数实际不做任何工作。
下列代码位于drivers/base/bus.c。
/** * bus_attach_device - add device to bus * @dev: device tried to attach to a driver * * - Add device to bus's list of devices. * - Try to attach to driver. */void bus_attach_device(struct device *dev){struct bus_type *bus = dev->bus;int ret = 0;if (bus) {if (bus->p->drivers_autoprobe)ret = device_attach(dev);/*尝试获取驱动*/WARN_ON(ret < 0);if (ret >= 0)/*将设备挂在到总线中*/klist_add_tail(&dev->p->knode_bus, &bus->p->klist_devices);}}/** * device_attach - try to attach device to a driver. * @dev: device. * * Walk the list of drivers that the bus has and call * driver_probe_device() for each pair. If a compatible * pair is found, break out and return. * * Returns 1 if the device was bound to a driver; * 0 if no matching device was found; * -ENODEV if the device is not registered. * * When called for a USB interface, @dev->parent->sem must be held. */int device_attach(struct device *dev){ int ret = 0; down(&dev->sem); if (dev->driver) { /*如果已指定驱动,即已绑定*/ ret = device_bind_driver(dev); /*在sysfs中建立链接关系*/ if (ret == 0) ret = 1; else { dev->driver = NULL; ret = 0; } } else { /*尚未绑定,尝试绑定,遍历该总线上的所有驱动*/ ret = bus_for_each_drv(dev->bus, NULL, dev, __device_attach); } up(&dev->sem); return ret;}EXPORT_SYMBOL_GPL(device_attach);
如果bus存在的话,将会调用device_attach函数进行绑定工作。该函数首先判断dev->driver,如果非0,表示该设备已经绑定了驱动,只要在sysfs中建立链接关系即可。
为0表示没有绑定,接着调用bus_for_each_drv,注意作为参数传入的__device_attach,这是个函数,后面会调用它。
我们来看下bus_for_each_drv:
/** * bus_for_each_drv - driver iterator * @bus: bus we're dealing with. * @start: driver to start iterating on. * @data: data to pass to the callback. * @fn: function to call for each driver. * * This is nearly identical to the device iterator above. * We iterate over each driver that belongs to @bus, and call * @fn for each. If @fn returns anything but 0, we break out * and return it. If @start is not NULL, we use it as the head * of the list. * * NOTE: we don't return the driver that returns a non-zero * value, nor do we leave the reference count incremented for that * driver. If the caller needs to know that info, it must set it * in the callback. It must also be sure to increment the refcount * so it doesn't disappear before returning to the caller. */int bus_for_each_drv(struct bus_type *bus, struct device_driver *start, void *data, int (*fn)(struct device_driver *, void *)){ struct klist_iter i; struct device_driver *drv; int error = 0; if (!bus) return -EINVAL; klist_iter_init_node(&bus->p->klist_drivers, &i, start ? &start->p->knode_bus : NULL); while ((drv = next_driver(&i)) && !error) error = fn(drv, data); klist_iter_exit(&i); return error;}EXPORT_SYMBOL_GPL(bus_for_each_drv);该函数将遍历总线的drivers目录下的所有驱动,也就是/sys/bus/XXX/drivers/下的目录,为该driver调用fn函数,也就是__device_attach。我们来看下:static int __device_attach(struct device_driver *drv, void *data){struct device *dev = data;if (!driver_match_device(drv, dev)) /*进行匹配工作*/return 0;return driver_probe_device(drv, dev);}static inline int driver_match_device(struct device_driver *drv, struct device *dev){ return drv->bus->match ? drv->bus->match(dev, drv) : 1;} /** * driver_probe_device - attempt to bind device & driver together * @drv: driver to bind a device to * @dev: device to try to bind to the driver * * This function returns -ENODEV if the device is not registered, * 1 if the device is bound sucessfully and 0 otherwise. * * This function must be called with @dev->sem held. When called for a * USB interface, @dev->parent->sem must be held as well. */int driver_probe_device(struct device_driver *drv, struct device *dev){ int ret = 0; if (!device_is_registered(dev)) /*该device是否已在sysfs中*/ return -ENODEV; pr_debug("bus: '%s': %s: matched device %s with driver %s\n", drv->bus->name, __func__, dev_name(dev), drv->name); ret = really_probe(dev, drv);/*device已在sysfs,调用really_probe*/ return ret;}该函数首先调用driver_match_device函数,后者将会调用总线的match方法,如果有的话,来进行匹配工作。如果没有该方法,则返回1,表示匹配成功。
我们这里是针对platform总线,该总线的方法将在7.6.2节中看到。
随后,又调用了driver_probe_device函数。该函数将首先判断该device是否已在sysfs中,如果在则调用really_probe,否则返回出错。
really_probe将会调用驱动的probe并完成绑定的工作。该函数将在7.6.2节中分析。
6.2.10 小结
在本例中,当device_register调用完成以后,将在/sys/devices/下建立目录platform,并在platfrom下建立属性文件uevent和子目录power,最后在power子目录下建立wakeup属性文件。
最后以函数调用过程的总结来结束第6.2小结。

6.3 spi主控制器的平台设备
本节对一个特定的platform设备进行讲解,那就是spi主控制器的平台设备。
在内核的启动阶段,platform设备将被注册进内核。我们来看下。
下列代码位于arch/arm/mach-s3c2440/mach-smdk2440.c
static struct resource s3c_spi0_resource[] = { [0] = { .start = S3C24XX_PA_SPI, .end = S3C24XX_PA_SPI + 0x1f, .flags = IORESOURCE_MEM, }, [1] = { .start = IRQ_SPI0, .end = IRQ_SPI0, .flags = IORESOURCE_IRQ, }};static u64 s3c_device_spi0_dmamask = 0xffffffffUL;struct platform_device s3c_device_spi0 = { .name = "s3c2410-spi", .id = 0, .num_resources = ARRAY_SIZE(s3c_spi0_resource), .resource = s3c_spi0_resource, .dev = { .dma_mask = &s3c_device_spi0_dmamask, .coherent_dma_mask = 0xffffffffUL }};static struct platform_device *smdk2440_devices[] __initdata = { &s3c_device_usb, &s3c_device_lcd, &s3c_device_wdt, &s3c_device_i2c0, &s3c_device_iis, &s3c_device_spi0,};static void __init smdk2440_machine_init(void){s3c24xx_fb_set_platdata(&smdk2440_fb_info);s3c_i2c0_set_platdata(NULL);platform_add_devices(smdk2440_devices, ARRAY_SIZE(smdk2440_devices));smdk_machine_init();}在smdk2440_machine_init函数中,通过调用platform_add_devices将设备注册到内核中。接着来看下该函数。
6.3.1 platform_add_devices
/** * platform_add_devices - add a numbers of platform devices * @devs: array of platform devices to add * @num: number of platform devices in array */int platform_add_devices(struct platform_device **devs, int num){int i, ret = 0;for (i = 0; i < num; i++) {ret = platform_device_register(devs[i]);if (ret) {while (--i >= 0)platform_device_unregister(devs[i]);break;}}return ret;}EXPORT_SYMBOL_GPL(platform_add_devices);该函数将根据devs指针数组,调用platform_device_register将platform设备逐一注册进内核。
6.3.2 platform_device_register
/** * platform_device_register - add a platform-level device * @pdev: platform device we're adding */int platform_device_register(struct platform_device *pdev){device_initialize(&pdev->dev);return platform_device_add(pdev);}EXPORT_SYMBOL_GPL(platform_device_register);调用了两个函数,第一个函数在6.1节已经分析过。我们来看下第二个函数。
6.3.2 platform_device_register
/** * platform_device_add - add a platform device to device hierarchy * @pdev: platform device we're adding * * This is part 2 of platform_device_register(), though may be called * separately _iff_ pdev was allocated by platform_device_alloc(). */int platform_device_add(struct platform_device *pdev){int i, ret = 0;if (!pdev)return -EINVAL;if (!pdev->dev.parent)pdev->dev.parent = &platform_bus;/*该设备的父设备是platform设备,/sys/devices/platform*/pdev->dev.bus = &platform_bus_type;/*设备挂载到platform总线上*/if (pdev->id != -1)dev_set_name(&pdev->dev, "%s.%d", pdev->name, pdev->id);elsedev_set_name(&pdev->dev, pdev->name);/*pdev->dev->kobj->name = pdev->name*//*遍历平台设备的资源,并将资源添加到资源树中*/for (i = 0; i < pdev->num_resources; i++) {struct resource *p, *r = &pdev->resource[i];if (r->name == NULL)r->name = dev_name(&pdev->dev);/*获取dev->kobject->name*/p = r->parent;if (!p) {/*p空*/if (resource_type(r) == IORESOURCE_MEM)p = &iomem_resource;else if (resource_type(r) == IORESOURCE_IO)p = &ioport_resource;}if (p && insert_resource(p, r)) {/*将资源添加到资源树中*/printk(KERN_ERR "%s: failed to claim resource %d\n", dev_name(&pdev->dev), i);ret = -EBUSY;goto failed;}}pr_debug("Registering platform device '%s'. Parent at %s\n", dev_name(&pdev->dev), dev_name(pdev->dev.parent));ret = device_add(&pdev->dev);/*添加设备*/if (ret == 0)return ret; failed:while (--i >= 0) {struct resource *r = &pdev->resource[i];unsigned long type = resource_type(r);if (type == IORESOURCE_MEM || type == IORESOURCE_IO)release_resource(r);}return ret;}EXPORT_SYMBOL_GPL(platform_device_add);在这个函数的最后赫然出现了device_add函数。我们回忆下在6.1节中device_register的注册过程,该函数只调用了两个函数,一个是device_initialize函数,另一个就是device_add。
本节的platform_device_register函数,首先也是调用了device_initialize,但是随后他做了一些其他的工作,最后调用了device_add。
那么这个"其他的工作"干了些什么呢?
首先,它将该SPI主控制对应的平台设备的父设备设为虚拟的platform设备(platform_bus),然后将该平台设备挂在至platform总线(platform_bus_type)上,这两步尤为重要,后面我们将看到。
然后,调用了dev_set_name设置了pdev->dev-kobj.name,也就是该设备对象的名字,这里的名字为s3c2410-spi.0,这个名字将被用来建立一个目录。
最后,将平台的相关资源添加到资源树中。这不是本篇文章讨论的重点所在,所以不做过多说明。
在"其他的工作""干完之后,调用了device_add函数。那么后面的函数调用过程将和6.2小结的一致。
由于“其他的工作”的原因,实际执行的过程和结果将有所区别。我们来分析下。
6.3.3 不一样device_add调用结果
首先,在device_add被调用之前,有若干个非常重要的条件已经被设置了。如下:
pdev->dev->kobj.kset = devices_kset
pdev->dev-.parent = &platform_bus
pdev->dev.bus = &platform_bus_type
set_up函数执行时,由于参数parent为&platform_bus,因此最后将设置pdev->dev->kobj.parent = platform_bus.kobj。平台设备对象的父对象为虚拟的platform设备。
kobject_add函数执行时,由于参数parent的存在,将在parent对象所对应的目录下创建另一个目录。parent对象代表目录/sys/devices/下的platform,因此将在/sys/devices/platform下建立目录s3c2410-spi.0。
device_create_file建立属性文件uevent。
bus_add_device函数执行时,由于dev.bus 为&platform_bus_type,因此将建立三个symlink。
/sys/devices/platform/s3c2410-spi.0下建立链接subsystem和bus,他们指向/sys/bus/platform。
/sys/bus/platform/devices/下建立链接s3c2410-spi.0,指向/sys/devices/platform/s3c2410-spi.0。
dpm_sysfs_add函数在/sys/devices/platform/s3c2410-spi.0下建立子目录power,并在该子目录下建立属性文件wakeup。
执行到这里时,sysfs已将内核中新添加的SPI主控制器平台设备呈现出来了,我们来验证下。
[root@yj423 s3c2410-spi.0]#pwd
/sys/devices/platform/s3c2410-spi.0
[root@yj423 s3c2410-spi.0]#ll
lrwxrwxrwx 1 root root 0 Jan 1 00:29 bus -> ../../../bus/platform
lrwxrwxrwx 1 root root 0 Jan 1 00:29 driver -> ../../../bus/platform/drivers/s3c2410-spi
-r--r--r-- 1 root root 4096 Jan 1 00:29 modalias
drwxr-xr-x 2 root root 0 Jan 1 00:29 power
drwxr-xr-x 3 root root 0 Jan 1 00:00 spi0.0
drwxr-xr-x 3 root root 0 Jan 1 00:00 spi0.1
lrwxrwxrwx 1 root root 0 Jan 1 00:29 spi_master:spi0 -> ../../../class/spi_master/spi0
lrwxrwxrwx 1 root root 0 Jan 1 00:29 subsystem -> ../../../bus/platform
-rw-r--r-- 1 root root 4096 Jan 1 00:29 uevent
[root@yj423 devices]#pwd
/sys/bus/platform/devices
[root@yj423 devices]#ll s3c2410-spi.0
lrwxrwxrwx 1 root root 0 Jan 1 00:44 s3c2410-spi.0 -> ../../../devices/platform/s3c2410-spi.0
通过sysfs将设备驱动的模型层次呈现在用户空间以后,将更新内核的设备模型之间的关系,这是通过修改链表的指向来完成的。
bus_attach_device函数执行时,将设备添加到总线的设备链表中,同时也会尝试绑定驱动,不过会失败。
接着,由于dev->parent的存在,将SPI主控制器设备添加到父设备platform虚拟设备的儿子链表中。
7. driver举例
我们已经介绍过platform总线的注册,也讲述了SPI主控制器设备作为平台设备的注册过程,在本节,将描述SPI主控制器的platform驱动是如何注册的。
7.1 s3c24xx_spi_init
下列代码位于drivers/spi/spi_s3c24xx.c。
MODULE_ALIAS("platform:s3c2410-spi");static struct platform_driver s3c24xx_spi_driver = { .remove = __exit_p(s3c24xx_spi_remove), .suspend = s3c24xx_spi_suspend, .resume = s3c24xx_spi_resume, .driver = { .name = "s3c2410-spi", .owner = THIS_MODULE, },};static int __init s3c24xx_spi_init(void){ return platform_driver_probe(&s3c24xx_spi_driver, s3c24xx_spi_probe);//设备不可热插拔,所以使用该函数,而不是platform_driver_register}驱动注册通过调用platform_driver_probe来完成。注意:driver.name字段使用来匹配设备的,该字段必须和6.3节一开始给出的pdev.name字段相同。
7.2 platform_driver_probe
下列代码位于drivers/base/platform.c。
/** * platform_driver_probe - register driver for non-hotpluggable device * @drv: platform driver structure * @probe: the driver probe routine, probably from an __init section * * Use this instead of platform_driver_register() when you know the device * is not hotpluggable and has already been registered, and you want to * remove its run-once probe() infrastructure from memory after the driver * has bound to the device. * * One typical use for this would be with drivers for controllers integrated * into system-on-chip processors, where the controller devices have been * configured as part of board setup. * * Returns zero if the driver registered and bound to a device, else returns * a negative error code and with the driver not registered. */int __init_or_module platform_driver_probe(struct platform_driver *drv,int (*probe)(struct platform_device *)){int retval, code;/* temporary section violation during probe() */drv->probe = probe;retval = code = platform_driver_register(drv); /*注册platform驱动*//* Fixup that section violation, being paranoid about code scanning * the list of drivers in order to probe new devices. Check to see * if the probe was successful, and make sure any forced probes of * new devices fail. */spin_lock(&platform_bus_type.p->klist_drivers.k_lock);drv->probe = NULL;if (code == 0 && list_empty(&drv->driver.p->klist_devices.k_list))retval = -ENODEV;drv->driver.probe = platform_drv_probe_fail;spin_unlock(&platform_bus_type.p->klist_drivers.k_lock);if (code != retval)platform_driver_unregister(drv);return retval;}EXPORT_SYMBOL_GPL(platform_driver_probe);这里的重点是platform_driver_register,由它来完成了platform驱动的注册。7.3 platform_driver_register
/** * platform_driver_register * @drv: platform driver structure */int platform_driver_register(struct platform_driver *drv){drv->driver.bus = &platform_bus_type;if (drv->probe)drv->driver.probe = platform_drv_probe;if (drv->remove)drv->driver.remove = platform_drv_remove;if (drv->shutdown)drv->driver.shutdown = platform_drv_shutdown;if (drv->suspend)drv->driver.suspend = platform_drv_suspend;if (drv->resume)drv->driver.resume = platform_drv_resume;return driver_register(&drv->driver); /*驱动注册*/}EXPORT_SYMBOL_GPL(platform_driver_register);driver_register函数就是driver注册的核心函数。需要注意的是,在调用函数之前,将该驱动所挂载的总线设置为platform总线(platform_bus_type)。
7.4 driver_register
下列代码位于drivers/base/driver.c。
/** * driver_register - register driver with bus * @drv: driver to register * * We pass off most of the work to the bus_add_driver() call, * since most of the things we have to do deal with the bus * structures. */int driver_register(struct device_driver *drv){int ret;struct device_driver *other;BUG_ON(!drv->bus->p);if ((drv->bus->probe && drv->probe) || (drv->bus->remove && drv->remove) || (drv->bus->shutdown && drv->shutdown))printk(KERN_WARNING "Driver '%s' needs updating - please use ""bus_type methods\n", drv->name);other = driver_find(drv->name, drv->bus);/*用驱动名字来搜索在该总线上驱动是否已经存在*/if (other) {/*存在则报错*/put_driver(other);printk(KERN_ERR "Error: Driver '%s' is already registered, ""aborting...\n", drv->name);return -EEXIST;}ret = bus_add_driver(drv);/*将驱动添加到一个总线中*/if (ret)return ret;ret = driver_add_groups(drv, drv->groups); /*建立属性组文件*/if (ret)bus_remove_driver(drv);return ret;}EXPORT_SYMBOL_GPL(driver_register);这里主要调用两个函数driver_find和bus_add_driver。前者将通过总线来搜索该驱动是否存在,后者将添加驱动到总线中。接下来就分析这两个函数。
7.5 driver_find
下列代码位于drivers/base/driver.c。
/** * driver_find - locate driver on a bus by its name. * @name: name of the driver. * @bus: bus to scan for the driver. * * Call kset_find_obj() to iterate over list of drivers on * a bus to find driver by name. Return driver if found. * * Note that kset_find_obj increments driver's reference count. */struct device_driver *driver_find(const char *name, struct bus_type *bus){struct kobject *k = kset_find_obj(bus->p->drivers_kset, name);struct driver_private *priv;if (k) {priv = to_driver(k);return priv->driver;}return NULL;}EXPORT_SYMBOL_GPL(driver_find);/** * kset_find_obj - search for object in kset. * @kset: kset we're looking in. * @name: object's name. * * Lock kset via @kset->subsys, and iterate over @kset->list, * looking for a matching kobject. If matching object is found * take a reference and return the object. */struct kobject *kset_find_obj(struct kset *kset, const char *name){struct kobject *k;struct kobject *ret = NULL;spin_lock(&kset->list_lock);list_for_each_entry(k, &kset->list, entry) {if (kobject_name(k) && !strcmp(kobject_name(k), name)) {ret = kobject_get(k);break;}}spin_unlock(&kset->list_lock);return ret;}这里调用了kset_find_obj函数,传入的实参bus->p->drivers_kset,它对应的就是/sys/bus/platform/下的drivers目录,然后通过链表,它将搜索该目录下的所有文件,来寻找是否有名为s3c2410-spi的文件。还记得吗? kobject就是一个文件对象。如果没有找到将返回NULL,接着将调用bus_add_driver把驱动注册进内核。7.6 bus_add_driver
下列代码位于drivers/base/bus.c
/** * bus_add_driver - Add a driver to the bus. * @drv: driver. */int bus_add_driver(struct device_driver *drv){struct bus_type *bus;struct driver_private *priv;int error = 0;bus = bus_get(drv->bus);/*增加引用计数获取bus_type*/if (!bus)return -EINVAL;pr_debug("bus: '%s': add driver %s\n", bus->name, drv->name);priv = kzalloc(sizeof(*priv), GFP_KERNEL);/*分配driver_private结构体*/if (!priv) {error = -ENOMEM;goto out_put_bus;}/*初始化内核链表*/klist_init(&priv->klist_devices, NULL, NULL);/*相互保存*/priv->driver = drv;drv->p = priv;/*设置该kobj属于那个kset*/priv->kobj.kset = bus->p->drivers_kset;error = kobject_init_and_add(&priv->kobj, &driver_ktype, NULL,/*parent=NULL*/ "%s", drv->name);/*执行完以后,会在bus/总线名/drivers/下建立名为drv->name的目录*/if (error)goto out_unregister;if (drv->bus->p->drivers_autoprobe) {error = driver_attach(drv);/*尝试绑定驱动和设备*/if (error)goto out_unregister;}/*添加该驱动到bus的内核链表中*/klist_add_tail(&priv->knode_bus, &bus->p->klist_drivers);module_add_driver(drv->owner, drv);/*?????????*//*创建属性,在bus/总线名/drivers/驱动名/下建立文件uevent*/error = driver_create_file(drv, &driver_attr_uevent);if (error) {printk(KERN_ERR "%s: uevent attr (%s) failed\n",__func__, drv->name);}/*利用bus->drv_attrs创建属性,位于bus/总线名/drivers/驱动名/*/error = driver_add_attrs(bus, drv);if (error) {/* How the hell do we get out of this pickle? Give up */printk(KERN_ERR "%s: driver_add_attrs(%s) failed\n",__func__, drv->name);}/*创建属性,在bus/总线名/drivers/驱动名/下建立文件bind和unbind*/error = add_bind_files(drv);if (error) {/* Ditto */printk(KERN_ERR "%s: add_bind_files(%s) failed\n",__func__, drv->name);}/*通知用户空间???*/kobject_uevent(&priv->kobj, KOBJ_ADD);return 0;out_unregister:kfree(drv->p);drv->p = NULL;kobject_put(&priv->kobj);out_put_bus:bus_put(bus);return error;}在设置driver的kobj.kset为drivers目录所对应的kset之后,调用了kobject_init_and_add,我们来看下。7.6.1 kobject_init_and_add
下列代码位于lib/kobject.c。
/** * kobject_init_and_add - initialize a kobject structure and add it to the kobject hierarchy * @kobj: pointer to the kobject to initialize * @ktype: pointer to the ktype for this kobject. * @parent: pointer to the parent of this kobject. * @fmt: the name of the kobject. * * This function combines the call to kobject_init() and * kobject_add(). The same type of error handling after a call to * kobject_add() and kobject lifetime rules are the same here. */int kobject_init_and_add(struct kobject *kobj, struct kobj_type *ktype, struct kobject *parent, const char *fmt, ...){va_list args;int retval;kobject_init(kobj, ktype);va_start(args, fmt);retval = kobject_add_varg(kobj, parent, fmt, args);va_end(args);return retval;}EXPORT_SYMBOL_GPL(kobject_init_and_add);该函数中调用了两个函数,这两个函数分别在6.1.2和6.2.2中讲述过,这里不再赘述。调用该函数时由于parent为NULL,但kobj.kset为drivers目录,所以将在/sys/bus/platform/drivers/下建立目录,名为s3c2410-spi。
我们来验证下:
[root@yj423 s3c2410-spi]#pwd
/sys/bus/platform/drivers/s3c2410-spi
接着由于drivers_autoprobe在bus_register执行的时候已经置1,将调用driver_attach。
7.6.2 driver_attach
下列代码位于drivers/base/dd.c。
/** * driver_attach - try to bind driver to devices. * @drv: driver. * * Walk the list of devices that the bus has on it and try to * match the driver with each one. If driver_probe_device() * returns 0 and the @dev->driver is set, we've found a * compatible pair. */int driver_attach(struct device_driver *drv){return bus_for_each_dev(drv->bus, NULL, drv, __driver_attach);}EXPORT_SYMBOL_GPL(driver_attach);该函数将调用bus_for_each_dev来寻找总线上的每个设备,这里的总线即为platform总线,然后尝试绑定设备。这里需要注意的是最后一个参数__driver_attach,这是一个函数名,后面将会调用它。
/** * bus_for_each_dev - device iterator. * @bus: bus type. * @start: device to start iterating from. * @data: data for the callback. * @fn: function to be called for each device. * * Iterate over @bus's list of devices, and call @fn for each, * passing it @data. If @start is not NULL, we use that device to * begin iterating from. * * We check the return of @fn each time. If it returns anything * other than 0, we break out and return that value. * * NOTE: The device that returns a non-zero value is not retained * in any way, nor is its refcount incremented. If the caller needs * to retain this data, it should do, and increment the reference * count in the supplied callback. */int bus_for_each_dev(struct bus_type *bus, struct device *start, void *data, int (*fn)(struct device *, void *)){struct klist_iter i;struct device *dev;int error = 0;if (!bus)return -EINVAL;klist_iter_init_node(&bus->p->klist_devices, &i, (start ? &start->p->knode_bus : NULL));while ((dev = next_device(&i)) && !error)error = fn(dev, data);klist_iter_exit(&i);return error;}EXPORT_SYMBOL_GPL(bus_for_each_dev);通过klist将遍历该总线上的所有设备,并为其调用__driver_attach函数。static int __driver_attach(struct device *dev, void *data){struct device_driver *drv = data;/* * Lock device and try to bind to it. We drop the error * here and always return 0, because we need to keep trying * to bind to devices and some drivers will return an error * simply if it didn't support the device. * * driver_probe_device() will spit a warning if there * is an error. */if (!driver_match_device(drv, dev))return 0;if (dev->parent)/* Needed for USB */down(&dev->parent->sem);down(&dev->sem);if (!dev->driver)driver_probe_device(drv, dev);up(&dev->sem);if (dev->parent)up(&dev->parent->sem);return 0;}首先调用了driver_match_device函数,该函数进会进行匹配,如果匹配成功将返回1。我们看下这个函数:static inline int driver_match_device(struct device_driver *drv, struct device *dev){return drv->bus->match ? drv->bus->match(dev, drv) : 1;}这里直接调用了platform总线的match方法,我们来看下这个方法。
/** * platform_match - bind platform device to platform driver. * @dev: device. * @drv: driver. * * Platform device IDs are assumed to be encoded like this: * "<name><instance>", where <name> is a short description of the type of * device, like "pci" or "floppy", and <instance> is the enumerated * instance of the device, like '0' or '42'. Driver IDs are simply * "<name>". So, extract the <name> from the platform_device structure, * and compare it against the name of the driver. Return whether they match * or not. */static int platform_match(struct device *dev, struct device_driver *drv){struct platform_device *pdev = to_platform_device(dev);struct platform_driver *pdrv = to_platform_driver(drv);/* match against the id table first */if (pdrv->id_table)return platform_match_id(pdrv->id_table, pdev) != NULL;/* fall-back to driver name match */return (strcmp(pdev->name, drv->name) == 0);}该方法的核心其实就是使用stcmp进行字符匹配,判断pdev->name和drv->name是否相等。在本例中两者同为s3c2410-spi。因此匹配完成,返回1。
返回后,由于dev->driver为NULL,将调用driver_probe_device函数。我们来看下:
/** * driver_probe_device - attempt to bind device & driver together * @drv: driver to bind a device to * @dev: device to try to bind to the driver * * This function returns -ENODEV if the device is not registered, * 1 if the device is bound sucessfully and 0 otherwise. * * This function must be called with @dev->sem held. When called for a * USB interface, @dev->parent->sem must be held as well. */int driver_probe_device(struct device_driver *drv, struct device *dev){int ret = 0;if (!device_is_registered(dev))return -ENODEV;pr_debug("bus: '%s': %s: matched device %s with driver %s\n", drv->bus->name, __func__, dev_name(dev), drv->name);ret = really_probe(dev, drv);return ret;}static inline int device_is_registered(struct device *dev){ return dev->kobj.state_in_sysfs;}该函数将调用really_probe来绑定设备和它的驱动。static int really_probe(struct device *dev, struct device_driver *drv){int ret = 0;atomic_inc(&probe_count);pr_debug("bus: '%s': %s: probing driver %s with device %s\n", drv->bus->name, __func__, drv->name, dev_name(dev));WARN_ON(!list_empty(&dev->devres_head));dev->driver = drv;if (driver_sysfs_add(dev)) {/*创建两个symlink,更新sysfs*/printk(KERN_ERR "%s: driver_sysfs_add(%s) failed\n",__func__, dev_name(dev));goto probe_failed;}if (dev->bus->probe) {ret = dev->bus->probe(dev);/*调用总线的probe方法*/if (ret)goto probe_failed;} else if (drv->probe) {ret = drv->probe(dev);/*调用驱动的probe方法*/if (ret)goto probe_failed;}driver_bound(dev); /*绑定设备和驱动*/ret = 1;pr_debug("bus: '%s': %s: bound device %s to driver %s\n", drv->bus->name, __func__, dev_name(dev), drv->name);goto done;probe_failed:devres_release_all(dev);driver_sysfs_remove(dev);dev->driver = NULL;if (ret != -ENODEV && ret != -ENXIO) {/* driver matched but the probe failed */printk(KERN_WARNING "%s: probe of %s failed with error %d\n", drv->name, dev_name(dev), ret);}/* * Ignore errors returned by ->probe so that the next driver can try * its luck. */ret = 0;done:atomic_dec(&probe_count);wake_up(&probe_waitqueue);return ret;}在这个函数中调用4个函数。
第一个函数driver_sysfs_add将更新sysfs。
static int driver_sysfs_add(struct device *dev){int ret;/* 在/sys/bus/XXX/drivers/XXX目录下建立symlink,链接名为kobj->name, 链接指向/sys/devices/platform/XXX */ret = sysfs_create_link(&dev->driver->p->kobj, &dev->kobj, kobject_name(&dev->kobj));if (ret == 0) {/* 在/sys/devices/platform/XXX/下建立symlink,链接名为driver, 指向/sys/bus/xxx/drivers目录下的某个目录*/ret = sysfs_create_link(&dev->kobj, &dev->driver->p->kobj,"driver");if (ret)sysfs_remove_link(&dev->driver->p->kobj,kobject_name(&dev->kobj));}return ret;}执行完以后,建立了两个链接。
在/sys/bus/platform/drivers/s3c2410-spi下建立链接,指向/sys/devices/platform/s3c2410-spi.0
在/sys/devices/platform/s3c2410-spi.0下建立链接,指向/sys/devices/platform/s3c2410-spi.0。
这样就在用户空间呈现出驱动和设备的关系了。我们来验证下。
[root@yj423 s3c2410-spi]#pwd/sys/bus/platform/drivers/s3c2410-spi
[root@yj423 s3c2410-spi]#ll s3c2410-spi.0
lrwxrwxrwx 1 root root 0 Jan 1 02:28 s3c2410-spi.0 -> ../../../../devices/platform/s3c2410-spi.0
[root@yj423 s3c2410-spi.0]#pwd
/sys/devices/platform/s3c2410-spi.0
[root@yj423 s3c2410-spi.0]#ll driver
lrwxrwxrwx 1 root root 0 Jan 1 02:26 driver -> ../../../bus/platform/drivers/s3c2410-spi
第2个函数执行总线的probe方法,由于platform总线没有提供probe方法,因此不执行。
第3个函数执行驱动的probe方法,驱动提供了probe,因此调用它,该函数的细节超过了本文的讨论内容,所以略过。
第4个函数执行driver_bound,用来绑定设备和驱动,来看下这个函数。
static void driver_bound(struct device *dev){if (klist_node_attached(&dev->p->knode_driver)) {printk(KERN_WARNING "%s: device %s already bound\n",__func__, kobject_name(&dev->kobj));return;}pr_debug("driver: '%s': %s: bound to device '%s'\n", dev_name(dev), __func__, dev->driver->name);if (dev->bus)blocking_notifier_call_chain(&dev->bus->p->bus_notifier, BUS_NOTIFY_BOUND_DRIVER, dev);klist_add_tail(&dev->p->knode_driver, &dev->driver->p->klist_devices);}其实,所谓的绑定,就是将设备的驱动节点添加到驱动支持的设备链表中。至此,通过内核链表,这个platform device 和platform driver 已经绑定完成,将继续遍历内核链表尝试匹配和绑定,直到链表结束。
在driver_attach执行完毕以后,bus_add_driver函数还有些剩余工作要完成。
首先,将驱动添加到总线的驱动列表中。
接着,如果定义了驱动属性文件,则创建。
最后,在/sys/bus/platform/drivers/s3c2410-spi/下建立属性文件uevent,并在同一目录下建立文件bind和unbind。
我们来验证下:
[root@yj423 s3c2410-spi]#pwd
/sys/bus/platform/drivers/s3c2410-spi
[root@yj423 s3c2410-spi]#ls
bind s3c2410-spi.0 uevent unbind
7.7 小结
在本节中,我们看到了platform driver是如何注册到内核中,在注册过程中,通过更新了sysfs,向用户空间展示总线,设备和驱动之间的关系。
同时,还更新了链表的指向,在内核中体现了同样的关系。
最后以platform driver的注册过程结束本章。

8. sysfs底层函数
下面讲述的内容将基于VFS,有关VFS的基本内容超过本文的范围,请参考<<深入理解Linux内核>>一书的第12章。
在前面讲述的过程中,我们知道设备驱动模型是如何通过kobject将总线,设备和驱动间的层次关系在用户空间呈现出来的。事实上,就是通过目录,文件和symlink来呈现相互之间的关系。在前面的叙述中,我们并没有对目录,文件和symlink的创建进行 讲解,本章就对这些底层函数进行讲解。在讲解这些函数之前,我们先来看下,sysfs文件系统是如何注册的。
8.1 注册sysfs文件系统
sysfs文件系统的注册是调用sysfs_init函数来完成的,该函数在内核启动阶段被调用,我们来看下大致函数调用流程,这里不作分析。
start_kernel( ) -> vfs_caches_init( ) -> mnt_init( ) -> mnt_init( ) -> sysfs_init( )。
int __init sysfs_init(void){int err = -ENOMEM;/*建立cache,名字为sysfs_dir_cache*/sysfs_dir_cachep = kmem_cache_create("sysfs_dir_cache", sizeof(struct sysfs_dirent), 0, 0, NULL);if (!sysfs_dir_cachep)goto out;err = sysfs_inode_init();if (err)goto out_err;/*注册文件系统*/err = register_filesystem(&sysfs_fs_type);if (!err) {/*注册成功,加载文件系统*/sysfs_mount = kern_mount(&sysfs_fs_type);if (IS_ERR(sysfs_mount)) {printk(KERN_ERR "sysfs: could not mount!\n");err = PTR_ERR(sysfs_mount);sysfs_mount = NULL;unregister_filesystem(&sysfs_fs_type);goto out_err;}} elsegoto out_err;out:return err;out_err:kmem_cache_destroy(sysfs_dir_cachep);sysfs_dir_cachep = NULL;goto out;}static struct file_system_type sysfs_fs_type = { .name = "sysfs", .get_sb = sysfs_get_sb, .kill_sb = kill_anon_super,};8.1.1 register_filesystem
下列代码位于fs/filesystems.c。/** *register_filesystem - register a new filesystem *@fs: the file system structure * *Adds the file system passed to the list of file systems the kernel *is aware of for mount and other syscalls. Returns 0 on success, *or a negative errno code on an error. * *The &struct file_system_type that is passed is linked into the kernel *structures and must not be freed until the file system has been *unregistered. */ int register_filesystem(struct file_system_type * fs){int res = 0;struct file_system_type ** p;BUG_ON(strchr(fs->name, '.'));if (fs->next)return -EBUSY;INIT_LIST_HEAD(&fs->fs_supers);write_lock(&file_systems_lock);p = find_filesystem(fs->name, strlen(fs->name));/*查找要住的文件是同是否存在,返回位置*/if (*p)res = -EBUSY;/*该文件系统已存在,返回error*/else*p = fs;/*将新的文件系统加入到链表中*/write_unlock(&file_systems_lock);return res;}static struct file_system_type **find_filesystem(const char *name, unsigned len){struct file_system_type **p;for (p=&file_systems; *p; p=&(*p)->next)if (strlen((*p)->name) == len && strncmp((*p)->name, name, len) == 0)break;return p;}该函数将调用函数file_system_type,此函数根据name字段(sysfs)来查找要注册的文件系统是否已经存在。如果不存在,表示还未注册,则将新的fs添加到链表中,链表的第一项为全局变量file_systems。
该全局变量为单项链表,所有已注册的文件系统都被插入到这个链表当中。
8.1.2 kern_mount函数
下列代码位于include/linux/fs.h
#define kern_mount(type) kern_mount_data(type, NULL)下列代码位于fs/sysfs/mount.c
struct vfsmount *kern_mount_data(struct file_system_type *type, void *data){ return vfs_kern_mount(type, MS_KERNMOUNT, type->name, data);}EXPORT_SYMBOL_GPL(kern_mount_data);kern_mount实际上最后是调用了vfs_kern_mount函数。我们来看下:
struct vfsmount *vfs_kern_mount(struct file_system_type *type, int flags, const char *name, void *data){struct vfsmount *mnt;char *secdata = NULL;int error;if (!type)return ERR_PTR(-ENODEV);error = -ENOMEM;mnt = alloc_vfsmnt(name);/*分配struct vfsmount*/if (!mnt)goto out;if (data && !(type->fs_flags & FS_BINARY_MOUNTDATA)) {secdata = alloc_secdata();if (!secdata)goto out_mnt;error = security_sb_copy_data(data, secdata);if (error)goto out_free_secdata;} /*get_sb方法,分配superblock对象,并初始化*/error = type->get_sb(type, flags, name, data, mnt);if (error < 0)goto out_free_secdata;BUG_ON(!mnt->mnt_sb); error = security_sb_kern_mount(mnt->mnt_sb, flags, secdata); if (error) goto out_sb;mnt->mnt_mountpoint = mnt->mnt_root;/*设置挂载点的dentry*/mnt->mnt_parent = mnt; /*设置所挂载的fs为自己本身*/up_write(&mnt->mnt_sb->s_umount);free_secdata(secdata);return mnt;out_sb:dput(mnt->mnt_root);deactivate_locked_super(mnt->mnt_sb);out_free_secdata:free_secdata(secdata);out_mnt:free_vfsmnt(mnt);out:return ERR_PTR(error);}该函数在首先调用alloc_vfsmnt来分配struct vfsmount结构,并做了一些初试化工作。
下列函数位于fs/super.c
struct vfsmount *alloc_vfsmnt(const char *name){struct vfsmount *mnt = kmem_cache_zalloc(mnt_cache, GFP_KERNEL);if (mnt) {int err;err = mnt_alloc_id(mnt);/*设置mnt->mnt_id*/if (err)goto out_free_cache;if (name) {mnt->mnt_devname = kstrdup(name, GFP_KERNEL); /*拷贝name,并赋值*/if (!mnt->mnt_devname)goto out_free_id;}atomic_set(&mnt->mnt_count, 1);INIT_LIST_HEAD(&mnt->mnt_hash);INIT_LIST_HEAD(&mnt->mnt_child);INIT_LIST_HEAD(&mnt->mnt_mounts);INIT_LIST_HEAD(&mnt->mnt_list);INIT_LIST_HEAD(&mnt->mnt_expire);INIT_LIST_HEAD(&mnt->mnt_share);INIT_LIST_HEAD(&mnt->mnt_slave_list);INIT_LIST_HEAD(&mnt->mnt_slave);atomic_set(&mnt->__mnt_writers, 0);}return mnt;out_free_id:mnt_free_id(mnt);out_free_cache:kmem_cache_free(mnt_cache, mnt);return NULL;}分配好结构体以后,由于参数data为NULL,将直接调用文件系统类型提供的get_sb方法,该方法就是函数sysfs_get_sb。我们来看下:下列函数位于fs/sysfs/mount.c。
static int sysfs_get_sb(struct file_system_type *fs_type,int flags, const char *dev_name, void *data, struct vfsmount *mnt){return get_sb_single(fs_type, flags, data, sysfs_fill_super, mnt);}这里直接调用了get_sb_single函数,注意这里的第4个实参sysfs_fill_super,该参数是函数名,后面将会调用该函数。该函数将分配sysfs文件系统的superblock,获取文件系统根目录的inode和dentry。
该函数的执行过程相当复杂,在下一节单独讲述。
8.2 get_sb_single函数
下列函数位于fs/sysfs/mount.c。
int get_sb_single(struct file_system_type *fs_type,int flags, void *data,int (*fill_super)(struct super_block *, void *, int),struct vfsmount *mnt){struct super_block *s;int error;/*查找或者创建super_block*/s = sget(fs_type, compare_single, set_anon_super, NULL);if (IS_ERR(s))return PTR_ERR(s);if (!s->s_root) {/*没有根目录dentry*/s->s_flags = flags;/*获取root( / )的 inode和dentry*/error = fill_super(s, data, flags & MS_SILENT ? 1 : 0);if (error) {deactivate_locked_super(s);return error;}s->s_flags |= MS_ACTIVE;}do_remount_sb(s, flags, data, 0);simple_set_mnt(mnt, s);/*设置vfsmount的superblock和根dentry*/return 0;}EXPORT_SYMBOL(get_sb_single);8.2.1 sget函数
首先调用了sget函数来查找是否
下列函数位于fs/super.c。
/** *sget-find or create a superblock *@type:filesystem type superblock should belong to *@test:comparison callback *@set:setup callback *@data:argument to each of them */struct super_block *sget(struct file_system_type *type,int (*test)(struct super_block *,void *),int (*set)(struct super_block *,void *),void *data){struct super_block *s = NULL;struct super_block *old;int err;retry:spin_lock(&sb_lock);if (test) {/*遍历所有属于该文件系统的super_block*/list_for_each_entry(old, &type->fs_supers, s_instances) {if (!test(old, data))continue;if (!grab_super(old))goto retry;if (s) {up_write(&s->s_umount);destroy_super(s);}return old;}}if (!s) {spin_unlock(&sb_lock);s = alloc_super(type);/*创建新的super_block并初始化*/if (!s)return ERR_PTR(-ENOMEM);goto retry;}err = set(s, data);/*设置s->s_dev */if (err) {spin_unlock(&sb_lock);up_write(&s->s_umount);destroy_super(s);return ERR_PTR(err);}s->s_type = type;strlcpy(s->s_id, type->name, sizeof(s->s_id));/*拷贝name*/list_add_tail(&s->s_list, &super_blocks);/*将新的super_block添加到链表头super_blocks中*/list_add(&s->s_instances, &type->fs_supers);/*将新的super_block添加到相应的文件系统类型的链表中*/spin_unlock(&sb_lock);get_filesystem(type);return s;}EXPORT_SYMBOL(sget);该函数将遍历属于sysfs文件系统的所有superblock,本例中由于之前没有任何superblock创建,遍历立即结束。然后调用alloc_super函数来创建新的struct super_block。
下列函数位于fs/super.c。
/** *alloc_super-create new superblock *@type:filesystem type superblock should belong to * *Allocates and initializes a new &struct super_block. alloc_super() *returns a pointer new superblock or %NULL if allocation had failed. */static struct super_block *alloc_super(struct file_system_type *type){struct super_block *s = kzalloc(sizeof(struct super_block), GFP_USER);/*分配并清0super_block*/static struct super_operations default_op;if (s) {if (security_sb_alloc(s)) {kfree(s);s = NULL;goto out;}INIT_LIST_HEAD(&s->s_dirty);INIT_LIST_HEAD(&s->s_io);INIT_LIST_HEAD(&s->s_more_io);INIT_LIST_HEAD(&s->s_files);INIT_LIST_HEAD(&s->s_instances);INIT_HLIST_HEAD(&s->s_anon);INIT_LIST_HEAD(&s->s_inodes);INIT_LIST_HEAD(&s->s_dentry_lru);INIT_LIST_HEAD(&s->s_async_list);init_rwsem(&s->s_umount);mutex_init(&s->s_lock);lockdep_set_class(&s->s_umount, &type->s_umount_key);/* * The locking rules for s_lock are up to the * filesystem. For example ext3fs has different * lock ordering than usbfs: */lockdep_set_class(&s->s_lock, &type->s_lock_key);/* * sget() can have s_umount recursion. * * When it cannot find a suitable sb, it allocates a new * one (this one), and tries again to find a suitable old * one. * * In case that succeeds, it will acquire the s_umount * lock of the old one. Since these are clearly distrinct * locks, and this object isn't exposed yet, there's no * risk of deadlocks. * * Annotate this by putting this lock in a different * subclass. */down_write_nested(&s->s_umount, SINGLE_DEPTH_NESTING);s->s_count = S_BIAS;atomic_set(&s->s_active, 1);mutex_init(&s->s_vfs_rename_mutex);mutex_init(&s->s_dquot.dqio_mutex);mutex_init(&s->s_dquot.dqonoff_mutex);init_rwsem(&s->s_dquot.dqptr_sem);init_waitqueue_head(&s->s_wait_unfrozen);s->s_maxbytes = MAX_NON_LFS;s->dq_op = sb_dquot_ops;s->s_qcop = sb_quotactl_ops;s->s_op = &default_op;s->s_time_gran = 1000000000;}out:return s;}分配完以后,调用作为参数传入的函数指针set,也就是set_anon_super函数,该函数用来设置s->s_dev。下列函数位于fs/super.c。
int set_anon_super(struct super_block *s, void *data){int dev;int error; retry:if (ida_pre_get(&unnamed_dev_ida, GFP_ATOMIC) == 0)/*分配ID号*/return -ENOMEM;spin_lock(&unnamed_dev_lock);error = ida_get_new(&unnamed_dev_ida, &dev);/*获取ID号,保存在dev中*/spin_unlock(&unnamed_dev_lock);if (error == -EAGAIN)/* We raced and lost with another CPU. */goto retry;else if (error)return -EAGAIN;if ((dev & MAX_ID_MASK) == (1 << MINORBITS)) {spin_lock(&unnamed_dev_lock);ida_remove(&unnamed_dev_ida, dev);spin_unlock(&unnamed_dev_lock);return -EMFILE;}s->s_dev = MKDEV(0, dev & MINORMASK);/*构建设备号*/return 0;}8.2.2 sysfs_fill_super函数
分配了super_block之后,将判断该super_block是否有root dentry。本例中,显然没有。然后调用形参fill_super指向的函数,也就是sysfs_fill_super函数。
下列函数位于fs/sysfs/mount.c。
struct super_block * sysfs_sb = NULL;static int sysfs_fill_super(struct super_block *sb, void *data, int silent){struct inode *inode;struct dentry *root;sb->s_blocksize = PAGE_CACHE_SIZE;/*4KB*/sb->s_blocksize_bits = PAGE_CACHE_SHIFT; /*4KB*/sb->s_magic = SYSFS_MAGIC;/*0x62656572*/sb->s_op = &sysfs_ops;sb->s_time_gran = 1;sysfs_sb = sb;/*sysfs_sb即为sysfs的super_block*//* get root inode, initialize and unlock it */mutex_lock(&sysfs_mutex);inode = sysfs_get_inode(&sysfs_root); /*sysfs_root即为sysfs所在的根目录的dirent,,获取inode*/mutex_unlock(&sysfs_mutex);if (!inode) {pr_debug("sysfs: could not get root inode\n");return -ENOMEM;}/* instantiate and link root dentry */root = d_alloc_root(inode);/*为获得的根inode分配root(/) dentry*/if (!root) {pr_debug("%s: could not get root dentry!\n",__func__);iput(inode);return -ENOMEM;}root->d_fsdata = &sysfs_root;sb->s_root = root; /*保存superblock的根dentry*/return 0;}struct sysfs_dirent sysfs_root = { /*sysfs_root即为sysfs所在的根目录的dirent*/ .s_name = "", .s_count = ATOMIC_INIT(1), .s_flags = SYSFS_DIR, .s_mode = S_IFDIR | S_IRWXU | S_IRUGO | S_IXUGO, .s_ino = 1,};在设置了一些字段后,设置了sysfs_sb这个全局变量,该全局变量表示的就是sysfs的super_block。
随后,调用了sysfs_get_inode函数,来获取sysfs的根目录的dirent。该函数的参数sysfs_root为全局变量,表示sysfs的根目录的sysfs_dirent。
我们看些这个sysfs_dirent数据结构:
/* * sysfs_dirent - the building block of sysfs hierarchy. Each and * every sysfs node is represented by single sysfs_dirent. * * As long as s_count reference is held, the sysfs_dirent itself is * accessible. Dereferencing s_elem or any other outer entity * requires s_active reference. */struct sysfs_dirent {atomic_ts_count;atomic_ts_active;struct sysfs_dirent*s_parent;struct sysfs_dirent*s_sibling;const char*s_name;union {struct sysfs_elem_dirs_dir;struct sysfs_elem_symlinks_symlink;struct sysfs_elem_attrs_attr;struct sysfs_elem_bin_attrs_bin_attr;};unsigned ints_flags;ino_ts_ino;umode_ts_mode;struct iattr*s_iattr;};其中比较关键的就是那个联合体,针对不同的形式(目录,symlink,属性文件和可执行文件)将使用不同的数据结构。另外,sysfs_dirent将最为dentry的fs专有数据被保存下来,这一点会在下面中看到。
接着,在来看下sysfs_get_inode函数:
下列函数位于fs/sysfs/inode.c。
/** *sysfs_get_inode - get inode for sysfs_dirent *@sd: sysfs_dirent to allocate inode for * *Get inode for @sd. If such inode doesn't exist, a new inode *is allocated and basics are initialized. New inode is *returned locked. * *LOCKING: *Kernel thread context (may sleep). * *RETURNS: *Pointer to allocated inode on success, NULL on failure. */struct inode * sysfs_get_inode(struct sysfs_dirent *sd){struct inode *inode;inode = iget_locked(sysfs_sb, sd->s_ino);/*在inode cache查找inode是否存在,不存在侧创建一个*/if (inode && (inode->i_state & I_NEW))/*如果是新创建的inode,则包含I_NEW*/sysfs_init_inode(sd, inode);return inode;}/** * iget_locked - obtain an inode from a mounted file system * @sb: super block of file system * @ino: inode number to get * * iget_locked() uses ifind_fast() to search for the inode specified by @ino in * the inode cache and if present it is returned with an increased reference * count. This is for file systems where the inode number is sufficient for * unique identification of an inode. * * If the inode is not in cache, get_new_inode_fast() is called to allocate a * new inode and this is returned locked, hashed, and with the I_NEW flag set. * The file system gets to fill it in before unlocking it via * unlock_new_inode(). */struct inode *iget_locked(struct super_block *sb, unsigned long ino){ struct hlist_head *head = inode_hashtable + hash(sb, ino); struct inode *inode; inode = ifind_fast(sb, head, ino);/*在inode cache查找该inode*/ if (inode) return inode; /*找到了该inode*/ /* * get_new_inode_fast() will do the right thing, re-trying the search * in case it had to block at any point. */ return get_new_inode_fast(sb, head, ino); /*分配一个新的inode*/}EXPORT_SYMBOL(iget_locked);static void sysfs_init_inode(struct sysfs_dirent *sd, struct inode *inode){ struct bin_attribute *bin_attr; inode->i_private = sysfs_get(sd); inode->i_mapping->a_ops = &sysfs_aops; inode->i_mapping->backing_dev_info = &sysfs_backing_dev_info; inode->i_op = &sysfs_inode_operations; inode->i_ino = sd->s_ino; lockdep_set_class(&inode->i_mutex, &sysfs_inode_imutex_key); if (sd->s_iattr) { /* sysfs_dirent has non-default attributes * get them for the new inode from persistent copy * in sysfs_dirent */ set_inode_attr(inode, sd->s_iattr); } else set_default_inode_attr(inode, sd->s_mode);/*设置inode属性*/ /* initialize inode according to type */ switch (sysfs_type(sd)) { case SYSFS_DIR: inode->i_op = &sysfs_dir_inode_operations; inode->i_fop = &sysfs_dir_operations; inode->i_nlink = sysfs_count_nlink(sd); break; case SYSFS_KOBJ_ATTR: inode->i_size = PAGE_SIZE; inode->i_fop = &sysfs_file_operations; break; case SYSFS_KOBJ_BIN_ATTR: bin_attr = sd->s_bin_attr.bin_attr; inode->i_size = bin_attr->size; inode->i_fop = &bin_fops; break; case SYSFS_KOBJ_LINK: inode->i_op = &sysfs_symlink_inode_operations; break; default: BUG(); } unlock_new_inode(inode);}该函数首先调用了,iget_locked来查找该inode是否已存在,如果不存在则创建。如果是新创建的inode,则对inode进行初始化。再获取了根目录的inode和sysfs_dirent后,调用d_alloc_root来获得dirent。
/** * d_alloc_root - allocate root dentry * @root_inode: inode to allocate the root for * * Allocate a root ("/") dentry for the inode given. The inode is * instantiated and returned. %NULL is returned if there is insufficient * memory or the inode passed is %NULL. */ struct dentry * d_alloc_root(struct inode * root_inode){struct dentry *res = NULL;if (root_inode) {static const struct qstr name = { .name = "/", .len = 1 };res = d_alloc(NULL, &name);/*分配struct dentry,没有父dentry*/if (res) {res->d_sb = root_inode->i_sb;res->d_parent = res;d_instantiated_instantiate(res, root_inode); /*绑定inode和dentry之间的关系*/}}return res;}/** * d_alloc - allocate a dcache entry * @parent: parent of entry to allocate * @name: qstr of the name * * Allocates a dentry. It returns %NULL if there is insufficient memory * available. On a success the dentry is returned. The name passed in is * copied and the copy passed in may be reused after this call. */ struct dentry *d_alloc(struct dentry * parent, const struct qstr *name){ struct dentry *dentry; char *dname; dentry = kmem_cache_alloc(dentry_cache, GFP_KERNEL);/*分配struct dentry*/ if (!dentry) return NULL; if (name->len > DNAME_INLINE_LEN-1) { dname = kmalloc(name->len + 1, GFP_KERNEL); if (!dname) { kmem_cache_free(dentry_cache, dentry); return NULL; } } else { dname = dentry->d_iname; } dentry->d_name.name = dname; dentry->d_name.len = name->len; dentry->d_name.hash = name->hash; memcpy(dname, name->name, name->len); dname[name->len] = 0; atomic_set(&dentry->d_count, 1); dentry->d_flags = DCACHE_UNHASHED; spin_lock_init(&dentry->d_lock); dentry->d_inode = NULL; dentry->d_parent = NULL; dentry->d_sb = NULL; dentry->d_op = NULL; dentry->d_fsdata = NULL; dentry->d_mounted = 0; INIT_HLIST_NODE(&dentry->d_hash); INIT_LIST_HEAD(&dentry->d_lru); INIT_LIST_HEAD(&dentry->d_subdirs); INIT_LIST_HEAD(&dentry->d_alias); if (parent) { /*有父目录,则设置指针来表示关系*/ dentry->d_parent = dget(parent); dentry->d_sb = parent->d_sb; /*根dentry的父对象为自己*/ } else { INIT_LIST_HEAD(&dentry->d_u.d_child); } spin_lock(&dcache_lock); if (parent) /*有父目录,则添加到父目录的儿子链表中*/ list_add(&dentry->d_u.d_child, &parent->d_subdirs); dentry_stat.nr_dentry++; spin_unlock(&dcache_lock); return dentry;} /** * d_instantiate - fill in inode information for a dentry * @entry: dentry to complete * @inode: inode to attach to this dentry * * Fill in inode information in the entry. * * This turns negative dentries into productive full members * of society. * * NOTE! This assumes that the inode count has been incremented * (or otherwise set) by the caller to indicate that it is now * in use by the dcache. */ void d_instantiate(struct dentry *entry, struct inode * inode){ BUG_ON(!list_empty(&entry->d_alias)); spin_lock(&dcache_lock); __d_instantiate(entry, inode); spin_unlock(&dcache_lock); security_d_instantiate(entry, inode);}/* the caller must hold dcache_lock */static void __d_instantiate(struct dentry *dentry, struct inode *inode){ if (inode) list_add(&dentry->d_alias, &inode->i_dentry);/*将dentry添加到inode的链表中*/ dentry->d_inode = inode; /*保存dentry对应的inode*/ fsnotify_d_instantiate(dentry, inode);}该函数首先调用了d_alloc来创建struct dentry,参数parent为NULL,既然是为根( / )建立dentry,自然没有父对象。
接着调用d_instantiate来绑定inode和dentry之间的关系。
在sysfs_fill_super函数执行的最后,将sysfs_root保存到了dentry->d_fsdata。
可见,在sysfs中用sysfs_dirent来表示目录,但是对于VFS,还是要使用dentry来表示目录。
8.2.3 do_remount_sb
下列代码位于fs/super.c。
/** *do_remount_sb - asks filesystem to change mount options. *@sb:superblock in question *@flags:numeric part of options *@data:the rest of options * @force: whether or not to force the change * *Alters the mount options of a mounted file system. */int do_remount_sb(struct super_block *sb, int flags, void *data, int force){int retval;int remount_rw;#ifdef CONFIG_BLOCKif (!(flags & MS_RDONLY) && bdev_read_only(sb->s_bdev))return -EACCES;#endifif (flags & MS_RDONLY)acct_auto_close(sb);shrink_dcache_sb(sb);fsync_super(sb);/* If we are remounting RDONLY and current sb is read/write, make sure there are no rw files opened */if ((flags & MS_RDONLY) && !(sb->s_flags & MS_RDONLY)) {if (force)mark_files_ro(sb);else if (!fs_may_remount_ro(sb))return -EBUSY;retval = vfs_dq_off(sb, 1);if (retval < 0 && retval != -ENOSYS)return -EBUSY;}remount_rw = !(flags & MS_RDONLY) && (sb->s_flags & MS_RDONLY);if (sb->s_op->remount_fs) {lock_super(sb);retval = sb->s_op->remount_fs(sb, &flags, data);unlock_super(sb);if (retval)return retval;}sb->s_flags = (sb->s_flags & ~MS_RMT_MASK) | (flags & MS_RMT_MASK);if (remount_rw)vfs_dq_quota_on_remount(sb);return 0;}这个函数用来修改挂在选项,这个函数就不分析了,不是重点。
8.2.4simple_set_mnt
下列函数位于fs/namespace.c。
void simple_set_mnt(struct vfsmount *mnt, struct super_block *sb){mnt->mnt_sb = sb;mnt->mnt_root = dget(sb->s_root);}该函数设置了vfsmount的superblock和根dentry。8.2.5 小结
这里,对sysfs的注册过程做一个总结。
sysfs_init函数调用过程示意图如下:

在整个过程中,先后使用和创建了许多struct
第一,根据file_system_type表示的sysfs文件系统的类型注册了sysfs。
第二,建立了vfsmount。
第三,创建了超级块super_block。
第四,根据sysfs_dirent表示的根目录,建立了inode。
最后,根据刚才建立的inode创建了dentry。
除了sysfs_dirent,其他5个结构体都是VFS中基本的数据结构,而sysfs_dirent则是特定于sysfs文件系统的数据结构。
8.3 创建目录
在前面的描述中,使用sysfs_create_dir在sysfs下建立一个目录。我们来看下这个函数是如何来建立目录的。
下列代码位于fs/sysfs/dir.c。
/** *sysfs_create_dir - create a directory for an object. *@kobj:object we're creating directory for. */int sysfs_create_dir(struct kobject * kobj){struct sysfs_dirent *parent_sd, *sd;int error = 0;BUG_ON(!kobj);if (kobj->parent)/*如果有parent,获取parent对应的sys目录*/parent_sd = kobj->parent->sd;else/*没有则是在sys根目录*/parent_sd = &sysfs_root;error = create_dir(kobj, parent_sd, kobject_name(kobj), &sd);if (!error)kobj->sd = sd;return error;}函数中,首先获取待建目录的父sysfs_dirent,然后将它作为参数 来调用create_dir函数。
很明显,就是要在父sysfs_dirent下建立新的sysfs_dirent,新建立的sysfs_dirent将保存到参数sd中。
下列代码位于fs/sysfs/dir.c。
static int create_dir(struct kobject *kobj, struct sysfs_dirent *parent_sd, const char *name, struct sysfs_dirent **p_sd){umode_t mode = S_IFDIR| S_IRWXU | S_IRUGO | S_IXUGO;struct sysfs_addrm_cxt acxt;struct sysfs_dirent *sd;int rc;/* allocate *//*分配sysfs_dirent并初始化*/sd = sysfs_new_dirent(name, mode, SYSFS_DIR);if (!sd)return -ENOMEM;sd->s_dir.kobj = kobj; /*保存kobject对象*//* link in */sysfs_addrm_start(&acxt, parent_sd);/*寻找父sysfs_dirent对应的inode*/rc = sysfs_add_one(&acxt, sd);/*检查父sysfs_dirent下是否已有有该sysfs_dirent,没有则添加到父sysfs_dirent中*/sysfs_addrm_finish(&acxt);/*收尾工作*/if (rc == 0)/*rc为0表示创建成功*/*p_sd = sd;elsesysfs_put(sd);/*增加引用计数*/return rc;}这里要注意一下mode变量,改变了使用了宏定义SYSFS_DIR,这个就表示要创建的是一个目录。
mode还有几个宏定义可以使用,如下:
#define SYSFS_KOBJ_ATTR0x0002#define SYSFS_KOBJ_BIN_ATTR0x0004#define SYSFS_KOBJ_LINK0x0008#define SYSFS_COPY_NAME(SYSFS_DIR | SYSFS_KOBJ_LINK)
8.3.1 sysfs_new_dirent
在create_dir函数中,首先调用了sysfs_new_dirent来建立一个新的sysfs_dirent结构体。
下列代码位于fs/sysfs/dir.c。
struct sysfs_dirent *sysfs_new_dirent(const char *name, umode_t mode, int type){char *dup_name = NULL;struct sysfs_dirent *sd;if (type & SYSFS_COPY_NAME) {name = dup_name = kstrdup(name, GFP_KERNEL);if (!name)return NULL;}/*分配sysfs_dirent并清0*/sd = kmem_cache_zalloc(sysfs_dir_cachep, GFP_KERNEL);if (!sd)goto err_out1;if (sysfs_alloc_ino(&sd->s_ino))/*分配ID号*/goto err_out2;atomic_set(&sd->s_count, 1);atomic_set(&sd->s_active, 0);sd->s_name = name;sd->s_mode = mode;sd->s_flags = type;return sd; err_out2:kmem_cache_free(sysfs_dir_cachep, sd); err_out1:kfree(dup_name);return NULL;}8.3.2 有关sysfs_dirent中的联合体
分配了sysfs_dirent后,设置了该结构中的联合体数据。先来看下联合体中的四个数据结构。
/* type-specific structures for sysfs_dirent->s_* union members */struct sysfs_elem_dir {struct kobject*kobj;/* children list starts here and goes through sd->s_sibling */struct sysfs_dirent*children;};struct sysfs_elem_symlink { struct sysfs_dirent *target_sd;};struct sysfs_elem_attr { struct attribute *attr; struct sysfs_open_dirent *open;};struct sysfs_elem_bin_attr { struct bin_attribute *bin_attr; struct hlist_head buffers;};根据sysfs_dirent所代表的类型不同,也就是目录,synlink,属性文件和bin文件,将分别使用该联合体中相应的struct。在本例中要创建的是目录,自然使用sysfs_elem_dir结构体,然后保存了kobject对象。
在8.4和8.5中我们将分别看到sysfs_elem_attr和sysfs_elem_symlink的使用。
8.3.3 sysfs_addrm_start
在获取了父sysfs_dirent,调用sysfs_addrm_start来获取与之对应的inode。
下列代码位于fs/sysfs/dir.c。
/** *sysfs_addrm_start - prepare for sysfs_dirent add/remove *@acxt: pointer to sysfs_addrm_cxt to be used *@parent_sd: parent sysfs_dirent * *This function is called when the caller is about to add or *remove sysfs_dirent under @parent_sd. This function acquires *sysfs_mutex, grabs inode for @parent_sd if available and lock *i_mutex of it. @acxt is used to keep and pass context to *other addrm functions. * *LOCKING: *Kernel thread context (may sleep). sysfs_mutex is locked on *return. i_mutex of parent inode is locked on return if *available. */void sysfs_addrm_start(struct sysfs_addrm_cxt *acxt, struct sysfs_dirent *parent_sd){struct inode *inode;memset(acxt, 0, sizeof(*acxt));acxt->parent_sd = parent_sd;/* Lookup parent inode. inode initialization is protected by * sysfs_mutex, so inode existence can be determined by * looking up inode while holding sysfs_mutex. */mutex_lock(&sysfs_mutex);/*根据parent_sd来寻找父inode*/inode = ilookup5(sysfs_sb, parent_sd->s_ino, sysfs_ilookup_test, parent_sd);if (inode) {WARN_ON(inode->i_state & I_NEW);/* parent inode available */acxt->parent_inode = inode;/*保存找到的父inode*//* sysfs_mutex is below i_mutex in lock hierarchy. * First, trylock i_mutex. If fails, unlock * sysfs_mutex and lock them in order. */if (!mutex_trylock(&inode->i_mutex)) {mutex_unlock(&sysfs_mutex);mutex_lock(&inode->i_mutex);mutex_lock(&sysfs_mutex);}}}/* * Context structure to be used while adding/removing nodes. */struct sysfs_addrm_cxt { struct sysfs_dirent *parent_sd; struct inode *parent_inode; struct sysfs_dirent *removed; int cnt;};注意形参sysfs_addrm_cxt,该结构作用是临时存放数据。8.3.4 sysfs_add_one
下列代码位于fs/sysfs/dir.c。
/** *sysfs_add_one - add sysfs_dirent to parent *@acxt: addrm context to use *@sd: sysfs_dirent to be added * *Get @acxt->parent_sd and set sd->s_parent to it and increment *nlink of parent inode if @sd is a directory and link into the *children list of the parent. * *This function should be called between calls to *sysfs_addrm_start() and sysfs_addrm_finish() and should be *passed the same @acxt as passed to sysfs_addrm_start(). * *LOCKING: *Determined by sysfs_addrm_start(). * *RETURNS: *0 on success, -EEXIST if entry with the given name already *exists. */int sysfs_add_one(struct sysfs_addrm_cxt *acxt, struct sysfs_dirent *sd){int ret;ret = __sysfs_add_one(acxt, sd);if (ret == -EEXIST) {char *path = kzalloc(PATH_MAX, GFP_KERNEL);WARN(1, KERN_WARNING "sysfs: cannot create duplicate filename '%s'\n", (path == NULL) ? sd->s_name : strcat(strcat(sysfs_pathname(acxt->parent_sd, path), "/"), sd->s_name));kfree(path);}return ret;}/** * __sysfs_add_one - add sysfs_dirent to parent without warning * @acxt: addrm context to use * @sd: sysfs_dirent to be added * * Get @acxt->parent_sd and set sd->s_parent to it and increment * nlink of parent inode if @sd is a directory and link into the * children list of the parent. * * This function should be called between calls to * sysfs_addrm_start() and sysfs_addrm_finish() and should be * passed the same @acxt as passed to sysfs_addrm_start(). * * LOCKING: * Determined by sysfs_addrm_start(). * * RETURNS: * 0 on success, -EEXIST if entry with the given name already * exists. */int __sysfs_add_one(struct sysfs_addrm_cxt *acxt, struct sysfs_dirent *sd){ /*查找该parent_sd下有无将要建立的sd,没有返回NULL*/ if (sysfs_find_dirent(acxt->parent_sd, sd->s_name)) return -EEXIST; sd->s_parent = sysfs_get(acxt->parent_sd); /*设置父sysfs_dirent,增加父sysfs_dirent的引用计数*/ if (sysfs_type(sd) == SYSFS_DIR && acxt->parent_inode) /*如果要创建的是目录或文件,并且有父inode*/ inc_nlink(acxt->parent_inode); /*inode->i_nlink加1*/ acxt->cnt++; sysfs_link_sibling(sd); return 0;}/** * sysfs_find_dirent - find sysfs_dirent with the given name * @parent_sd: sysfs_dirent to search under * @name: name to look for * * Look for sysfs_dirent with name @name under @parent_sd. * * LOCKING: * mutex_lock(sysfs_mutex) * * RETURNS: * Pointer to sysfs_dirent if found, NULL if not. */struct sysfs_dirent *sysfs_find_dirent(struct sysfs_dirent *parent_sd, const unsigned char *name){ struct sysfs_dirent *sd; for (sd = parent_sd->s_dir.children; sd; sd = sd->s_sibling) if (!strcmp(sd->s_name, name)) return sd; return NULL;} /** * sysfs_link_sibling - link sysfs_dirent into sibling list * @sd: sysfs_dirent of interest * * Link @sd into its sibling list which starts from * sd->s_parent->s_dir.children. * * Locking: * mutex_lock(sysfs_mutex) */static void sysfs_link_sibling(struct sysfs_dirent *sd){ struct sysfs_dirent *parent_sd = sd->s_parent; struct sysfs_dirent **pos; BUG_ON(sd->s_sibling); /* Store directory entries in order by ino. This allows * readdir to properly restart without having to add a * cursor into the s_dir.children list. */ /*children链表根据s_ino按升序排列,现在将sd插入到正确的儿子链表中*/ for (pos = &parent_sd->s_dir.children; *pos; pos = &(*pos)->s_sibling) { if (sd->s_ino < (*pos)->s_ino) break; } /*插入链表*/ sd->s_sibling = *pos; *pos = sd; }该函数直接调用了__sysfs_add_one,后者先调用sysfs_find_dirent来查找该parent_sd下有无该的sysfs_dirent,如果没有,则设置创建好的新的sysfs_dirent的s_parent字段。也就是将新的sysfs_dirent添加到父sys_dirent中。接着调用sysfs_link_sibling函数,将新建的sysfs_dirent添加到sd->s_parent->s_dir.children链表中。8.3.5 sysfs_addrm_finish
下列代码位于fs/sysfs/dir.c。
/** *sysfs_addrm_finish - finish up sysfs_dirent add/remove *@acxt: addrm context to finish up * *Finish up sysfs_dirent add/remove. Resources acquired by *sysfs_addrm_start() are released and removed sysfs_dirents are *cleaned up. Timestamps on the parent inode are updated. * *LOCKING: *All mutexes acquired by sysfs_addrm_start() are released. */void sysfs_addrm_finish(struct sysfs_addrm_cxt *acxt){/* release resources acquired by sysfs_addrm_start() */mutex_unlock(&sysfs_mutex);if (acxt->parent_inode) {struct inode *inode = acxt->parent_inode;/* if added/removed, update timestamps on the parent */if (acxt->cnt)inode->i_ctime = inode->i_mtime = CURRENT_TIME;/*更新父inode的时间*/mutex_unlock(&inode->i_mutex);iput(inode);}/* kill removed sysfs_dirents */while (acxt->removed) {struct sysfs_dirent *sd = acxt->removed;acxt->removed = sd->s_sibling;sd->s_sibling = NULL;sysfs_drop_dentry(sd);sysfs_deactivate(sd);unmap_bin_file(sd);sysfs_put(sd);}}该函数结束了添加sysfs_dirent的工作,这个就不多做说明了。
至此,添加一个目录的工作已经完成了,添加目录的工作其实就是创建了一个新的sysfs_dirent,并把它添加到父sysfs_dirent中。
下面我们看下如何添加属性文件。
8.4 创建属性文件
添加属性文件使用sysfs_create_file函数。
下列函数位于fs/sysfs/file.c。
/** *sysfs_create_file - create an attribute file for an object. *@kobj:object we're creating for. *@attr:attribute descriptor. */int sysfs_create_file(struct kobject * kobj, const struct attribute * attr){BUG_ON(!kobj || !kobj->sd || !attr);return sysfs_add_file(kobj->sd, attr, SYSFS_KOBJ_ATTR);}int sysfs_add_file(struct sysfs_dirent *dir_sd, const struct attribute *attr, int type){ return sysfs_add_file_mode(dir_sd, attr, type, attr->mode);}int sysfs_add_file_mode(struct sysfs_dirent *dir_sd, const struct attribute *attr, int type, mode_t amode){ umode_t mode = (amode & S_IALLUGO) | S_IFREG; struct sysfs_addrm_cxt acxt; struct sysfs_dirent *sd; int rc; /*分配sysfs_dirent并初始化*/ sd = sysfs_new_dirent(attr->name, mode, type); if (!sd) return -ENOMEM; sd->s_attr.attr = (void *)attr; sysfs_addrm_start(&acxt, dir_sd); /*寻找父sysfs_dirent对应的inode*/ rc = sysfs_add_one(&acxt, sd); /*检查父sysfs_dirent下是否已有有该sysfs_dirent,没有则创建*/ sysfs_addrm_finish(&acxt); /*收尾工作*/ if (rc) /*0表示创建成功*/ sysfs_put(sd); return rc;}sysfs_create_file用参数SYSFS_KOBJ_ATTR(表示建立属性文件)来调用了sysfs_add_file,后者又直接调用了sysfs_add_file_mode。
sysfs_add_file_mode函数的执行和8.3节的create_dir函数非常类似,只不过它并没有保存kobject对象,也就是说该sysfs_dirent并没有一个对应的kobject对象。
需要注意的是,这里是建立属性文件,因此使用了联合体中的结构体s_attr。
8.5 创建symlink
最后,来看下symlink的建立。/** *sysfs_create_link - create symlink between two objects. *@kobj:object whose directory we're creating the link in. *@target:object we're pointing to. *@name:name of the symlink. */int sysfs_create_link(struct kobject *kobj, struct kobject *target, const char *name){return sysfs_do_create_link(kobj, target, name, 1);}static int sysfs_do_create_link(struct kobject *kobj, struct kobject *target, const char *name, int warn){ struct sysfs_dirent *parent_sd = NULL; struct sysfs_dirent *target_sd = NULL; struct sysfs_dirent *sd = NULL; struct sysfs_addrm_cxt acxt; int error; BUG_ON(!name); if (!kobj) /*kobj为空,表示在sysyfs跟目录下建立symlink*/ parent_sd = &sysfs_root; else /*有父sysfs_dirent*/ parent_sd = kobj->sd; error = -EFAULT; if (!parent_sd) goto out_put; /* target->sd can go away beneath us but is protected with * sysfs_assoc_lock. Fetch target_sd from it. */ spin_lock(&sysfs_assoc_lock); if (target->sd) target_sd = sysfs_get(target->sd); 、/*获取目标对象的sysfs_dirent*/ spin_unlock(&sysfs_assoc_lock); error = -ENOENT; if (!target_sd) goto out_put; error = -ENOMEM; /*分配sysfs_dirent并初始化*/ sd = sysfs_new_dirent(name, S_IFLNK|S_IRWXUGO, SYSFS_KOBJ_LINK); if (!sd) goto out_put; sd->s_symlink.target_sd = target_sd;/*保存目标sysfs_dirent*/ target_sd = NULL; /* reference is now owned by the symlink */ sysfs_addrm_start(&acxt, parent_sd);/*寻找父sysfs_dirent对应的inode*/ if (warn) error = sysfs_add_one(&acxt, sd);/*检查父sysfs_dirent下是否已有有该sysfs_dirent,没有则创建*/ else error = __sysfs_add_one(&acxt, sd); sysfs_addrm_finish(&acxt); /*收尾工作*/ if (error) goto out_put; return 0; out_put: sysfs_put(target_sd); sysfs_put(sd); return error;}这个函数的执行也和8.3节的create_dir函数非常类似。其次,symlink同样没有对应的kobject对象。
因为sysfs_dirent表示的是symlink,这里使用了联合体中的s_symlink。同时设置了s_symlink.target_sd指向的目标sysfs_dirent为参数targed_sd。
8.6 小结
本节首先对syfs这一特殊的文件系统的注册过程进行了分析。接着对目录,属性文件和symlink的建立进行了分析。这三者的建立过程基本一致,但是目录
有kobject对象,而剩余两个没有。其次,这三者的每个sysfs_dirent中,都使用了自己的联合体数据。
9 总结
本文首先对sysfs的核心数据kobject,kset等数据结构做出了分析,正是通过它们才能向用户空间呈现出设备驱动模型。
接着,以/sys/bus目录的建立为例,来说明如何通过kobject和kset来建立该bus目录。
随后,介绍了驱动模型中表示总线,设备和驱动的三个数据结构。
然后,介绍了platform总线(bus/platform)的注册,再介绍了虚拟的platform设备(devices/platform)的添加过程。
之后 ,以spi主控制器的platform设备为例,介绍了该platform设备和相应的驱动的注册过程。
最后,介绍了底层sysfs文件系统的注册过程和如何建立目录,属性文件和symlink的过程。
更新说明:
2012.09.14 在6.2.9中,添加分析 bus_for_each_drv。
- Linux设备模型——设备驱动模型和sysfs文件系统解读
- Linux设备模型——设备驱动模型和sysfs文件系统解读
- Linux设备模型——设备驱动模型和sysfs文件系统解读
- Linux设备模型——设备驱动模型和sysfs文件系统解读
- Linux设备模型——设备驱动模型和sysfs文件系统解读
- Linux设备模型——设备驱动模型和sysfs文件系统解读
- Linux设备模型——设备驱动模型和sysfs文件系统解读
- Linux设备驱动模型 sysfs
- Linux 文件系统与设备文件系统 (二)—— sysfs 文件系统与Linux设备模型
- Linux 文件系统与设备文件系统 (二)—— sysfs 文件系统与Linux设备模型
- Sysfs文件系统与Linux设备模型
- Linux-2.6设备模型与sysfs文件系统
- linux文件系统的系统分析--(十一)sysfs和设备模型--Bus
- linux文件系统的系统分析--(十三)sysfs和设备模型--Device
- linux文件系统的系统分析--(十四)sysfs和设备模型--Driver
- linux文件系统的系统分析--(十五)sysfs和设备模型--Class
- linux设备模型 —— sysfs
- linux设备模型 —— sysfs
- 0.ring3-DLL劫持技术详解(lpk.dll)
- java异常的详解
- Struts2中action重定向跳转到jsp页面两种配置方式
- Android WebView不调用默认的 Browser
- 判断一个整数是否是回文数
- Linux设备模型——设备驱动模型和sysfs文件系统解读
- 又开始看孙鑫视频了:菜单之静态菜单
- 泛泰binx解包控件,小改一下提取脚本(7.31)
- 面向IT产品经理的计算机语言知识普及(一)
- wordpress的编辑后台显示历史版本
- 算法时间复杂度
- spring 的JDBCtemplate试用
- 头文件中的ifndef/define/endif是干什么的?
- 命令模式