MFC Dialog Boxes
来源:互联网 发布:淘宝店铺装修全部教程 编辑:程序博客网 时间:2024/05/05 14:03
Overview of Dialog Boxes
A dialog box is a rectangular window whose main role is to host or hold other Windows controls. For this reason, a dialog box is referred to as a container. It is the primary interface of user interaction with the computer. By itself, a dialog box means nothing. The controls it hosts accomplish the role of dialog between the user and the machine.
A dialog box has the following characteristics:
- It is equipped with the system Close button
 . As the only system button, this button allows the user to dismiss the dialog and ignore whatever the user would have done on the dialog box.
 - It cannot be minimized, maximized, or restored. A dialog box does not have any other system button but Close.
- It is usually modal. The user is usually not allowed to continue any other operation until the dialog box is dismissed.
- It provides a way for the user to close or dismiss the dialog. Most dialog boxes have the OK and the Cancel buttons, although this depends on the application developer. When the dialog has the OK and the Cancel buttons, the OK button is configured to behave as if the user had pressed Enter. In that case, whatever the user had done would be acknowledged and transferred to the hosting dialog box, window, or application. Pressing Esc applies the same behavior as if the user had clicked Cancel.
![]() Practical Learning: Creating an Application
Practical Learning: Creating an Application
- Start Microsoft Visual C++ or Microsoft Visual Studio
- Create a new Win32 Project named ExoDialog1
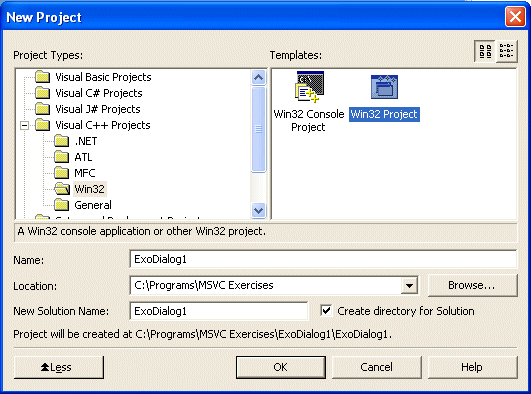
- Make sure you create the Windows Application in an Empty Project
- In the Solution Explorer, right-click ExoDialog1 and click Properties...
- In the Property Pages, specify that you want to Use MFC in a Shared DLL
- To create the application class of the project, on the main menu, click Project -> Add New Item...
- In the Templates section, click C++ File. Set the File Name to Exercise and click Finish.
- To create the application, change the file as follows:
#include <afxwin.h>class CExerciseApp : public CWinApp{public:BOOL InitInstance();};BOOL CExerciseApp::InitInstance(){return TRUE;}CExerciseApp theApp; - Save All
Dialog Box Creation
When using Win32 to create an application, a dialog is created using a text file called a resource file. The file has the extension .rc as we saw in a previous lesson. Microsoft Visual C++ makes it particularly easy to create a dialog box and, behind the scenes, it creates the appropriate section for a dialog box.
To create a dialog box in MSVC, from the Add Resources dialog box, simply select the Dialog node and the object is ready.
After creating a "physical" dialog box, you should create its class so that other objects of the application can use this control.
![]() Practical Learning: Creating a Dialog Box
Practical Learning: Creating a Dialog Box
- To create a dialog box, on the main menu, click Project -> Add Resource...
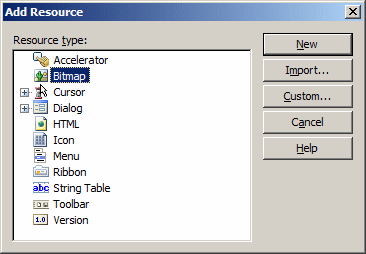
- In the Add Resource dialog box, click Dialog and click New
- To save the dialog box and the new resource, on the Standard toolbar, click the Save All button

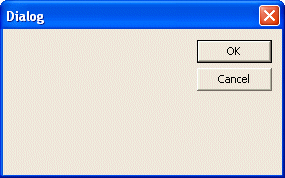
- To create a class for the dialog box and display the dialog box in the application, change the file as follows:
#include <afxwin.h>#include "Resource.h"class CExerciseApp : public CWinApp{public:BOOL InitInstance();};class CExoDialog : public CDialog{public:enum { IDD = IDD_DIALOG1 };CExoDialog();};CExoDialog::CExoDialog(): CDialog(CExoDialog::IDD, NULL){}BOOL CExerciseApp::InitInstance(){CExoDialog Dlg;m_pMainWnd = &Dlg;Dlg.DoModal();return TRUE;}CExerciseApp theApp; - Test the application
- Close it and return to MSVC
The MFC Wizard for a Dialog-Based Application
Microsoft Visual C++ provides an easier way to create an application that is mainly based on a dialog box. To use this technique, start a new project and specify that you want to create an MFC Application. In the
![]() Practical Learning: Using the Wizard to create a Dialog-Based Application
Practical Learning: Using the Wizard to create a Dialog-Based Application
- On the main menu, click File -> New -> Project...
- In the New Project dialog box, in the Templates list, click MFC Application
- Set the Project Name to ExoDialog2

- Click OK
- In the MFC Application Wizard dialog box, click Application Type and, on the right side, click the Dialog Based radio button

- Click Finish
- Test the application and return to MSVC
Properties of a Dialog Box
Like every resource, a dialog box is recognized throughout the program by an identifier. By default, the first dialog box is identified as IDD_DIALOG1. In this name, ID stands for IDentifier. The second D stands for Dialog. In most cases, you should give an explicit identifier to each resource. For example, if a dialog box is used as an employment application, you can identify it as IDD_EMPL_APP or something like that.
The top section of a dialog box is made of a long bar that we call the title bar. The main area of this bar contains a word or a group of words forming a sentence called a caption. There are two main ways you can change it. At design time, on the Properties window, change the value of the Caption field. At run time, to change the caption, call the CWnd::SetWindowText() method and provide the necessary string as argument. Here is an example:
BOOL CExoDialog2Dlg::OnInitDialog(){CDialog::OnInitDialog();. . .// TODO: Add extra initialization hereSetWindowText("Go Slow, Don't Rush It!!!");return TRUE; // return TRUE unless you set the focus to a control}By convention, a dialog box is equipped with only the system Close button ![]() on its title bar. The Minimize and Maximize buttons are omitted. If you want to add the Minimize button
on its title bar. The Minimize and Maximize buttons are omitted. If you want to add the Minimize button ![]() , at design time, set the Minimize Box property to True or checked. If you want the Maximize button
, at design time, set the Minimize Box property to True or checked. If you want the Maximize button ![]() , set its property to True or checked. Setting one of these properties to True or checked and not the other would disable the other system button. Therefore, here are the combinations you can get:
, set its property to True or checked. Setting one of these properties to True or checked and not the other would disable the other system button. Therefore, here are the combinations you can get:

System Menu = False
There is no system button
System Menu = TrueMinimize Box = FalseMaximize Box = True
The Minimize button is disabled


System Menu = TrueMinimize Box = TrueMaximize Box = False
The Maximize button is disabled
System Menu = TrueMinimize Box = TrueMaximize Box = True
Both the Minimize and Maximize buttons are enabled


System Menu = TrueMinimize Box = TalseMaximize Box = Talse
Only the Close button is available
All of the windows we will use in this book are created using a style set in the Win32 API asHWND and implement in MFC by the CWnd class. This class, among other things, defines the style used to control the appearance and certainly part of the behavior of an object. Based on this, a window is referred to as popup if it can be displayed on the screen. That is, if it can be "physically" located.
A window is referred to as child if its appearance is dependent of the appearance of another window. All of the Windows controls that we will be placing on our dialog boxes are child controls.
A window is called overlapped if it has the following characteristics:
- It has a title bar equipped with a caption and at least one of the system buttons
- It has borders
The Child, Popup, and Overlapped characteristics can be set at design time using the Styleproperty.
Because a dialog box follows these rules, it qualifies as an overlapped window.
By design, a dialog box has thick borders and cannot be resized from its borders or corners, even if the system buttons are available. This characteristic of dialog boxes is controlled by theBorder property. The default border of a dialog box is Dialog Frame. If you want he user to be able to resize a dialog box, set its Border value to Resizing:

A Thin value gives a thin border to the dialog box.
If you do not want borders at all on the object, set its Border value to None. This also removes the title bar and thus the system buttons:

![]() Practical Learning: Using Dialog Box Properties
Practical Learning: Using Dialog Box Properties
- To display the dialog's properties, right-click it and click Properties. If you are using MSVC 6, to maintain the Properties window on the screen, click the pushpin button

- Change the IDentifier of the dialog box to IDD_DLG_MAIN and change its Caption to Credit Application
- Change the X Pos value to 120 and the Y Pos value to 100

- To change the dialog box into a resizable window, click the Styles property page. Set its Border to Resizing. Set its Maximize Box and its Minimize Box properties to True or checked
- To give a client edge to the window, (click the More Styles property page and) set the Client Edge to True or checked
- Test the application. After viewing the dialog box, close it and return to MSVC
Dialog Box Methods
As seen above, to create dialog box, derive a class from CDialog and use a constructor to specify the resource that holds the default characteristics of the object. The CDialog class provides three constructors as follows:
CDialog();CDialog(UINT nIDTemplate, CWnd* pParentWnd = NULL);CDialog(LPCTSTR lpszTemplateName, CWnd* pParentWnd = NULL);
The default constructor, CDialog() can be use to create a variable whose behavior is not yet known or, for one reason or another, cannot yet be defined.
The resources we will be using in MFC have an identifier that allow them to be recognized by other others of an application. This is why, whenever you visually create a dialog box, you also specify its identifier. This identifier can be used as the first argument, nIDTemplate, of a CDialog() constructor to create a dialog box from an existing resource.
If you are using a Win32 template to create your dialog box, pass the name of this template as a string to a CDialog() constructor, lpszTemplateName.
All or most of the window we will be creating in this book are owned and made available to the operating system by an application. The second argument of the last two constructors allow you to specify "who" owns the dialog box you are creating. If the dialog box has a parent, which is usually a CWnd type, specify its name as the pParenWnd argument. Otherwise, leave this argument at its default, which is NULL, letting the application own the dialog box.
There are two types of dialog boxes: modal and modeless. A Modal dialog box is one that the user must first close in order to have access to any other framed window or dialog box of the same application:
- MFC Dialog Boxes
- MFC Dialog Boxes
- Modal Dialog Boxes
- Win32 Series - Modal Dialog Boxes
- Win32 Series - Modeless Dialog Boxes
- MFC Dialog
- Differences Between Modal and Modeless Dialog Boxes
- Three Types of Dialog Boxes in JavaScript
- Win32 Series - The Common Dialog Boxes
- MFC Dialog InitInstance
- MFC对话框Dialog设计
- MFC之Dialog
- mfc dialog 添加工具栏
- MFC Dialog stype
- MFC 设置Dialog背景图片
- MFC Dialog 添加菜单栏
- Summary : Creating Dialog Boxes using ASP.NET, JavaScript and IE
- Find and Replace Dialog Boxes 查找和替换对话框
- PowerDesigner使用教程 —— 概念数据模型 (转)
- uml 学习笔记
- Android的listview和ScrollView存在兼容问题
- C++ 网络模型实例
- 如何开创一个新的市场领域
- MFC Dialog Boxes
- 互联网时代的社会语言学:基于SNS的文本数据挖掘
- re.sub(r'\*(.+?)\*',r'<em>\1</em>','pages of *World Wide Spam*,')的理解
- 第十六篇 黑马程序员-网络编程
- Android的Activity屏幕切换动画----左右滑动切换
- 关于64位Windows操作系统中的注册表
- 用xfire开发webservice总结
- Struts2中的数据校验(二[验证框架校验]) .
- 第十七篇 黑马程序员-Java高新技术