ANDROID2.3 Launcher源码分析-MVC
来源:互联网 发布:网络银行的注册号码 编辑:程序博客网 时间:2024/05/17 07:24
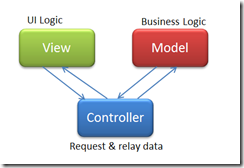
Launcher从总体架构上来看采用了MVC模式。其中Launcher.java为控制器,LauncherModel为模型;XML界面配置文件为视图,其中Workspace为视图容器。模型中操作数据库模型,保持数据模型和数据库的一致。控制器同步视图和模型,视图和模型之间不直接关联,通过唯一通过控制器发生关联。
举个例子,当Gallery.apk应用被删除时,数据模型(LauncherModel)接收到ACTION_PACKAGE_REMOVED消息,然后在消息处理中,从数据模型中删除该应用的信息,从数据库记录中删除该应用的信息,然后通过回调(Callbacks)去更新视图(Workspace),而这个回调就是在Launcher中实现的。(LauncherModel——>Launcher(回调)——>Workspace)
再举一个例子,当Gallery应用移动位置时,假设有空位置可以移动,Gallery应用从原位置移动到目标位置过程。View处理移动事件,Controller 将DragTarget设置为数据模型(LauncherModel)。所以最终触发数据模型的放置动作,数据判断有无空位置放置,如果有成功放置,更新该应用的数据模型和数据库记录。 (Workspace——>Launcher(回调)——>LauncherModel)
(LauncherProvider)数据库帮助类。实现了数据库的常见,默认配置的加载;常见增删改查操作的重载,增删改查的适配方便具体使用环境调用。
public class LauncherProvider extends ContentProvider { private static final String DATABASE_NAME = "launcher.db"; private SQLiteOpenHelper mOpenHelper; @Override public boolean onCreate() { mOpenHelper = new DatabaseHelper(getContext()); return true; } public String getType(Uri uri); public Cursor query(Uri uri, String[] projection, String selection,String[] selectionArgs, String sortOrder); public Uri insert(Uri uri, ContentValues initialValues); public int bulkInsert(Uri uri, ContentValues[] values); public int delete(Uri uri, String selection, String[] selectionArgs); public int update(Uri uri, ContentValues values, String selection, String[] selectionArgs); private void sendNotify(Uri uri); private static class DatabaseHelper extends SQLiteOpenHelper { private static final String TAG_FAVORITES = "favorites"; private static final String TAG_FAVORITE = "favorite"; private static final String TAG_SHORTCUT = "shortcut"; DatabaseHelper(Context context) { super(context, DATABASE_NAME, null, DATABASE_VERSION); ...... } public void onCreate(SQLiteDatabase db) { if (LOGD) Log.d(TAG, "creating new launcher database"); db.execSQL("CREATE TABLE favorites (" + "_id INTEGER PRIMARY KEY," + "title TEXT," + "intent TEXT," + "container INTEGER," + "screen INTEGER," + "cellX INTEGER," + "cellY INTEGER," + "spanX INTEGER," + "spanY INTEGER," + "itemType INTEGER," + "appWidgetId INTEGER NOT NULL DEFAULT -1," + "isShortcut INTEGER," + "iconType INTEGER," + "iconPackage TEXT," + "iconResource TEXT," + "icon BLOB," + "uri TEXT," + "displayMode INTEGER" + ");"); ...... if (!convertDatabase(db)) { // Populate favorites table with initial favorites loadFavorites(db); } } private boolean convertDatabase(SQLiteDatabase db); private int copyFromCursor(SQLiteDatabase db, Cursor c); public void onUpgrade(SQLiteDatabase db, int oldVersion, int newVersion); private boolean updateContactsShortcuts(SQLiteDatabase db); private void convertWidgets(SQLiteDatabase db); /*Loads the default set of favorite packages from an xml file. 【R.xml.default_workspace】*/ private int loadFavorites(SQLiteDatabase db); private boolean addAppShortcut(SQLiteDatabase db, ContentValues values, TypedArray a,PackageManager packageManager, Intent intent); private boolean addAppWidget(SQLiteDatabase db, ContentValues values, TypedArray a,PackageManager packageManager); private boolean addAppWidget(SQLiteDatabase db, ContentValues values, ComponentName cn,int spanX, int spanY); private boolean addUriShortcut(SQLiteDatabase db, ContentValues values,TypedArray a); static String buildOrWhereString(String column, int[] values);}(LauncherModel)数据模型类,从数据模型上去完整维护Launcher的所有数据。加载数据库中保存的数据到模型,监听外界变化,当外部数据改变时,更新数据模型,并更新数据库,这是其核心任务。另外它有一套丰富的回调函数,当数据变更时,这些回调会被调用,主要用于更新视图(这些回调需要视图去实现)。不明白回调函数怎么回事的,需要补充一下基础知识啦。模型加载是使用消息开启一个高权限任务,加载完成后,降低运行权限。所以启动过程中很好任务在运行,而Launcher加载的时候不会卡原因就在这里。
public class LauncherModel extends BroadcastReceiver { /*回调函数,当数据变更时,这些回调会被调用*/ public void initialize(Callbacks callbacks){mCallbacks = new WeakReference<Callbacks>(callbacks);} public interface Callbacks { public boolean setLoadOnResume(); public int getCurrentWorkspaceScreen(); public void startBinding(); public void bindItems(ArrayList<ItemInfo> shortcuts, int start, int end); public void bindFolders(HashMap<Long,FolderInfo> folders); public void finishBindingItems(); public void bindAppWidget(LauncherAppWidgetInfo info); public void bindAllApplications(ArrayList<ApplicationInfo> apps); public void bindAppsAdded(ArrayList<ApplicationInfo> apps); public void bindAppsUpdated(ArrayList<ApplicationInfo> apps); public void bindAppsRemoved(ArrayList<ApplicationInfo> apps, boolean permanent); public boolean isAllAppsVisible(); } /*下面为数据模型的维护操作,将增删改查的数据项更新到数据库*/ static void addOrMoveItemInDatabase(Context context, ItemInfo item, long container, int screen, int cellX, int cellY); static void moveItemInDatabase(Context context, ItemInfo item, long container, int screen, int cellX, int cellY); static boolean shortcutExists(Context context, String title, Intent intent); static void addItemToDatabase(Context context, ItemInfo item, long container, int screen, int cellX, int cellY, boolean notify); static void updateItemInDatabase(Context context, ItemInfo item); static void deleteItemFromDatabase(Context context, ItemInfo item); static void deleteUserFolderContentsFromDatabase(Context context, UserFolderInfo info); /* 程序包变化处理器: ACTION_PACKAGE_ADDED, ACTION_PACKAGE_REMOVED and ACTION_PACKAGE_CHANGED.*/ public void onReceive(Context context, Intent intent); /*加载过程管理*/ public void startLoader(Context context, boolean isLaunching); public void stopLoader(); private class LoaderTask implements Runnable { private void loadAndBindWorkspace();//从数据库将数据条目读到模型,并调用回调,将模型加载到视图 public void run() { loadAndBindWorkspace(); //加载和绑定workspace, 这里简化了,这里面还有些性能管理的代码 } /*其他函数略*/}(Workspace)视图容器类,负责视图的布局工作;用户事件的分发与处理;拖放的实现;子视图的更新操作等。public class Workspace extends ViewGroup{ private static class WorkspaceOvershootInterpolator implements Interpolator { private static final float DEFAULT_TENSION = 1.3f; private float mTension; public WorkspaceOvershootInterpolator(); public void setDistance(int distance); public void disableSettle(); public float getInterpolation(float t); } public Workspace(Context context, AttributeSet attrs, int defStyle) { super(context, attrs, defStyle); ...... initWorkspace(); } private void initWorkspace() { Context context = getContext(); mScrollInterpolator = new WorkspaceOvershootInterpolator(); mScroller = new Scroller(context, mScrollInterpolator); mCurrentScreen = mDefaultScreen; Launcher.setScreen(mCurrentScreen); LauncherApplication app = (LauncherApplication)context.getApplicationContext(); mIconCache = app.getIconCache(); final ViewConfiguration configuration = ViewConfiguration.get(getContext()); mTouchSlop = configuration.getScaledTouchSlop(); mMaximumVelocity = configuration.getScaledMaximumFlingVelocity(); } void setLauncher(Launcher launcher); /*重载父类函数,实现添加和布局功能*/ public void addView(View child, int index, LayoutParams params); public void addView(View child); public void addView(View child, int index); public void addView(View child, int width, int height); public void addView(View child, LayoutParams params); protected void dispatchDraw(Canvas canvas); protected void onAttachedToWindow(); protected void onMeasure(int widthMeasureSpec, int heightMeasureSpec); protected void onLayout(boolean changed, int left, int top, int right, int bottom); /*简化外部调用的困难,最简添加视图的函数*/ int getCurrentScreen(); void setCurrentScreen(int currentScreen); void addInCurrentScreen(View child, int x, int y, int spanX, int spanY); void addInCurrentScreen(View child, int x, int y, int spanX, int spanY, boolean insert); void addInScreen(View child, int screen, int x, int y, int spanX, int spanY); void addInScreen(View child, int screen, int x, int y, int spanX, int spanY, boolean insert); CellLayout.CellInfo findAllVacantCells(boolean[] occupied); /*用户事件处理函数*/ public void setOnLongClickListener(OnLongClickListener l) public boolean requestChildRectangleOnScreen(View child, Rect rectangle, boolean immediate); public boolean dispatchUnhandledMove(View focused, int direction); public void addFocusables(ArrayList<View> views, int direction, int focusableMode); public boolean dispatchTouchEvent(MotionEvent ev); public boolean onInterceptTouchEvent(MotionEvent ev); /*拖动操作的实现过程*/ public void setDragController(DragController dragController); public void onDrop(DragSource source, int x, int y, int xOffset, int yOffset, DragView dragView, Object dragInfo); public void onDragEnter(DragSource source, int x, int y, int xOffset, int yOffset, DragView dragView, Object dragInfo); public void onDragOver(DragSource source, int x, int y, int xOffset, int yOffset, DragView dragView, Object dragInfo); public void onDragExit(DragSource source, int x, int y, int xOffset, int yOffset, DragView dragView, Object dragInfo); public boolean acceptDrop(DragSource source, int x, int y, int xOffset, int yOffset, DragView dragView, Object dragInfo); /*计算对象可安放的区域*/ public Rect estimateDropLocation(DragSource source, int x, int y, int xOffset, int yOffset, DragView dragView, Object dragInfo, Rect recycle);}附录:Launcher的主要模型、类和定制方法,参考自百度百科【Launcher】
Launcher是安卓系统中的桌面启动器,安卓系统的桌面UI统称为Launcher。Launcher是安卓系统中的主要程序组件之一,安卓系统中如果没有Launcher就无法启动安卓桌面,Launcher出错的时候,安卓系统会出现“进程 com.android.launcher 意外停止”的提示窗口。这时需要重新启动桌面Launcher。
一、主要文件和类
1.Launcher.java:launcher中主要的activity。
2.DragLayer.java:launcher layout的rootview。DragLayer实际上也是一个抽象的界面,用来处理拖动和对事件进行初步处理然后按情况分发下去,角色是一个controller。它首先用onInterceptTouchEvent(MotionEvent)来拦截所有的touch事件,如果是长按item拖动的话不把事件传下去,直接交由onTouchEvent()处理,这样就可以实现item的移动了,如果不是拖动item的话就把事件传到目标view,交有目标view的事件处理函数做相应处理。如过有要对事件的特殊需求的话可以修改onInterceptTouchEvent(MotionEvent)来实现所需要的功能。
3. DragController.java:为Drag定义的一个接口。包含一个接口,两个方法和两个静态常量。接口为DragListener(包含onDragStart(),onDragEnd()两个函数),onDragStart()是在刚开始拖动的时候被调用,onDragEnd()是在拖动完成时被调用。在launcher中典型的应用是DeleteZone,在长按拖动item时调用onDragStart()显示,在拖动结束的时候onDragEnd()隐藏。两个函数包括startDrag()和setDragItemInfo().startDrag()用于在拖动是传递要拖动的item的信息以及拖动的方式,setDragItemInfo()用于传递item的参数信息(包括位置以及大小)。两个常量为DRAG_ACTION_MOVE,DRAG_ACTION_COPY来标识拖动的方式,DRAG_ACTION_MOVE为移动,表示在拖动的时候需要删除原来的item,DRAG_ACTION_COPY为复制型的拖动,表示保留被拖动的item。
4.LauncherModel.java:辅助的文件。里面有许多封装的对数据库的操作。包含几个线程,其中最主要的是ApplicationsLoader和DesktopItemsLoader。ApplicationsLoader在加载所有应用程序时使用,DesktopItemsLoader在加载workspace的时候使用。其他的函数就是对数据库的封装,比如在删除,替换,添加程序的时候做更新数据库和UI的工作。
5.Workspace.java:抽象的桌面。由N个celllaout组成,从cellLayout更高一级的层面上对事件的处理。
6.LauncherProvider.java:launcher的数据库,里面存储了桌面的item的信息。在创建数据库的时候会loadFavorites(db)方法,loadFavorites()会解析xml目录下的default_workspace.xml文件,把其中的内容读出来写到数据库中,这样就做到了桌面的预制。
7.CellLayout.java:组成workspace的view,继承自viewgroup,既是一个dragSource,又是一个dropTarget,可以将它里面的item拖出去,也可以容纳拖动过来的item。在workspace_screen里面定了一些它的view参数。
8.ItemInfo.java:对item的抽象,所有类型item的父类,item包含的属性有id(标识item的id),cellX(在横向位置上的位置,从0开始),cellY(在纵向位置上的位置,从0开始) ,spanX(在横向位置上所占的单位格),spanY(在纵向位置上所占的单位格),screen(在workspace的第几屏,从0开始),itemType(item的类型,有widget,search,application等),container(item所在的)。
9.UserFolder.java: 用户创建的文件夹。可以将item拖进文件夹,单击时打开文件夹,长按文件夹上面标题处可以重命名文件夹。
10.LiveFolder.java:系统自带的文件夹。从系统中创建出的如联系人的文件夹等。
11.DeleteZone:删除框。在平时是出于隐藏状态,在将item长按拖动的时候会显示出来,如果将item拖动到删除框位置时会删除item。DeleteZone实现了DropTarget和DragListener两个接口。
12.LauncherSettings.java:字符串的定义。数据库项的字符串定义,另外在这里定义了container的类型,还有itemType的定义,除此还有一些特殊的widget(如search,clock的定义等)的类型定义。
二、主要模块
1.界面模型:
Launcher的界面的rootview是DragLayer,它是一个FrameLayout,在它上面workspace(应该说是celllayout)占了绝大部分的空间,celllayout的参数文件是workspace_screen.xml。workspace既是一个DropTarget又是一个DragSource,可以从AllAppGridView中拖出应用程序放在它上面,也可以把它里面的item拖走删除或者拖到bottomabr里面去。
2.Drop& Drag模型:
2.1 DragSource:可以拖动的对象来源的容器,在launcher中主要有AllAppGridView,workspace等。void onDropCompleted(View target, boolean success,int x,int y);2.2 DropTarget:可以放置被拖动的对象的容器。在launcher中有folder,workspace,bottombar等,一个View既可以是Dragsource也可以是DropTarget。主要包含以下几个接口:
1) boolean acceptDrop(DragSource source, int x, int y, int xOffset, int yOffset, Object dragInfo);
acceptDrop 函数用来判断dropTarget是否可以接受item放置在自己里面。
2) void onDragEnter(DragSource source, int x, int y, int xOffset, int yOffset, Object dragInfo);
onDragEnter是item被拖动进入到一个dropTarget的时候的回调。
3) void onDragOver(DragSource source, int x, int y, int xOffset, int yOffset, Object dragInfo);
onDragOver是item在上一次位置和这一次位置所处的dropTarget相同的时候的回调。
4) void onDragExit(DragSource source, int x, int y, int xOffset, int yOffset, Object dragInfo);
onDragExit是item被拖出dropTarget时的回调。
5) boolean onDrop(DragSource source, int x, int y, int xOffset, int yOffset, Object dragInfo);
onDrop是item被放置到dropTarget时的回调。
3.Touch event总结:
由于launcher的事件比较多比较复杂,所以在事件处理的时候一般采用rootview先用onInterceptTouchEvent(MotionEvent)拦截所有的touch事件,经过判断后分发给childview。判断的规则如下:
a.down事件首先会传递到onInterceptTouchEvent()方法
b.如果该ViewGroup的onInterceptTouchEvent()在接收到down事件处理完成之后return false,那么后续的move, up等事件将继续会先传递给该ViewGroup,之后才和down事件一样传递给最终的目标view的onTouchEvent()处理。
c.如果该ViewGroup的onInterceptTouchEvent()在接收到down事件处理完成之后return true,那么后续的move, up等事件将不再传递给onInterceptTouchEvent(),而是和down事件一样传递给该ViewGroup的onTouchEvent()处理,注意,目标view将接收不到任何事件。
d.如果最终需要处理事件的view的onTouchEvent()返回了false,那么该事件将被传递至其上一层次的view的onTouchEvent()处理。
e.如果最终需要处理事件的view 的onTouchEvent()返回了true,那么后续事件将可以继续传递给该view的onTouchEvent()处理。
三、几种问题的解决方式
1.将所有的应用都排列在桌面上将所有的应用都排列在桌面是通过首先创建一个三维的boolean型全局数组来记录item的排列情况,第一维是屏数,第二维是纵向上的排列情况,第三维是横向的排列情况,如果那个位置被item所占用就标记为1,否则标记为0.在启动时把全局数组初始化为0,然后在添加的时候把相应的位置置1.凡是涉及到workspace上item的变化,比如移动、添加、删除操作时都需要维护数组,保持数组的正确性,因为在安装新程序时依据数组的状态去判断把item加到什么位置。
2.动态增加屏幕
动态增加屏幕是通过worksapce .addchild(view)的方式实现。基本思路是:首先预先规定所允许的最大的屏幕数,然后在需要增加屏幕而且当前屏幕数没有超过最大屏幕数的时候通过(CellLayout)mInflater.inflate(R.layout.workspace_screen,null)创建一个celllayout实例出来,然后通过addchild把它加入进去。在屏幕上的item被删除时通过从最后一屏起判断屏幕上是否有item,如果有的话保留,没有的话则删除最后一屏,以此类推。3.预制桌面
a.添加普通的应用程序快捷方式:
在../res/xml下的default_workspace.xml文件中加入默认要放置的普通的应用程序。加入的格式为:
<favorite
launcher:packageName="... " //应用的packageName
launcher:className="... " //应用启动时的第一个activity
launcher:screen="..." //放置在第几屏(放在workspace的时候需要,从0开始,0为第一屏,1为第二屏,以此类推...)
launcher:x="..." //放置x方向的位置(在列中的位置)
launcher:y="..." /> //放置y方向的位置(在行中的位置)
packageName和className可以通过点击程序,然后在打印出的log中找到comp={...},例如如下信息:
comp={com.estrongs.android.taskmanager/com.estrongs.android.taskmanager.TaskManager}。其中com.estrongs.android.taskmanager为packageName,
com.estrongs.android.taskmanager.TaskManager为className。
workspace的布局如下: (0,0)-(1,0)-(2,0)-(3,0)-(4,0)
(0,1)- (1,1)-(2,1)-(3,1)-(4,1)
(0,2)- (1,2)-(2,2)-(3,2)-(4,2)
b.添加widget:
在../package/apps/VLauncher/res/xml下的default_workspace.xml文件中加入默认要放置的普通的应用程序。加入的格式为:
<widget
launcher:packageName="..." //widget的packageName
launcher:className=" ..." //实现 widget的 receiver 类的名称.
launcher:container="..." //放置的位置(只能为desktop)
launcher:screen="..." //放置在第几屏上
launcher:x="..." //放置的x位置
launcher:y="..." //放置的y位置
launcher:spanx="..." //在x方向上所占格数
launcher:spany="..."/> //在y方向上所占格数
例如,要在第3屏的第一行第二列放置开始放置一个x方向上占两个单位格,y方向上占两个单位格的时钟,可以加入以下代码:
<appwidget
launcher:packageName="com.android.alarmclock" launcher:className="com.android.alarmclock.AnalogAppWidgetProvider"
launcher:container="desktop"
launcher:screen="2"
launcher:x="1"
launcher:y="0"
launcher:spanx="2"
launcher:spany="2"/>
4.改变主界面的排列方式要修改桌面的排列方式,如下,先根据横竖屏设置修改workspace_screen.xml里shortAxisCells和longAxisCells的参数,然后在Launcher.java中修改NUMBER_CELLS_X和NUMBER_CELLS_Y的值,在2.3版本中刚开始往数据库中添加item的时候会去判断,如果不修改NUMBER_CELLS_X和NUMBER_CELLS_Y的话会导致一部分的item显示不出来,导致预制apk的失败。
5.增加worksapce上的屏数要增加屏数,首先在根据横竖屏在launcher.xml中的<com.android.launcher.Workspace 中删除或增加 <include android:id="@+id/cellN" layout="@layout/workspace_screen" />,然后在Launcher.java中修改SCREEN_COUNT的值即可。
四、xml配置文件
1.workspace_screen.xmllauncher:cellWidth="95dip" cell(即item)的宽
launcher:cellHeight="93dip" cell(即item)的宽
launcher:longAxisStartPadding="25dip"
较长(屏幕的宽和高中较大的那一方向,根据横竖屏方向有所不同)方向上距离起点的像素数
launcher:longAxisEndPadding="55dip"
较长(屏幕的宽和高中较大的那一方向,根据横竖屏方向有所不同)方向上距离终点的像素数
launcher:shortAxisStartPadding="20dip"
较短(屏幕的宽和高中较大的那一方向,根据横竖屏方向有所不同)方向上距离起点的像素数
launcher:shortAxisEndPadding="120dip"
较短(屏幕的宽和高中较大的那一方向,根据横竖屏方向有所不同)方向上距离起点的像素数
launcher:shortAxisCells="3"
较短的方向上可以容纳的cell的数量
launcher:longAxisCells="5"
较长的方向上可以容纳的cell的数量
shortAxisCells和longAxisCells决定一个workspace(即CellLayout)上可以容纳的item的个数为shortAxisCells*longAxisCells.
2. application_boxed.xml所有应用程序和系统文件夹中item的定义。
3.application.xmlWorkspace的item的layout定义。
- ANDROID2.3 Launcher源码分析-MVC
- ANDROID2.3 Launcher源码分析-MVC
- ANDROID2.3 Launcher源码分析-MVC
- android2.3-adb源码分析
- android2.3-adb源码分析
- android2.3-adb源码分析
- android2.3-adb源码分析
- android2.3-adb源码分析
- 在eclipse中运行Android2.3的launcher源码
- Launcher 3 源码分析笔记
- Android2.3 源码下载并分析
- android launcher源码分析
- android launcher源码分析 .
- launcher源码分析
- android launcher源码分析
- android launcher源码分析
- android launcher源码分析
- Launcher.java源码分析
- 最新Xcode 4.3.2 下使用Storyboard和ARC开发iPhone4程序 03——Storyboard类及使用
- 敏捷开发“松结对编程”系列之七:问题集之一 .
- andriod 断点续传和下载原理分析
- 我6个月的学习苹果编程经历:从”大齿怪“到“狂欢者”
- ASPxDateEdit这个控件里按钮的汉化
- ANDROID2.3 Launcher源码分析-MVC
- Linux环境变量配置文件
- 单源多目标最短路径模型
- 关于SVN添加无用的受控文件后,取消文件受控的方法
- 【转】Selenium WebDriver的简单操作说明
- 开发问题及解决 java.lang.ClassCastException:android.widget.LinearLayout$LayoutParams
- MAC下Android的Eclipse开发环境的搭建
- FPGA与MCU/模拟技术整合提速
- UVa 442 - Matrix Chain Multiplication