WPF Cover Flow Tutorial : Part 1
来源:互联网 发布:加湿器的危害 知乎 编辑:程序博客网 时间:2024/05/01 19:06
Disclaimer : if you don't know anything about WPF, you should read this excellent tutorial. This should be considered as Part 0.
Now, I will describe how to develop a Cover Flow component in WPF.
 The z-axis is not visible here. Actually, it is going in your direction.

The first basic task will just display one cover in the middle of the screen.
In 3D, we usually work with triangles.
So we simply cut the square in two :
Let's start with the code. We create the 4 points :Then we create a MeshGeometry3D object. This object will contain our model. In order to build a model, we need to set all the points. Then, for each triangle, we define the point indices and the normals. To calculate the normals, I use the same method as the one defined in Part 0.For the first triangle, we take the first 3 points. The normal is OK with these points (going towards us, in the positive direction of the z-axis). We need to pay attention to the second triangle. If we simply take the points in the same order (e.g. 1, 2 and 3), the normal will be inverted, in the negative direction of the z-axis. So we choose the points 0, 2 and 3.As far as texturing is concerned, I strongly advise you to read Daniel Lehenbauer's Blog. We need to deal with 4 points, but in 2D this time :As you've read in Daniel's post, there is a big difference between 3D and 2D texture conventions. In 3D, you have :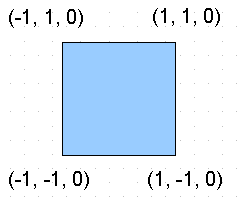
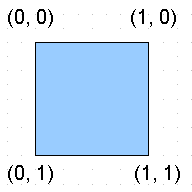
But 2D texturing uses :
So the coordinates associations are :
The mesh will be frozen for performance reasons. In the future, we will only need to transform this mesh with rotations and translations. We will not need to move the points.
This gives us a Tesselate method that will return the mesh :This method will be part of a Cover class. This class will be the main class to deal with covers. Here are two more methods that will help us to load the texture image :We finish the class with its constructor :Let's load this class in an empty WPF application.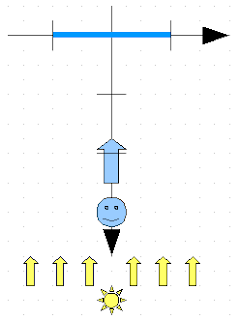
We place the camera at (0, 0, 3). We add a light source so that we will not see black objects.
We also add an empty ModelVisual3D object that will contain our single cover (for now).
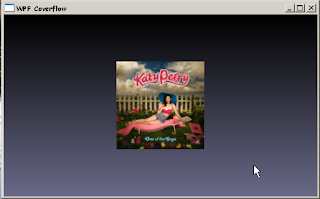
Here is the xaml code :This simple application will display :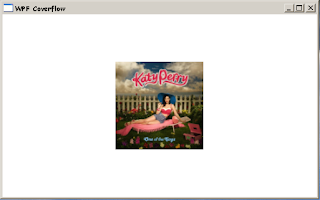 This can be prettier if we add some background :
 Continue with Part 2. Download source.
Edit 2011.06.07 : Only one normal is needed per triangle. Source code has not been updated.
Now, I will describe how to develop a Cover Flow component in WPF.
The z-axis is not visible here. Actually, it is going in your direction.The first basic task will just display one cover in the middle of the screen.
In 3D, we usually work with triangles.
So we simply cut the square in two :
Let's start with the code. We create the 4 points :
- var p0 = new Point3D(-1, -1, 0);
- var p1 = new Point3D(1, -1, 0);
- var p2 = new Point3D(1, 1, 0);
- var p3 = new Point3D(-1, 1, 0);
- private Vector3D CalculateNormal(Point3D p0, Point3D p1, Point3D p2)
- {
- var v0 = new Vector3D(p1.X - p0.X, p1.Y - p0.Y, p1.Z - p0.Z);
- var v1 = new Vector3D(p2.X - p1.X, p2.Y - p1.Y, p2.Z - p1.Z);
- return Vector3D.CrossProduct(v0, v1);
- }
- var mesh = new MeshGeometry3D();
- mesh.Positions.Add(p0);
- mesh.Positions.Add(p1);
- mesh.Positions.Add(p2);
- mesh.Positions.Add(p3);
- var normal = CalculateNormal(p0, p1, p2);
- mesh.TriangleIndices.Add(0);
- mesh.TriangleIndices.Add(1);
- mesh.TriangleIndices.Add(2);
- mesh.Normals.Add(normal);
- normal = CalculateNormal(p2, p3, p0);
- mesh.TriangleIndices.Add(2);
- mesh.TriangleIndices.Add(3);
- mesh.TriangleIndices.Add(0);
- mesh.Normals.Add(normal);
- var q0 = new Point(0, 0);
- var q1 = new Point(1, 0);
- var q2 = new Point(1, 1);
- var q3 = new Point(0, 1);
But 2D texturing uses :
So the coordinates associations are :
- p0 <-> q3
- p1 <-> q2
- p2 <-> q1
- p3 <-> q0
- mesh.TextureCoordinates.Add(q3);
- mesh.TextureCoordinates.Add(q2);
- mesh.TextureCoordinates.Add(q1);
- mesh.TextureCoordinates.Add(q0);
- mesh.TextureCoordinates.Add(q1);
- mesh.TextureCoordinates.Add(q2);
This gives us a Tesselate method that will return the mesh :
- private Geometry3D Tessellate()
- {
- var p0 = new Point3D(-1, -1, 0);
- ...
- var mesh = new MeshGeometry3D();
- ...
- mesh.Freeze();
- return mesh;
- }
- private ImageSource LoadImageSource(string imagePath)
- {
- Image thumb = Image.FromFile(imagePath);
- return new BitmapImage(new Uri(imagePath, UriKind.RelativeOrAbsolute));
- }
- private Material LoadImage(ImageSource imSrc)
- {
- return new DiffuseMaterial(new ImageBrush(imSrc));
- }
- using ...
- namespace Ded.Tutorial.Wpf.CoverFlow.Part1
- {
- class Cover : ModelVisual3D
- {
- #region Fields
- private readonly Model3DGroup modelGroup;
- #endregion
- #region Private stuff
- private Vector3D CalculateNormal(Point3D p0, Point3D p1, Point3D p2)...
- private Geometry3D Tessellate()...
- private ImageSource LoadImageSource(string imagePath)...
- private Material LoadImage(ImageSource imSrc)...
- #endregion
- public Cover(string imagePath)
- {
- ImageSource imSrc = LoadImageSource(imagePath);
- modelGroup = new Model3DGroup();
- modelGroup.Children.Add(new GeometryModel3D(Tessellate(), LoadImage(imSrc)));
- Content = modelGroup;
- }
- }
- }
We place the camera at (0, 0, 3). We add a light source so that we will not see black objects.
We also add an empty ModelVisual3D object that will contain our single cover (for now).
Here is the xaml code :
- <Window x:Class="Ded.Tutorial.Wpf.CoverFlow.Part1.TestWindow"
- xmlns="http://schemas.microsoft.com/winfx/2006/xaml/presentation"
- xmlns:x="http://schemas.microsoft.com/winfx/2006/xaml"
- Title="WPF Coverflow" Height="320" Width="512">
- <Grid>
- <Viewport3D x:Name="viewPort" Grid.Column="0" Grid.Row="0" ClipToBounds="False">
- <Viewport3D.Camera>
- <PerspectiveCamera x:Name="camera" Position="0,0,3"
- UpDirection="0,1,0" LookDirection="0,0,-1"
- FieldOfView="100" NearPlaneDistance="0.125"/>
- </Viewport3D.Camera>
- <Viewport3D.Children>
- <ModelVisual3D>
- <ModelVisual3D.Content>
- <DirectionalLight Color="White" Direction="0,0,-4" />
- </ModelVisual3D.Content>
- </ModelVisual3D>
- <ModelVisual3D x:Name="visualModel">
- </ModelVisual3D>
- </Viewport3D.Children>
- </Viewport3D>
- </Grid>
- </Window>
This can be prettier if we add some background :- <Grid.Background>
- <LinearGradientBrush StartPoint="0,0" EndPoint="0,1">
- <LinearGradientBrush.GradientStops>
- <GradientStop Color="Black" Offset="0"/>
- <GradientStop Color="#696988" Offset="1"/>
- </LinearGradientBrush.GradientStops>
- </LinearGradientBrush>
- </Grid.Background>
Continue with Part 2. Download source.Edit 2011.06.07 : Only one normal is needed per triangle. Source code has not been updated.
- WPF Cover Flow Tutorial : Part 1
- WPF Cover Flow Tutorial : Part 2
- WPF Cover Flow Tutorial : Part 3
- WPF Cover Flow Tutorial : Part 4
- WPF Cover Flow Tutorial : Part 5
- WPF Cover Flow Tutorial : Part 6
- WPF Cover Flow Tutorial : Part 6 (bis)
- WPF Cover Flow Tutorial : Part 7
- WPF Cover Flow Tutorial : Part 7 (source)
- Android下Cover Flow(1)
- Cover Flow特效实现(1)
- GMF Tutorial Part 1
- GObject Tutorial Part 1
- Cover Flow编程1118
- Cover Flow布局
- Rich Client Tutorial Part 1
- Tutorial - Deferred Rendering (Part 1)
- Cover Flow 期待已久!
- 敏捷测试核心理念
- 想你,但不爱你
- flex---->行为和特效
- Mysql Explain 详解
- 好像有两年没写技术文章了
- WPF Cover Flow Tutorial : Part 1
- 从那一天起,你就成了我的全部
- 申请开发者认证IDP
- 伺服电机
- 计算设定时间点与当前时间差的代码 .
- 奢望
- win7无法打开查看.hlp帮助文件解决办法
- docx文件格式转PDF格式
- HTTP简介