ubuntu_Install Android SDK on Ubuntu 12.04 LTS
来源:互联网 发布:知已的诗句 编辑:程序博客网 时间:2024/05/18 03:50
Ubuntu (latest version: 12.04 LTS) is now the most popular GNU/Linux distribution on this planet; Android, the most popular operating system for Mobile Devices, both are rocking!
If you are a Android Developer (or an absolute beginner) – who wants to use Ubuntu as the development platform OR an Ubuntu user interested in developing Android Applications – then this post might be helpful insetting up Android Development Environment on Ubuntu 12.04 (a.k.a Precise Pangolin). Although, the setup process is primarily explained for Ubuntu 12.04 but it may works seamlessly on other GNU/Linux systems such as Linux Mint, Debian, OpenSuse, Fedora etc (and of course you would have to replace apt-get by yum in RPM based distro).
Setting Up Android SDK on Ubuntu 12.04 LTS

Since Android uses Java as the programming language so you must install Java Development Kit (JDK) such as OpenJDK (Open Source implementation), followed by the Eclipse IDE and ADT plugins required for Android Development.
Step 1. Install JDK and Eclipse IDE
Although, you could install JDK or IDE separately (specially if you want specific version of JDK and Eclipse, Since Android SDK requires JDK 1.6+ and Eclipse Helios 3.6.2+) but eclipse-jdt package meets the above conditions so it would be much easier. Open a terminal and install Eclipse IDE as well as JDK, in one command (Installs Eclipse 3.7 + OpenJDK 6 ) -
sudo apt-get install eclipse-jdt
step 2. Download Android SDK Starter Package
Download Android SDK Starter Package (From Official Site)
step 3. Install ADT Plugins for Eclipse

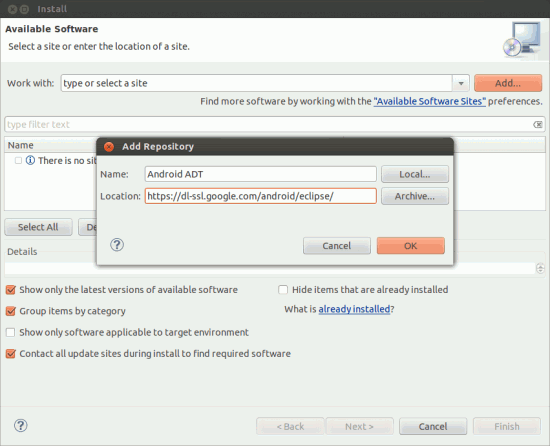
Now, Open Eclipse IDE and go to Help -> Install New Software then click onAdd and enter the URL :
https://dl-ssl.google.com/android/eclipse/

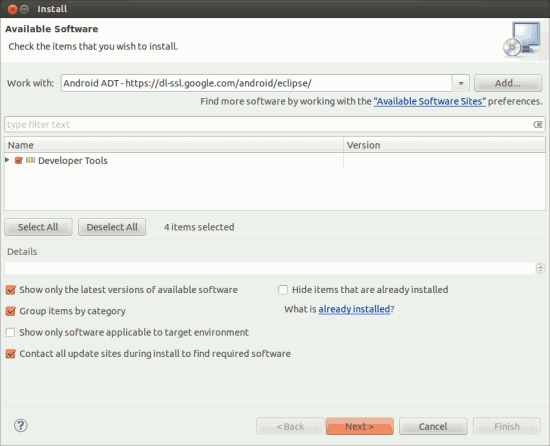
Now select the developer tools, then a couple of Next, followed by Finish would begin the Download/Installation process; Next, restart the Eclipse.
step 4. Install Android SDK
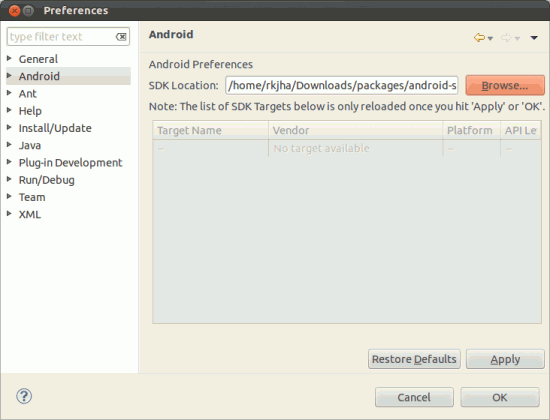
Then open Window -> Preferences and locate your Android SDK starter package.

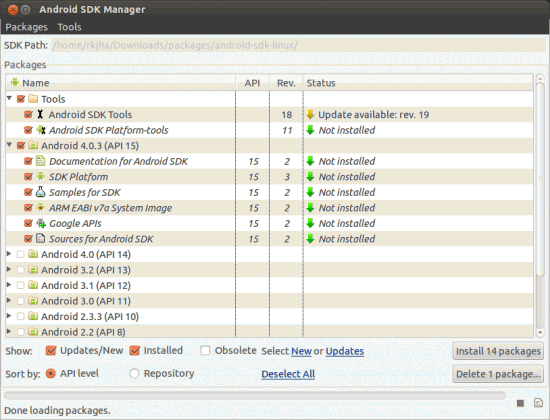
Then go to Window -> Android SDK Manager, Select the packages you want to install and clickInstall [x] Packages.

Packages to select ?
Mandatory packages are SDK Tools, SDK – Platform Tools and the SDK platform (2.1 (recommended if you want to target for 97%+ users) or 4.0.3 (the latest version at the time of writing this post)) for which you want to write the Application.
Select other packages depending on your need, although most recommended packages are – Documentation, Code Samples, USB Driver, Google API, Google Analytics SDK, Google Admob Ads SDK (If you want to show ads in your App) etc. Don’t select unnecessary packages – that you don’t need now – otherwise it may take much time to download/install all those stuffs.
Wait, until the download/install process complete (it may take a lot of time if your Internet connection is not very fast).
That’s All. Now it’s time start developing some cool Applications for Android. Have Fun!
Recommended Book(s) for Beginners
- Learning Android (o’reilly media) By Marko Gargenta
- Programming Android (o’reilly media) By Zigurd Mednieks and others
Possibly Related Posts:
- Android SDK for Ubuntu 11.04/10.10/11.10
- How to Install Eclipse IDE on Ubuntu 12.04
- how to install Eclipse IDE on Ubuntu 11.10
- how to install eclipse ide on ubuntu 10.10
- how to Install Eclipse in Ubuntu 10.04
- ubuntu_Install Android SDK on Ubuntu 12.04 LTS
- Ubuntu_Install Eclipse IDE on Ubuntu 12.04
- 在 Ubuntu 12.04 LTS 安装 Android SDK&NDK 开发环境
- 在 Ubuntu 12.04 LTS 安裝 Android SDK&NDK 開發環境
- Android build error on Ubuntu 16.04 LTS
- Compile Linux Kernel on Ubuntu 12.04 LTS
- Installing Wireshark on Ubuntu 12.04 LTS
- OpenStack Installation on Ubuntu 12.04 LTS
- Installing C++11 on Ubuntu 12.04 LTS
- Installing Wireshark on Ubuntu 12.04 LTS
- KLEE on Ubuntu 12.04 LTS 64Bit
- Install Ruby on Rails on Ubuntu 12.04 LTS
- ubuntu 12.04.5 LTS搭建海思android SDK编译环境遇到的问题总结
- Getting Android SDK working on Ubuntu 64
- Install Apache 2.4.2 on Ubuntu 12.04 LTS
- Installing OpenStack on Ubuntu 12.04 LTS in 10 Minutes
- Install Atheros AR8161 Gigabit Ethernet Driver on Ubuntu 12.04LTS
- get network hotplugging working on Ubuntu 12.04 LTS
- 用环境变量控制c/c++的条件编译
- QT学习笔记 QTimer 与信号 槽
- OCP-043 SHRINK SPACE CASCADE
- Request.ServerVariables的用法
- 基于对话框的单实例应用程序
- ubuntu_Install Android SDK on Ubuntu 12.04 LTS
- Struts2拦截器实现原理的理解
- Activity的四种launchMode
- 大数据量,海量数据 处理方法总结
- Rdlc报表出现空白页解决方法
- android activity 生命周期详解
- Oracle中的case when then 用法.
- 条款5:了解C++默默编写并调用哪些函数
- SQL Server 2005为数据库设置用户名和密码的方法


