TabHost两种实现方式
来源:互联网 发布:互联网产品数据分析 编辑:程序博客网 时间:2024/04/27 20:33
第一种:继承TabActivity,从TabActivity中用getTabHost()方法获取TabHost。只要定义具体Tab内容布局就行了.
xml布局:
- <FrameLayout xmlns:android="http://schemas.android.com/apk/res/android"
- android:layout_width="fill_parent" android:layout_height="fill_parent">
- <LinearLayout android:id="@+id/widget_layout_Blue"
- android:layout_width="fill_parent" android:layout_height="fill_parent"
- android:orientation="vertical" >
- <EditText android:id="@+id/widget34" android:layout_width="fill_parent"
- android:layout_height="wrap_content" android:text="EditText"
- android:textSize="18sp">
- </EditText>
- <Button android:id="@+id/widget30" android:layout_width="wrap_content"
- android:layout_height="wrap_content" android:text="Button">
- </Button>
- </LinearLayout>
- <LinearLayout android:id="@+id/widget_layout_red"
- android:layout_width="fill_parent" android:layout_height="fill_parent"
- android:orientation="vertical" >
- <AnalogClock android:id="@+id/widget36"
- android:layout_width="wrap_content" android:layout_height="wrap_content">
- </AnalogClock>
- </LinearLayout>
- <LinearLayout android:id="@+id/widget_layout_green"
- android:layout_width="fill_parent" android:layout_height="fill_parent"
- android:orientation="vertical">
- <RadioGroup android:id="@+id/widget43"
- android:layout_width="166px" android:layout_height="98px"
- android:orientation="vertical">
- <RadioButton android:id="@+id/widget44"
- android:layout_width="wrap_content" android:layout_height="wrap_content"
- android:text="RadioButton">
- </RadioButton>
- <RadioButton android:id="@+id/widget45"
- android:layout_width="wrap_content" android:layout_height="wrap_content"
- android:text="RadioButton">
- </RadioButton>
- </RadioGroup>
- </LinearLayout>
- </FrameLayout>
- java代码:
- super.onCreate(savedInstanceState);
- myTabhost=this.getTabHost();
- //get Tabhost
- LayoutInflater.from(this).inflate(R.layout.main, myTabhost.getTabContentView(), true);
- myTabhost.setBackgroundColor(Color.argb(150, 22, 70, 150));
- myTabhost
- .addTab(myTabhost.newTabSpec("One")// make a new Tab
- .setIndicator("A")
- // set the Title and Icon
- .setContent(R.id.widget_layout_Blue));
- // set the layout
- myTabhost
- .addTab(myTabhost.newTabSpec("Two")// make a new Tab
- .setIndicator("B",
- getResources().getDrawable(R.drawable.mumule))
- // set the Title and Icon
- .setContent(R.id.widget_layout_green));
- // set the layout
- myTabhost
- .addTab(myTabhost.newTabSpec("Three")// make a new Tab
- .setIndicator("C",
- getResources().getDrawable(R.drawable.notepad))
- // set the Title and Icon
- .setContent(R.id.widget_layout_red));
第二种:不用继承TabActivity,在布局文件中定义TabHost即可,但是TabWidget的id必须是
@android:id/tabs,FrameLayout的id必须是@android:id/tabcontent。TabHost的id可以自定义.
xml布局:
- <?xml version="1.0" encoding="utf-8"?>
- <LinearLayout xmlns:android="http://schemas.android.com/apk/res/android"
- android:id="@+id/hometabs"
- android:orientation="vertical"
- android:layout_width="fill_parent"
- android:layout_height="fill_parent">
- <TabHost android:id="@+id/tabhost"
- android:layout_width="wrap_content"
- android:layout_height="wrap_content">
- <LinearLayout
- android:orientation="vertical"
- android:layout_width="fill_parent"
- android:layout_height="fill_parent">
- <TabWidget android:id="@android:id/tabs"
- android:orientation="horizontal"
- android:layout_width="wrap_content"
- android:layout_height="wrap_content">
- </TabWidget>
- <FrameLayout android:id="@android:id/tabcontent"
- android:layout_width="wrap_content"
- android:layout_height="wrap_content">
- <TextView android:id="@+id/view1"
- android:layout_width="fill_parent"
- android:layout_height="fill_parent"/>
- <TextView android:id="@+id/view2"
- android:layout_width="fill_parent"
- android:layout_height="fill_parent"/>
- <TextView android:id="@+id/view3"
- android:layout_width="fill_parent"
- android:layout_height="fill_parent"/>
- </FrameLayout>
- </LinearLayout>
- </TabHost>
- </LinearLayout>
- java代码:
- protected void onCreate(Bundle savedInstanceState) {
- super.onCreate(savedInstanceState);
- setContentView(R.layout.hometabs);
- TabHost tabHost = (TabHost) findViewById(R.id.tabhost);
- tabHost.setup();
- TabWidget tabWidget = tabHost.getTabWidget();
- tabHost.addTab(tabHost.newTabSpec("tab1")
- .setIndicator("tab1", getResources().getDrawable(R.drawable.mumule))
- .setContent(R.id.view1));
- tabHost.addTab(tabHost.newTabSpec("tab3")
- .setIndicator("tab3")
- .setContent(R.id.view3));
- tabHost.addTab(tabHost.newTabSpec("tab2")
- .setIndicator("tab2")
- .setContent(R.id.view2));
- final int tabs = tabWidget.getChildCount();
- Log.i(TAG, "***tabWidget.getChildCount() : " + tabs);
- final int tabWidth = 90;
- final int tabHeight = 45;
- for (int i = 0; i < tabs; i++) {
- /* final View view = tabWidget.getChildAt(i);
- view.getLayoutParams().width = tabWidth;
- view.getLayoutParams().height = tabHeight;
- final TextView tv = (TextView) view.findViewById(android.R.id.title);
- tv.setTextColor(this.getResources().getColorStateList(android.R.color.black));
- MarginLayoutParams tvMLP = (MarginLayoutParams)tv.getLayoutParams();
- tvMLP.bottomMargin = 8;*/
- }
- }
Android开发之TabHost控件的使用
首先展示个效果,截图如下:
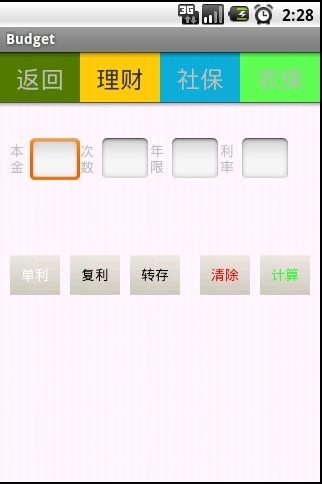
在这里我们使用了一个TabHost控件,下面我们来详细讲解下这个控件以及使用这个控件时,应该注意的一些问题。
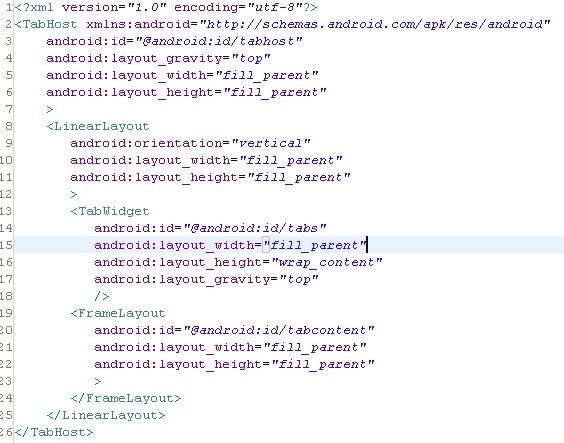
使用TabHost有两种方法,一种是继承TabActivity;一种是不继承TabActivity;在这里我要讲解的是继承 TabActivity的;首先我们得写好main.xml布局文件,在写这个布局文件时要注意,使用TabHost一定要有TabWidget、 FramLayout这两个控件,并且TabWidget必须使用系统ID @android:id/tabs;FrameLayout作为标签内容的基本框架,也必须使用系统ID @android:id/tabcontent;而TabHost可以自定义ID,这是为了在系统初始化时能够使用,否则会报错!布局文件 main.xml如下:
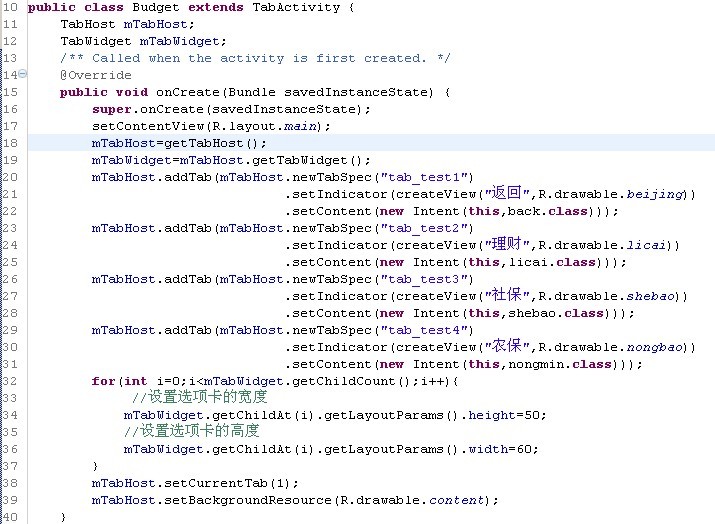
布局文件弄好之后,我们就需要开发用户界面;首先,我们让它继承TabActivity;之后我们可以通过getTabHost()方法得到一个 TabHost对象;得到TabHost对象之后,我们就可以使用该对象来添加上面顶部的四个标签(返回、理财、社保和农保);这里有个问题,就是如何设 置每个标签的大小和位置呢?呵呵,在这里我们用getTabWidget()方法取TabWidget对象。通过该对象使用getChildAt(int i)来取得每个标签,取得每个标签之后,我们就可以使用下面代码来设置标签内容中的位置了:
for(int i=0;i<mTabWidget.getChildCount();i++){
//设置选项卡的宽度
mTabWidget.getChildAt(i).getLayoutParams().height=50;
//设置选项卡的高度
mTabWidget.getChildAt(i).getLayoutParams().width=60;
}
设置好这些之后,我想单击它时,会跳转到别的界面去。在这里我们使用setContent(new Intent(this,cls))进行跳转;
代码截图如下:
接下来,我们又有问题了!如何设置文字颜色?如何设置每个标签的背景颜色或图片呢?在这里我定义了一个方法,这个方法里面解决了上面的那些问题!该方法截图如下:
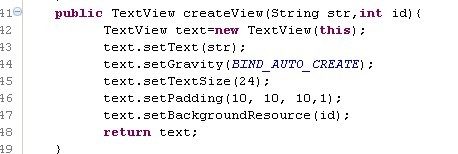
这个函数我们返回了一个TextView对象;然后使用setIndicator(view)方法,把TextView添加进去;这个函数有两个参数,第一个参数是指标签的内容,第二个参数是标签的背景图片;到此我们已经把主要的东西都理清
源链接:http://blog.csdn.net/ch_984326013/article/details/6602602%E4%B8%8A%E9%9D%A2%E9%82%A3%E4%B8%AA%E6%98%AFtabHost
- TabHost两种实现方式
- TabHost两种实现方式
- TabHost两种实现方式
- TabHost两种实现方式
- TabHost两种实现方式
- TabHost两种实现方式
- TabHost两种实现方式
- TabHost两种实现方式
- Android TabHost两种实现方式
- tabHost的两种实现方式
- TabHost两种不同的实现方式
- TabHost的两种实现方式
- TabHost两种方式
- tabhost的两种方式
- android的TabHost的两种实现方式
- TabHost两种实现方式及各个方法的作用
- 自学Android系列 笔记2 TabHost两种实现方式
- 两种特殊TabHost实现
- “类引用”概念
- lucene结构详解之二域 (Field)的元数据信息 (.fnm)
- 风的世界里有海的七滴泪水
- mysql 基本操作
- How to use an external dll file in VisualStudio project
- TabHost两种实现方式
- 概率分布的近似
- OSGi Maven开发/部署环境的搭建历程
- Linux操作系统下/etc/hosts文件详解
- Android入门之Fragment简介
- MyEclipse优化技巧
- 2012国内外云实践之企业总名单【更新至325家】
- Template matching
- 清空Linux系统的缓存