(转载)wp基础应用(一)Flip Clock
来源:互联网 发布:centos删除指令 编辑:程序博客网 时间:2024/06/01 21:14
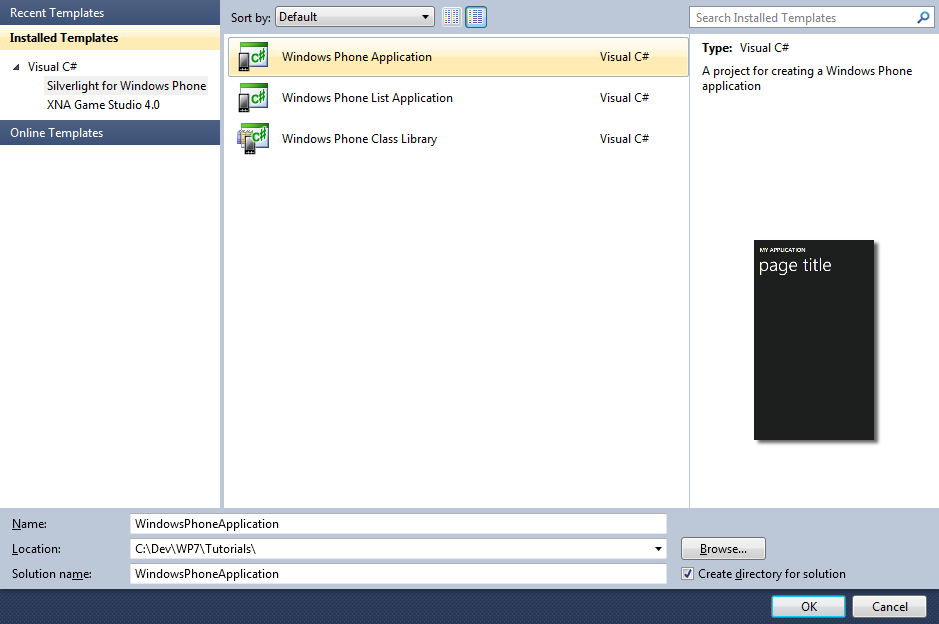
Step 1
Start Microsoft Visual Studio 2010 Express for Windows Phone, then Select File then New Project... Select "Visual C#" then "Silverlight for Windows Phone" and then "Windows Phone Application" from Templates, select a Location if you wish, then enter a name for the Project and then click OK, see below:
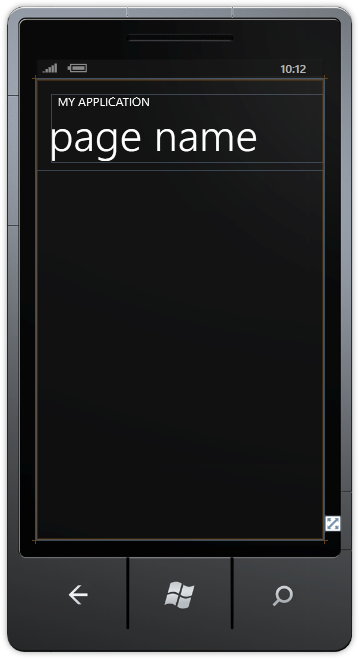
Step 2
A Windows Phone application Page named MainPage.xaml should then appear, see below:
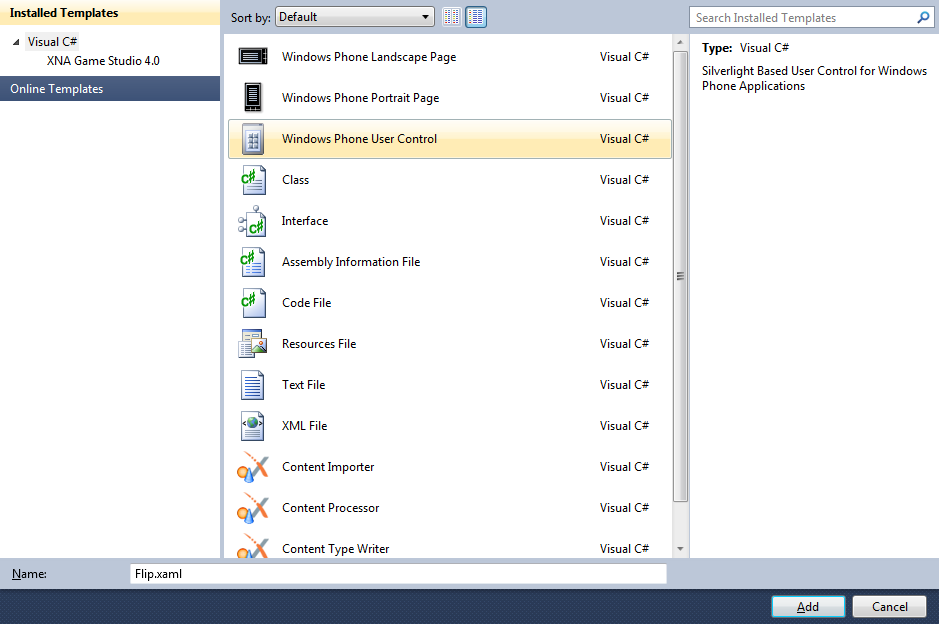
Step 3
Select from the Main Menu "Project" then "Add New Item...", and select the "Windows Phone User Control" Template, then change the "Name" to Flip.xaml see below:
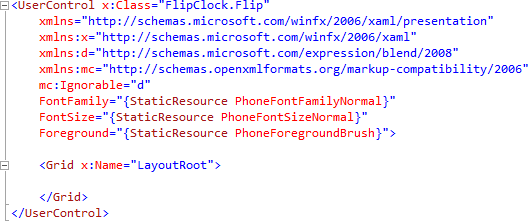
Step 4
Add the new User Control to the Project by Clicking on Add, then in the XAML Pane for the Flip.xaml User Control.
Remove d:DesignHeight="480"d:DesignWidth="480"from the<UserControl ...> Tag.
Also remove Background="{StaticResourcePhoneChromeBrush}" from <Grid x:Name="LayoutRoot" ...>, see below:
Step 5
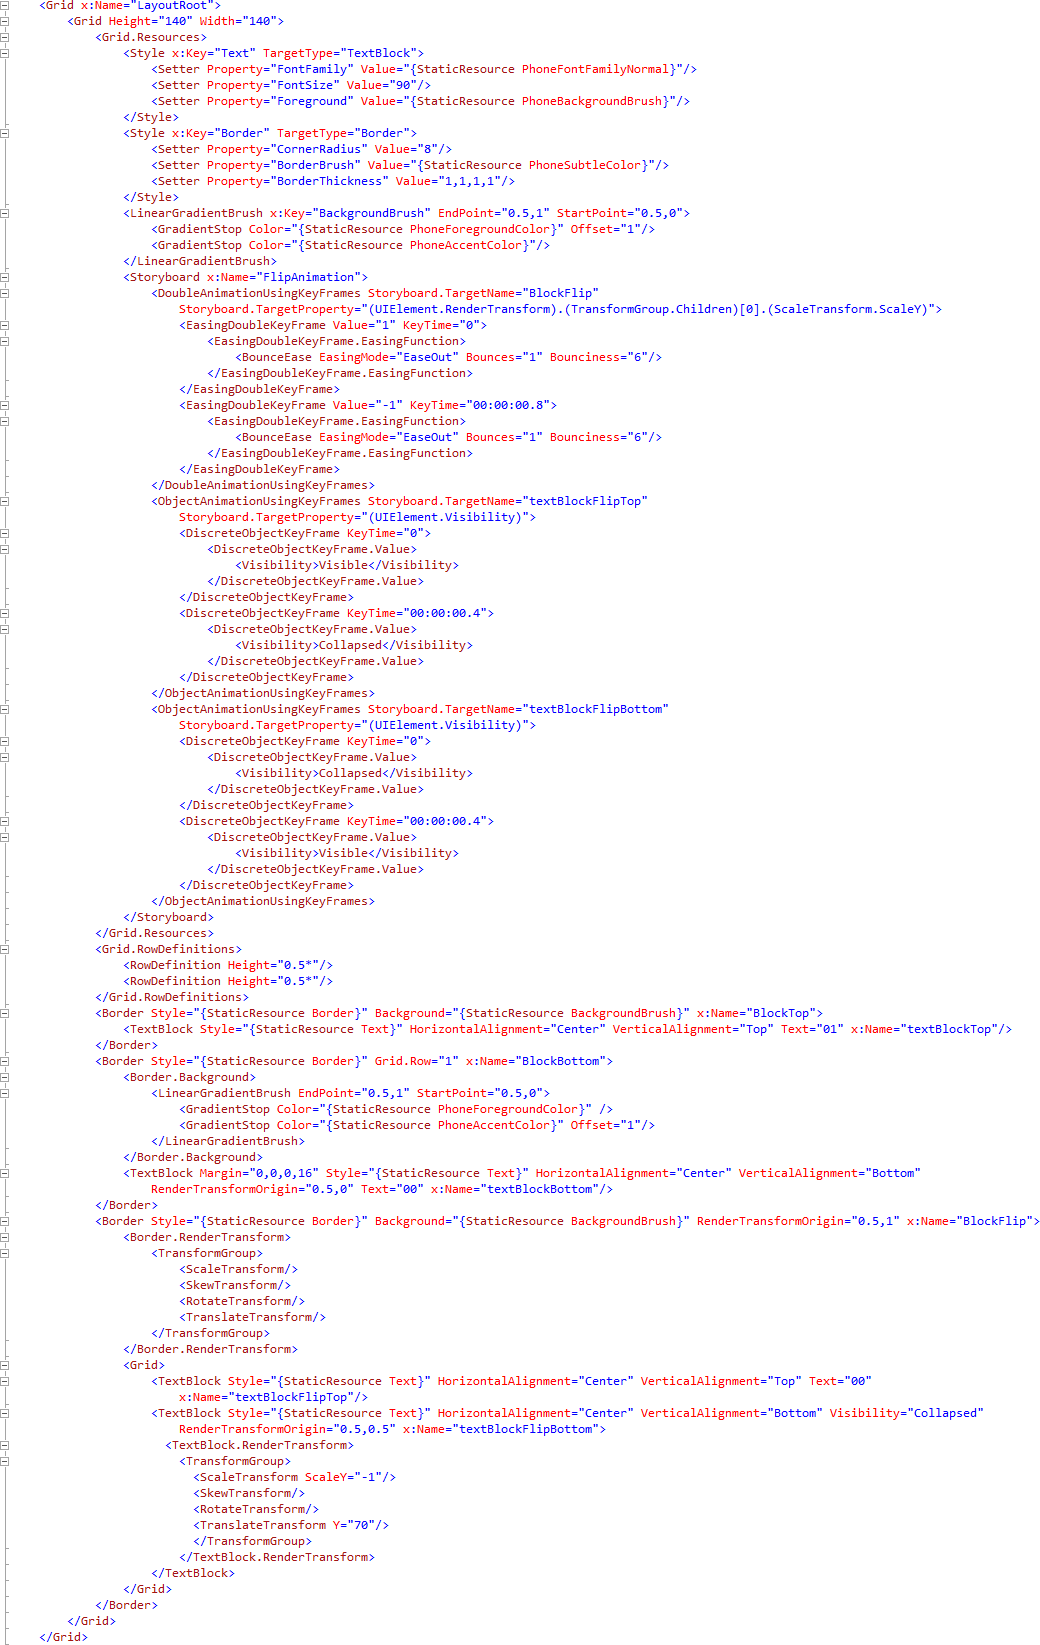
While still in the XAML Pane for the Flip.xaml User Control, between the <Grid x:Name="LayoutRoot"Background="#FF1F1F1F"> and </Grid> lines type the following XAML:
<Grid Height="140" Width="140"> <Grid.Resources> <Style x:Key="Text" TargetType="TextBlock"> <Setter Property="FontFamily" Value="{StaticResource PhoneFontFamilyNormal}"/> <Setter Property="FontSize" Value="90"/> <Setter Property="Foreground" Value="{StaticResource PhoneBackgroundBrush}"/> </Style> <Style x:Key="Border" TargetType="Border"> <Setter Property="CornerRadius" Value="8"/> <Setter Property="BorderBrush" Value="{StaticResource PhoneSubtleColor}"/> <Setter Property="BorderThickness" Value="1,1,1,1"/> </Style> <LinearGradientBrush x:Key="BackgroundBrush" EndPoint="0.5,1" StartPoint="0.5,0"> <GradientStop Color="{StaticResource PhoneForegroundColor}" Offset="1"/> <GradientStop Color="{StaticResource PhoneAccentColor}"/> </LinearGradientBrush> <Storyboard x:Name="FlipAnimation"> <DoubleAnimationUsingKeyFrames Storyboard.TargetName="BlockFlip" Storyboard.TargetProperty="(UIElement.RenderTransform).(TransformGroup.Children)[0].(ScaleTransform.ScaleY)"> <EasingDoubleKeyFrame Value="1" KeyTime="0"> <EasingDoubleKeyFrame.EasingFunction> <BounceEase EasingMode="EaseOut" Bounces="1" Bounciness="6"/> </EasingDoubleKeyFrame.EasingFunction> </EasingDoubleKeyFrame> <EasingDoubleKeyFrame Value="-1" KeyTime="00:00:00.8"> <EasingDoubleKeyFrame.EasingFunction> <BounceEase EasingMode="EaseOut" Bounces="1" Bounciness="6"/> </EasingDoubleKeyFrame.EasingFunction> </EasingDoubleKeyFrame> </DoubleAnimationUsingKeyFrames> <ObjectAnimationUsingKeyFrames Storyboard.TargetName="textBlockFlipTop" Storyboard.TargetProperty="(UIElement.Visibility)"> <DiscreteObjectKeyFrame KeyTime="0"> <DiscreteObjectKeyFrame.Value> <Visibility>Visible</Visibility> </DiscreteObjectKeyFrame.Value> </DiscreteObjectKeyFrame> <DiscreteObjectKeyFrame KeyTime="00:00:00.4"> <DiscreteObjectKeyFrame.Value> <Visibility>Collapsed</Visibility> </DiscreteObjectKeyFrame.Value> </DiscreteObjectKeyFrame> </ObjectAnimationUsingKeyFrames> <ObjectAnimationUsingKeyFrames Storyboard.TargetName="textBlockFlipBottom" Storyboard.TargetProperty="(UIElement.Visibility)"> <DiscreteObjectKeyFrame KeyTime="0"> <DiscreteObjectKeyFrame.Value> <Visibility>Collapsed</Visibility> </DiscreteObjectKeyFrame.Value> </DiscreteObjectKeyFrame> <DiscreteObjectKeyFrame KeyTime="00:00:00.4"> <DiscreteObjectKeyFrame.Value> <Visibility>Visible</Visibility> </DiscreteObjectKeyFrame.Value> </DiscreteObjectKeyFrame> </ObjectAnimationUsingKeyFrames> </Storyboard> </Grid.Resources> <Grid.RowDefinitions> <RowDefinition Height="0.5*"/> <RowDefinition Height="0.5*"/> </Grid.RowDefinitions> <Border Style="{StaticResource Border}" Background="{StaticResource BackgroundBrush}" x:Name="BlockTop"> <TextBlock Style="{StaticResource Text}" HorizontalAlignment="Center" VerticalAlignment="Top" Text="01" x:Name="textBlockTop"/> </Border> <Border Style="{StaticResource Border}" Grid.Row="1" x:Name="BlockBottom"> <Border.Background> <LinearGradientBrush EndPoint="0.5,1" StartPoint="0.5,0"> <GradientStop Color="{StaticResource PhoneForegroundColor}" /> <GradientStop Color="{StaticResource PhoneAccentColor}" Offset="1"/> </LinearGradientBrush> </Border.Background> <TextBlock Margin="0,0,0,16" Style="{StaticResource Text}" HorizontalAlignment="Center" VerticalAlignment="Bottom" RenderTransformOrigin="0.5,0" Text="00" x:Name="textBlockBottom"/> </Border> <Border Style="{StaticResource Border}" Background="{StaticResource BackgroundBrush}" RenderTransformOrigin="0.5,1" x:Name="BlockFlip"> <Border.RenderTransform> <TransformGroup> <ScaleTransform/> <SkewTransform/> <RotateTransform/> <TranslateTransform/> </TransformGroup> </Border.RenderTransform> <Grid> <TextBlock Style="{StaticResource Text}" HorizontalAlignment="Center" VerticalAlignment="Top" Text="00" x:Name="textBlockFlipTop"/> <TextBlock Style="{StaticResource Text}" HorizontalAlignment="Center" VerticalAlignment="Bottom" Visibility="Collapsed" RenderTransformOrigin="0.5,0.5" x:Name="textBlockFlipBottom"> <TextBlock.RenderTransform> <TransformGroup> <ScaleTransform ScaleY="-1"/> <SkewTransform/> <RotateTransform/> <TranslateTransform Y="70"/> </TransformGroup> </TextBlock.RenderTransform> </TextBlock> </Grid> </Border></Grid>XAML:
Design:
Step 6
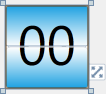
Right Click on the Page or the entry for "Flip.xaml" in Solution Explorer and choose the "View Code" option. In the Code View above "public Flip()" type the following Dependancy Properties, Properties and Methods:
public static readonly DependencyProperty TextPrevProperty =DependencyProperty.Register("TextPrev", typeof(string),typeof(Flip), null);public static readonly DependencyProperty TextNextProperty =DependencyProperty.Register("TextNext", typeof(string),typeof(Flip), null);public string TextPrev{ get { return (string)GetValue(TextPrevProperty); } set { SetValue(TextPrevProperty, value); textBlockBottom.Text = TextPrev; textBlockFlipTop.Text = TextPrev; }}public string TextNext{ get { return (string)GetValue(TextNextProperty); } set { SetValue(TextNextProperty, value); textBlockTop.Text = TextNext; textBlockFlipBottom.Text = TextNext; }}public void Value(string source, string target){ TextNext = target; TextPrev = source; FlipAnimation.Begin();}
See Below:
Step 7
Select "Build Solution" from the Debug menu, see below:
Step 8
When the Build completes, return to the MainPage Designer View by selecting the "MainPage.xaml" Tab.
In XAML Pane for MainPage.xaml between the <Gridx:Name="ContentGrid" Grid.Row="1"> and </Grid> lines type the following StackPanel XAML:
<StackPanel Height="200" Width="420" HorizontalAlignment="Center" Orientation="Horizontal"></StackPanel>XAML:

Design:
Step 9
Then from the FlipClock Controls section in the Toolbox select the Flip control:
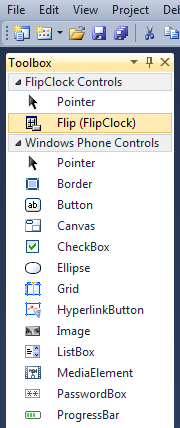
Step 10
Draw three Flip Controls onto the StackPanel by dragging the Flip Controls from the Toolbox onto the StackPanel, then in the XAML Pane change the<my:Flip ...> lines to the following:
<my:Flip x:Name="Hours"/><my:Flip x:Name="Minutes"/><my:Flip x:Name="Seconds"/>XAML:
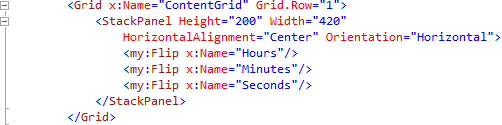
Design:
Step 11
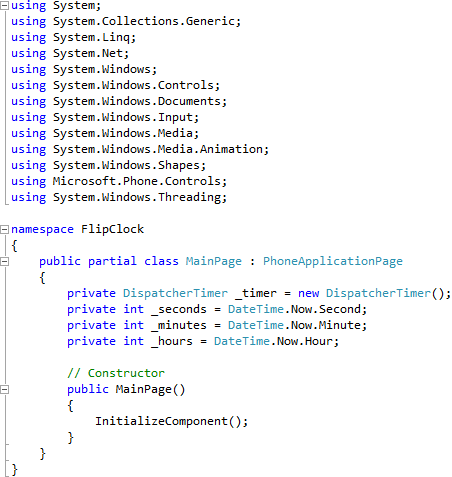
Right Click on the Page or the entry for "MainPage.xaml" in Solution Explorer and choose the "View Code" option. In the Code View above "namespace FlipClock" type the following:
using System.Windows.Threading;Also in the CodeView above "public MainPage()" type the following Declarations:
private DispatcherTimer _timer = new DispatcherTimer();private int _seconds = DateTime.Now.Second;private int _minutes = DateTime.Now.Minute;private int _hours = DateTime.Now.Hour;
See Below:
Step 12
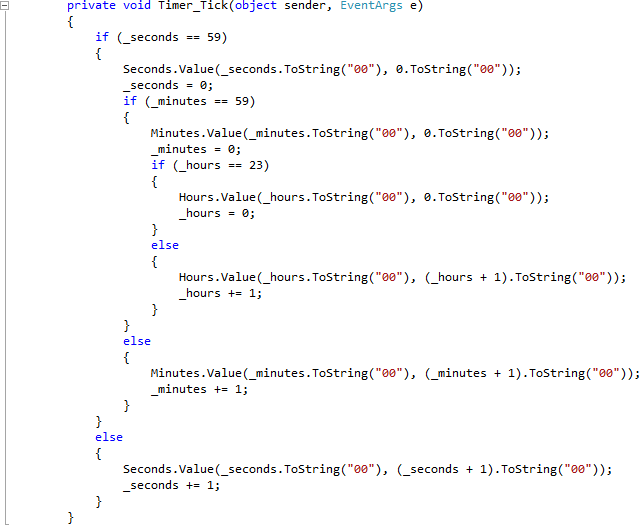
While still the Code View for MainPage.xaml.cs above "public MainPage()" type the following Event Handler:
private void Timer_Tick(object sender, EventArgs e){ if (_seconds == 59) { Seconds.Value(_seconds.ToString("00"), 0.ToString("00")); _seconds = 0; if (_minutes == 59) { Minutes.Value(_minutes.ToString("00"), 0.ToString("00")); _minutes = 0; if (_hours == 23) { Hours.Value(_hours.ToString("00"), 0.ToString("00")); _hours = 0; } else { Hours.Value(_hours.ToString("00"), (_hours + 1).ToString("00")); _hours += 1; } } else { Minutes.Value(_minutes.ToString("00"), (_minutes + 1).ToString("00")); _minutes += 1; } } else { Seconds.Value(_seconds.ToString("00"), (_seconds + 1).ToString("00")); _seconds += 1; }}
See Below:
Step 13
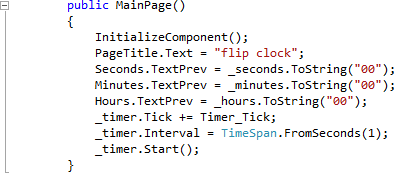
While still in the Code View in the "public MainPage()" Constructor below "InitializeComponent();" type the following:
PageTitle.Text = "flip clock";Seconds.TextPrev = _seconds.ToString("00");Minutes.TextPrev = _minutes.ToString("00");Hours.TextPrev = _hours.ToString("00");_timer.Tick += Timer_Tick;_timer.Interval = TimeSpan.FromSeconds(1);_timer.Start();
See Below:
Step 14
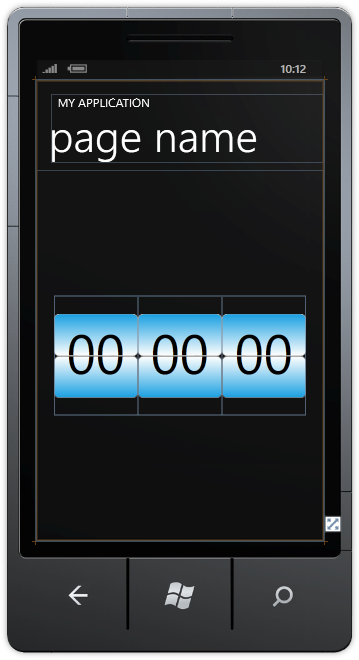
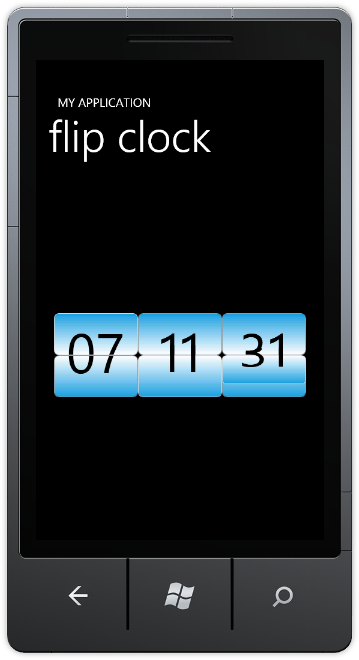
Save the Project as you have now finished the Windows Phone Silverlight application. Select the Windows Phone Emulator option then Select Debug then Start Debugging or click on Start Debugging:
After you do, the following will appear in the Windows Phone Emulator after it has been loaded:
Step 15
You can then Stop the application by selecting the Visual Studio 2010 application window and clicking on the Stop Debugging button:
This is a simple Flip Clock using a Flip UserControl, it would be possible to use the Flip user control to display text such as the previously mentioned Airport displays for example - you can change the control to look even more like a classic flip clock or anything else - make it your own!
- (转载)wp基础应用(一)Flip Clock
- s3c2410之clock(转载)
- 实验吧安全杂项WP(一)
- 实验吧编程WP(一)
- hackinglab脚本关WP(一)
- (转载)wp基础教程(二)Expander Control
- 转载:分布式基础学习(一)
- (转载)JSP的基础语法【一】
- IC设计基础系列之CDC篇1:clock domain crossing(CDC) (一 CDC的基本概念)
- Cesium应用篇:3控件(1)Clock
- MSP430F1612 基础时钟模块(Basic Clock Module)
- FLIP GAME(DFS)
- 正则表达式的基础及常见应用(网上转载)
- J2EE应用部署(一):基础篇
- zigbee基础应用(一)流水灯
- DOM基础及应用(一)
- iOS应用开发基础(一)基础知识
- Dialog(一)------基础应用篇
- 黑马程序员——自学笔记12(图形化界面编程1—各种组件及创建)
- 利用qemu-img创建系统镜像补丁,解决系统升级的方法
- JSTL 标签库详细介绍资料 .
- 标准输入输出
- 静静的在心里承受所有的伤痛和不快乐
- (转载)wp基础应用(一)Flip Clock
- 从一个字符串中删除其包含的某个(第一个)子串
- 创新工场2013年笔试题(二) 位域及结构体对齐
- SQLite在VC下的使用
- eval() 括号中必须是字符串
- 单例模式与垃圾回收
- VC 6 调试调试子进程
- 银行结算业务
- 产检假