B2G Architecture
来源:互联网 发布:mac os固件验证失败 编辑:程序博客网 时间:2024/05/16 08:14
Gaia : B2G系统的用户界面。B2G系统启动后,手机屏幕上所绘制的所有内容都属于Gaia的一部分。也就是说在B2G系统中,用户所见到的几乎所有的UI界面都是基于Gaia实现的。Gaia实现了锁屏、主屏、拨号键盘、短信应用、相机应用......。Gaia是完全由HTML、CSS和JAVASCRIPT实现的,Open Web APIs(由Gecko实现)是它与操作系统(即:系统内核)之间通讯的唯一接口。 Gaia 可以完美的运行于B2G之上,除此之外,由于它是基于标准的Web API实现的,因此可以在其他的操作和浏览器上工作,第三方应用也可以与 Gaia一起被安装。
Gecko : B2G的应用运行时环境(application runtime)。 站在比较高的角度来看,Gecko实现了HTML、CSS和JS的开放标准并且使这些接口在所有Gecko支持的系统中运行良好。这就是说Gecko包含了: 网络栈、 图形栈、布局引擎、 JS虚拟机以及端口层。
Gonk : B2G系统的底层。Gonk由linux 内核和用户空间硬件抽象层(HAL)组成。内核和几个用户空间库包含一些常见的开源项目:: linux, libusb, bluez, 等。HAL中的一些部与Android项目中是一样的,比如说: GPS, camera, 等,在HAL层,除了极个别的之外。你可以认为Gonk是一个极端简化过的linux分发版。 Gonk is a porting target of Gecko; there is a port of Gecko to Gonk, just like there is a port of Gecko to OS X, and a port of Gecko to Android. Since the b2g project has full control over Gonk, we can expose interfaces to Gecko that aren't possible to expose on other OSes. For example, Gecko has direct access to the full telephony stack and display framebuffer on Gonk, but doesn't have this access on any other OS.
开机后,主引导程序开始执行。接着,引导主系统内核的过程以通常的方式进行: 一系列高级bootloader依次引导链中的下一个引导程序。在执行的最后过程,执行由bootloader转交到linux内核。.
对于启动过程没有什么可说的,但是,下面这些内容有必要了解一下。
- Bootloader通常用于在设备启动过程中显示用于展示厂商logo等信息的启动画面(splash screen)。
- Bootloader实现了映像到设备的映射。不同的设备使用不同的协议。大部分手机使用的都是fastboot协议,但在三星的 Galaxy S II手机上, 使用的事 "odin" 协议。
- 在引导过程结束的时候,modem映像文件通常会被加载并在modem处理器中运行。至于modem映像的加载以及是如何在modem处理器上运行,是与特定的设备相关的,也是设备专有的。
Kernel (Linux)
Gonk中的linux内核一定程度上接近upstream(The Linux community) linux,但是,AOSP(Android Open Source Project)做了少量的修改,这些修改并不在upstream linux之中。供应商也在按照他们自己的计划修改linux内核和 upstream。不过,总的来说,Gonk中linux的内核与仓库中的还是非常接近的。
Linux的启动过程在互联网上有大量详细的文档介绍,因此这里就不再包含。在内核启动的最后,如同其他类Unix系统一样,用户空间中的init进程被启动。此时,只有内存虚拟盘(ramdisk)被挂载。Ramdisk在B2G系统构建的过程中被构建,包含了关键工具(critical utilities (like init))、其他启动脚本脚本和可装载内存模块(loadable kernel modules)。
在init进程启动后,linux内核服务系统可以从硬件设备从用户空间和中断等调用。许多设备通过sysfs(documented elsewhere on the internet)暴露给用户空间。例如:下面是一些Gecko中获取电池状态的代码 (lnk to original code)
- FILE *capacityFile = fopen("/sys/class/power_supply/battery/capacity", "r");
- double capacity = dom::battery::kDefaultLevel * 100;
- if (capacityFile) {
- fscanf(capacityFile, "%lf", &capacity);
- fclose(capacityFile);
- }
在Gonk中,init进程挂载必要的文件系统,孵化系统服务并且在服务启动后充当服务管理器。这与其他类Unix系统中的init进程非常相似。init解析init*.rc脚本(rc脚本有一系列的命令组成,可以参加linux中的相关介绍)。下面是 三星 Galaxy S II 的注意脚本。
Main init script for the Galaxy S II
特别的,就像下面介绍的,init负责启动B2G进程。下面是启动B2G的代码片段。
- service b2g /system/b2g/b2g
- onrestart restart media
此时,我们后退一小步,从比较高的层次上看一下B2G中的各种组件是如何协调工作的。
下图展示了B2G系统用户空间中的主要进程。其中,虚线表示被init孵化的进程,实线表示其他的通信管道。
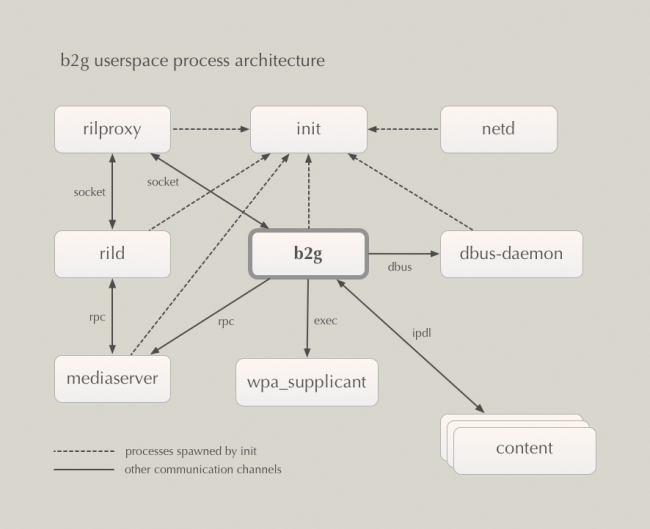
rild进程是访问modem处理器的接口。 "RIL" 是无线接口层(radio interface layer"),"rild" 是Ril守护进程(RIL daemon)。 这是由硬件厂商实现的一段代码。. rild 允许客户端连接到它所绑定的UNIX-domain socket。
- service ril-daemon /system/bin/rild
- socket rild stream 660 root radio
在B2G中,rild客户端是rilproxy进程,它仅仅在rild和b2g之间充当了一个静默转发代理(dumb forwarding proxy)。为什么我们需要这个代理是一个实现细节,并不重要。. 代码在这里.。
netd进程用于配置网络接口。wpa_supplicant是通过端点连接到WiFi的标准UNIX-ish 守护进程。
Gecko中的大部分动作都是由输入事件触发的,这些事件包括:按下按钮、触摸触摸屏等等。输入事件通过"app shell" (在b2g进程中)进入Gonk。例如:
- void
- GeckoInputDispatcher::notifyKey(nsecs_t eventTime,
- int32_t deviceId,
- int32_t source,
- uint32_t policyFlags,
- int32_t action,
- int32_t flags,
- int32_t keyCode,
- int32_t scanCode,
- int32_t metaState,
- nsecs_t downTime)
- {
- UserInputData data;
- data.timeMs = nanosecsToMillisecs(eventTime);
- data.type = UserInputData::KEY_DATA;
- data.action = action;
- data.flags = flags;
- data.metaState = metaState;
- data.key.keyCode = keyCode;
- data.key.scanCode = scanCode;
- {
- MutexAutoLock lock(mQueueLock);
- mEventQueue.push(data);
- }
- gAppShell->NotifyNativeEvent();
- }
这些输入事件起源于标准的linux输入事件系统(the standard linux input_event system),由输入设备驱动( input-device drivers)对这些事件进行转发(dispatcher)。我们在提供了一些良好特性的事件(如:事件过滤器)之上,使用了一个简单抽象。下面的代码展示了输入事件是如何产生的。
- if (pfd.revents & POLLIN) {
- int32_t readSize = read(pfd.fd, mInputBufferData,
- sizeof(struct input_event) * INPUT_BUFFER_SIZE);
- if (readSize < 0) {
- if (errno != EAGAIN && errno != EINTR) {
- LOGW("could not get event (errno=%d)", errno);
- }
- } else if ((readSize % sizeof(struct input_event)) != 0) {
- LOGE("could not get event (wrong size: %d)", readSize);
- } else {
- mInputBufferCount = readSize / sizeof(struct input_event);
- mInputBufferIndex = 0;
- }
- }
- }
- static nsEventStatus
- sendKeyEventWithMsg(PRUint32 keyCode,
- PRUint32 msg,
- uint64_t timeMs,
- PRUint32 flags)
- {
- nsKeyEvent event(true, msg, NULL);
- event.keyCode = keyCode;
- event.time = timeMs;
- event.flags |= flags;
- return nsWindow::DispatchInputEvent(event);
- }
Gecko: Graphics(图形)
在非常底层的地方,Gecko使用OpenGL ES 2.0进行绘制,绘制到一个包含硬件帧缓冲的叫做图形上下文(glcontext )的地方。Gecko设置图形上下文( graphics context)的代码如下:
- gNativeWindow = new android::FramebufferNativeWindow();
- sGLContext = GLContextProvider::CreateForWindow(this);
FramebufferNativeWindow的实现在这里。它使用了到图形驱动的 "gralloc"硬件接口映射帧缓冲到缓冲区。
Gecko使用它的图层系统将内容进行组合,绘制显示到屏幕上。关于图层的详细介绍已经超出了本文的范围,感兴趣的读者可以自行查阅相关资料。下面做一个简单的介绍:
- Gecko绘制不同的页面区域到内存缓冲中。有时,这些缓冲就是系统内存;另外一些时候,他们是映射到Gecko地址空间的纹理(textures) 。即:Gecko直接绘制到VRAM(Video Random Access Memory:显存)。通常情况下,绘制发生在这里。
- Gecko使用GL指令组合这些纹理到屏幕上。上面绘制的像素的组合发生在这里。
The details of how Gecko actually draws web content are beyond the scope of this document.
(注意:请不要混淆Gecko的硬件抽象层与Gonk的硬件抽象层。为了避免这种混淆的发生,Gecko硬件层将被成为 "hal",而Gonk的硬件抽象层将被称为 "HAL"。)
"hal"位于Gecko的移植层( porting layers)。它被低层通过多平台访问系统接口。hal为Gecko中的更高层次提供了一个跨平台的C++ API,这些API实在hal内部实现的,而实现的本身是与平台相关的。hal没有被直接暴露给Gecko中除C++代码之外的任何东西,换句话说,hal只能被Gecko中的C++代码所访问。
通过下面的例子我们可以更好的理解hal。在这个例子中使用了vibration API。hal 中vibration API在这里:
- void Vibrate(const nsTArray<uint32>& pattern);
(注意:真正的API比这里要稍微复杂一些。为了便于理解,与本例无关的比较复杂的API在举例时进行的删除)
这个API根据pattern中所指定的样式(pattern)控制马达(vibration motor)开和关。Gonk中的API实现在此:
- void
- Vibrate(const nsTArray<uint32> &pattern)
- {
- EnsureVibratorThreadInitialized();
- sVibratorRunnable->Vibrate(pattern);
- }
- while (!mShuttingDown) {
- if (mIndex < mPattern.Length()) {
- uint32 duration = mPattern[mIndex];
- if (mIndex % 2 == 0) {
- vibrator_on(duration);
- }
- mIndex++;
- mMonitor.Wait(PR_MillisecondsToInterval(duration));
- }
- else {
- mMonitor.Wait();
- }
- }
vibrator_on()是打开马达的Gonk HAL API 。 vibrator_on() 写了一个值到通过sysfs暴露的内存对象中,达到往kernel driver发送一条消息的效果。
hal API被所有的平台所支持。Gecko在一个没有提供震动马达接口的平台上被构建时,hal API的反馈("fallback" )将被使用。 对于震动,这里:
- void
- Vibrate(const nsTArray<uint32>& pattern)
- {}
- void
- Vibrate(const nsTArray<uint32>& pattern)
- {
- Hal()->SendVibrate(pattern);
- }
- Vibrate(uint32[] pattern);
- NS_OVERRIDE virtual bool
- RecvVibrate(const InfallibleTArray<unsigned int>& pattern)
- {
- // Forward to hal::, not hal_impl::, because we might be a
- // subprocess of another sandboxed process. The hal:: entry point
- // will do the right thing.
- hal::Vibrate(pattern);
- return true;
Gecko: DOM APIs
"DOM interfaces", approximately, are how web content communicates with Gecko. There's a lot more to the DOM than that, but the longer discussion is beyond the scope of this document. DOM interfaces are defined inIDL, which comprises both a foreign function interface (ffi) and object model (OM) between JavaScript and C++. Again, there are more details that could be discussed here which are beyond the scope of this document. Let's learn a bit of IDL by example.
The very simple vibration API is exposed to web content through an IDL interface. That interface ishere
- [implicit_jscontext]
- void mozVibrate(in jsval aPattern);
- NS_IMETHODIMP
- Navigator::MozVibrate(const jsval& aPattern, JSContext* cx)
- {
- // ...
- hal::Vibrate(pattern);
- return NS_OK;
- }
There's quite a lot of code that's hidden here by the ellipsis ("..."), but let's ignore for it now.
The call to hal::Vibrate() transfers control from the DOM to hal. From there, we enter the hal implementation discussed above. A key point to note here is that the DOM implementation doesn't care what platform it's running on (Gonk or Windows or OS X or ...), nor does it care whether the code is running in a "content process" or the Gecko "server process". This is all left to lower levels of the system.
The vibration API happens to be quite simple, so it's a good example. The SMS API, which is much more complicated and has its own "remoting" layer from content processes to the server, is here.
The RIL was discussed briefly above. In this section, we'll how the various pieces interact in a little more detail. The main actors are
- rild : the proprietary bit of code that talks to the proprietary modem firmware
- rilproxy : the daemon that proxies messages between rild and Gecko (the b2g process)
- Gecko (the b2g process) : implements the higher-level telephony stack
Let's start with an example that demonstrates the lower-level parts of the system. When the modem receives an incoming call, it notifies the rild using a proprietary mechanism. The rild then prepares a message for its client according to the "open" protocolhere. In this case, an incoming call generates theRIL_UNSOL_RESPONSE_CALL_STATE_CHANGED message. This message is sent by rild to its client and received by rilproxy here
- ret = read(rilproxy_rw, data, 1024);
- if(ret > 0) {
- writeToSocket(rild_rw, data, ret);
- }
- int ret = read(fd, mIncoming->mData, 1024);
- // [handle errors]
- mIncoming->mSize = ret;
- sConsumer->MessageReceived(mIncoming.forget());
- virtual void MessageReceived(RilRawData *aMessage) {
- nsRefPtr<DispatchRILEvent> dre(new DispatchRILEvent(aMessage));
- mDispatcher->PostTask(dre);
- }
- return JS_CallFunctionName(aCx, obj, "onRILMessage", NS_ARRAY_LENGTH(argv),
- argv, argv);
- handleParcel: function handleParcel(request_type, length) {
- let method = this[request_type];
- if (typeof method == "function") {
- if (DEBUG) debug("Handling parcel as " + method.name);
- method.call(this, length);
- }
- }
- };
- RIL[UNSOLICITED_RESPONSE_CALL_STATE_CHANGED] = function UNSOLICITED_RESPONSE_CALL_STATE_CHANGED() {
- Phone.onCallStateChanged();
- };
- getCurrentCalls: function getCurrentCalls() {
- Buf.simpleRequest(REQUEST_GET_CURRENT_CALLS);
- },
- _handleChangedCallState: function _handleChangedCallState(changedCall) {
- let message = {type: "callStateChange",
- call: {callIndex: changedCall.callIndex,
- state: changedCall.state,
- number: changedCall.number,
- name: changedCall.name}};
- this.sendDOMMessage(message);
- },
- handleEvent: function fm_handleEvent(evt) {
- console.log('Call changed state: ' + evt.call.state);
- switch (evt.call.state) {
- case 'incoming':
- console.log('incoming call from ' + evt.call.number);
- this.incoming(evt.call);
- break;
- case 'connected':
- this.connected();
- break;
- case 'disconnected':
- this.disconnected();
- break;
- default:
- break;
- }
- },
RIL: 3G Data
There is a RIL message that places a "data call" to the cellular tower, which enables data-transfer mode in the modem. This data call ends up creating/activating a PPP interface device in the linux kernel that can be configured through usual interfaces. TODO
Note: Much of the interesting stuff here depends deeply on the possible state changes in wpa_supplicant.
The wifi backend for B2G simply uses wpa_supplicant to do all of the heavy lifting. That means that its main purpose is to simply manage supplicant (and do some auxiliary tasks like loading the wifi driver and enabling or disabling the network interface). Effectively, this means that the backend is a state machine, with the states following the state of the supplicant. Bugs in the backend tend to stem from the supplicant following a state change that the code wasn't prepared to deal with.
The implementation of the wifi component is broken up in two files:
- - DOMWifiManager.js - The implementation of the API exposed to web
- pages (defined in nsIWifi.idl).
- - WifiWorker.js - The implementation of the state machine and the code
- that drives the supplicant.
The two files talk to each other via the message manager. The backend listens for messages requesting certain actions, such as associate and responds with a message when it's done. The DOM side listens for the response methods as well as several "event" messages indicating state changes and information updates. Note that one side effect of this communication is that any synchronous DOM APIs are implemented by caching data on that side of the pipe. In general, we avoid synchronous messages.
This file implements the main logic behind the wifi. That means that it runs in the chrome process (in e10s builds) and is instantiated by the SystemWorkerManager. The file is generally broken into two sections: a giant anonymous function and WifiWorker (and its prototype). The giant anonymous function, ends up being the WifiManager. It provides a local API including notifications for events like connection to the supplicant and scan results being available. In general, it contains relatively little logic, letting its one consumer "drive" while it notifies it of events and controls the details of the connection with the supplicant.
The second part of WifiWorker.js sits between the WifiManager and the DOM. It reacts to events and forwards them to the DOM and it receives requests from the DOM and performs the appropriate actions on the supplicant. It also maintains state about the wpa_supplicant and what it needs to do next.
This file implements the DOM API, ferrying messages back and forth to the actual worker. There is very little logic in this file. That being said: one note: in order to avoid synchronous messages to the chrome process, we do need to cache the state based on the event that came in. There is a single synchronous message, sent at the time that the DOM API is instantiated in order to get the current state of the supplicant.
DHCP: DHCP (and DNS) is handled by dhcpcd (the standard Linux DHCP client). However, it isn't able to react when we lose the connection to a network. So we kill and restart dhcpcd for each time we connect to a given wireless network. dhcpcd is also responsible for setting the default route. We call into the network manager in order to tell the kernel about DNS servers.
The network manager configures network interfaces opened by the 3g-data and wifi components. TODO
- B2G Architecture
- 【B2G】Mozilla B2G 操作系统详解,HTML5方兴未艾
- ubuntu compile b2g
- 开发B2G商旅系统
- [b2g] firefoxOS 移植记录
- Architecture
- ARCHITECTURE
- B2B,B2C,C2C,C2B,B2G
- b2g Introduction(Boot To Gecko)
- 机票B2B/B2C/B2G分销系统
- 【B2G】B2G揭秘:首款完全由HTML构建的开放移动操作系统 [复制链接]
- 解决下载B2G gonk_ics源码时遇到的 download error
- B2G系统简介(部分资料来源于网上)
- 全面HTML5化:火狐移动操作系统B2G价值几何
- B2B,B2C,C2C,C2B,B2G 之间的区别
- Firefox OS启动过程分析-b2g进程启动(序)
- Firefox OS启动过程分析-b2g进程启动
- Software Architecture
- 我们都一样
- MFC文件操作的笔记和关键,MMClassify
- redis主从服务器配置
- JAVA环境配置(超详细)
- 跨库查询推荐使用的方法
- B2G Architecture
- 如何将免安装版的tomcat添加到services中进行自启动
- 快递查询 api
- Android 获取屏幕尺寸与密度
- @SuppressWarnings("unused")
- Hdu1452 因子和的积性函数 以及积性函数的一些性质和举例
- 数列操作
- asp,asp.net中关于双引号和单引号的用法!
- JS控制字体大小中、设为首页、收藏本站功能、超链接去掉颜色