对话框 AlertDialog
来源:互联网 发布:手机内存清理软件 编辑:程序博客网 时间:2024/04/29 07:31
介绍一下Android基本组件:对话框AlertDialog。
API:
java.lang.Object↳android.app.AlertDialog.Builder
使用AlertDialog.Builder创建对话框需要了解以下几个方法:
- setTitle :为对话框设置标题
- setIcon :为对话框设置图标
- setMessage:为对话框设置内容
- setView : 给对话框设置自定义样式
- setItems :设置对话框要显示的一个list,一般用于显示几个命令时。
- setMultiChoiceItems :用来设置对话框显示一系列的复选框。
- setNeutralButton :
- setPositiveButton :给对话框添加"Yes"按钮
- setNegativeButton :对话框添加"No"按钮
- create : 创建对话框
- show :显示对话框
下面我们来看一下最简单对话框。
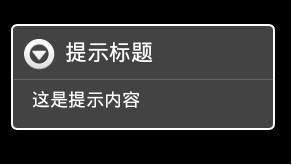
这个对话框只是简单的显示内容,使用默认图标,没有按钮,不多说,贴代码:
- new AlertDialog.Builder(Lesson_01_Pic.this).setTitle("提示标题").setMessage("这是提示内容").show();
(Lesson_02_Dia是类名,请换成自己的!!)
下面我们为这个对话框加个按钮,效果:

代码:
- new AlertDialog.Builder(Lesson_01_Pic.this)
- .setTitle("这是标题")
- .setMessage("这是提示内容")
- .setPositiveButton("确定",
- new DialogInterface.OnClickListener(){
- public void onClick(DialogInterface dialoginterface,int i){
- //按钮事件
- Toast.makeText(Lesson_01_Pic.this,"确定",Toast.LENGTH_LONG).show();
- }
- }).show();
添加按钮时,需要同时为该按钮指定监听器。
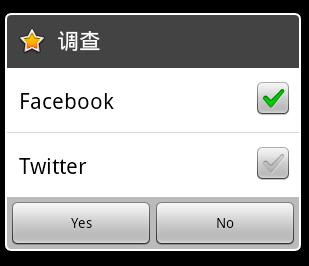
下面,我们修改一个图标,添加两个按钮,同时显示多个选项,先看下效果:
代码:
- package com.yfz;
- import android.app.Activity;
- import android.app.AlertDialog;
- import android.app.Dialog;
- import android.content.DialogInterface;
- import android.content.DialogInterface.OnClickListener;
- import android.content.DialogInterface.OnMultiChoiceClickListener;
- import android.os.Bundle;
- import android.view.View;
- import android.widget.Button;
- import android.widget.Toast;
- public class Lesson_02_Dia extends Activity {
- /** Called when the activity is first created. */
- @Override
- public void onCreate(Bundle savedInstanceState) {
- super.onCreate(savedInstanceState);
- setContentView(R.layout.main);
- Button button = (Button)findViewById(R.id.b01);
- button.setText("对话框");
- button.setOnClickListener(new Button.OnClickListener(){
- @Override
- public void onClick(View v) {
- //选项数组
- String[] choices={"Facebook","Twitter"};
- //Check判断数组,与选项对应
- boolean[] chsBool = {true,false};
- //包含多个选项及复选框的对话框
- AlertDialog dialog = new AlertDialog.Builder(Lesson_02_Dia.this)
- .setIcon(android.R.drawable.btn_star_big_on)
- .setTitle("调查")
- .setMultiChoiceItems(choices, chsBool, multiClick)
- .setPositiveButton("Yes", onclick)
- .setNegativeButton("No", onclick).create();
- dialog.show();
- }
- });
- }
- /**
- * 对话框复选框事件监听器
- */
- OnMultiChoiceClickListener multiClick = new OnMultiChoiceClickListener(){
- @Override
- public void onClick(DialogInterface dialog,int which, boolean isChecked) {
- Toast.makeText(Lesson_02_Dia.this,"第"+(which+1)+"项,选中结果:"+isChecked,Toast.LENGTH_SHORT).show();
- }
- };
- /**
- * 对话框按钮点击事件监听器
- */
- OnClickListener onclick = new OnClickListener() {
- @Override
- public void onClick(DialogInterface dialog,int which) {
- switch (which) {
- case Dialog.BUTTON_NEGATIVE:
- Toast.makeText(Lesson_02_Dia.this,"No..",
- Toast.LENGTH_LONG).show();
- break;
- case Dialog.BUTTON_NEUTRAL:
- Toast.makeText(Lesson_02_Dia.this,"I don't know.",
- Toast.LENGTH_LONG).show();
- break;
- case Dialog.BUTTON_POSITIVE:
- Toast.makeText(Lesson_02_Dia.this,"Yes!!",
- Toast.LENGTH_LONG).show();
- break;
- }
- }
- };
- }
说明已经写在注释中了。
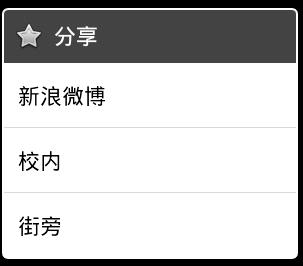
下面再介绍一种比较常用的式样,如图:
代码:
- @Override
- public void onCreate(Bundle savedInstanceState) {
- super.onCreate(savedInstanceState);
- setContentView(R.layout.main);
- Button button = (Button)findViewById(R.id.b01);
- button.setText("对话框");
- button.setOnClickListener(new Button.OnClickListener(){
- @Override
- public void onClick(View v) {
- //选项数组
- String[] choices={"新浪微博","校内","街旁"};
- //包含多个选项的对话框
- AlertDialog dialog = new AlertDialog.Builder(Lesson_02_Dia.this)
- .setIcon(android.R.drawable.btn_star)
- .setTitle("分享")
- .setItems(choices, onselect).create();
- dialog.show();
- }
- });
- }
- /**
- * 选项的事件监听器
- */
- OnClickListener onselect = new OnClickListener() {
- @Override
- public void onClick(DialogInterface dialog,int which) {
- // TODO Auto-generated method stub
- switch (which) {
- case 0:
- Toast.makeText(Lesson_02_Dia.this,"您选择了新浪微博.",Toast.LENGTH_SHORT).show();
- break;
- case 1:
- Toast.makeText(Lesson_02_Dia.this,"您选择了校内",Toast.LENGTH_SHORT).show();
- break;
- case 2:
- Toast.makeText(Lesson_02_Dia.this,"您选择了街旁",Toast.LENGTH_SHORT).show();
- break;
- }
- }
- };
好了,今天就写到这,改天写一下,如果在弹出框中做一个登陆界面。
继续补充...先上图...
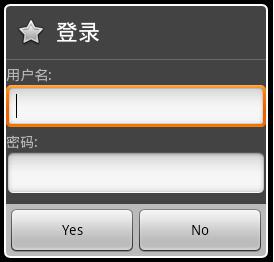
页面login.xml: 示例写的比较简单,布局大家可以自己完善、修改。
- <?xmlversion="1.0"encoding="utf-8"?>
- <TableLayout
- android:id="@+id/widget36"
- android:layout_width="fill_parent"
- android:layout_height="fill_parent"
- android:orientation="vertical"
- xmlns:android="http://schemas.android.com/apk/res/android"
- >
- <TextView
- android:id="@+id/widget37"
- android:layout_width="wrap_content"
- android:layout_height="wrap_content"
- android:text="用户名:"
- >
- </TextView>
- <EditText
- android:id="@+id/widget38"
- android:layout_width="wrap_content"
- android:layout_height="wrap_content"
- android:text=""
- android:textSize="18sp"
- >
- </EditText>
- <TextView
- android:id="@+id/widget39"
- android:layout_width="wrap_content"
- android:layout_height="wrap_content"
- android:text="密码:"
- >
- </TextView>
- <EditText
- android:id="@+id/widget40"
- android:layout_width="wrap_content"
- android:layout_height="wrap_content"
- android:text=""
- android:textSize="18sp"
- >
- </EditText>
- </TableLayout>
代码 : (也比较简单)
- LayoutInflater factory = LayoutInflater.from(Lesson_02_Dia.this);
- //获得自定义对话框
- View view = factory.inflate(R.layout.login, null);
- AlertDialog dialog02 = new AlertDialog.Builder(Lesson_02_Dia.this)
- .setIcon(android.R.drawable.btn_star)
- .setTitle("登录")
- .setView(view)
- .setPositiveButton("Yes", onclick)
- .setNegativeButton("No", onclick).create();
- dialog02.show();
- AlertDialog对话框
- 对话框 AlertDialog
- 对话框AlertDialog
- AlertDialog对话框
- AlertDialog对话框
- AlertDialog对话框
- AlertDialog对话框
- AlertDialog对话框
- AlertDialog(对话框)
- AlertDialog(对话框)
- AlertDialog对话框
- AlertDialog对话框
- 对话框AlertDialog
- AlertDialog(对话框)
- AlertDialog对话框
- AlertDialog对话框
- Android中的对话框AlertDialog
- 【Android】对话框 AlertDialog
- ROM、RAM、DRAM、SRAM和FLASH的区别
- Android中startActivity中的permission检测与UID机制
- __attribute__((packed))的作用
- OLAP的基本概念
- Windows与VirtualBox Ubuntu共享数据
- 对话框 AlertDialog
- [UIView beginAnimations:context:]与[UIView animateWithDuration:animations:]区别
- android dialog —— 多选列表对话框
- MPI编程简介
- 我和移动开发的那点事__记一个好玩的android壁纸游戏诞生记
- VC++ ??
- linux硬链接与软链接
- 二树 ,增 、删、查
- android 简单列表对话框(AlertDialog.Builder().setItems())