Step by Step Setup Git Server on Windows with CopSSH + msysGit and Integrate Git with Visual Studio
来源:互联网 发布:酷狗网络歌手图片 编辑:程序博客网 时间:2024/06/05 00:34
http://www.codeproject.com/Articles/296398/Step-by-Step-Setup-Git-Server-on-Windows-with-CopS
Introduction
First of all, let me clarify that Git doesn’t need to specify the side for client and server. Your workstation can be both the client and server. That means you can get code from other computer, you’re the client; while others can also get code from your computer, you’re the server. That’s why Git is great.
In this post, the “Git server” means to make your computer available for others to pull/push code from/to.
The post is long because it’s step by step and with lots of screenshots. In fact, it just takes about 10 minutes to setup all.
Note: CopSSH is not open source any more, please buy it if you want to use it.
Software Requirement
Software required to setup a Git server:
- CopSSH (install on the server side)
- msysgit (install both on the server side and client side)
- PuTTY (install both on the server side and client side)
Software required to integrate with Visual Studio:
- GitExtensions (install both on the server side and client side)
Setup Steps
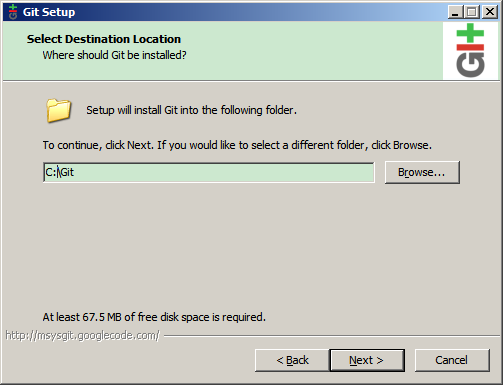
1. Install msysgit
- When you installing the msysgit, please choose c:\Git as the installation directory, because the space in the directory name may cause an issue in bash commands.
- In the “Adjusting your PATH environment”, I recommend to select “Use Git Bash only”.

- Other settings are default. After installation, you get the git bash icons on your desktop. You can try it with git command, if you get the following screen, you’ve installed the msysgit successfully.

- Add C:\Git\bin and C:\Git\libexec\git-core to Path. This step is very important.

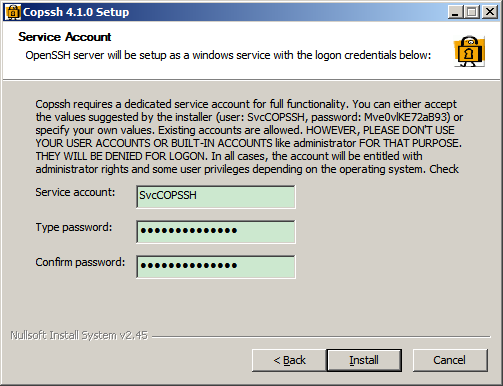
2. Install CopSSH
- Just like the msysgit, we don’t install the CopSSH in program files folder to avoid some space issues. We install it to c:\ICW.

- Just use the default account as CopSSH provides:
- After installation, open COPSSH Control Panel.

- Click Add button in Users tab.
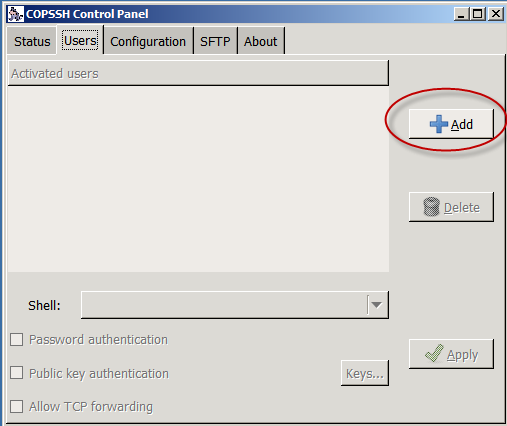
- Choose an existing user on your computer (you can create one in computer management). Here in my sample, the user is jinweijie.

- Allow all access:

- After the user is activated, click the Keys… button in the Activated Users section:

- Click Add:

- Use default key settings:

- Enter the Passphrase and File name:

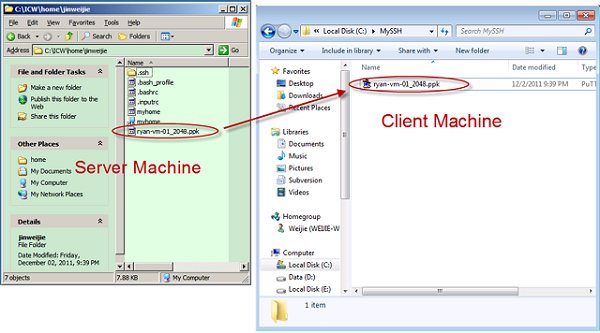
- The private key will be saved to c:\ICW\home\jinweijie\ryan-vm-01_2048.ppk.

[Test step] Now we try to use the activated user to log on through SSH, open Git Bash, enter commands:
ssh jinweijie@ryan-vm-01 Enter “yes” to continue.

[Test step] After entering your passwords (the windows account’s password), then you try to run git as the ssh user, but it isn’t performed as you expected:

That’s because CopSSH cannot find the git.exe on the server, so we need to tell CopSSH the git path.
3. Config CopSSH with Git path.
- Open C:\ICW\etc\profile with your favorite editor, add :/cygdrive/c/git/bin:/cygdrive/c/git/libexec/git-core(don’t forget the starting colon) to PATH , the whole line will be:
export PATH="/bin:$syspath:$winpath:/cygdrive/c/git/bin:/cygdrive/c/git/libexec/git-core"
Then Save.

- Restart the CopSSH by clicking twice the big button in CopSSH Control Panel:

- If we run Git Bash again, ssh jinweijie@ryan-vm-01, enter your password and run the git command, git should be found this time:

4. Configure Private Key on Client
- Copy the private key (we generated in step 1-k) from server to client.
- On the client side, use puttygen.exe to load the key (if you set the password in 1-j, you need to enter the password while loading the key):

- Click “Save private key” to save a copy of private key for plink.exe to recognize.

5. Create Repository, Integrate with Visual Studio
- Install gitextensions on both server and client.

- Since we have already installed the msysgit in step 1-a, we skip the “Install MsysGit”. But if you haven’t install msysgit on the client machine, you can check the checkbox and install it.

- Install to C:\GitExtensions\, other settings are default.

- On the server side, open Git Extensions, click “Create new repository”.

- On the server side, set the path to the project name under you CopSSH user’s home directory, select“Central repository, no working dir” (because we are the server), then “Initialize”:

- On the client side, open Git Extensions, click “Clone repository”:

- On the client side, the repository address should be ssh://jinweijie@ryan-vm-01/ICW/home/jinweijie/mydotnetproject. Please be aware that, the repository should begin with c:\ on the server.

- On the client side, click “Load SSH Key” and load the key which was saved in step 4-b:

- On the client side, enter the password if you set password to the key, then click Clone:

- On the client side, add ignore files:

- On the client side, open Visual Studio, create a project to mydotnetproject folder (which is the cloned repository), you may find the files are already under git source control:

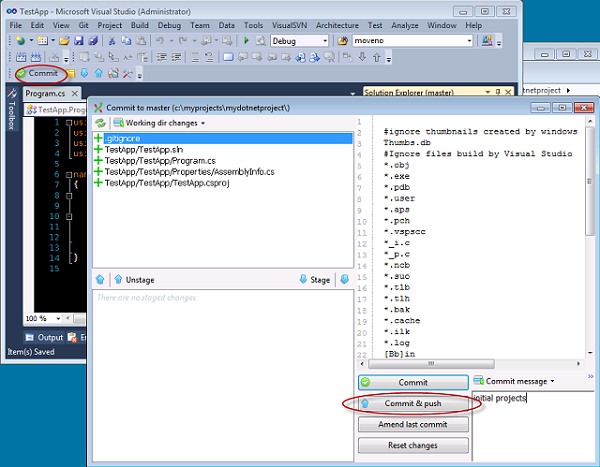
- Click the “Commit” button on the menu bar, then click “Commit & Push”:
- Push succeeded:

- On the server side, you can find the new pushed files:

That’s all, happy GITTING! :)
History
- 7th December, 2011: Initial version
License
This article, along with any associated source code and files, is licensed under The Code Project Open License (CPOL)
- Step by Step Setup Git Server on Windows with CopSSH + msysGit and Integrate Git with Visual Studio
- Step by Step Setup Git Server on Windows with CopSSH + msysGit and Integrate Git with Visual Studio
- Android Studio and NDK Integration on Windows Step by Step with a Hello JNI example
- Git step by step
- Git Step by Step
- Git step by step
- OOP with Microsoft Visual Basic .NET and Microsoft Visual C# .NET Step by Step
- OOP with Microsoft Visual Basic.NET and Visual C# Step By Step
- Step by Step with Duwamish
- Running OpenBTS with the Nuand bladeRF on Ubuntu (The Definitive and Step by Step Guide)
- Microsoft Visual Basic 2008 Step by Step (with companion CD)
- Git:step by step 1
- debug python step by step on linux ubuntu with ipdb
- Step-By-Step Installation of RAC with RAW Datafiles on Windows 2000
- Git Step By Step - Step 3: Branching
- Assembly Language Step-by-step: Programming with DOS and Linux
- Assembly Language Step-by-step: Programming with DOS and Linux
- Git Step by Step (1):Git 简介
- android的selector的使用方法
- python 字符串替换
- mysql处理上百万条的数据库如何优化语句来提高处理查询效率
- 虎扑上看到的一种js对table的排序控件
- 深入体验JavaWeb开发内幕之servlet中的ServletContext的相关内容和实例展示
- Step by Step Setup Git Server on Windows with CopSSH + msysGit and Integrate Git with Visual Studio
- jvm参数
- Cisco Router中的模块
- php的Heredoc技术使用介绍
- Iphone怎么创建证书部署真机调试
- unity3d粒子效果--羽毛的飞溅
- 文本分类入门(十)特征选择算法之开方检验 .
- 命令行运行jmeter脚本
- 图像处理的一些资料