linux数据结构
来源:互联网 发布:手机上能注册淘宝店铺 编辑:程序博客网 时间:2024/06/05 17:27
链表,队列,映射,二叉树等数据结构是程序设计中常用的数据结构。为了统一这些数据结构的操作接口,Linux内核开发者实现了一些标准的操作接口及实现(使用了大量的GNU扩展特性),以达到代码重用,开发者应该尽量使用这些标准接口,避免实现自己的再创造,虽然那样看起来很酷,很有劲。
有关链表
传统的双向链表实现方法是在链表元素中加入两个指针,然后用这些指针来构造双向链表。如下所示
- struct node{
- value_type value;
- struct element *prev;
- struct element *next;
- }node, *list_head;
其示意图如下:NULL为空指针。
如果将双向链表中的首尾两个元素进行链接,则会形成循环双向链表。示意图如下:
由上可以看出,如果想得到链表中某个指定节点,必须要遍历链表。所以,对于那些需要随机存取的数据,尽量使用数组,而不是链表,当然也可以配合一个哈希表来使用链表,有兴趣的同志可以看看。
上面的实现方法没有问题,但是对于内核来说,如果每个内核对象都采用这种方法,那么要为每个结构体添加相应代码,还要实现其链表操作函数。这样很麻烦,而且也不能达到代码复用以及提供统一的接口。所以内核开发者采用了另外一种巧妙的方法:声明list_head这么一个结构,然后只要嵌入这么一个数据结构就可以实现双向链表了。
- struct list_head{
- struct list_head *next;
- struct list_head *prev;
- };
假设你想以链表形式存储自己的课程与成绩,则可以采用下面的形式
- struct cource_score{
- int num;
- int score;
- struct list_head list;
- };
这样,就利用成员变量list将所有的链表节点连接起来,当然,一般还要设置一个头结点。
除此之外,开发者还提供了一些函数和宏用于链表操作。如使用container_of()可以通过list成员获得course_score结构体的地址。
- #define container_of(ptr, type, member) ({ /
- const typeof( ((type *)0)->member ) *_mptr = (ptr); /
- (type *)( (char *)_mptr - offsetof(type, member) ) ;})
- #define offsetof(type, member) ((ssize_t)&(type *)0)->member)
- #define list_entry(ptr, type, member) /
- constainer_of(ptr, type, member)
宏container_of使用了GNU扩展。分析一下这个宏定义,首先注意ptr为指向容器结构体的指针,type为容器结构体的类型,而member则是其内嵌的list_head成员变量的名称,如上例,type为course_score,而member则为list。
(type *)0将地址0转换为结构type的地址
(type *)0->member获取type机构体中member成员变量的偏移地址。由于容器结构体的地址为0,这就是member成员的偏移地址,所以宏offsetof也就是这个作用。
typeof( ((type *)0->member)返回member成员的类型,然后将指针_mptr声明为该类型的指针,并赋值为ptr。
(type *)((char *)_mptr - offsetof(type, member));})则根据member成员的实际_mptr以及偏移量offsetof()则可以得到容器结构体的地址。
当有两种方法可以初始化链表,静态初始化和动态初始化。
- #define LIST_HEAD_INIT(name) {&(name),&name)}
- #define LIST_HEAD(name) struct list_head name = LIST_HEAD_INIT(name)
- #define INIT_LIST_HEAD(ptr) do{/
- (ptr)->next = (ptr);(ptr)->next = (ptr);/
- }while (0)
- static inline void INIT_LIST_HEAD(struct list_head * list)
- {
- list->next = list;
- list->prev = list;
- }
如果在编码时初始化链表,则可以使用宏LIST_HEAD_INIT,如上例中,则可以
- struct course_score math = {
- num = 1;
- score = 60;
- list = LIST_HEAD_INIT(math.list);
- };
如果是运行时初始化链表,则可以使用宏INIT_LIST_HEAD或者内联函数INIT_LIST_HEAD来初始化,两者功能一样,只是内联函数提供了类型检测。如下所示
- struct course_score *math;
- math = kmalloc(sizeof(struct course_score));
- math->num = 1;
- math->score = 60;
- INIT_HEAD_LIST(&math->list);
链表的其他操作包括添加、删除、合并、遍历等。
插入节点
- static inline void list_add(struct list_head * new , struct list_head * head)
- {
- __list_add(new , head, head->next);
- }
- static inline void list_add_tail(struct list_head * new ,struct list_head * head)
- {
- __list_add(new , head->prev, head);
- }
- struct inline void __list_add(struct list_head * new , struct list_head * prev, struct list_head * next)
- {
- next->prev = new ;
- new ->next = next;
- new ->prev = prev;
- prev->next = new ;
- }
插入操作有两种:表头插入和表尾插入。实际上,两种插入的方法是一样的,只是内部函数调用时,参数不同而已。
删除节点
- static inline void __list_del(struct list_head * prev, struct list_head * next)
- {
- next->prev = prev;
- prev->next = next;
- }
- static inline void list_del(struct list_head * entry)
- {
- __list_del(entry->prev, entry->next);
- entry->next = LIST_POSITION;
- entry->prev = LIST_POSITION;
- }
对 LIST_POISON1,LIST_POISON2 的解释:
These are non-NULL pointers that will result in page faults under normal circumstances, used to verify that nobody uses non-initialized list entries.
- #define LIST_POISON1 ((void *) 0x00100100)
- #define LIST_POISON2 ((void *) 0x00200200)
移动节点
- static inline void list_move(struct list_head * list, struct list_head * head)
- {
- __list_del(list->prev, list->next);
- list_add(list, head);
- }
- static inline void list_move_tail(struct list_head * list, struct list_head * head)
- {
- __list_del(list->prev, list->next);
- list_add_tail(list, head);
- }
链表合并
- static inline void _list_splice(struct list_head * list, struct list_head * head)
- {
- struct list_head * first = list->next;
- struct list_head * last = list->prev;
- struct list_head * at = head->next;
- first->prev = head;
- head->next = first;
- last->next = at;
- at->prev = last;
- }
- static inline void list_splice(struct list_head * list, struct list_head * head)
- {
- if(!list_empty(list))
- __list_splice(list, head);
- }
将一个非空链表插入到另外一个链表中。先做链表是否为空的检查,因为每个链表只有一个头节点,将空链表插入到另外一个链表中是没有意义的。但被插入的链表可以是空的。两个链表有两个头结点,在函数中要去掉一个头结点。
链表遍历
- #define list_for_each(pos, head)/
- for(pos = (head)->next; prefetch(pos->next), pos != (head);
- static inline void prefetch(void *x)
- {
- asm volatile("prefetch0 %0":
- :
- "m"(* unsigned long *)x));
- }
- #define list_for_each_entry(pos, head, member) /
- for(pos = list_entry((head)->next, typeof(*pos),member); /
- prefetch(pos->member.next), &pos->member != (head); /
- pos = list_entry(pos->member.next, typeof(*pos),member))
prefetch为预取函数,提前预取下一指令,能提高程序执行速度。
队列
队列也是一种链表,只是针对队列的操作只能是从队尾插入,从队首删除。在操作系统中有很多这种数据结构的用武之地,一般是一个进程产生数据,另外一个进程处理数据,如Linux中网络数据包的处理,进程之间使用管道通信等,都是这种情况。Linux内核中队列称作kfifo,其对应的源文件时kernel/kfifo.c,<linux/kfifo.h>中包含了其声明。
- struct __kfifo {
- unsigned int in;
- unsigned int out;
- unsigned int mask;
- unsigned int esize;
- void *data;
- };
- #define __STRUCT_KFIFO_COMMON(datatype, recsize, ptrtype) /
- union { /
- struct __kfifo kfifo; /
- datatype *type; /
- char (*rectype)[recsize]; /
- ptrtype *ptr; /
- const ptrtype *ptr_const; /
- }
- #define __STRUCT_KFIFO_PTR(type, recsize, ptrtype) /
- { /
- __STRUCT_KFIFO_COMMON(type, recsize, ptrtype); /
- type buf[0]; /
- }
- struct kfifo __STRUCT_KFIFO_PTR(unsigned char, 0, void);
kfifo提供了两种操作,入队(in)和出队(out),为了记录下一次出队或者入队的位置,kfifo维护了两个变量in和out。入队操作会将数据拷贝至队列中,具体位置由in确定,然后根据数据大小更新in,标识下一入队发生的位置。出队的操作与之类似。当in和out相等时,队列为空,此时不能执行出队操作。当in等于队列长度时,不能执行入队操作。
和其他内核对象一样,定义并初始化队列也有静态和动态两种方式。
动态方法
- static inline int __must_check
- __kfifo_int_must_check_helper(int val)
- {
- return val;
- }
- #define kfifo_alloc(fifo, size, gfp_mask) /
- __kfifo_int_must_check_helper( /
- ({ /
- typeof((fifo) + 1) __tmp = (fifo); /
- struct __kfifo *__kfifo = &__tmp->kfifo; /
- __is_kfifo_ptr(__tmp) ? /
- __kfifo_alloc(__kfifo, size, sizeof(*__tmp->type), gfp_mask) : /
- -EINVAL; /
- }) /
- )
这个函数创建并初始化一个大小为size的队列。gfp_mask指定内存分配方式,可以取值GFP_KERNEL,GFP_ATOMIC,当在进程上下文分配内存,使用GFP_KERNEL,此时,允许kmalloc函数因为等待内存页释放而睡眠。如果,在中断上下文中分配内存,使用GFP_ATOMIC,此时kmalloc不能睡眠,此时可能由于内存不足导致分配失败。
如果,你想自己分配队列空间,可以使用下面这个函数。
- #define kfifo_init(fifo, buffer, size) /
- ({ /
- typeof((fifo) + 1) __tmp = (fifo); /
- struct __kfifo *__kfifo = &__tmp->kfifo; /
- __is_kfifo_ptr(__tmp) ? /
- __kfifo_init(__kfifo, buffer, size, sizeof(*__tmp->type)) : /
- -EINVAL; /
- })
这个函数创建并初始化kfifo,这个kfifo使用buffer指向的大小为size的区域作为队列节点存储区域。注意,size必须为2的n次方,即size = 2n。
静态方法
DECLARE_KFIFO(name, size);
INIT_KFIFO(name);
入队
但kfifo成功创建后,就可以想队列尾部放入数据
- #define kfifo_in(fifo, buf, n) /
- ({ /
- typeof((fifo) + 1) __tmp = (fifo); /
- typeof((buf) + 1) __buf = (buf); /
- unsigned long __n = (n); /
- const size_t __recsize = sizeof(*__tmp->rectype); /
- struct __kfifo *__kfifo = &__tmp->kfifo; /
- if (0) { /
- typeof(__tmp->ptr_const) __dummy __attribute__ ((unused)); /
- __dummy = (typeof(__buf))NULL; /
- } /
- (__recsize) ?/
- __kfifo_in_r(__kfifo, __buf, __n, __recsize) : /
- __kfifo_in(__kfifo, __buf, __n); /
- })
这个函数将buf开始的n个字符插入队列。这里是尽最大努力的拷贝,也就是说如果空间不足,拷贝的大小就是可用空间可容纳的大小。
出队
- #define kfifo_out(fifo, buf, n) /
- __kfifo_uint_must_check_helper( /
- ({ /
- typeof((fifo) + 1) __tmp = (fifo); /
- typeof((buf) + 1) __buf = (buf); /
- unsigned long __n = (n); /
- const size_t __recsize = sizeof(*__tmp->rectype); /
- struct __kfifo *__kfifo = &__tmp->kfifo; /
- if (0) { /
- typeof(__tmp->ptr) __dummy = NULL; /
- __buf = __dummy; /
- } /
- (__recsize) ?/
- __kfifo_out_r(__kfifo, __buf, __n, __recsize) : /
- __kfifo_out(__kfifo, __buf, __n); /
- }) /
- )
这个函数从队列中读出长度为n的数据,然后放入以buf表示的缓冲区中。出队意味着以后数据已不在队列中,你也可以调用函数kfifo_out_peek来读取数据而不从队列中删除这些数据。对于队列的操作需要注意的就是同步的问题,因为这等效于读者和写者问题。有兴趣可以看看内核中的实现。
其他队列的操作还有很多,代码文件位于linux/kfifo.c以及include/linux/kfifo.h中。
1. 前言
本文介绍linux内核中一些常用的数据结构和操作。
2. 双向链表(list)
linux内核中的双向链表通过结构 struct list_head来将各个节点连接起来,此结构会作为链表元素结构中的一个参数:
struct list_head {
struct list_head *next, *prev;
};
链表头的初始化,注意,结构中的指针为NULL并不是初始化,而是指向自身才是初始化,如果只是按普通情况下的置为NULL,而不是指向自身,系统会崩溃,这是一个容易犯的错误:
#define LIST_HEAD_INIT(name) { &(name), &(name) }
#define LIST_HEAD(name) \
struct list_head name = LIST_HEAD_INIT(name)
#define INIT_LIST_HEAD(ptr) do { \
(ptr)->next = (ptr); (ptr)->prev = (ptr); \
} while (0)
最常用的链表操作:
插入到链表头:
void list_add(struct list_head *new, struct list_head *head);
插入到链表尾:
void list_add_tail(struct list_head *new, struct list_head *head);
删除链表节点:
void list_del(struct list_head *entry);
将节点移动到另一链表:
void list_move(struct list_head *list, struct list_head *head);
将节点移动到链表尾:
void list_move_tail(struct list_head *list,struct list_head *head);
判断链表是否为空,返回1为空,0非空
int list_empty(struct list_head *head);
把两个链表拼接起来:
void list_splice(struct list_head *list, struct list_head *head);
取得节点指针:
#define list_entry(ptr, type, member) \
((type *)((char *)(ptr)-(unsigned long)(&((type *)0)->member)))
遍历链表中每个节点:
#define list_for_each(pos, head) \
for (pos = (head)->next, prefetch(pos->next); pos != (head); \
pos = pos->next, prefetch(pos->next))
逆向循环链表中每个节点:
#define list_for_each_prev(pos, head) \
for (pos = (head)->prev, prefetch(pos->prev); pos != (head); \
pos = pos->prev, prefetch(pos->prev))
举例:
LISH_HEAD(mylist);
struct my_list{
struct list_head list;
int data;
};
static int ini_list(void)
{
struct my_list *p;
int i;
for(i=0; i<100; i++){
p="kmalloc"(sizeof(struct my_list), GFP_KERNEL);
list_add(&p->list, &mylist);
}
}
在内存中形成如下结构的一个双向链表:
+---------------------------------------------------------------+
| |
| mylist 99 98 0 |
| +----+ +---------+ +---------+ +---------+ |
+->|next|--->|list.next|--->|list.next|--->...--->|list.next|---+
|----| |---------| |---------| |---------|
+--|prev|<---|list.prev|<---|list.prev|<---...<---|list.prev|<--+
| +----+ |---------| |---------| |---------| |
| | data | | data | | data | |
| +---------+ +---------+ +---------+ |
| |
+---------------------------------------------------------------+
知道了链表头就能遍历整个链表,如果是用list_add()插入新节点的话,从链表头的next方向看是一个堆栈型。
从链表中删除节点很容易:
static void del_item(struct my_list *p)
{
list_del(&p->list, &mylist);
kfree(p);
}
最重要的宏是list_entry,这个宏的思路是根据链表元素结构中链表头结构list_head的地址推算出链表元素结构的实际地址:
#define list_entry(ptr, type, member) \
((type *)((char *)(ptr)-(unsigned long)(&((type *)0)->member)))
ptr是链表元素结构(如struct my_list)中链表头结构list_head的地址
member是链表元素结构(如struct my_list)中链表头结构list_head参数的名称
type是链表元素结构类型(如struct my_list)
计算原理是根据链表头结构list_head的地址减去其在链表元素结构中的偏移位置而得到链表元素结构的地址。
例如:
static void print_list(void)
{
struct list_head *cur;
struct my_list *p;
list_for_each(cur, &mylist){
p="list"_entry(cur, struct my_list, list);
printk("data=%d\n", p->data);
}
}
优点:
这样就可以用相同的数据处理方式来描述所有双向链表,不用再单独为各个链表编写各种编辑函数。
缺点:
1) 链表头中元素置为NULL不是初始化,与普通习惯不同;
2) 仍然需要单独编写各自的删除整个链表的函数,不能统一处理,因为不能保证所有链表元素结构中链表头结构list_head的偏移地址都是相同的,当然如果把链表头结构list_head都作为链表元素结构的第一个参数,就可以用统一的删除整个链表的函数。
linux内核hlist分析
在Linux内核中,hlist(哈希链表)使用非常广泛。本文将对其数据结构和核心函数进行分析。
和hlist相关的数据结构有两个(1)hlist_head (2)hlist_node
- struct hlist_head {
- struct hlist_node *first;
- };
- struct hlist_node {
- struct hlist_node *next, **pprev;
- };
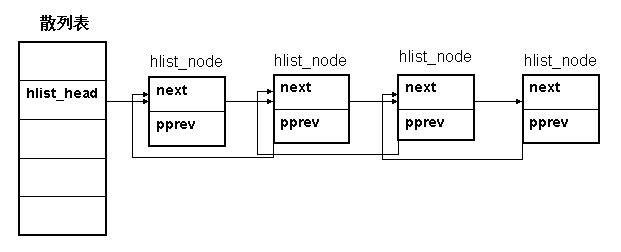
hlist_head结构体只有一个域,即first。 first指针指向该hlist链表的第一个节点。
hlist_node结构体有两个域,next 和pprev。 next指针很容易理解,它指向下个hlist_node结点,倘若该节点是链表的最后一个节点,next指向NULL。
pprev是一个二级指针, 它指向前一个节点的next指针。为什么我们需要这样一个指针呢?它的好处是什么?
在回答这个问题之前,我们先研究另一个问题:为什么散列表的实现需要两个不同的数据结构?
散列表的目的是为了方便快速的查找,所以散列表通常是一个比较大的数组,否则“冲突”的概率会非常大, 这样也就失去了散列表的意义。如何做到既能维护一张大表,又能不使用过多的内存呢?就只能从数据结构上下功夫了。所以对于散列表的每个entry,它的结构体中只存放一个指针,解决了占用空间的问题。现在又出现了另一个问题:数据结构不一致。显然,如果hlist_node采用传统的next,prev指针, 对于第一个节点和后面其他节点的处理会不一致。这样并不优雅,而且效率上也有损失。
hlist_node巧妙地将pprev指向上一个节点的next指针的地址,由于hlist_head和hlist_node指向的下一个节点的指针类型相同,这样就解决了通用性!
下面我们再来看一看hlist_node这样设计之后,插入 删除这些基本操作会有什么不一样。
- static inline void __hlist_del(struct hlist_node *n)
- {
- struct hlist_node *next = n->next;
- struct hlist_node **pprev = n->pprev;
- *pprev = next;
- if (next)
- next->pprev = pprev;
- }
首先获取n的下一个节点next, n->pprev指向n的前一个节点的next指针的地址, 这样×pprev就代表n前一个节点的下一个节点(现在即n本身),第三行代码*pprev=next;就将n的前一个节点和下一个节点关联起来了。至此,n节点的前一个节点的关联工作就完成了,现在再来完成下一个节点的关联工作。如果n是链表的最后一个节点,那么n->next即为空, 则无需任何操作,否则,next->pprev = pprev。
给链表增加一个节点需要考虑两个条件:(1)是否为链表的首个节点(2)普通节点。
- static inline void hlist_add_head(struct hlist_node *n, struct hlist_head *h)
- {
- struct hlist_node *first = h->first;
- n->next = first;
- if (first)
- first->pprev = &n->next;
- h->first = n;
- n->pprev = &h->first;
- }
first = h->first; 获取当前链表的首个节点;
n->next = fist; 将n作为链表的首个节点,让first往后靠;
先来看最后一行 n->pprev - &h->first; 将n的pprev指向hlist_head的first指针,至此关于节点n的关联工作就做完了。
再来看倒数第二行 h->first = n; 将节点h的关联工作做完;
最后我们再来看原先的第一个节点的关联工作,对于它来说,仅仅需要更新一下pprev的关联信息: first->pprev = &n->next;
接下来讨论条件(2)。 这里也包括两种情况:a)插在当前节点的前面b)插在当前节点的后面
- /* next must be != NULL */
- static inline void hlist_add_before(struct hlist_node *n,
- struct hlist_node *next)
- {
- n->pprev = next->pprev;
- n->next = next;
- next->pprev = &n->next;
- *(n->pprev) = n;
- }
先讨论情况a) 将节点n 插到next之前 (n是新插入的节点)
还是一个一个节点的搞定(一共三个节点), 先搞定节点n
n->pprev = next->prev; 将 next 的pprev 赋值给n->pprev n取代next的位置
n->next = next; 将next作为n的下一个节点, 至此节点n的关联动作完成。
next->pprev = &n->next; next的关联动作完成。
*(n->pprev) = n; n->pprev表示n的前一个节点的next指针; *(n->pprev)则表示n的前一个节点next指针所指向下一个节点的内容, 这里将n赋值给它,正好完成它的关联工作。
- static inline void hlist_add_after(struct hlist_node *n,
- struct hlist_node *next)
- {
- next->next = n->next;
- n->next = next;
- next->pprev = &n->next;
- if(next->next)
- next->next->pprev = &next->next;
- }
具体步骤就不分析了。 应该也很容易。
下面我还要介绍一个函数:
- static inline int hlist_unhashed(const struct hlist_node *h)
- {
- return !h->pprev;
- }
最后我们看一个具体的例子,Linux内核是如何管理pid的。(正好和上一篇介绍pid的文章相呼应:)) 基于内核3.0.3
内核初始化时要调用pidhash_init()创建哈希表。 该函数会在 start_kernel()函数里被调用(init/main.c Line 509)
- void __init pidhash_init(void)
- {
- int i, pidhash_size;
- pid_hash = alloc_large_system_hash("PID", sizeof(*pid_hash), 0, 18,
- HASH_EARLY | HASH_SMALL,
- &pidhash_shift, NULL, 4096);
- pidhash_size = 1 << pidhash_shift;
- for (i = 0; i < pidhash_size; i++)
- INIT_HLIST_HEAD(&pid_hash[i]);
- }
在alloc_pid函数里
- struct pid *alloc_pid(struct pid_namespace *ns)
- {
- struct pid *pid;
- enum pid_type type;
- int i, nr;
- struct pid_namespace *tmp;
- struct upid *upid;
- pid = kmem_cache_alloc(ns->pid_cachep, GFP_KERNEL); /×在slab上分配pid结构体×/
- if (!pid)
- goto out;
- tmp = ns;
- for (i = ns->level; i >= 0; i--) { /×虽然这里是for循环,实际只会运行一次,因为现在只支持global namespace即ns->level=0×/
- nr = alloc_pidmap(tmp); /×在各级pid_namespace上寻找并分配pid的值×/
- if (nr < 0)
- goto out_free;
- pid->numbers[i].nr = nr;
- pid->numbers[i].ns = tmp;
- tmp = tmp->parent;
- }
- get_pid_ns(ns);
- pid->level = ns->level;
- atomic_set(&pid->count, 1);
- for (type = 0; type < PIDTYPE_MAX; ++type)
- INIT_HLIST_HEAD(&pid->tasks[type]);
- upid = pid->numbers + ns->level;
- spin_lock_irq(&pidmap_lock);
- for ( ; upid >= pid->numbers; --upid)
- hlist_add_head_rcu(&upid->pid_chain,
- &pid_hash[pid_hashfn(upid->nr, upid->ns)]); /×将各级namespace中的upid插入pidhash的哈希表里×/
- spin_unlock_irq(&pidmap_lock);
- out:
- return pid;
- out_free:
- while (++i <= ns->level)
- free_pidmap(pid->numbers + i);
- kmem_cache_free(ns->pid_cachep, pid);
- pid = NULL;
- goto out;
- }
inux中的hlist_head和hlist_node结构被用于hash表,具体定义如下:
struct hlist_head {
struct hlist_node *first;
};
struct hlist_node {
struct hlist_node *next, **pprev;
};
一般hash表都比较大,所以设计成单链表能节省几乎一半空间。这并不奇怪。奇怪的是hlist_node的pprev域。pprev域被设计成hlist_node的二级指针,而且指向前一个节点的next域(或者对于第一个节点,指向表头的first域)。为什么要设计成这样?
考虑普通的单链表,如下:
struct node {
struct node *next;
};
对于这样的链表,在指定节点(a)后插入节点(b)很容易:b->next = a->next; a->next = b;
但是要在指定节点(a)前插入(b)则很麻烦:先通过while(i->next == a) i = i->next;得到a的前一个节点,然后再进行i->next = b; b->next = a;进行插入;这就花费一定的时间用来搜索a的前一个节点。
linux要节省这部分时间。分析一下,搜索的目的是修改上一个节点的next域。为了省去搜索,hlist_node便增加了pprev域指向上一个节点的next域。要修改上一个节点的next,可以同*pprev = ?快速的修改。
总结一下,引入pprv域是把单链表的前插操作最优。
- Linux数据结构
- linux数据结构
- linux--数据结构
- Linux核心数据结构
- Linux内核数据结构
- Linux下:数据结构习题
- Linux内核数据结构
- linux内核数据结构
- linux VFS数据结构(一)
- linux VFS数据结构(二)
- linux内核中的数据结构
- Linux内核数据结构
- linux中断三个数据结构
- Linux内核关键数据结构
- Linux核心数据结构
- linux内核数据结构
- linux----VFS中的数据结构
- linux tasklet 数据结构解析
- 无配置文件使用log4j
- java输入语句
- java算法:图遍历(深度优先和广度优先)
- 用代码来控制自定义的控件 自动适应横竖屏时的相对位置
- 《TCP/IP详解-协议》(21)TCP的超时与重传
- linux数据结构
- 批处理
- java算法:冒泡排序
- 扫雷___建立工程和界面预估
- CString 实现原理
- 第一篇:测试
- java算法:排序实现
- iOS开发之iOS程序偏好设置(Settings Bundle)的使用
- 记录Android Framework级开发的心酸历程(一):环境篇