AndroidGUI18:ListView常用技巧
来源:互联网 发布:阿里云取消实名认证 编辑:程序博客网 时间:2024/05/16 03:50
AndroidGUI18:ListView常用技巧
ListView将需要显示的内容,放在一个可以垂直滚动的列表中进行显示。而要显示的内容是由和ListView相关联的ListAdapter指定的。通常是ArrayAdapter或者CursorAdapter,这两者都是ListAdapter的派生类。
因此ArrayAdapter和CursorAdapter就是ListView的数据源。通常情况下,他们的主要区别是:
a. ArrayAdapter用于指定数组中的数据,而CursorAdapter用于指定一个Cursor对象中的数据(比如从数据库中查询得到的结果)
b. ArrayAdapter用于适合指定只有一列的数据,而CursorAdapter适合指定由多列的数据,但这点并不是很严格,也就是说ArrayAdapter也可以用于多列数据,CursorAdapter也可以用于显示单列数据。
下面我们用实际的例子来说明。
第一个例子:
最简单的ListView用法。
1. 创建一个AndroidProject,修改其main.xml,使之如下:
<?xmlversion="1.0"encoding="utf-8"?>
<LinearLayoutxmlns:android="http://schemas.android.com/apk/res/android"
android:id="@+id/linearlayout"
android:orientation="vertical"
android:layout_width="fill_parent"
android:layout_height="fill_parent"
>
<!--在layout中增加一个ListView -->
<ListView
android:id="@+id/listview"
android:layout_width="wrap_content"
android:layout_height="wrap_content"
/>
</LinearLayout>
2. 修改Activity所对应的代码,使之如下:
package com.pat.gui;
import android.app.Activity;
import android.os.Bundle;
import android.view.View;
import android.widget.AdapterView;
import android.widget.ArrayAdapter;
import android.widget.ListView;
import android.widget.TextView;
import android.widget.Toast;
import android.widget.AdapterView.OnItemClickListener;
publicclass ControlListViewextends Activity
implements
OnItemClickListener
{
//声明一个ListView对象
private ListViewlistview;
//定义一个String数组,用以代表各种不同的手机操作系统
private Stringos[] = {"Android","iOS", "Windows Phone", "Symbian",
"BlackBerry", "PalmOS", "OPhone","Others..."};
@Override
publicvoid onCreate(Bundle savedInstanceState)
{
super.onCreate(savedInstanceState);
setContentView(R.layout.main);
//获得ListView对象
listview = (ListView)this.findViewById(R.id.listview);
//定义一个ArrayAdapter对象,ArrayAdapter有多个构造方法重载,其中下面用到的构造方法原型为:
//public ArrayAdapter (Context context,int textViewResourceId, T[] objects)
//context The current context.
//textViewResourceId Theresource ID for a layout file containing a TextView to use
// wheninstantiating views.
//objects The objects to represent in theListView.
ArrayAdapter<String>adapter =new ArrayAdapter<String>(this, android.R.layout.simple_list_item_1,os);
// android.R.layout.simple_list_item_1是Android预先定义好的,我们自己也可以另外定义
listview.setAdapter(adapter); // 将adapter和listview关联起来
listview.setOnItemClickListener(this); // 为listview设置OnItemClickListener
}
//@Override
publicvoid onItemClick(AdapterView<?> parent, View view,int position,long id)
// parent The AdapterView where theclick happened.
// view The view within theAdapterView that was clicked (this will be a view provided by the adapter)
// position Theposition of the view in the adapter.
// id The row id of theitem that was clicked.
{
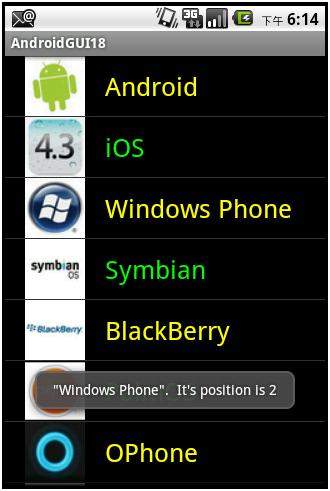
Toast.makeText(this,
"/"" + ((TextView)view).getText().toString() +"/". It's position is " + position,
Toast.LENGTH_SHORT).show();
}
}
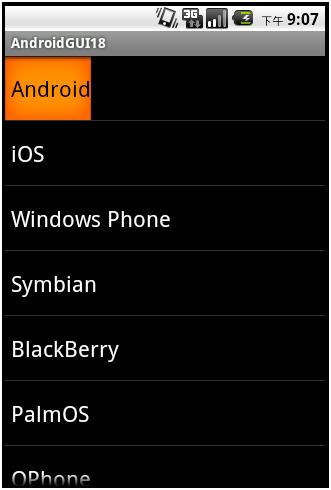
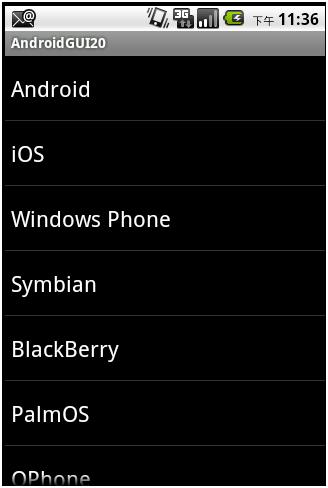
运行结果如下:
上面的ListView可以上下滚动。
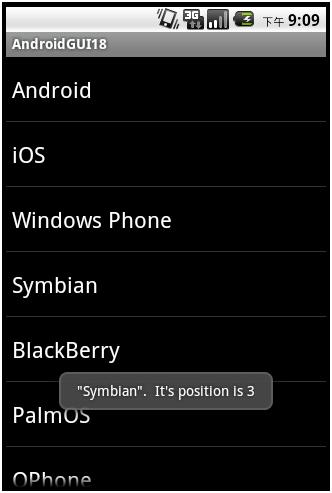
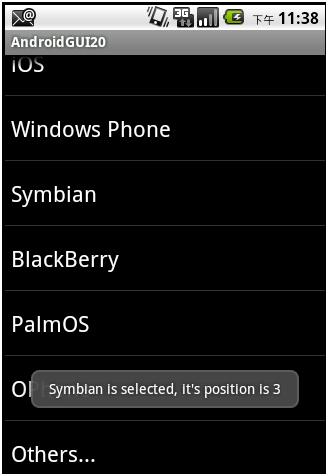
点击Symbian,则会出现:
第二个例子:
自定义显示ListView中每行的layout,同时显示图片和文字。
1. 在res/layout中,创建一个用于显示ListView条目的layout文件:rowlayout.xml,使之如下:
<?xmlversion="1.0"encoding="utf-8"?>
<LinearLayout
xmlns:android="http://schemas.android.com/apk/res/android"
android:layout_width="wrap_content"
android:layout_height="wrap_content"
android:orientation="horizontal">
<ImageView
android:id="@+id/row_icon"
android:layout_width="60px"
android:layout_height="80px"
android:src="@drawable/icon"
/>
<TextView
android:id="@+id/row_text"
android:layout_width="wrap_content"
android:layout_height="80px"
android:textSize="30px"
android:textColor="#0F0"
android:gravity="center_vertical"
/>
</LinearLayout>
其中的ImageView用于显示图片,TextView用于显示文字。
2. 修改Activity所对应的代码,使之如下:
package com.pat.gui;
import android.app.Activity;
import android.os.Bundle;
import android.view.View;
import android.widget.AdapterView;
import android.widget.ArrayAdapter;
import android.widget.ListView;
import android.widget.TextView;
import android.widget.Toast;
import android.widget.AdapterView.OnItemClickListener;
publicclass ControlListViewextends Activity
implements
OnItemClickListener
{
//声明一个ListView对象
private ListViewlistview;
//定义一个代表手机操作系统的String数组
String[] os =
{
"Android",
"iOS",
"Windows Phone",
"Symbian",
"BlackBerry",
"PalmOS",
"OPhone",
"Other"
};
@Override
publicvoid onCreate(Bundle savedInstanceState)
{
super.onCreate(savedInstanceState);
setContentView(R.layout.main);
//获得ListView对象
listview = (ListView)this.findViewById(R.id.listview);
//定义一个ArrayAdapter对象,ArrayAdapter有多个构造方法重载,其中下面用到的构造方法原型为:
// public ArrayAdapter (Context context,int resource, int textViewResourceId, T[] objects)
// context The current context.
// resource The resource ID for a layoutfile containing a layout to use when instantiating views.
// textViewResourceId The id of the TextView within thelayout resource to be populated
// objects The objects to represent in theListView.
ArrayAdapter<String>adapter =new ArrayAdapter<String>(this, R.layout.rowlayout, R.id.row_text,os);
listview.setAdapter(adapter); // 将adapter和listview关联起来
listview.setOnItemClickListener(this); // 为listview设置OnItemClickListener
}
//@Override
publicvoid onItemClick(AdapterView<?> parent, View view,int position,long id)
// parent The AdapterView where the click happened.
// view Theview within the AdapterView that was clicked (this will be a view provided bythe adapter)
// position The position of the view in the adapter.
// id Therow id of the item that was clicked.
{
//此处接收到的view,就是我们在rowlayout.xml中定义的LinearLayout,
//下面的语句用以获取其中的TextView(ID为row_text)
TextView tv =(TextView)view.findViewById(R.id.row_text);
Toast.makeText(this,"/"" + tv.getText().toString() +"/". It's position is " + position,
Toast.LENGTH_SHORT).show();
}
}
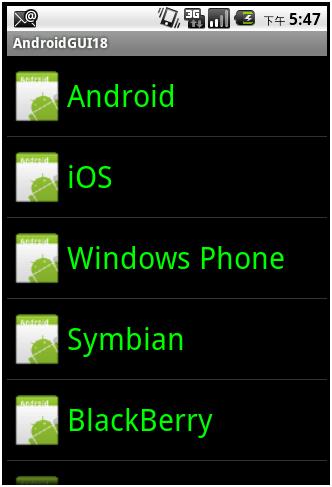
运行结果:
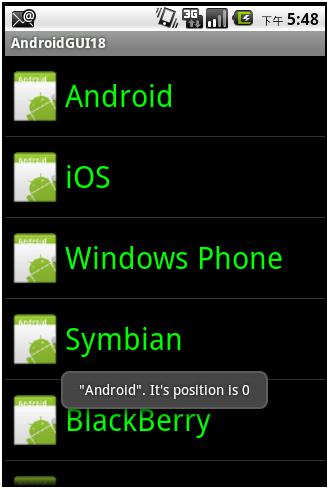
点击Android,得到:
在这个例子中,我们发现所有的图片都是一样的,要想图片和文字都不一样,请参考第三个例子。
第三个例子:
自定义Adapter,以控制如何显示ListView中的条目
1. 首先我们把各种手机操作系统的logo,拷贝到项目的res/drawable-mdpi中


他们对应的文件名分别为:android.png,ios.png, wp.png, symbian.png, blackberry.png, palm.png, ophone.png和other.png
2. 修改strings.xml,使之如下:
<?xmlversion="1.0"encoding="utf-8"?>
<resources>
<stringname="hello">Hello World, ControlListView!</string>
<stringname="app_name">AndroidGUI18</string>
<stringname="android">Android</string>
<stringname="ios">iOS</string>
<stringname="wp">Windows Phone</string>
<stringname="symbian">Symbian</string>
<stringname="palmos">PalmOS</string>
<stringname="blackberry">BlackBerry</string>
<stringname="ophone">OPhone</string>
<stringname="other">Other</string>
</resources>
定义了各种手机操作系统的名称
3. 修改Activity所对应的代码,使之如下:
package com.pat.gui;
import android.app.Activity;
import android.graphics.Color;
import android.os.Bundle;
import android.view.Gravity;
import android.view.View;
import android.view.ViewGroup;
import android.widget.AdapterView;
import android.widget.BaseAdapter;
import android.widget.ImageView;
import android.widget.LinearLayout;
import android.widget.ListView;
import android.widget.TextView;
import android.widget.Toast;
import android.widget.AdapterView.OnItemClickListener;
publicclass ControlListViewextends Activity
implements
OnItemClickListener
{
//声明一个ListView对象
private ListViewlistview;
//定义一个图片资源ID数组,代表各种手机操作系统的logo
privateint[]drawableIDs =
{
R.drawable.android,
R.drawable.ios,
R.drawable.wp,
R.drawable.symbian,
R.drawable.blackberry,
R.drawable.palm,
R.drawable.ophone,
R.drawable.other
};
//定义一个字符串ID数组,用以代表各种不同的手机操作系统名称,和drawableIDs有一一对应的关系
privateint[]os =
{
R.string.android,
R.string.ios,
R.string.wp,
R.string.symbian,
R.string.blackberry,
R.string.palmos,
R.string.ophone,
R.string.other
};
@Override
publicvoid onCreate(Bundle savedInstanceState)
{
super.onCreate(savedInstanceState);
setContentView(R.layout.main);
//获得ListView对象
listview = (ListView)this.findViewById(R.id.listview);
//定义一个ArrayAdapter对象,ArrayAdapter有多个构造方法重载,其中下面用到的构造方法原型为:
//public ArrayAdapter (Context context,int textViewResourceId, T[] objects)
//context The current context.
//textViewResourceId Theresource ID for a layout file containing a TextView to use
// wheninstantiating views.
//objects The objects to represent in theListView.
//ArrayAdapter<String> adapter =new ArrayAdapter<String>(this, android.R.layout.simple_list_item_1, os);
// android.R.layout.simple_list_item_1是Android预先定义好的,我们自己也可以单独定义
//现在我们使用自己定义的Adapter
CustomizedAdapter adapter =new CustomizedAdapter();
listview.setAdapter(adapter); //将adapter和listview关联起来
listview.setOnItemClickListener(this); // 为listview设置OnItemClickListener
}
//@Override
publicvoid onItemClick(AdapterView<?> parent, View view,int position,long id)
// parent The AdapterView where theclick happened.
// view The view within theAdapterView that was clicked (this will be a view provided by the adapter)
// position Theposition of the view in the adapter.
// id The row id of theitem that was clicked.
{
//方法onItemClick中传递过来的view,是CustomizedAdapter中getView返回的一个LinearLayout对象
TextView tv =(TextView)view.findViewWithTag("tagTextView"); //得到相应的 TextView对象
Toast.makeText(this,
"/"" + ((TextView)tv).getText().toString() +"/". It's position is " + position,
Toast.LENGTH_SHORT).show();
}
//内部类:自定义的Adapter,重写getCount、getItem 、getItemId和getView方法。其中的 getView方法最为重要
class CustomizedAdapterextends BaseAdapter // ArrayAdapter和CursorAdapter都是BaseAdapter的派生类
{
publicint getCount()
{
returndrawableIDs.length;
}
public Object getItem(int position)
{
returndrawableIDs[position];
}
publiclong getItemId(int position)
{
return position;
}
//返回一个LinearLayout对象,其中包括一个ImageView和一个TextView
public View getView(int position, View convertView, ViewGroupparent)
{
//先设定一个 LinearLayout对象 ll
LinearLayout ll =new LinearLayout(ControlListView.this );
//使 ll 的 Orientation 为 HORIZONTAL
ll.setOrientation(LinearLayout.HORIZONTAL );
//在垂直方向居中
ll.setGravity(Gravity.CENTER_VERTICAL);
//创建一个 ImageView对象
ImageView iv =new ImageView(ControlListView.this );
//指定对应 position的 Image
iv.setImageResource(drawableIDs[position]);
//设定 ImageView对象 iv 的宽度为 100 像素,高度为 50像素
iv.setLayoutParams(new ViewGroup.LayoutParams(100, 60));
//将 iv 加入到 ll
ll.addView(iv);
// 创建一个 TextView对象
TextView tv =new TextView(ControlListView.this );
// 指定对应 position的 Text
tv.setText(os[position]);
// 设定文字大小
tv.setTextSize(26);
//设定文字颜色
if(position%2 == 0)
{
tv.setTextColor(Color.YELLOW);
}
else
{
tv.setTextColor(Color.GREEN);
}
// 为 TextView对象增加一个 Tag ,以便在后续的处理中,可以通过
// findViewWithTag方法来获取这个 TextView对象
tv.setTag("tagTextView" );
//将 tv 加入到 ll
ll.addView(tv);
return ll;
}
}
}
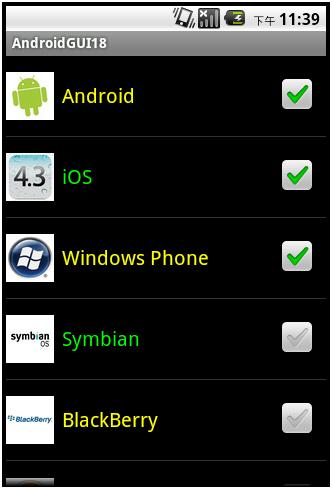
运行结果如下:

点击WindowsPhone,得到的结果如下:
可以看到,我们同样能够获取到所选项目的文本信息。
其他操作和第一种情况一样。
第四个例子:
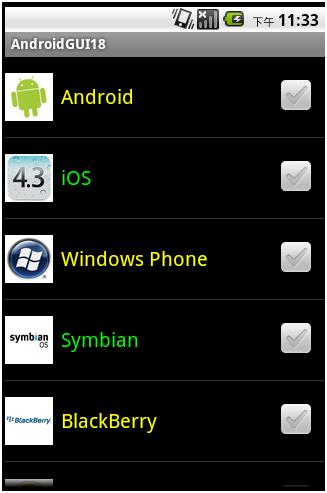
在第三个例子的基础上,我们在每个ListView条目的最后增加一个CheckBox,即每一个ListView条目所包含的内容为:
ImageView、TextView和CheckBox。
我们可以通过点击每个条目最后的CheckBox,在选中相关ListView中的条目。需要注意的地方:
+ 除CheckBox外,不让ListView中的条目接受Click事件
+ 在ListView中条目比较多(比较多的意思是,比如,屏幕只能显示6个条目,而ListView中一共有8个条目,也就是说,ListView的条目数量大于屏幕可以显示的条目数量)的时候,有两个问题需要特别注意:
- 因为ListView可以在垂直方向滚动,那么总有一些条目是在屏幕上看不到的,这些看不到的条目,如果你试图用ListView.GetChildAt(intposition)去获取它时,你会发现得到的结果将会是null。
- 要考虑到CheckBox的状态保持。比如程序开始运行后,在屏幕上显示ListView中的第0~第5个条目,第6、7两个条目在屏幕上不可见,这时候,我们点击第0个条目的CheckBox,那么这个CheckBox就会被显示为Checked的状态,然后我们将整个ListView向下滚动到底,那么第0个条目就不可见了。如果我们再将整个ListView向上滚动到头,那么此时第0个条目又可见了,如果不做一些处理,我们将会发现,第0个条目对应的CheckBox本应该处于Checked状态,但在它重新出现时,居然自动变成了unChecked的状态。
+ 在这个例子中,我们采取第三个例子中自己定义一个Adapter的方式来进行相关的处理。所不同的是,在第三个例子中的CustomizedAdapter.getView,完全用代码实现返回的View及其Layout,以及其中所包含的ImageView和TextView对象,而在这个例子中,我们准备先用xml文件,定义一个xml文件,用作ListView中每个条目的View,然后再通过LayoutInflater中inflate方法,获取getView方法所需要返回的View对象。
下面开始描述具体的步骤:
1. 在第三例子项目的基础上,我们在res/layout文件夹中,创建一个xml文件:rowcheckboxlayout.xml,如下:
这个rowcheckboxlayout.xml就是ListView中每个条目所需要用的View。编辑该xml文件,使其内容如下:
<?xmlversion="1.0"encoding="utf-8"?>
<!-- 这次使用RelativeLayout-->
<RelativeLayout
xmlns:android="http://schemas.android.com/apk/res/android"
android:id="@+id/row_checkbox_item"
android:layout_width="fill_parent"
android:layout_height="wrap_content"
android:orientation="horizontal">
<!-- 用于显示图片 -->
<ImageView
android:id="@+id/row_checkbox_icon"
android:layout_width="48px"
android:layout_height="80px"
/>
<!-- 用于显示文字,注意其相关的属性 -->
<TextView
android:id="@+id/row_checkbox_text"
android:layout_width="wrap_content"
android:layout_height="wrap_content"
android:textSize="20px"
android:layout_toRightOf="@id/row_checkbox_icon"
android:layout_marginLeft="8px"
android:layout_centerVertical="true">
</TextView>
<!--用于显示ChechBox,注意其相关的属性 -->
<CheckBox
android:id="@+id/row_checkbox"
android:layout_width="wrap_content"
android:layout_height="wrap_content"
android:layout_marginLeft="4px"
android:layout_marginRight="10px"
android:layout_alignParentRight="true"
android:layout_centerVertical="true"
>
</CheckBox>
<!--
android:focusable="false"
android:focusableInTouchMode="false"
如果想让ListView中的整个条目可以接收click事件,那么需要将
上面两个属性,加入到CheckBox对象的属性中即可。
-->
</RelativeLayout>
2. 定义一个用于记录ListView条目状态的POJO类:ListItemData.java,使其内容如下:
package com.pat.gui;
publicclassListItemData
{
privateintos_id;
privateintdrawable_id;
privatebooleanselected;
public ListItemData(int os_id,int drawable_id)
{
this.os_id = os_id;
this.drawable_id = drawable_id;
selected =false;
}
publicint getOs_id()
{
returnos_id;
}
publicvoid setOs_id(int osId)
{
os_id = osId;
}
publicint getDrawable_id()
{
returndrawable_id;
}
publicvoidsetDrawable_id(int drawableId)
{
drawable_id = drawableId;
}
publicbooleanisSelected()
{
returnselected;
}
publicvoidsetSelected(boolean selected)
{
this.selected = selected;
}
}
3. 创建一个自定义的Adapter类,这次我们将自定义的Adapter独立出来存放于另外一个Java文件CustomizedAdapter.java中,而不是像再第三个例子那样,将CustomizedAdapter作为内部类。编辑CustomizedAdapter.java,使之如下:
package com.pat.gui;
import java.util.List;
importandroid.content.Context;
importandroid.graphics.Color;
importandroid.view.LayoutInflater;
import android.view.View;
importandroid.view.ViewGroup;
importandroid.widget.ArrayAdapter;
importandroid.widget.CheckBox;
importandroid.widget.CompoundButton;
importandroid.widget.ImageView;
import android.widget.TextView;
importandroid.widget.Toast;
importandroid.widget.CompoundButton.OnCheckedChangeListener;
// 自定义的Adapter,重写getCount、getItem 、getItemId和getView方法。其中的 getView方法最为重要
class CustomizedAdapterextends ArrayAdapter<ListItemData>
{
//声明一个LayoutFlater对象
private LayoutInflaterinflater;
private Contextctx;
//声明一个List对象,其元素的数据类型为ListItemData。因此这个list对象实际上
//就是ListView对象的数据。
privatefinal List<ListItemData>list;
public CustomizedAdapter(Context ctx, List<ListItemData> list)
{
super(ctx, R.layout.rowcheckboxlayout, list);
this.ctx = ctx;
this.list = list;
inflater = (LayoutInflater)ctx.getSystemService(Context.LAYOUT_INFLATER_SERVICE);
}
publicint getCount()
{
returnlist.size();
}
public ListItemData getItem(int position)
{
returnlist.get(position);
}
publiclong getItemId(int position)
{
return position;
}
//返回一个RelativeLayout对象,其中包括一个ImageView、一个TextView以及一个CheckBox
public View getView(int position, View convertView, ViewGroupparent)
{
// getView方法中的第二个参数convertView有时候可能会是null,在这样的情况下,
//我们就必须创建一个新的rowView(ListView中每一个条目需要用到的)。但是,如果
// convertView不为null的时候,它是什么呢?它实际上就是前面通过inflate方法
//得到的rowView(见下面代码)。这种情况主要发生在ListView滚动的时候:当一个
//新的条目(行)出现的时候,Android首先会试图重复使用被移除屏幕的那些条目所
//对应的rowView对象。由于每一行都有相同的结构,因此可以通过findViewById方法
//得到rowView中各个对象,根据相关的数据改变这些对象,然后将contentView对象
//返回,而不需要重新构建一个rowView对象。
//所以,在这里,我们先检查convertView是否为null,如果是null的,那么我们创建
//一个新的rowView,否则,我们重用convertView。这样做可以大大减少耗时和耗资源
//的inflate的调用。根据2010年Google I/O大会,这样做比每次都inflate的做法的
//性能快出150%,如果rowView包含的对象很复杂的话,快出150%也许都是低估了。
//另外,这样做,还可以节省内存。如果如下面重复利用业已存在的rowView,那么
//仅需要6个rowView对象即可(假定屏幕可以显示的行数是6),假定每个rowView所占用的
//内存是6kB(有图像的时候,超过这个数字很容易),那么一共需要的内存是36kB。如果不
//采取这种重复利用的方式,在假定有1000行,那么所需要的内存就是6MB了,而且所需要
//的内存和ListView中的行数有关,这本身也不符合可扩展性的原则,容易造成性能上
//的不稳定。
finalint pos = position;
View rowView =(View)convertView;
if(rowView ==null)
{
rowView= (View)inflater.inflate(R.layout.rowcheckboxlayout,null, true);
}
// 获得 ImageView对象
ImageView iv =(ImageView)rowView.findViewById(R.id.row_checkbox_icon);
// 指定对应 position的 Image
iv.setImageResource(list.get(pos).getDrawable_id());
// 获得 TextView对象
TextView tv =(TextView)rowView.findViewById(R.id.row_checkbox_text);
// 指定对应 position的 Text
tv.setText(list.get(pos).getOs_id());
// 设定文字颜色
if(position%2 == 0)
{
tv.setTextColor(Color.YELLOW);
}
else
{
tv.setTextColor(Color.GREEN);
}
// 为 TextView对象增加一个 Tag ,以便在后续的处理中,可以通过
//findViewWithTag 方法来获取这个 TextView对象,注意setTag的参数可以是任意对象
tv.setTag("tagTextView");
// 获得CheckBox对象
CheckBox chkbox = (CheckBox)rowView.findViewById(R.id.row_checkbox);
// 为 CheckBox对象增加一个 Tag ,以便在后续的处理中,可以通过
//findViewWithTag 方法来获取这个 TextView对象,注意setTag的参数可以是任意对象
chkbox.setTag("tagCheckBox");
// 为CheckBox设定CheckedChangedListener
chkbox.setOnCheckedChangeListener(new OnCheckedChangeListener()
{
publicvoid onCheckedChanged(CompoundButtonbuttonView,boolean isChecked)
{
// 如果有CheckBox被点击了(有可能是由unchecked变为checked,也有可能是由checked变为unchecked),
// 那么,我们在list中保存对应位置上的CheckBox的状态
list.get(pos).setSelected(isChecked);
StringcheckedItems = "Thefollowing items are checked:/n/n";
int j = 0; // 一个标记
// 根据list中记录的状态,输出ListView中对应CheckBox状态为checked的条目
for(int i = 0; i <list.size(); ++i)
{
if(list.get(i).isSelected())
{
// 通过getString方法(Context中定义的)获取id对应的字符串
checkedItems+= i + "/t" +ctx.getString(list.get(i).getOs_id()) +"/n";
++j;
}
}
if(j == 0)
{
checkedItems+= "NO ITEMCHECKED.";
}
Toast.makeText(ctx, checkedItems, Toast.LENGTH_SHORT).show();
}
});
// 下面这行特别重要,否则ListView中的CheckBox不能正常显示。
chkbox.setChecked(list.get(pos).isSelected());
return rowView;
}
}
4. 修改Activity所对应代码,使之如下:
(下面代码中被注释的部分,曾想用OnScrollListener来处理ListView滚动时界面元素的重画,但由于GetChildAt可能返回null,而导致程序崩溃,详见下面onScrollStateChanged方法中的说明)
package com.pat.gui;
import java.util.ArrayList;
import java.util.List;
import android.app.Activity;
import android.os.Bundle;
//importandroid.util.Log;
//importandroid.view.View;
//importandroid.widget.AdapterView;
//importandroid.widget.CheckBox;
import android.widget.ListView;
//importandroid.widget.AbsListView.OnScrollListener;
//importandroid.widget.AdapterView.OnItemClickListener;
publicclass ControlListViewextends Activity
//implements
//OnItemClickListener
{
//声明一个ListView对象
private ListViewlistview;
private CustomizedAdapteradapter;
// private int FIRST; //用于记录在ListView停止滚动时,第一条在屏幕上可见的item的在ListView的位置
// private int VISIBLE; // 用于记录在屏幕上显示item的条数
// private int TOTAL; // 在ListView中item的数量
//定义一个图片资源ID数组,代表各种手机操作系统的logo
privateint[]drawableIDs =
{
R.drawable.android,
R.drawable.ios,
R.drawable.wp,
R.drawable.symbian,
R.drawable.blackberry,
R.drawable.palm,
R.drawable.ophone,
R.drawable.other
};
//定义一个字符串ID数组,用以代表各种不同的手机操作系统名称,和drawableIDs有一一对应的关系
privateint[]os =
{
R.string.android,
R.string.ios,
R.string.wp,
R.string.symbian,
R.string.blackberry,
R.string.palmos,
R.string.ophone,
R.string.other
};
@Override
publicvoid onCreate(Bundle savedInstanceState)
{
super.onCreate(savedInstanceState);
setContentView(R.layout.main);
//获得ListView对象
listview = (ListView)this.findViewById(R.id.listview);
listview.setChoiceMode(ListView.CHOICE_MODE_MULTIPLE);
//构造一个和listview对应的list对象。list用于保存listview中各item的状态。
finalList<ListItemData> list =new ArrayList<ListItemData>();
for(int i = 0; i < 8;++i)
{
list.add(new ListItemData(os[i],drawableIDs[i]));
}
//使用自定义的Adapter
adapter =new CustomizedAdapter(this, list);
//将adapter和listview关联起来
listview.setAdapter(adapter);
//listview.setOnItemClickListener(this);
//listview.setOnScrollListener(newOnScrollListener()
//{
//publicvoid onScroll(AbsListView view, int firstVisibleItem, int visibleItemCount, inttotalItemCount)
//{
// FIRST= firstVisibleItem;
// VISIBLE= visibleItemCount;
// TOTAL= totalItemCount;
// Log.e("111","firstVisibleItem = " + firstVisibleItem + ", visibleItemCount =" +
// visibleItemCount + ", totalItemCount = " + totalItemCount);
//}
//
//publicvoid onScrollStateChanged(AbsListView view, int scrollState)
//{
// Viewlist_item;
// CheckBoxchk_box;
// //scrollState等于0的时候,也就是不滚动的时候,分别取出FIRST,VISIBLE和TOTAL的值
// if(scrollState== 0)
// {
// Log.e("111","FIRST = " + FIRST + ", VISIBLE = " + VISIBLE + ",TOTAL = " + TOTAL);
//
// //仅处理屏幕上可见的item,但是,即便如此view.getChildAt还是有可能返回null,从而导致程序崩溃。
// //疑是getChildAt的bug。而按道理而言,只要item在屏幕上可见,那么view.getChildAt不应该返回null
// // 因此试图通过这种方式来重画CheckBox的状态,似乎不可行。
// for(inti = FIRST; i < (FIRST + VISIBLE); ++i)
// {
// list_item= (View)view.getChildAt(i);
// //if(list_item== null)continue;
//
// //if(list_item== null) break;
// //if((list.get(i).isSelected())&& (list_item != null) && (list_item.isShown() == true))
// if(list.get(i).isSelected())
// {
// chk_box= (CheckBox) list_item.findViewWithTag("tagCheckBox");
// chk_box.setChecked(true);
// }
// }
// }
//}
//});
}
//public voidonItemClick(AdapterView<?> parent, View view, int position, long id)
//{
// Log.e("1",""+position);
// Viewlist_item = (View)parent.getChildAt(position);
// CheckBoxchk_box = (CheckBox)list_item.findViewWithTag("tagCheckBox");
// chk_box.setChecked(true);
// adapter.notifyDataSetChanged();
//}
}
运行结果:
点击Android、iOS和WindowsPhone右边的CheckBox得到:

向下滚到到底,并点击Other右边的CheckBox,得到:
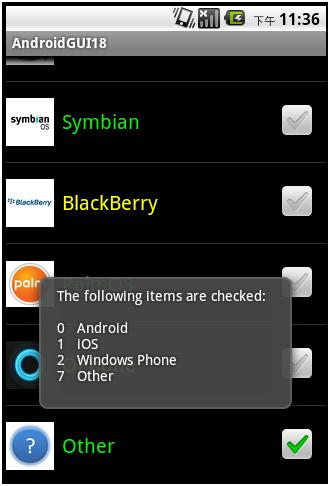
现在想上滚到到头,观察Android、iOS和WindowsPhone右边的CheckBox的Checked是否仍然被保持着:
可以看到状态保持得很好。
第五个例子:
ListView的Header和Footer有很多种做法。在这里我们只介绍一种比较简单,但非常有效的做法。我们将在ListView的上方增加一个固定的Header(即不随ListView的滚动而滚动),该Header实际上就是一个Button,当点击这个Button的时候,就显示ListView中的那些行被选中了。在第四个例子的基础上,具体做法如下:
1. 修改main.xml,使之如下:
<?xmlversion="1.0"encoding="utf-8"?>
<LinearLayoutxmlns:android="http://schemas.android.com/apk/res/android"
android:id="@+id/linearlayout"
android:orientation="vertical"
android:layout_width="fill_parent"
android:layout_height="fill_parent"
>
<!--在ListView之上,增加一个Header,这个Header实际上就是一个Button -->
<Button
android:id="@+id/header"
android:layout_width="fill_parent"
android:layout_height="wrap_content"
android:text="HEADER"
android:textSize="30px"
android:textColor="#00F"
/>
<!--在layout中增加一个ListView -->
<ListView
android:id="@+id/listview"
android:layout_width="wrap_content"
android:layout_height="wrap_content"
/>
</LinearLayout>
2. 修改Activity所对应的代码,使之如下:
package com.pat.gui;
import java.util.ArrayList;
import java.util.List;
import android.app.Activity;
import android.os.Bundle;
import android.view.View;
import android.view.View.OnClickListener;
import android.widget.Button;
import android.widget.ListView;
import android.widget.Toast;
publicclass ControlListViewextends Activity
implements
OnClickListener
{
//声明一个ListView对象
private ListViewlistview;
private CustomizedAdapteradapter;
//定义一个图片资源ID数组,代表各种手机操作系统的logo
privateint[]drawableIDs =
{
R.drawable.android,
R.drawable.ios,
R.drawable.wp,
R.drawable.symbian,
R.drawable.blackberry,
R.drawable.palm,
R.drawable.ophone,
R.drawable.other
};
//定义一个字符串ID数组,用以代表各种不同的手机操作系统名称,和drawableIDs有一一对应的关系
privateint[]os =
{
R.string.android,
R.string.ios,
R.string.wp,
R.string.symbian,
R.string.blackberry,
R.string.palmos,
R.string.ophone,
R.string.other
};
private Buttonheader;
private List<ListItemData>list;
@Override
publicvoid onCreate(Bundle savedInstanceState)
{
super.onCreate(savedInstanceState);
setContentView(R.layout.main);
listview = (ListView)this.findViewById(R.id.listview);
listview.setChoiceMode(ListView.CHOICE_MODE_MULTIPLE);
header = (Button)this.findViewById(R.id.header);
header.setOnClickListener(this);
//构造一个和listview对应的list对象。list用于保存listview中各item的状态。
list =new ArrayList<ListItemData>();
for(int i = 0; i < 8; ++i)
{
list.add(new ListItemData(os[i],drawableIDs[i]));
}
//使用自定义的Adapter
adapter =newCustomizedAdapter(this,list);
//将adapter和listview关联起来
listview.setAdapter(adapter);
}
publicvoid onClick(View v)
{
Stringtmpstr ="THE CHECKED ITEMS ARE:/n/n";
if(v.getId() == R.id.header)
{
for(ListItemData lid :list)
{
if(lid.isSelected())
{
tmpstr+= this.getString(lid.getOs_id());
tmpstr+= "/n";
}
}
}
Toast.makeText(this, tmpstr, Toast.LENGTH_SHORT).show();
}
}
其中粗体字的部分是新增加的代码。
3. 简化CustomizedAdapter的代码,使之如下:
package com.pat.gui;
import java.util.List;
import android.content.Context;
import android.graphics.Color;
import android.view.LayoutInflater;
import android.view.View;
import android.view.ViewGroup;
import android.widget.ArrayAdapter;
import android.widget.CheckBox;
import android.widget.CompoundButton;
import android.widget.ImageView;
import android.widget.TextView;
import android.widget.Toast;
import android.widget.CompoundButton.OnCheckedChangeListener;
// 自定义的Adapter,要重写getCount、getItem 、getItemId和getView方法。其中的 getView方法最为重要
class CustomizedAdapterextends ArrayAdapter<ListItemData>
{
//声明一个LayoutFlater对象
private LayoutInflaterinflater;
private Contextctx;
//声明一个List对象,其元素的数据类型为ListItemData。因此这个list对象实际上
//就是ListView对象的数据。
privatefinalList<ListItemData>list;
publicCustomizedAdapter(Context ctx, List<ListItemData> list)
{
super(ctx, R.layout.rowcheckboxlayout, list);
this.ctx = ctx;
this.list = list;
inflater =(LayoutInflater)ctx.getSystemService(Context.LAYOUT_INFLATER_SERVICE);
}
publicint getCount()
{
returnlist.size();
}
public ListItemData getItem(int position)
{
returnlist.get(position);
}
publiclong getItemId(int position)
{
return position;
}
//返回一个RelativeLayout对象,其中包括一个ImageView、一个TextView以及一个CheckBox
public View getView(int position, View convertView, ViewGroupparent)
{
// getView方法中的第二个参数convertView有时候可能会是null,在这样的情况下,
// 我们就必须创建一个新的rowView(ListView中每一个条目需要用到的)。但是,如果
// convertView不为null的时候,它是什么呢?它实际上就是前面通过inflate方法
//得到的rowView(见下面代码)。这种情况主要发生在ListView滚动的时候:当一个
//新的条目(行)出现的时候,Android首先会试图重复使用被移除屏幕的那些条目所
//对应的rowView对象。由于每一行都有相同的结构,因此可以通过findViewById方法
//得到rowView中各个对象,根据相关的数据改变这些对象,然后将contentView对象
//返回,而不需要重新构建一个rowView对象。
//所以,在这里,我们先检查convertView是否为null,如果是null的,那么我们创建
//一个新的rowView,否则,我们重用convertView。这样做可以大大减少耗时和耗资源
//的inflate的调用。根据2010年Google I/O大会,这样做比每次都inflate的做法的
//性能快出150%,如果rowView包含的对象很复杂的话,快出150%也许都是低估了。
//另外,这样做,还可以节省内存。如果如下面重复利用业已存在的rowView,那么
//仅需要6个rowView对象即可(假定屏幕可以显示的行数是6),假定每个rowView所占用的
//内存是6kB(有图像的时候,超过这个数字很容易),那么一共需要的内存是36kB。如果不
//采取这种重复利用的方式,在假定有1000行,那么所需要的内存就是6MB了,而所需要
//的内存和ListView中的行数有关,这本身也不符合可扩展性的原则,容易造成性能上
//的不稳定。
finalint pos = position;
View rowView =(View)convertView;
if(rowView ==null)
{
rowView= (View)inflater.inflate(R.layout.rowcheckboxlayout,null, true);
}
//获得 ImageView对象
ImageView iv =(ImageView)rowView.findViewById(R.id.row_checkbox_icon);
//指定对应 position的 Image
iv.setImageResource(list.get(pos).getDrawable_id());
//获得 TextView对象
TextView tv =(TextView)rowView.findViewById(R.id.row_checkbox_text);
//指定对应 position的 Text
tv.setText(list.get(pos).getOs_id());
//设定文字颜色
if(position%2 == 0)
{
tv.setTextColor(Color.YELLOW);
}
else
{
tv.setTextColor(Color.GREEN);
}
//为 TextView 对象增加一个 Tag ,以便在后续的处理中,可以通过
//findViewWithTag方法来获取这个 TextView对象,注意setTag的参数可以是任意对象
tv.setTag("tagTextView");
//获得CheckBox对象
CheckBox chkbox =(CheckBox)rowView.findViewById(R.id.row_checkbox);
//为 CheckBox 对象增加一个 Tag ,以便在后续的处理中,可以通过
//findViewWithTag方法来获取这个 TextView对象,注意setTag的参数可以是任意对象
chkbox.setTag("tagCheckBox");
//为CheckBox设定CheckedChangedListener
chkbox.setOnCheckedChangeListener(new OnCheckedChangeListener()
{
publicvoid onCheckedChanged(CompoundButton buttonView,boolean isChecked)
{
// 如果有CheckBox被点击了(有可能是由unchecked变为checked,也有可能是由checked变为unchecked),
// 那么,我们在list中保存对应位置上的CheckBox的状态
list.get(pos).setSelected(isChecked);
// 原CustomizedAdapter中,此处的代码已经被简化掉
}
});
//下面这行特别重要,否则ListView中的CheckBox不能正常显示。
chkbox.setChecked(list.get(pos).isSelected());
return rowView;
}
}
运行结果:
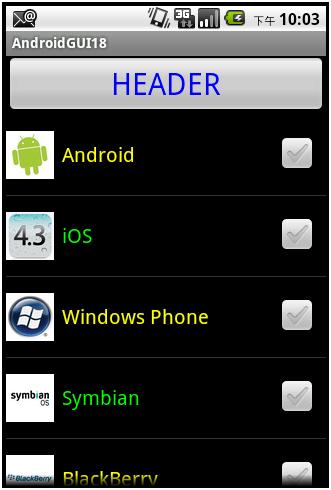
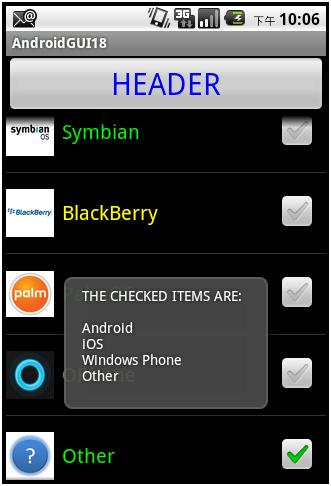
选中Android、iOs、WindowsPhone,然后向下滚动到底,再选中Other,在滚动的过程中,我们发现HEADER并不会随ListView的滚动而滚动,同时,ListView在滚动的过程中,每行的CheckBox的状态和第四个例子一样,也得到了很好的保持。点击HEADER,将会出现:
第六个例子:
前面五个例子都是使用ArrayAdapter,这个例子我们准备用CursorAdapter。
1. 创建一个新的项目,并修改main.xml,使之如下:
<?xmlversion="1.0"encoding="utf-8"?>
<LinearLayoutxmlns:android="http://schemas.android.com/apk/res/android"
android:id="@+id/linearlayout"
android:orientation="vertical"
android:layout_width="fill_parent"
android:layout_height="fill_parent"
>
<!--在layout中增加一个ListView -->
<ListView
android:id="@+id/listview"
android:layout_width="fill_parent"
android:layout_height="wrap_content"
/>
</LinearLayout>
2. 再在res/layout中创建一个xml文件(rowview.xml),用于显示ListView中的每一行
<?xmlversion="1.0"encoding="utf-8"?>
<LinearLayout
xmlns:android="http://schemas.android.com/apk/res/android"
android:orientation="horizontal"
android:layout_width="fill_parent"
android:layout_height="wrap_content">
<TextView
android:id="@+id/tv_id"
android:layout_width="60px"
android:layout_height="wrap_content"
android:textSize="30px"
android:text=""
/>
<TextView
android:id="@+id/tv_name"
android:layout_width="wrap_content"
android:layout_height="wrap_content"
android:textSize="30px"
android:text=""
/>
</LinearLayout>
3. 创建一个自定的Adapter类(位于CustomizedCursorAdapter.java),使之继承CursorAdapter,使其内容如下:
package com.pat.gui;
import android.content.Context;
import android.database.Cursor;
import android.view.LayoutInflater;
import android.view.View;
import android.view.ViewGroup;
import android.widget.CursorAdapter;
import android.widget.TextView;
publicclass CustomizedCursorAdapterextends CursorAdapter
{
public CustomizedCursorAdapter(Context ctx, Cursor c)
{
super(ctx, c);
}
//必须重写bindView方法,其函数原型如下:
//public abstract void bindView (Viewview, Context context, Cursor cursor)
//Bind an existing view to the datapointed to by cursor
//
//Parameters
//view Existingview, returned earlier by newView
//context Interface to application's global information
//cursor The cursor from which to get the data. The cursor is already movedto the correct position.
@Override
publicvoid bindView(View v, Context ctx, Cursor cursor)
{
TextView tv_id =(TextView) v.findViewById(R.id.tv_id);
TextView tv_name =(TextView) v.findViewById(R.id.tv_name);
tv_id.setText(cursor.getString(0));
tv_name.setText(cursor.getString(1));
}
//必须重写newView方法,其函数原型如下
//public abstract View newView (Contextcontext, Cursor cursor, ViewGroup parent)
//Makes a new view to hold the datapointed to by cursor.
//
//Parameters
//context Interface to application's global information
//cursor The cursor from which to get the data. The cursor is already movedto the correct position.
//parent The parent to which the new view is attached to
@Override
public View newView(Context ctx, Cursor cursor,ViewGroup parent)
{
//通过LayoutInflater将rowview.xml(R.layout.rowview)inflate为一个View对象
LayoutInflaterinflater = (LayoutInflater)ctx.getSystemService(Context.LAYOUT_INFLATER_SERVICE);
View v =inflater.inflate(R.layout.rowview, parent,false);
//获取View对象中定义的两个TextView对象
TextView tv_id = (TextView)v.findViewById(R.id.tv_id);
TextView tv_name =(TextView) v.findViewById(R.id.tv_name);
//将Cursor对象中的不同字段的数据,分别显示在上面的两个TextView对象中
tv_id.setText(cursor.getString(0)); // 显示cursor中的第一个字段
tv_name.setText(cursor.getString(1)); // 显示cursor中的第二个字段
return v; // 返回一个View对象,有可能会被bindView使用
}
}
注意,需要重写newView和bindView两个方法。
4. 编辑Activity所对应的代码,使之如下:
package com.pat.gui;
import android.app.Activity;
import android.database.Cursor;
import android.net.Uri;
import android.os.Bundle;
import android.provider.ContactsContract;
import android.util.Log;
import android.view.View;
import android.widget.AdapterView;
import android.widget.CursorAdapter;
import android.widget.ListView;
import android.widget.TextView;
import android.widget.Toast;
import android.widget.AdapterView.OnItemClickListener;
publicclass ControlCusorAdapterextends Activity
implements
OnItemClickListener
{
private ListViewlistview;
private Cursorcursor;
@Override
publicvoid onCreate(Bundle savedInstanceState)
{
super.onCreate(savedInstanceState);
setContentView(R.layout.main);
//获取main.xml中定义的ListView对象,并为其设定OnItemClickListener
listview = (ListView)this.findViewById(R.id.listview);
listview.setOnItemClickListener(this);
//查询联系人数据库,并将结果保存在cursor中
cursor = getContacts();
// This method allows the activity totake care of managing the given Cursor's
// lifecycle for you based on theactivity's lifecycle. That is, when the activity
// is stopped it will automatically calldeactivate() on the given Cursor, and
// when it is later restarted it willcall requery() for you. When the activity
// is destroyed, all managed Cursorswill be closed automatically.
startManagingCursor(cursor);
//创建一个CustomizedCursorAdapter对象
CursorAdapter adapter = new CustomizedCursorAdapter(this,cursor);
//将adpater和listview关联起来
listview.setAdapter(adapter);
}
//查询联系人数据库中所有联系人的ID和姓名,并俺姓名的升序进行排列
private Cursor getContacts()
{
// Run query
Uri uri =ContactsContract.Contacts.CONTENT_URI;
String[] projection=new String[]
{
ContactsContract.Contacts._ID,
ContactsContract.Contacts.DISPLAY_NAME
};
String selection =null;
String[]selectionArgs =null;
String sortOrder =ContactsContract.Contacts.DISPLAY_NAME +" ASC";
return managedQuery(uri, projection, selection,selectionArgs, sortOrder);
}
@Override
publicvoid onItemClick(AdapterView<?> parent, View view,int position,long id)
{
// parent The AdapterView where the click happened.
// view Theview within the AdapterView that was clicked (this will be a view provided bythe adapter)
// 在我们这个例子中就是CustomizedCursorAdapter中newView方法里面
// inflater.inflate(R.layout.rowview,parent, false)的结果,即rowview.xml设定的内容
// position The position of the view in the adapter.
// id Therow id of the item that was clicked.
Toast.makeText(this,
"/"" + ((TextView)view.findViewById(R.id.tv_name)).getText().toString() +
"/". It's position is " + position, Toast.LENGTH_SHORT).show();
}
}
5. 最后要记得在AndroidManifest.xml中增加查询联系人数据库的权限
<?xmlversion="1.0"encoding="utf-8"?>
<manifestxmlns:android="http://schemas.android.com/apk/res/android"
package="com.pat.gui"
android:versionCode="1"
android:versionName="1.0">
<applicationandroid:icon="@drawable/icon"android:label="@string/app_name">
<activityandroid:name=".ControlCusorAdapter"
android:label="@string/app_name">
<intent-filter>
<actionandroid:name="android.intent.action.MAIN"/>
<categoryandroid:name="android.intent.category.LAUNCHER"/>
</intent-filter>
</activity>
</application>
<uses-sdkandroid:minSdkVersion="8"/>
<uses-permissionandroid:name="android.permission.READ_CONTACTS"/>
</manifest>
运行结果:

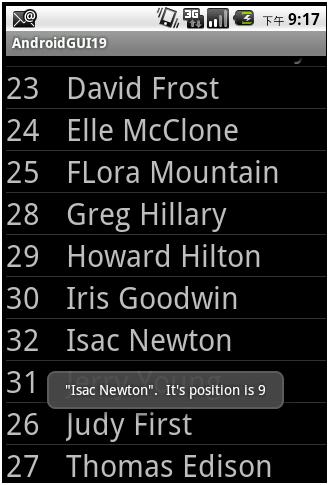
向下滚动到底,并点击Isac Newton,得到:
关于使用CursorAdapter的几点说明:
这个例子给出的CursorAdapter的用法是比较正规的用法,除此之外也可以使用SimpleCursorAdapter,要比这个例子简单些,但如果要实现前面几个例子中的效果,一般而言要采用本例所给出的做法。至于具体到增加诸如CheckBox类似这样的feature,可以参考前面的代码,大致情况相若。
最后要说明的,Activity有一个派生类叫ListActivity,官方的解释是:
Anactivity that displays a list of items by binding to a data source such as anarray or Cursor, and exposes event handlers when the user selects an item. ListActivityhosts a ListView object that can be bound to different data sources, typicallyeither an array or a Cursor holding query results.
从上面的官方描述中,不难看出,一个ListActivity基本上等于在一个Activity里面host了一个ListView,从这点上看和我们前面做的事情几乎没有什么不同,只不过ListActivity已经把两者结合了起来,因此从使用的角度来看,应该更加简单一些。下面我们就举一个简单的例子来说明之。
第七个例子:
使用ListActivity。
创建一个新的项目,其他均无需改动,只需将ListActivity对应的代码修改,使之如下即可:
package com.pat.gui;
import android.app.ListActivity;
import android.os.Bundle;
import android.view.View;
import android.widget.ArrayAdapter;
import android.widget.ListView;
import android.widget.Toast;
publicclass ControlListActivityextendsListActivity
{
private String[]os = new String[]
{
"Android",
"iOS",
"WindowsPhone",
"Symbian",
"BlackBerry",
"PalmOS",
"OPhone",
"Others..."
};
@Override
protectedvoidonCreate(Bundle savedInstanceState)
{
super.onCreate(savedInstanceState);
//创建一个ArrayAdapter对象,其中android.R.layout.simple_list_item_1是Android预先定义好的
// layout的资源ID,用于显示ListView中的每行数据。
ArrayAdapter<String>adapter =new ArrayAdapter<String>(this, android.R.layout.simple_list_item_1,os);
//将this(即ListActivity对象)和Adapter关联起来
this.setListAdapter(adapter);
}
//重写ListActivity中的onListItemClick方法
@Override
protectedvoid onListItemClick(ListView l, View v,int position,long id)
{
super.onListItemClick(l, v, position, id);
Object obj = this.getListAdapter().getItem(position);
String list_item =obj.toString();
Toast.makeText(this,"/"" + list_item +"/" is selected, it's positionis " + position,Toast.LENGTH_SHORT).show();
}
}
运行结果:
向下滚动到底,并点击Symbian,得到:
所得结果和第一个例子相同,但可以看到使用ListActivity,代码显得更简单一些。
从第一个到第六个例子中对ListView适用的技巧,均可用于ListActivity,在此就不一一举例说明了。
- AndroidGUI18:ListView常用技巧
- AndroidGUI18:ListView常用技巧
- ListView常用小技巧
- ListView常用小技巧
- ListView常用小技巧
- ListView常用小技巧
- ListView常用小技巧
- ListView常用小技巧
- ListView常用优化技巧
- ListView常用优化技巧
- ListView常用的优化技巧
- listview常用的优化技巧
- ListView常用技巧及优化
- Delphi ListView的用法(常用技巧)[转载]
- Delphi ListView的用法(常用技巧)
- Delphi ListView的用法(常用技巧)
- Delphi ListView的用法(常用技巧)
- Delphi ListView的用法(常用技巧)
- LeetCode Count and Say
- 汇编—双重循环—计算4*4矩阵与4*1矩阵乘法
- 进程的状态转换
- 去掉xcode编译warning:ld: warning: directory not found for option '---- iOS开发之最灵异事件之5
- Ajax 进行Post传值和Get传值
- AndroidGUI18:ListView常用技巧
- 汇编—多重循环—矩阵乘法
- AVAudioPlayer连续播放音乐的代码(通到单例)
- 快算求幂算法
- POJ 1094 Sorting It All Out
- 归纳一下:C#线程同步的几种方法
- Spring+Hibernate+Struts2整合所需要的Jar包
- Windows phone 7之页面布局
- *** is not in the sudoers file 问题解决