原型模式(Prototype Pattern)
来源:互联网 发布:mac版变色龙工具下载 编辑:程序博客网 时间:2024/05/31 13:14
设计模式 - 吕震宇
.NET设计模式系列文章
薛敬明的专栏
乐在其中设计模式(C#)
.NET Design PatternsC#设计模式(9)-Prototype Pattern
http://www.cnblogs.com/zhenyulu/articles/39257.html
一、 原型(Prototype)模式
原型模式的用意是:通过给出一个原型对象来指明所要创建的对象类型,然后用复制这个原型对象的办法创建出更多的同类型对象。
从孙大圣的手段谈起
孙悟空在与黄风怪的战斗中,"使一个身外身的手段:把毫毛揪下一把,用口嚼得粉碎,望上一喷,叫声'变',变有百十个行者,都是一样得打扮,各执一根铁棒,把那怪围在空中。"换而言之,孙悟空可以根据自己的形象,复制出很多"身外身"来。
老孙这种身外身的手段在面向对象设计领域里叫原型(Prototype)模式。
C#对原型模式的支持
在C#里面,我们可以很容易的通过Clone()方法实现原型模式。任何类,只要想支持克隆,必须实现C#中的ICloneable接口。ICloneable接口中有一Clone方法,可以在类中复写实现自定义的克隆方法。克隆的实现方法有两种:浅拷贝(shallow copy)与深拷贝(deep copy)。
(以下摘自:《.NET框架程序设计(修订版)》,李建忠译)浅拷贝是指当对象的字段值被拷贝时,字段引用的对象不会被拷贝。例如,如果一个对象有一个指向字符串的字段,并且我们对该对象做了一个浅拷贝,那么两个对象将引用同一个字符串。而深拷贝是对对象实例中字段引用的对象也进行拷贝的一种方式,所以如果一个对象有一个指向字符串的字段,并且我们对该对象做了一个深拷贝的话,我们将创建一个新的对象和一个新的字符串--新对象将引用新字符串。需要注意的是执行深拷贝后,原来的对象和新创建的对象不会共享任何东西;改变一个对象对另外一个对象没有任何影响。
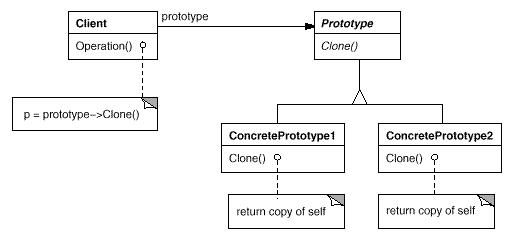
二、 Prototype模式的结构:

客户(Client)角色:客户类提出创建对象的请求。
抽象原型(Prototype)角色:这是一个抽象角色,通常由一个C#接口或抽象类实现。此角色给出所有的具体原型类所需的接口。在C#中,抽象原型角色通常实现了ICloneable接口。
具体原型(Concrete Prototype)角色:被复制的对象。此角色需要实现抽象原型角色所要求的接口。
三、 程序举例:
下面的程序给出了一个示意性的实现:
 // Prototype pattern -- Structural example using System;// "Prototype"abstract class Prototype
 {
{ // Fields private string id; // Constructors public Prototype( string id )
 { this.id = id;
 } public string Id { get{ return id; } } // Methods abstract public Prototype Clone();
 }// "ConcretePrototype1"class ConcretePrototype1 : Prototype{ // Constructors public ConcretePrototype1( string id ) : base ( id ) {} // Methods override public Prototype Clone() { // Shallow copy return (Prototype)this.MemberwiseClone(); }}// "ConcretePrototype2"class ConcretePrototype2 : Prototype{ // Constructors public ConcretePrototype2( string id ) : base ( id ) {} // Methods override public Prototype Clone() { // Shallow copy return (Prototype)this.MemberwiseClone(); }}/// <summary>/// Client test/// </summary>class Client{ public static void Main( string[] args ) { // Create two instances and clone each ConcretePrototype1 p1 = new ConcretePrototype1( "I" ); ConcretePrototype1 c1 = (ConcretePrototype1)p1.Clone(); Console.WriteLine( "Cloned: {0}", c1.Id ); ConcretePrototype2 p2 = new ConcretePrototype2( "II" ); ConcretePrototype2 c2 = (ConcretePrototype2)p2.Clone(); Console.WriteLine( "Cloned: {0}", c2.Id ); }}
这个例子实现了一个浅拷贝。其中MemberwiseClone()方法是Object类的一个受保护方法,实现了对象的浅拷贝。如果希望实现一个深拷贝,应该实现ICloneable接口,并自己编写ICloneable的Clone接口方法。
四、 带Prototype Manager的原型模式
原型模式的第二种形式是带原型管理器的原型模式,其UML图如下:

客户(Client)角色:客户端类向原型管理器提出创建对象的请求。
抽象原型(Prototype)角色:这是一个抽象角色,通常由一个C#接口或抽象类实现。此角色给出所有的具体原型类所需的接口。在C#中,抽象原型角色通常实现了ICloneable接口。
具体原型(Concrete Prototype)角色:被复制的对象。此角色需要实现抽象的原型角色所要求的接口。
原型管理器(Prototype Manager)角色:创建具体原型类的对象,并记录每一个被创建的对象。
下面这个例子演示了在原型管理器中存储用户预先定义的颜色原型,客户通过原型管理器克隆颜色对象。
// Prototype pattern -- Real World example using System;using System.Collections;// "Prototype"abstract class ColorPrototype{ // Methods public abstract ColorPrototype Clone();}// "ConcretePrototype"class Color : ColorPrototype{ // Fields private int red, green, blue; // Constructors public Color( int red, int green, int blue) { this.red = red; this.green = green; this.blue = blue; } // Methods public override ColorPrototype Clone() { // Creates a 'shallow copy' return (ColorPrototype) this.MemberwiseClone(); } public void Display() { Console.WriteLine( "RGB values are: {0},{1},{2}", red, green, blue ); }}// Prototype managerclass ColorManager{ // Fields Hashtable colors = new Hashtable(); // Indexers public ColorPrototype this[ string name ] { get{ return (ColorPrototype)colors[ name ]; } set{ colors.Add( name, value ); } }}/// <summary>/// PrototypeApp test/// </summary>class PrototypeApp{ public static void Main( string[] args ) { ColorManager colormanager = new ColorManager(); // Initialize with standard colors colormanager[ "red" ] = new Color( 255, 0, 0 ); colormanager[ "green" ] = new Color( 0, 255, 0 ); colormanager[ "blue" ] = new Color( 0, 0, 255 ); // User adds personalized colors colormanager[ "angry" ] = new Color( 255, 54, 0 ); colormanager[ "peace" ] = new Color( 128, 211, 128 ); colormanager[ "flame" ] = new Color( 211, 34, 20 ); // User uses selected colors string colorName = "red"; Color c1 = (Color)colormanager[ colorName ].Clone(); c1.Display(); colorName = "peace"; Color c2 = (Color)colormanager[ colorName ].Clone(); c2.Display(); colorName = "flame"; Color c3 = (Color)colormanager[ colorName ].Clone(); c3.Display(); }}
五、 浅拷贝与深拷贝
下面给出浅拷贝与深拷贝的两个例子,例子使用了ICloneable接口。C#中的数组是引用型的变量,我们通过数组来进行演示:
浅拷贝:
using System;class ShallowCopy : ICloneable{ public int[] v = {1,2,3}; public Object Clone() { return this.MemberwiseClone(); } public void Display() { foreach(int i in v) Console.Write( i + ", "); Console.WriteLine(); }}class Client{ public static void Main() { ShallowCopy sc1 = new ShallowCopy(); ShallowCopy sc2 = (ShallowCopy)sc1.Clone(); sc1.v[0] = 9; sc1.Display(); sc2.Display(); }}
ShallowCopy对象实现了一个浅拷贝,因此当对sc1进行克隆时,其字段v并没有克隆,这导致sc1与sc2的字段v都指向了同一个v,因此,当修改了sc1的v[0]后,sc2的v[0]也发生了变化。
深拷贝:
using System;class DeepCopy : ICloneable{ public int[] v = {1,2,3}; // 默认构造函数 public DeepCopy() { } // 供Clone方法调用的私有构造函数 private DeepCopy(int[] v) { this.v = (int[])v.Clone(); } public Object Clone() { // 构造一个新的DeepCopy对象,构造参数为 // 原有对象中使用的 v return new DeepCopy(this.v); } public void Display() { foreach(int i in v) Console.Write( i + ", "); Console.WriteLine(); }}class Client{ public static void Main() { DeepCopy dc1 = new DeepCopy(); DeepCopy dc2 = (DeepCopy)dc1.Clone(); dc1.v[0] = 9; dc1.Display(); dc2.Display(); }}
这次在克隆的时候,不但克隆对象本身,连里面的数组字段一并克隆。因此,最终打印出来的dc1与dc2不同。
六、 Prototype模式的优点与缺点
Prototype模式的优点包括
1、Prototype模式允许动态增加或减少产品类。由于创建产品类实例的方法是产批类内部具有的,因此增加新产品对整个结构没有影响。
2、Prototype模式提供了简化的创建结构。工厂方法模式常常需要有一个与产品类等级结构相同的等级结构,而Prototype模式就不需要这样。
3、Portotype模式具有给一个应用软件动态加载新功能的能力。由于Prototype的独立性较高,可以很容易动态加载新功能而不影响老系统。
4、产品类不需要非得有任何事先确定的等级结构,因为Prototype模式适用于任何的等级结构。
Prototype模式的缺点:
Prototype模式的最主要缺点就是每一个类必须配备一个克隆方法。而且这个克隆方法需要对类的功能进行通盘考虑,这对全新的类来说不是很难,但对已有的类进行改造时,不一定是件容易的事。
参考文献:
阎宏,《Java与模式》,电子工业出版社
[美]James W. Cooper,《C#设计模式》,电子工业出版社
[美]Alan Shalloway James R. Trott,《Design Patterns Explained》,中国电力出版社
[美]Robert C. Martin,《敏捷软件开发-原则、模式与实践》,清华大学出版社
[美]Don Box, Chris Sells,《.NET本质论 第1卷:公共语言运行库》,中国电力出版社
.NET设计模式(6):原型模式(Prototype Pattern)
http://terrylee.cnblogs.com/archive/2006/01/16/317896.html
原型模式(Prototype Pattern)
——.NET设计模式系列之六
Terrylee,2006年1月
概述
在软件系统中,有时候面临的产品类是动态变化的,而且这个产品类具有一定的等级结构。这时如果用工厂模式,则与产品类等级结构平行的工厂方法类也要随着这种变化而变化,显然不大合适。那么如何封装这种动态的变化?从而使依赖于这些易变对象的客户程序不随着产品类变化?
意图
用原型实例指定创建对象的种类,并且通过拷贝这些原型创建新的对象。
结构图
Prototype模式结构图
生活中的例子
Prototype模式使用原型实例指定创建对象的种类。新产品的原型通常是先于全部产品建立的,这样的原型是被动的,并不参与复制它自己。一个细胞的有丝分裂,产生两个同样的细胞,是一个扮演主动角色复制自己原型的例子,这演示了原型模式。一个细胞分裂,产生两个同样基因型的细胞。换句话说,细胞克隆了自己。

使用细胞分裂例子的Prototype模式对象图
原型模式解说
我们考虑这样一个场景,假定我们要开发一个调色板,用户单击调色板上任一个方块,将会返回一个对应的颜色的实例,下面我们看看如何通过原型模式来达到系统动态加载具体产品的目的。
很自然,我们利用OO的思想,把每一种颜色作为一个对象,并为他们抽象出一个公用的父类,如下图:
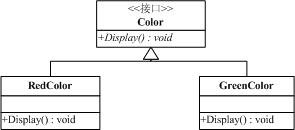
实现代码:
public abstractclass Color
{
public abstract void Display();
}
public class RedColor:Color
{
public override void Display()
{
Console.WriteLine("Red's RGB Values are:255,0,0");
}
}
public class GreenColor:Color
{
public override void Display()
{
Console.WriteLine("Green's RGB Values are:0,255,0");
}
}
客户程序需要某一种颜色的时候,只需要创建对应的具体类的实例就可以了。但是这样我们并没有达到封装变化点的目的,也许你会说,可以使用工厂方法模式,为每一个具体子类定义一个与其等级平行的工厂类,那么好,看一下实现:
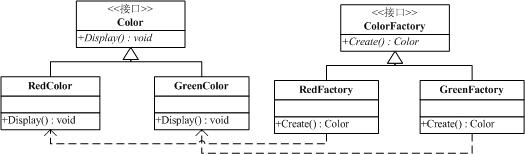
实现代码:
public abstractclass ColorFactory
{
public abstract Color Create();
}
public class RedFactory:ColorFactory
{
public override Color Create()
{
return new RedColor();
}
}
public class GreenFactory:ColorFactory
{
public override Color Create()
{
return new GreenColor();
}
}
实现了这一步之后,可以看到,客户程序只要调用工厂方法就可以了。似乎我们用工厂方法模式来解决是没有问题的。但是,我们考虑的仅仅是封装了new变化,而没有考虑颜色的数量是不断变化的,甚至可能是在程序运行的过程中动态增加和减少的,那么用这种方法实现,随着颜色数量的不断增加,子类的数量会迅速膨大,导致子类过多,显然用工厂方法模式有些不大合适。
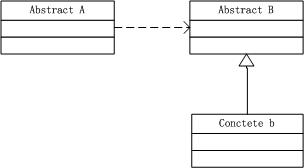
进一步思考,这些Color子类仅仅在初始化的颜色对象类别上有所不同。添加一个ColorTool这样的类,来参数化的它的实例,而这些实例是由Color支持和创建的。我们让ColorTool通过克隆或者拷贝一个Color子类的实例来创建新的Color,这个实例就是一个原型。如下图所示:

实现代码:
abstract class ColorPrototype
{
public abstract ColorPrototype Clone();
}
class ConcteteColorPrototype : ColorPrototype
{
private int _red, _green, _blue;
public ConcteteColorPrototype(int red,int green,int blue)
{
this._red= red;
this._green= green;
this._blue= blue;
}
public override ColorPrototype Clone()
{
//实现浅拷贝
return (ColorPrototype) this.MemberwiseClone();
}
public void Display(string _colorname)
{
Console.WriteLine("{0}'s RGB Values are: {1},{2},{3}",
_colorname,_red, _green, _blue );
}
}
class ColorManager
{
Hashtable colors = new Hashtable();
public ColorPrototype this[string name]
{
get
{
return (ColorPrototype)colors[name];
}
set
{
colors.Add(name,value);
}
}
}
现在我们分析一下,这样带来了什么好处?首先从子类的数目上大大减少了,不需要再为每一种具体的颜色产品而定一个类和与它等级平行的工厂方法类,而ColorTool则扮演了原型管理器的角色。再看一下为客户程序的实现:
class App
{
public static void Main(string[] args)
{
ColorManager colormanager =new ColorManager();
//初始化颜色
colormanager["red"] = new ConcteteColorPrototype(255,0,0);
colormanager["green"] = new ConcteteColorPrototype(0,255,0);
colormanager["blue"] = new ConcteteColorPrototype(0,0,255);
colormanager["angry"] = new ConcteteColorPrototype(255,54,0);
colormanager["peace"] = new ConcteteColorPrototype(128,211,128);
colormanager["flame"] = new ConcteteColorPrototype(211,34,20);
//使用颜色
string colorName = "red";
ConcteteColorPrototype c1 = (ConcteteColorPrototype)colormanager[colorName].Clone();
c1.Display(colorName);
colorName = "peace";
ConcteteColorPrototype c2 = (ConcteteColorPrototype)colormanager[colorName].Clone();
c2.Display(colorName);
colorName = "flame";
ConcteteColorPrototype c3 = (ConcteteColorPrototype)colormanager[colorName].Clone();
c3.Display(colorName);
Console.ReadLine();
}
}
可以看到,客户程序通过注册原型实例就可以将一个具体产品类并入到系统中,在运行时刻,可以动态的建立和删除原型。最后还要注意一点,在上面的例子中,用的是浅表复制。如果想做深复制,需要通过序列化的方式来实现。经过了上面的分析之后,我们再来思考下面的问题:
1.为什么需要Prototype模式?
引入原型模式的本质在于利用已有的一个原型对象,快速的生成和原型对象一样的实例。你有一个A的实例a:A a = new A();现在你想生成和car1一样的一个实例b,按照原型模式,应该是这样:A b= a.Clone();而不是重新再new一个A对象。通过上面这句话就可以得到一个和a一样的实例,确切的说,应该是它们的数据成员是一样的。Prototype模式同样是返回了一个A对象而没有使用new操作。
2.引入Prototype模式带来了什么好处?
可以看到,引入Prototype模式后我们不再需要一个与具体产品等级结构平行的工厂方法类,减少了类的构造,同时客户程序可以在运行时刻建立和删除原型。
3.Prototype模式满足了哪些面向对象的设计原则?
依赖倒置原则:上面的例子,原型管理器(ColorManager)仅仅依赖于抽象部分(ColorPrototype),而具体实现细节(ConcteteColorPrototype)则依赖与抽象部分(ColorPrototype),所以Prototype很好的满足了依赖倒置原则。
通过序列化实现深拷贝
要实现深拷贝,可以通过序列化的方式。抽象类及具体类都必须标注为可序列化的[Serializable],上面的例子加上深拷贝之后的完整程序如下:
using System;
using System.Collections;
using System.IO;
using System.Runtime.Serialization;
using System.Runtime.Serialization.Formatters.Binary;
[Serializable]
abstract class ColorPrototype
{
public abstract ColorPrototype Clone(bool Deep);
}
[Serializable]
class ConcteteColorPrototype : ColorPrototype
{
private int _red, _green, _blue;
public ConcteteColorPrototype(int red,int green,int blue)
{
this._red= red;
this._green= green;
this._blue= blue;
}
public override ColorPrototype Clone(bool Deep)
{
if(Deep)
return CreateDeepCopy();
else
return (ColorPrototype)this.MemberwiseClone();
}
//实现深拷贝
public ColorPrototype CreateDeepCopy()
{
ColorPrototype colorPrototype;
MemoryStream memoryStream =new MemoryStream();
BinaryFormatter formatter =new BinaryFormatter();
formatter.Serialize(memoryStream,this);
memoryStream.Position = 0;
colorPrototype = (ColorPrototype)formatter.Deserialize(memoryStream);
return colorPrototype;
}
public ConcteteColorPrototype Create(int red,int green,int blue)
{
return new ConcteteColorPrototype(red,green,blue);
}
public void Display(string _colorname)
{
Console.WriteLine("{0}'s RGB Values are: {1},{2},{3}",
_colorname,_red, _green, _blue );
}
}
class ColorManager
{
Hashtable colors = new Hashtable();
public ColorPrototype this[string name]
{
get
{
return (ColorPrototype)colors[name];
}
set
{
colors.Add(name,value);
}
}
}
class App
{
public static void Main(string[] args)
{
ColorManager colormanager =new ColorManager();
//初始化颜色
colormanager["red"] = new ConcteteColorPrototype(255,0,0);
colormanager["green"] = new ConcteteColorPrototype(0,255,0);
colormanager["blue"] = new ConcteteColorPrototype(0,0,255);
colormanager["angry"] = new ConcteteColorPrototype(255,54,0);
colormanager["peace"] = new ConcteteColorPrototype(128,211,128);
colormanager["flame"] = new ConcteteColorPrototype(211,34,20);
//使用颜色
string colorName = "red";
ConcteteColorPrototype c1 = (ConcteteColorPrototype)colormanager[colorName].Clone(false);
c1.Display(colorName);
colorName = "peace";
ConcteteColorPrototype c2 = (ConcteteColorPrototype)colormanager[colorName].Clone(true);
c2.Display(colorName);
colorName = "flame";
ConcteteColorPrototype c3 = (ConcteteColorPrototype)colormanager[colorName].Clone(true);
c3.Display(colorName);
Console.ReadLine();
}
}
实现要点
1.使用原型管理器,体现在一个系统中原型数目不固定时,可以动态的创建和销毁,如上面的举的调色板的例子。
2.实现克隆操作,在.NET中可以使用Object类的MemberwiseClone()方法来实现对象的浅表拷贝或通过序列化的方式来实现深拷贝。
3.Prototype模式同样用于隔离类对象的使用者和具体类型(易变类)之间的耦合关系,它同样要求这些“易变类”拥有稳定的接口。
效果
1.它对客户隐藏了具体的产品类,因此减少了客户知道的名字的数目。
2.Prototype模式允许客户只通过注册原型实例就可以将一个具体产品类并入到系统中,客户可以在运行时刻建立和删除原型。
3.减少了子类构造,Prototype模式是克隆一个原型而不是请求工厂方法创建一个,所以它不需要一个与具体产品类平行的Creater类层次。
4.Portotype模式具有给一个应用软件动态加载新功能的能力。由于Prototype的独立性较高,可以很容易动态加载新功能而不影响老系统。
5.产品类不需要非得有任何事先确定的等级结构,因为Prototype模式适用于任何的等级结构
6.Prototype模式的最主要缺点就是每一个类必须配备一个克隆方法。而且这个克隆方法需要对类的功能进行通盘考虑,这对全新的类来说不是很难,但对已有的类进行改造时,不一定是件容易的事。
适用性
在下列情况下,应当使用Prototype模式:
1.当一个系统应该独立于它的产品创建,构成和表示时;
2.当要实例化的类是在运行时刻指定时,例如,通过动态装载;
3.为了避免创建一个与产品类层次平行的工厂类层次时;
4.当一个类的实例只能有几个不同状态组合中的一种时。建立相应数目的原型并克隆它们可能比每次用合适的状态手工实例化该类更方便一些。
总结
Prototype模式同工厂模式,同样对客户隐藏了对象的创建工作,但是,与通过对一个类进行实例化来构造新对象不同的是,原型模式是通过拷贝一个现有对象生成新对象的,达到了“隔离类对象的使用者和具体类型(易变类)之间的耦合关系”的目的。
参考文献
《设计模式》(中文版)
《DesignPatternsExplained》
《Java与模式》(阎宏 著)
出处:http://terrylee.cnblogs.com
本文版权归作者和博客园共有,欢迎转载,但未经作者同意必须保留此段声明,且在文章页面明显位置给出原文连接,否则保留追究法律责任的权利。
C#之MemberwiseClone与Clone
http://www.cnblogs.com/zhaojin/archive/2012/03/22/2411299.html
MemberwiseClone 方法创建一个浅表副本,具体来说就是创建一个新对象,然后将当前对象的非静态字段复制到该新对象。如果字段是值类型的,则对该字段执行逐位复制。如果字段是引用类型,则复制引用但不复制引用的对象;因此,原始对象及其复本引用同一对象。
为了实现深度复制,我们就必须遍历有相互引用的对象构成的图,并需要处理其中的循环引用结构。这无疑是十分复杂的。幸好借助.Net的序列化和反序列化机制,可以十分简单的深度Clone一个对象。原理很简单,首先将对象序列化到内存流中,此时对象和对象引用的所用对象的状态都被保存到内存中。.Net的序列化机制会自动处理循环引用的情况。然后将内存流中的状态信息反序列化到一个新的对象中。这样一个对象的深度复制就完成了。在原型设计模式中CLONE技术非常关键。
下面的代码就是演示这个问题:
using System;using System.IO;using System.Runtime.Serialization.Formatters.Binary;namespace CloneDemo{ [Serializable] class DemoClass { public int i = 0; public int[] iArr = { 1, 2, 3 }; public DemoClass Clone1() //浅CLONE { return this.MemberwiseClone() as DemoClass; } public DemoClass Clone2() //深clone { MemoryStream stream = new MemoryStream(); BinaryFormatter formatter = new BinaryFormatter(); formatter.Serialize(stream, this); stream.Position = 0; return formatter.Deserialize(stream) as DemoClass; } } class Program { static void Main(string[] args) { DemoClass a = new DemoClass(); a.i = 10; a.iArr = new int[] { 8, 9, 10 }; DemoClass b = a.Clone1(); DemoClass c = a.Clone2(); // 更改 a 对象的iArr[0], 导致 b 对象的iArr[0] 也发生了变化 而 c不会变化 a.iArr[0] = 88; Console.WriteLine("MemberwiseClone"); Console.WriteLine(b.i); foreach (var item in b.iArr) { Console.WriteLine(item); } Console.WriteLine("Clone2"); Console.WriteLine(c.i); foreach (var item in c.iArr) { Console.WriteLine(item); } Console.ReadLine(); } }}另外一个例子是针对数组,C#中的数组是引用型的变量,我们通过数组来进行演示:
浅拷贝:
using System;class ShallowCopy : ICloneable{ public int[] v = {1,2,3}; public Object Clone() { return this.MemberwiseClone(); } public void Display() { foreach(int i in v) Console.Write( i + ", "); Console.WriteLine(); }}class Client{ public static void Main() { ShallowCopy sc1 = new ShallowCopy(); ShallowCopy sc2 = (ShallowCopy)sc1.Clone(); sc1.v[0] = 9; sc1.Display(); sc2.Display(); }}
ShallowCopy对象实现了一个浅拷贝,因此当对sc1进行克隆时,其字段v并没有克隆,这导致sc1与sc2的字段v都指向了同一个v,因此,当修改了sc1的v[0]后,sc2的v[0]也发生了变化。
深拷贝:
using System;class DeepCopy : ICloneable{ public int[] v = {1,2,3}; // 默认构造函数 public DeepCopy() { } // 供Clone方法调用的私有构造函数 private DeepCopy(int[] v) { this.v = (int[])v.Clone(); } public Object Clone() { // 构造一个新的DeepCopy对象,构造参数为 // 原有对象中使用的 v return new DeepCopy(this.v); } public void Display() { foreach(int i in v) Console.Write( i + ", "); Console.WriteLine(); }}class Client{ public static void Main() { DeepCopy dc1 = new DeepCopy(); DeepCopy dc2 = (DeepCopy)dc1.Clone(); dc1.v[0] = 9; dc1.Display(); dc2.Display(); }}
这次在克隆的时候,不但克隆对象本身,连里面的数组字段一并克隆。因此,最终打印出来的dc1与dc2不同。
当然我们也可以建个深拷贝的帮助类:
public static class ObjectCopier{ /// <summary> /// Perform a deep Copy of the object. /// </summary> /// <typeparam name="T">The type of object being copied.</typeparam> /// <param name="source">The object instance to copy.</param> /// <returns>The copied object.</returns> public static T Clone<T>(T source) { if (!typeof(T).IsSerializable) { throw new ArgumentException("The type must be serializable.", "source"); } // Don't serialize a null object, simply return the default for that object if (Object.ReferenceEquals(source, null)) { return default(T); } IFormatter formatter = new BinaryFormatter(); Stream stream = new MemoryStream(); using (stream) { formatter.Serialize(stream, source); stream.Seek(0, SeekOrigin.Begin); return (T)formatter.Deserialize(stream); } }} 记得《.net组件程序设计》中讲序列化一章提到可用序列化Clone对象,应该如下,贴出来大家看看:
/// <summary>/// 利用序列化克隆对象/// </summary>/// <typeparam name="T">对象的类型</typeparam>/// <param name="source">原对象</param>/// <returns></returns>public static T Clone<T>(T source) where T : class{ if(typeof(T).IsSerializable) { using(Stream stream =newMemoryStream()) { BinarySerialize(source, stream); T clone = BinaryDeserialize<T>(stream); returnclone; } } else { thrownewException(string.Format ("不能用序列化的方式克隆类型为{0}的对象",typeof(T).Name)); }}BinarySerialize和BinaryDeserialize<T> :
public static void BinarySerialize(object obj, Stream stream) { IFormatter formatter =newBinaryFormatter(); formatter.Serialize(stream, obj); }public static T BinaryDeserialize<T>(Stream stream) where T :class { IFormatter formatter =newBinaryFormatter(); objectobj = formatter.Deserialize(stream); if(objisT) { returnobjasT; } else { Type type =typeof(T); thrownewException(string.Format ("反序列化后不能得到类型{1}",type.Name)); } }乐在其中设计模式(C#) - 原型模式(Prototype Pattern)
作者:webabcd
介绍
用原型实例指定创建对象的种类,并且通过拷贝这个原型来创建新的对象。
示例
有一个Message实体类,现在要克隆它。
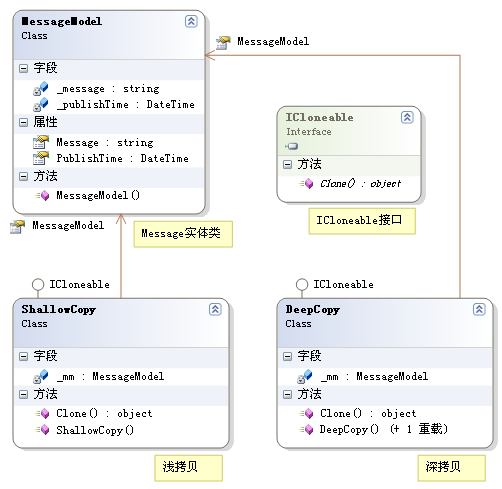
MessageModel
using System;using System.Collections.Generic;using System.Text;namespace Pattern.Prototype{ /// <summary> /// Message实体类 /// </summary> public class MessageModel { /// <summary> /// 构造函数 /// </summary> /// <param name="msg">Message内容</param> /// <param name="pt">Message发布时间</param> public MessageModel(string msg, DateTime pt) { this._message = msg; this._publishTime = pt; } private string _message; /// <summary> /// Message内容 /// </summary> public string Message { get { return _message; } set { _message = value; } } private DateTime _publishTime; /// <summary> /// Message发布时间 /// </summary> public DateTime PublishTime { get { return _publishTime; } set { _publishTime = value; } } }}ShallowCopy
using System;using System.Collections.Generic;using System.Text;namespace Pattern.Prototype{ /// <summary> /// 浅拷贝 /// </summary> public class ShallowCopy : ICloneable { /// <summary> /// 构造函数 /// </summary> public ShallowCopy() { } /// <summary> /// 实现ICloneable的Clone()方法 /// </summary> /// <returns></returns> public Object Clone() { return this.MemberwiseClone(); } private MessageModel _mm; /// <summary> /// Message实体对象 /// </summary> public MessageModel MessageModel { get { return _mm; } set { _mm = value; } } }}DeepCopy
using System;using System.Collections.Generic;using System.Text;namespace Pattern.Prototype{ /// <summary> /// 深拷贝 /// </summary> public class DeepCopy : ICloneable { /// <summary> /// 构造函数 /// </summary> public DeepCopy() { } /// <summary> /// 构造函数 /// </summary> /// <param name="mm">Message实体对象</param> public DeepCopy(MessageModel mm) { _mm = mm; } /// <summary> /// 实现ICloneable的Clone()方法 /// </summary> /// <returns></returns> public Object Clone() { return new DeepCopy(new MessageModel(_mm.Message, _mm.PublishTime)); } private MessageModel _mm; /// <summary> /// Message实体对象 /// </summary> public MessageModel MessageModel { get { return _mm; } set { _mm = value; } } }}client
using System;using System.Data;using System.Configuration;using System.Collections;using System.Web;using System.Web.Security;using System.Web.UI;using System.Web.UI.WebControls;using System.Web.UI.WebControls.WebParts;using System.Web.UI.HtmlControls;using Pattern.Prototype;public partial class Prototype : System.Web.UI.Page{ protected void Page_Load(object sender, EventArgs e) { Response.Write("ShallowCopy演示如下:<br />"); ShowShallowCopy(); Response.Write("DeepCopy演示如下:<br />"); ShowDeepCopy(); } private void ShowShallowCopy() { ShallowCopy sc = new ShallowCopy(); sc.MessageModel = new MessageModel("ShallowCopy", DateTime.Now); ShallowCopy sc2 = (ShallowCopy)sc.Clone(); Response.Write(sc.MessageModel.Message); Response.Write("<br />"); Response.Write(sc2.MessageModel.Message); Response.Write("<br />"); sc.MessageModel.Message = "ShallowCopyShallowCopy"; Response.Write(sc.MessageModel.Message); Response.Write("<br />"); Response.Write(sc2.MessageModel.Message); Response.Write("<br />"); } private void ShowDeepCopy() { DeepCopy sc = new DeepCopy(); sc.MessageModel = new MessageModel("DeepCopy", DateTime.Now); DeepCopy sc2 = (DeepCopy)sc.Clone(); Response.Write(sc.MessageModel.Message); Response.Write("<br />"); Response.Write(sc2.MessageModel.Message); Response.Write("<br />"); sc.MessageModel.Message = "DeepCopyDeepCopy"; Response.Write(sc.MessageModel.Message); Response.Write("<br />"); Response.Write(sc2.MessageModel.Message); Response.Write("<br />"); }}运行结果
ShallowCopy演示如下:
ShallowCopy
ShallowCopy
ShallowCopyShallowCopy
ShallowCopyShallowCopy
DeepCopy演示如下:
DeepCopy
DeepCopy
DeepCopyDeepCopy
DeepCopy
参考
http://www.dofactory.com/Patterns/PatternPrototype.aspx
OK
[源码下载]
- 原型模式(Prototype Pattern)
- 原型模式(Prototype Pattern)
- 原型模式(Prototype Pattern)
- 原型模式 Prototype Pattern
- 原型模式 Prototype Pattern
- 原型模式(Prototype Pattern)
- 原型模式( Prototype Pattern)
- 原型模式【PROTOTYPE PATTERN 】
- 原型模式(prototype pattern)
- 原型模式(Prototype Pattern)
- 原型模式(prototype pattern)
- 原型模式Prototype Pattern
- 原型模式(Prototype Pattern)
- 原型模式【Prototype Pattern】
- 原型模式(Prototype Pattern)
- 原型模式【Prototype Pattern】
- 原型模式-Prototype Pattern
- 原型模式(Prototype Pattern)
- The connection to adb is down, and a severe error has occured.
- wpf日记
- javascript clipboardData对象详解
- Java多线程编程详解
- Socket编程
- 原型模式(Prototype Pattern)
- android实现卸载提示
- 使用并行计算大幅提升递归算法效率
- c# 关键字 params ref out
- 字符串转换为日期格式(datetime)只显示年月日
- C6优化数据库IndexDefrag
- jquery-1.6.2.js
- shmid_ds 一个特殊的数据结构
- 常用log4j配置 [精简实用]