objective-c中的正式协议 protocol(十一)
来源:互联网 发布:mac开机选择用户 编辑:程序博客网 时间:2024/05/01 10:48
上一往篇文章中我们谈到了非正式协议类别,可以在一个类中补充方法。但是这个方法你可以不去调用。协议类似于java的接口,如果一个协议中定义了某些方法,而某类又实现了该协议,那么该类必须实现这些方法。换句话说,协议是一组公用的方法声明,谁实现协议,谁就负责实现这些方法,不然会有黄色警告。协议可以扩展已有协议。协议的关键字是protocol,以@protocol开始声明,以@end结束。在类中实现协议时,只需要在类名后面加个<协议名>,即可。下面 看代码:
先定义一个协议:eat.h
- #import <Foundation/Foundation.h>
- @protocol eat <NSObject>//协议eat扩展了协议NSObject.h
- -(void)eat;
- @end
上面扩展的NSObject协议不用实现,因为继承于NSObject的类已经继承了对NSObject协议的实现
下面创建一个类:Human.h
- #import <Foundation/Foundation.h>
- #import "eat.h"
- @interface Human : NSObject <eat>
- @end
Human.m
- #import "Human.h"
- @implementation Human
- -(void)eat
- {
- NSLog(@"协议中定义的eat");
- }
- @end
在main.m中调用:
- #import <Foundation/Foundation.h>
- #import "eat.h"
- #import "Human.h"
- int main(int argc, const char * argv[])
- {
- @autoreleasepool {
- Human *human =[[Human alloc] init];
- [human eat];
- }
- return 0;
- }
2012-03-18 14:35:29.099 category1[1752:403] 协议中定义的eat
很简单吧,另外,在新版本的objective-c中,增加了协议的一些可选项,@optional,@required,协议中的方法必须实现,不然会报错,但是如果以@optional修饰的话便没有这种限制,默认必须实现的方法其实就相当于以@required修饰,比如上面的代码,我们可以做出以下修改:
eat.h
- #import <Foundation/Foundation.h>
- @protocol eat <NSObject>//协议eat扩展了协议NSObject.h
- -(void)eat;
- @optional
- -(void)playGuitar;
- @required
- -(void)sleep;
- @end
这样的话,sleep方法和eat方法同样必须实现,而playGuitar方法便可选实现,是不是很人性化。
objective-c中的本地化操作(序列化,归档)(十二)
先介绍一个自定义类描述的方法description,一般情况下,一个自定义类我们在用%@输出的时候,给出的是一个内存地址,我们在该类的.m文件里重写description方法,来修改输出内容,呆会儿我们要用到这个方法来验证今天学习内容,所以先看一段代码熟悉一下:
Human.h:
- #import <Foundation/Foundation.h>
- @interface Human : NSObject
- {
- int age;
- NSString *name;
- Human *child;
- }
- @property int age;
- @property (copy)NSString *name;
- @property (retain)Human *child;
- @end
Human.m:
- #import "Human.h"
- @implementation Human
- @synthesize age;
- @synthesize name;
- @synthesize child;
- //-(NSString *)description
- //{
- // NSString *des = [NSString stringWithFormat:@"%d,%@,%@",age,name,child];
- // return des;
- //}
- @end
上面的重写描述被注释掉了,我们先看未修改前的输出:
main.m:
- #import <Foundation/Foundation.h>
- #import "Human.h"
- int main(int argc, const char * argv[])
- {
- @autoreleasepool {
- Human *human1=[[Human alloc]init];
- Human *human2=[[Human alloc]init];
- human1.child=human2;
- human1.name=@"holydancer";
- human1.age=22;
- NSLog(@"%@",human1);
- }
- return 0;
- }
2012-03-20 08:47:32.980 category[304:403] <Human: 0x7ff2cb414380>
如果把human.m中的注释去掉的话输出结果如下:
2012-03-20 08:48:09.869 category[315:403] 22,holydancer,0,(null),(null)
很简单吧,这样就可以查看自己定义类的内容了,好了,下面就让我们来研究一下在objective-c中如何实现序列化。
在OC中,有四类对象是可以直接使用writeToFile方法将内容写入磁盘的,分别是NSString,NSArray,NSDictionary,NSData.看代码:
- #import <Foundation/Foundation.h>
- #import "Human.h"
- int main(int argc, const char * argv[])
- {
- @autoreleasepool {
- NSData *data=[[NSData alloc]init];
- NSString *string=[[NSString alloc]init];
- NSArray *array=[[NSArray alloc]init];
- NSDictionary *dictionary=[[NSDictionary alloc]init];
- [data writeToFile:@"/Users/holydancer/Desktop/text1.txt" atomically:YES];
- [string writeToFile:@"/Users/holydancer/Desktop/text2.txt" atomically:YES];
- [array writeToFile:@"/Users/holydancer/Desktop/text3.txt" atomically:YES];
- [dictionary writeToFile:@"/Users/holydancer/Desktop/text4.txt" atomically:YES];
- //atomically参数是指是否将写入文件的内容开启保护机制,如果开启,会在复制时创建临时文件进行复制,以免写入失败破坏原始文件。安全,但是会消耗内存。
- //上面的文件地址,如果不存在的话会自动生成。有的话会覆盖原有文件内容。
- }
- return 0;
- }

以上四种是COCOA自带可以写入磁盘文件的类型,但是我们常常用到自定义类,可是里面并没有writeToFile方法,怎么办呢?这时NSData的作用就体现出来了,我们可以把任意自定义类转化成NSData格式即可,这个过程我们称之为编码,或者archive归档,需要将自定义类实现NSCoding协议并重写encodeWithCoder和initWithCoder两个方法,分别用以编码和反编码。然后在编码时会用NSCoder的子类NSKeyedArchiver和NSKeyedUnarchiver分别调用archivedDataWithRootObject和unarchiveObjectWithData来启动自定义类中重写的那两个方法,类似于回调。看代码:
Human.h:
- #import <Foundation/Foundation.h>
- @interface Human : NSObject<NSCoding>
- {
- int age;
- NSString *name;
- Human *child;
- }
- @property int age;
- @property (copy)NSString *name;
- @property (retain)Human *child;
- @end
Human.m:
- #import "Human.h"
- @implementation Human
- @synthesize age;
- @synthesize name;
- @synthesize child;
- -(NSString *)description
- {
- NSString *des = [NSString stringWithFormat:@"%d,%@,%@",age,name,child];
- return des;
- }
- -(void)encodeWithCoder:(NSCoder *)aCoder//要一一对应
- {
- [aCoder encodeInt:age forKey:@"age"];
- [aCoder encodeObject:name forKey:@"name"];
- [aCoder encodeObject:child forKey:@"child"];
- }
- -(id)initWithCoder:(NSCoder *)aDecoder//和上面对应
- {
- if (self=[super init]) {
- self.age=[aDecoder decodeIntForKey:@"age"];
- self.name=[aDecoder decodeObjectForKey:@"name"];
- self.child=[aDecoder decodeObjectForKey:@"child"];
- }
- return self;
- }
- @end
main.m:
- #import <Foundation/Foundation.h>
- #import "Human.h"
- #import <Foundation/NSKeyedArchiver.h>
- int main(int argc, const char * argv[])
- {
- @autoreleasepool {
- Human *human1=[[Human alloc]init];
- Human *human2=[[Human alloc]init];
- human1.age=20;
- human1.name=@"holydancer";
- human1.child=human2;
- //定义好自定义对象后使用NSCoding的子类调用archivedDataWithRootObject方法进行archive
- NSData *data1=[NSKeyedArchiver archivedDataWithRootObject:human1];
- //转成NSData类型后就可以写入本地磁盘了
- [data1 writeToFile:@"/Users/holydancer/Desktop/tmp.txt" atomically:YES];
- //倒过来的话先读取磁盘文件
- NSData *data2=[NSData dataWithContentsOfFile:@"/Users/holydancer/Desktop/tmp.txt"];
- Human *human3=[NSKeyedUnarchiver unarchiveObjectWithData:data2];
- NSLog(@"%@,%@",human1,human3);
- }
- return 0;
- }
2012-03-20 10:10:29.871 category[458:403]
20,holydancer,0,(null),(null)
20,holydancer,0,(null),(null)
有的同学一直不太清楚NSKeyedArchiver和NSKeyedUnarchiver是什么,调用的又是什么方法,大家可以在头文件里找到这样的信息: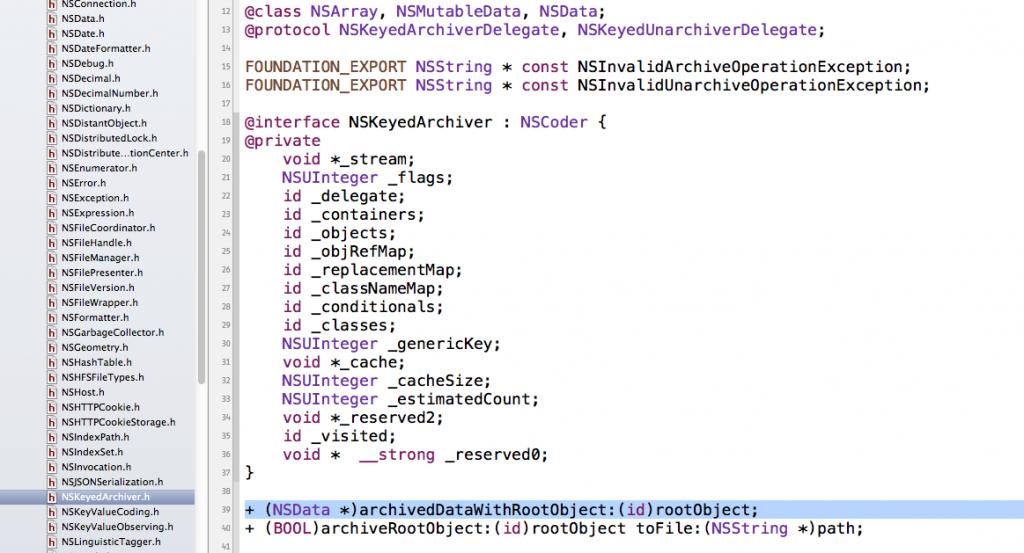
可以发现,NSKeyedArchiver是NSCoder的子类,而archivedDataWithRootObject是里面的一个类方法,这时我们看到archivedDataWithRootObject方法下在还有一个方法,不错,这个方法可以直接将自定义类写入本地磁盘,所以上在的代码我们还可以这样写:
- #import <Foundation/Foundation.h>
- #import "Human.h"
- #import <Foundation/NSKeyedArchiver.h>
- int main(int argc, const char * argv[])
- {
- @autoreleasepool {
- Human *human1=[[Human alloc]init];
- Human *human2=[[Human alloc]init];
- human1.age=20;
- human1.name=@"holydancer";
- human1.child=human2;
- [NSKeyedArchiver archiveRootObject:human1 toFile:@"/Users/holydancer/Desktop/tmp.txt"];//直接写入磁盘
- Human *human3=[NSKeyedUnarchiver unarchiveObjectWithFile:@"/Users/holydancer/Desktop/tmp.txt"];//从磁盘直接读取为id类型
- NSLog(@"\n%@\n%@",human1,human3);
- }
- return 0;
- }
2012-03-20 10:16:43.561 category[475:403]
20,holydancer,0,(null),(null)
20,holydancer,0,(null),(null)
最后,不得不说说cocoa中的方法命名,一个一个方法长得,虽然很人性化很好记,不过敲起来真是麻烦啊。
objective-c中的cocoa特性:KVC-键值编码(十三)
在oc中,可以使用KVC来访问变量的属性,即使该属性没有get,set方法也可以调用,方便灵活,另外还可以方便的管理集合,具体使用我们先看代码:
- #import <Foundation/Foundation.h>
- @interface Human:NSObject
- {
- NSString *name;
- int age;
- Human *child;
- }
- //注意下面并没有写age的property
- @property (copy) NSString *name;
- @property (retain)Human *child;
- @end
- @implementation Human
- @synthesize name;
- @synthesize child;
- @end
- int main(int argc, const char * argv[])
- {
- @autoreleasepool {
- Human *human = [[Human alloc]init];
- Human *child=[[Human alloc]init];
- [human setValue:@"holydancer" forKey:@"name"];//将name属性设置为"holydancer"
- NSString *nameOfHuman=[human valueForKey:@"name"];//将human中的name属性取出
- NSLog(@"%@",nameOfHuman);
- [human setValue:[NSNumber numberWithInt:20] forKey:@"age"];//将没有set方法的age属性赋值
- NSLog(@"%@",[human valueForKey:@"age"]);//将没有get方法的age值取出。
- [human setValue:child forKey:@"child"];//等价于human.child=child;
- //将human中的属性child的name属性设置为"dancer's child"
- [human setValue:@"dancer's child" forKeyPath:@"child.name"];
- //这里的方法名叫setValue:forKeyPath,可以用来设置当前对象属性的属性。
- //将human中的属性child的age属性取出。
- NSLog(@"%@",[human valueForKeyPath:@"child.name"]);
- }
- return 0;
- }
2012-03-20 19:58:30.634 kvc[3197:403] holydancer
2012-03-20 19:58:30.637 kvc[3197:403] 20
2012-03-20 19:58:30.638 kvc[3197:403] dancer's child
如上所示,例用键值编码可以很轻松地操作对象的属性和对象属性的属性。需要注意的是,因为KVC是cocoa的特性,所以在键值设置或者获取时,键统一是字符串,而值是不支持基本数据类型的,所以如上所示,我们需要将age包装成NSNumber类型,另外在输出age时,即使我们知道是int型,但取出时是按NSNumber操作的,输出占位符仍是%@.
下面我们来看看KVC的另一种简单用法,添加运算符:
- #import <Foundation/Foundation.h>
- @interface Human:NSObject
- {
- NSString *name;
- int age;
- NSMutableArray *children;
- }
- //注意下面并没有写age的property
- @property (copy) NSString *name;
- @property (retain)Human *child;
- @end
- @implementation Human
- @synthesize name;
- @synthesize child;
- @end
- int main(int argc, const char * argv[])
- {
- @autoreleasepool {
- Human *human = [[Human alloc]init];
- Human *child1=[[Human alloc]init];
- Human *child2=[[Human alloc]init];
- [child1 setValue:[NSNumber numberWithInt:5] forKey:@"age"];
- [child2 setValue:[NSNumber numberWithInt:10] forKey:@"age"];//给两个child的age属性赋值,因为没有property,所以用KVC模式赋值
- NSMutableArray *children =[[NSMutableArray alloc]init];
- [children addObject:child1];
- [children addObject:child2];
- //上面是为了将两个Human类包装为NSArray,准备放入human类
- [human setValue:children forKey:@"children"];
- NSNumber *count=[human valueForKeyPath:@"children.@count"];//利用键路径计算human对象中children属性包含的元素个数
- NSNumber *sumOfAge=[human valueForKeyPath:@"children.@sum.age"];//计算children中所有对象的年龄和
- NSNumber *maxOfAge=[human valueForKeyPath:@"children.@max.age"];//计算children中所有对象年龄最大的
- NSNumber *minOfAge=[human valueForKeyPath:@"children.@min.age"];//计算children中所有对象年龄最小的
- NSNumber *avgOfAge=[human valueForKeyPath:@"children.@avg.age"];//计算children中所有对象年龄的平均数
- //@是运算符的
- NSLog(@"children中有%@个元素,年龄和为%@,最大年龄为%@,最小年龄为%@,平均年龄为%@",count,sumOfAge,maxOfAge,minOfAge,avgOfAge);
- }
- return 0;
- }
2012-03-20 19:48:23.574 kvc[2996:403] children中有2个元素,年龄和为15,最大年龄为10,最小年龄为5,平均年龄为7.5
转自holydancer的CSDN专栏,原文地址:http://blog.csdn.net/holydancer/article/details/7366373
- objective-c中的正式协议 protocol(十一)
- objective-c中的正式协议 protocol(十一)
- objective-c中的正式协议 protocol
- Objective-C中的协议Protocol
- Objective-C 协议(protocol)
- Objective-C 协议(protocol)
- Objective-C 协议(protocol)
- Objective-C 协议(protocol)
- Objective-C 协议(protocol)
- Objective-C 协议(protocol)
- Objective-C中的协议(protocol)与委托
- 浅析Objective-C中的Protocol协议
- Objective-C(八、正式协议Protocol,非正式协议informal protocol)——iOS开发基础
- Objective-c 协议(protocol)
- Objective C 协议(Protocol)
- Objective-C 协议 protocol
- object-c 正式协议 protocol
- objective c学习:协议(protocol)
- 定制office2007静默安装版
- 解决eclipse打开出现Failed to create the java virtual machine
- 梯度下降法三
- JIRA+Confluence 安装(整合安装)[转帖]
- Windows server 2003 蓝屏 debug 结果“Probably caused by : netbt.sys”
- objective-c中的正式协议 protocol(十一)
- 【木头Cocos2d-x 022】状态机篇(第01章) --花5分钟告诉你什么是有限状态机
- Tim Yang:后端技术这一年
- ci基础知识总汇(持续更新)
- POI 的demo在Apache的存放位置
- 你所不知道的水军:有人当借口有人当枪手
- SharePoint 2013 设置搜索建议(智能提示query suggestions )
- Linux下Yum的使用
- objective-c中使用cocoa的NSPredicate,谓词(十四)