Python集成开发环境(eclipse+pydev)遇到的问题
来源:互联网 发布:杭州友谦网络 编辑:程序博客网 时间:2024/05/17 22:39
python 自己有集成的开发环境,但是觉得打开python 文件很不方便。于是使用 eclipse+pydev。
我的环境是 win 7 64bit 的。
网上有篇文章 详细介绍了 “how to configure eclipse for python", 很详细,具体,本文结尾处有转载。
web: http://www.rose-hulman.edu/class/csse/resources/Eclipse/eclipse-python-configuration.htm
我在安装 eclipse时与遇到的问题:
1. 从eclipse 官网 下载 64bit 的 classic eclipse. web: http://www.eclipse.org/downloads/
2. 从 orancle 官网下载 Java SDK for windows 64bit,这个一定要和 host OS 的匹配,从网上查找到很多人遇到了是由于 JDK位数与 host OS 位数不同照成的各种问题。
web: http://www.oracle.com/technetwork/java/javase/downloads/jdk7-downloads-1880260.html
这里选择 windows x64.
3. 配置java 环境,如果配置成功的在 cmd 终端输入 java -version 及 javac 命令都有关于 java 版本号及 javac 的usage 信息出来
在 window 的系统环境变量里配置 java 环境:
JAVA_HOME E:\Program Files (x86)\Java_64bit (jdk 安装的根目录)
CLASSPATH .;%JAVA_HOME%\lib;%JAVA_HOME%\lib\dt.jar;%JAVA_HOME%\lib\tools.jar (注意里面有当前目录)
PATH 增加 %JAVA_HOME%\bin
4. 修改eclipse的配置文件, 启动 eclipse
如果eclipse 启动失败,可能是要修改 eclipse 安装根目录下的配置文件要修改:
指定 vm option 为:
-vmC:\Java\JDK\1.6\bin\javaw.exe
or
-vmC:\Development\Java\64bit\jdk1.7.0_09\jre\bin\server\jvm.dll
详见: http://wiki.eclipse.org/Eclipse.ini#-vm_value:_Windows_Example
eclipse.ini
Contents
[hide]- 1 Overview
- 2 Specifying the JVM
- 2.1 -vm value: Windows Example
- 2.2 -vm value: Linux Example
- 2.3 -vm value: Mac OS X Example
- 3 See Also
Overview
Eclipse startup is controlled by the options in $ECLIPSE_HOME/eclipse.ini. If $ECLIPSE_HOME is not defined, the default eclipse.ini in your Eclipse installation directory (or in the case of Mac, the Eclipse.app/Contents/MacOS directory) is used.
eclipse.ini is a text file containing command-line options that are added to the command line used when Eclipse is started up. There are many options available, please see here.
Important:
- Each option and each argument to an option must be on its own line.
- All lines after
-vmargsare passed as arguments to the JVM, so all arguments and options for eclipse must be specified before-vmargs(just like when you use arguments on the command-line) - Any use of
-vmargson the command-line replaces all-vmargssettings in the .ini file unless--launcher.appendVmargsis specified either in the .ini file or on the command-line. (doc)
By default, eclipse.ini looks something like this (the exact contents will vary based on operating system and which Eclipse package you have):
-startup../../../plugins/org.eclipse.equinox.launcher_1.2.0.v20110502.jar--launcher.library../../../plugins/org.eclipse.equinox.launcher.cocoa.macosx.x86_64_1.1.100.v20110502-productorg.eclipse.epp.package.jee.product--launcher.defaultActionopenFile-showsplashorg.eclipse.platform--launcher.XXMaxPermSize256m--launcher.defaultActionopenFile-vmargs-Dosgi.requiredJavaVersion=1.5-XX:MaxPermSize=256m-Xms40m-Xmx512m
Among other things, this sets the heap space to 40MB initially and a maximum of 512MB, and also specifies a maximum PermGen size of 256MB. A max heap of 512MB might be OK for some users, but it's often necessary to bump that value up for large project sets or when some third-party plugins are installed.
Specifying the JVM
One of the most recommended options to use is to specify a specific JVM for Eclipse to run on. Doing this ensures that you are absolutely certainwhich JVM Eclipse will run in and insulates you from system changes that can alter the "default" JVM for your system. Many a user has been tripped up because they thought they knew what JVM would be used by default, but they thought wrong. eclipse.ini lets you be CERTAIN.
The following examples of eclipse.ini demonstrate correct usage of the -vm option.
Note the format of the -vm option - it is important to be exact:
- The -vm option and its value (the path) must be on separate lines.
- The value must be the full absolute or relative path to the Java executable, not just to the Java home directory.
- The -vm option must occur before the -vmargs option, since everything after -vmargs is passed directly to the JVM.
Here is an example of what eclipse.ini might look like on a Windows system after you've added the -vm argument and increased the maximum heap space:
-startupplugins/org.eclipse.equinox.launcher_1.2.0.v20110502.jar--launcher.libraryplugins/org.eclipse.equinox.launcher.win32.win32.x86_1.1.100.v20110502-productorg.eclipse.epp.package.java.product--launcher.defaultActionopenFile--launcher.XXMaxPermSize256M-showsplashorg.eclipse.platform--launcher.XXMaxPermSize256m--launcher.defaultActionopenFile-vmC:\Java\JDK\1.6\bin\javaw.exe-vmargs-Dosgi.requiredJavaVersion=1.5-Xms40m-Xmx1024m
Remember that the exact values will differ slightly depending on operating system and Eclipse package.
-vm value: Windows Example
This is how the -vm argument might look on Windows (your exact path to javaw.exe could be different, of course):
-vmC:\Java\JDK\1.6\bin\javaw.exe
This might not work on all systems. If you encounter "Java was started but returned exit code=1" error while starting the eclipse, modify the -vmargument to point to jvm.dll (exact path could be different):
-vmC:\Development\Java\64bit\jdk1.7.0_09\jre\bin\server\jvm.dll
-vm value: Linux Example
This is how the -vm argument might look on Linux (your exact path to javacould be different, of course):
-vm/opt/sun-jdk-1.6.0.02/bin/java
-vm value: Mac OS X Example
On a Mac OS X system, you can find eclipse.ini by right-clicking (or Ctrl+click) on the Eclipse executable in Finder, choose Show Package Contents, and then locate eclipse.ini in the MacOS folder under Contents.
To specify Java 6 for OS X:
-vm/System/Library/Frameworks/JavaVM.framework/Versions/1.6.0/Home/bin/java
这里也备份下 ”how to configure eclipse for python “ 全文。
http://www.rose-hulman.edu/class/csse/resources/Eclipse/eclipse-python-configuration.htm
Install the PyDev plug-in for Eclipse
Launch Eclipse
Launch Eclipse. A screen like this should appear, where you can choose which workspace to open. (If not, go to
File → Switch Workspace → Other)- Screenshots read 'Python 3.1', which is the old version. You will be installing Python 3.2.
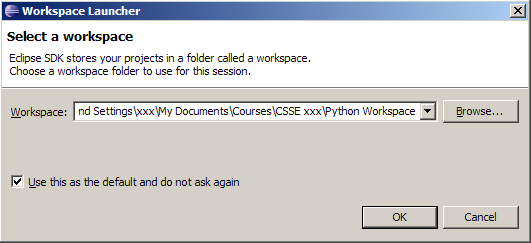
Browse the csse120 folder which you created when installing Eclipse. Select "Use this as the default and do not ask again".
If you do, Eclipse will automatically use this workspace next time you open Eclipse. If you want to change the workspace later you can always go to File → Switch Workspace... to be sent back to the Workspace Launcher window.
You should now see Eclipse's Welcome screen:

Click on the arrow on the right to go to the workbench.

This is where you'll do most of your work in Eclipse.
Download PyDev from within Eclipse
- Go to Help → Install New Software
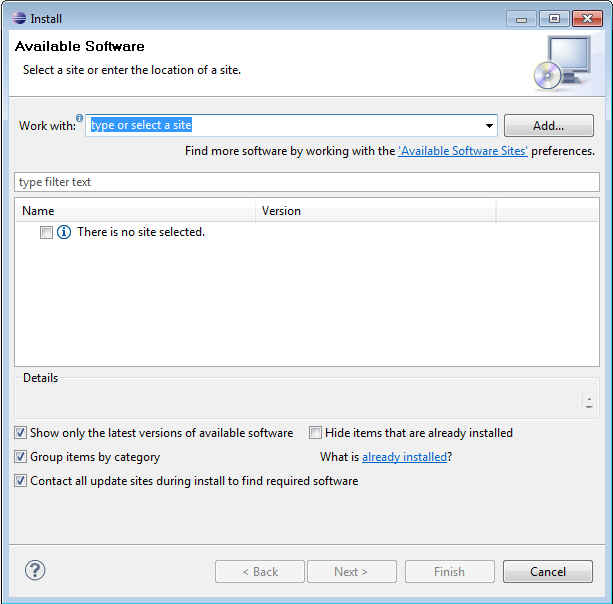
Enter http://pydev.org/updates in the Work with: field.
After several seconds, two options should appear. Select the PyDev for Eclipse option. Do not select the "PyDev Mylyn Integration" flag.

- Click "Next" and "OK" to continue installing PyDev.
- Select "I accept the terms of the license agreement", then click "Finish". The installer will begin to download the plug-in.
- Note: When you see the Selection Needed dialog box, you must manually check the box before pressing okay. If you do not, it appears that the installation is continuing, but it is not. You must uninstall PyDev, then reinstall.

- A security warning may appear asking whether you trust the software being installed- click "ok", then ensure the correct items are selected and click yes. The instillation process will continue.
- When the installation is complete, you will be asked if you want to restart Eclipse. Select "Yes". You may see a Subclipse Usage dialog, just uncheck the box and continue.
- Go to Help → Install New Software
Configure PyDev
- Python must be installed to configure PyDev.
Go to Window → Preferences. In the Preferences window, expand PyDev and select Interpreter-Python.
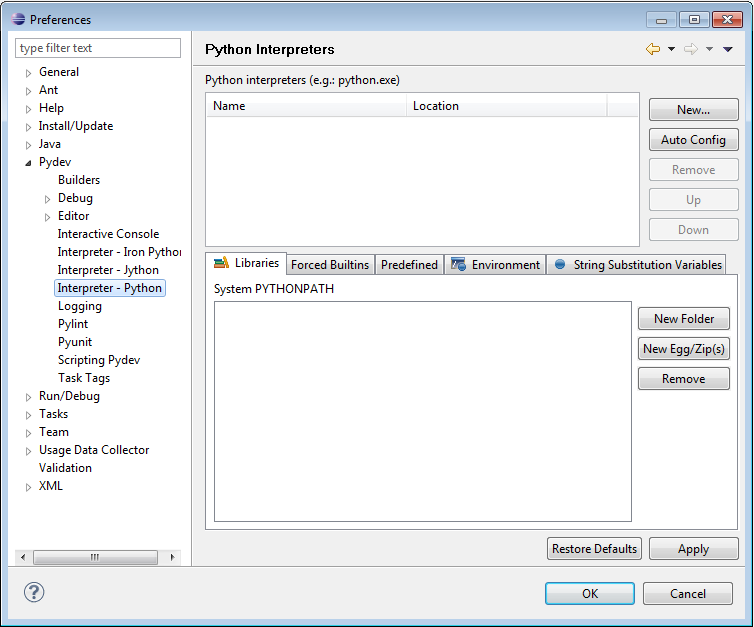
Click "New..." and type Python32 for the Interpreter name. For the Interpreter executable, browse to your copy of Python (C:\Program Files\Python32\python.exe), and press Open.
Click "OK" and the Selection Needed Window will appear.
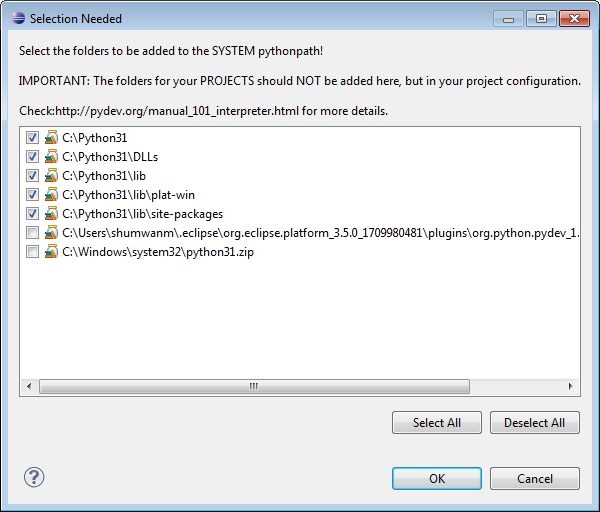
- Select all but the PySrc and python32.zip and click OK as many times as necessary to exit the preferences. The default selection should be fine.
- The Interpreter is now set up so that the code you write can be interpreted for the computer to run. You are now ready to start running code.
Installing Eclipse Preferences for Python
Download the Eclipse Preferences
Unzip this Preferences for csse120 file, placing its sole unzipped file (EclipsePreference-2011-06.epf) in any convenient location (your desktop, My Documents folder, etc).
Import the Preferences
Launch Eclipse.
If Eclipse offers to Select a Workspace, browse to C:\EclipseWorkspace\csse120.
If the csse 120 workspace does not appear automatically, choose File → Switch Workspace → Other, and click Next.
Now you are ready to set the preferences for the workspace:
Choose File → Import
In the Import dialog box, select General → Preferences and click Next.
When the Import Preferences dialog opens, select Browse and find the EclipsePreferences-2011-06.epf file that you unzipped and saved above.
Back in the Import Preferences dialog, check Import All, then select Finish.
As before, if the Subclipse Usage dialog makes an appearance, uncheck the box and continue.
Confirm that the installation did not leave behind unintended files by checking if there is:
random .eclipse folder anywhere, possibly in the folder immediately above My Documents.
Any extra users (for example, the installer), in C:\Users
Extra Eclipse workspaces anywhere except for the folders inside C:\EclipseWorkspaces.
Writing Your First Python Program
Switch to the Python perspective
Go to Window → Open Perspective → Other and choose PyDev, then click OK. If you look at the upper right corner you will see that the perspective has changed from "Java" to "PyDev".
Perspectives are designed to have the most useful tools within reach for whatever task you are doing (for example writing Java code or writing Python code). If you look in theFile→ New menu you will see that there are different options with the different perspective.
PyDev Perspective Java Perspective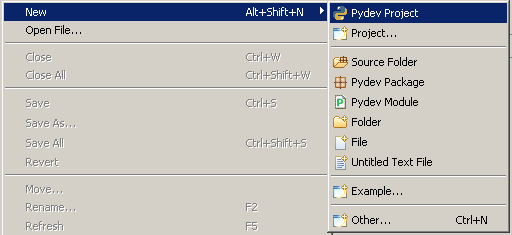

As you can see, perspectives greatly affect the look of the Eclipse program.
Create a new project
- Go to File → New → PyDev Project to start a wizard.
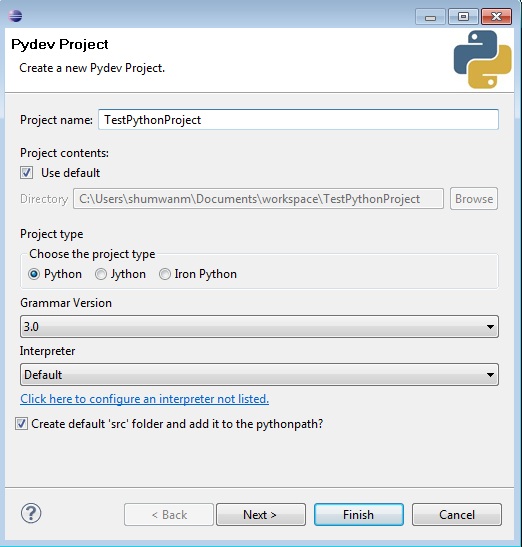
In the next window that appears, enter the name of your project and select "python" and 3.0"; as the type. Make sure "create default 'src' folder and add it to the pythonpath?" is selected. Click Finish.
If you look at the upper left corner of the workspace (in the Package Explorer view), you should now see your newly created project with a "src" folder inside.

Create a new module
Select the project you just created and go to File → New → PyDev Module. This will launch a new PyDev Module Wizard where you should enter a name for your module and make sure it is in the right location. Leave the Package field blank and select Finish.

Look in the Package Explorer view and you will see an icon of your new file inside the src folder, which Eclipse created when you made the new project before.

The file should be opened in the open space in the center of the workspace-the Editor view. (If not, right click on the greeting.py icon and select Open.) You will see a tab with the name of your file.

Write and run the program
Here's a program to greet the world. Simply type
print('Hello, World!')into the file. You may remove the default doc comment or leave it there; Python ignores it.
Right click on the file and select Save (or press Ctrl+S) to save the file.
- Finally, choose the greeting.py icon, and go to Run → Run As → Python Run to run your program.
(A quicker alternative is to right-click on the greeting.py icon, and select Run As → Python Run, or press Ctrl+F11.)

Look at the bottom of your screen at the Console view and you will see the message you told the computer to print.

Congratulations! You have written your first program with Python.
Configure PyDev for Productivity
Add line numbers
- Add line numbers by right-clicking in the margin at the left side of the code view and click on Show Line Numbers.
Change the comment color to one you can read more easily
- Go to Window → Preferences. Open PyDev and select Editors (actually click on 'Editors', don't just expand it). In the Appearance Color Options dropdown menu, select Comments. Then change it to a brighter color (perhaps fuchsia?).
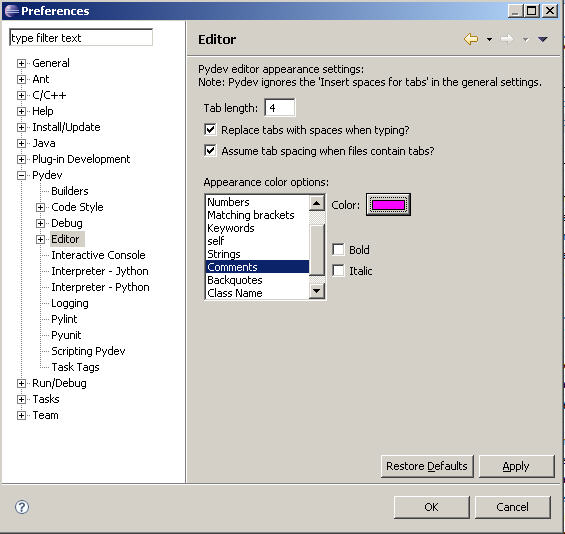
- Go to Window → Preferences. Open PyDev and select Editors (actually click on 'Editors', don't just expand it). In the Appearance Color Options dropdown menu, select Comments. Then change it to a brighter color (perhaps fuchsia?).
Turn on Task view to show TODO: items and add a CONSIDER: tag
- Go to Window → Show View → Tasks.
- Window → Preferences → PyDev → Task Tags, and add CONSIDER: to the end of the list.
- To get the task tags to show, run the program once, or select Project → Clean
- Python集成开发环境(eclipse+pydev)遇到的问题
- Python集成开发环境(Eclipse+Pydev)
- Python集成开发环境(Eclipse + Pydev)
- mac 配置Python集成开发环境(Eclipse +Python+Pydev)
- Eclipse+Pydev构建Python的开发环境
- [Python]集成开发环境PyDev for Eclipse的安装与使用
- python开发环境:eclipse + pydev
- Eclipse+Pydev开发环境 Python
- Python开发环境(Eclipse +Pydev+Python)
- 搭建Python的Eclipse开发环境之安装PyDev插件
- 离线配置Eclipse+PyDev的Python开发环境
- Eclipse搭建python的开发环境(pyDev)附小案例
- eclipse+pydev搭建python开发环境
- pydev 使用Eclipse搭建python开发环境
- 搭建python开发环境(eclipse+pydev)
- Eclipse+PyDev离线配置Python开发环境
- PyDev+Eclipse环境搭建python开发
- Eclipse +PyDev搭建python开发环境
- 碰撞事件对应捕捉与处理实例
- 计算机SAP-1 设计与实现(1)
- 开源 免费 java CMS - FreeCMS-功能说明-信息管理
- 给软件开发初学者 c++
- SQL 执行顺序和性能优化
- Python集成开发环境(eclipse+pydev)遇到的问题
- Linux系统目录结构
- 用Java写算法技巧(1)去掉List中的重复对象
- MPMoviePlayerController 获取视频缓冲大小
- Android 中LayoutInflater的使用!
- javascript 评分控件(鼠标滑动)
- iframe的跳转方法
- JAVA虚拟机内存分配原则
- mini2440之PWM混杂驱动分析