Core Text Tutorial
来源:互联网 发布:软件qq音乐 编辑:程序博客网 时间:2024/05/16 14:08
http://invasivecode.tumblr.com/core-text至今为止看到的Coretext最全面的一篇文章
Core Text Tutorial
Author: Eva Diaz-Santana @evdiasan
Introduction
As promised in one of the previous articles on Core Graphics, I want to talk about the wonderful Core Text. Consider the topic as a followup of the previous articles on Core Graphics. If you are new and would rather start with Core Graphics first, you can do so here. And for all, enjoy!
When I first learned Core Text, I thought it was such a great and powerful technology that I was convinced it was already used in many different applications. Unfortunately, I was wrong. And more, I was astonished when I found out that the digital press industry that should be taking the most of it was hardly using it. So, after reviewing the current world press applications published in the AppStore, I started to believe that only a small bunch of people understood the potential of Core Text. Magazines as Wired, newspapers as El Mundo or the so discussed The Daily are not great at all. I mean, there is such a poor design work behind these and other newspapers and magazines that it’s sad to believe how so many designers, creatives and experts cannnot put together something “usable”. Yes, because this is the main problem. A PDF reader is too far away from what a well done iPad or iPhone application can provide.
When the iPad appeared on the market, the press industry started to criticize saying that it wouldn’t have any impact on them. They could not be more wrong. After a while, the press industry realized that the iPad could be the solution to their current crisis: people prefer to read the news in the Internet for free more than in a newspaper. So, the iPad represented the answer to the problem and they began to launch the digital editions of their magazines just to have some presence in this market, just in case. But, the easiest thing to do was simply to copy what others had already done: scan the paper magazine pages and, voilà, the digital version of the magazine was ready to go.
Publishers haven’t understood the real truth: the iPad is a completely new communication channel with lots of capabilities and, as every new technology, it deserves a little bit of research and a hint of creativity. However, under the digital rush to the iPad, we’ve seen terrible mistakes: 500 MB magazines that are so slow and heavy to download, very slow and completely unintuitive user interfaces and, in some of them the simple page zoom is not allowed, and the icing on the cake, newspapers created exclusively for the iPad… But what does it exactly mean? Well, it only means that they do not print on paper, while the rest is just another “old-fashion digitized newspaper” and you can consider yourself lucky if the app does not crash in the middle of your reading.
I don’t really understand why many publishers keep investing so little or so badly in technology to come up with the umpteenth digital publication of a newspaper. What I really wanted to say is that to create a great iPad or iPhone app, the developer has to use the best possible technology and for magazines and newspapers, they should consider seriously Core Text.
Core Text is a C-based API available iOS from version 3.2 designed to ease the handling of advance text layout and font rendering requirements. If you are already familiar with OS X, you may know that it has been part of this OS for years. So, we are not talking about a completely new API.
The Core Text framework is a low-level technology which Apple defines as a text drawing engine. Core Text is not meant to replace the Cocoa text system. If you can deal with high-level constructs, you’d better use Cocoa. So, for example, if you need to display small amounts of text, just use UITextField. If you need to display a larger text, use UITextView. You don’t need much code and is easier to implement.
At this point, you could ask me: “Hey, wait a second! Why should I use Core Text for, if Cocoa offers me plenty of easier solutions to handle text?”. Well, you should be using Core Text, if you need to render text in a very special way (for example, around or inside a shape) or to import your fonts or if you want to draw mixed-style text. You should also consider using Core Text, when you want to display web content and the UIWebView class is a real limitation of what you want to achieve.
In those cases, you will need to dig into the Core Text framework and that’s exactly what I want to show you here. Core Text provides different levels of usage, meaning that it comes with high-level objects, which allow you to draw simple things in an easy way, but it has also low-level objects, which allow you to draw complex text composition and are harder to use.
1. Jumping on it
So, let’s start with the simplest one, which lets you draw individual text lines. To accomplish this, you have to create an attributed string and then just draw the line in the context. An attributed string consists of a string and some metadata describing formatting attributes for portions of the string. In the iOS, attributed strings are represented by the Objective-C class NSAttributedString and the Core Foundation type CFAttributedStringRef. These are toll-free bridged to one another, so you can use them interchangeably.
You will need to create a dictionary to store the attributes you want to apply to the string and then, combine the dictionary with a string generating aNSAttributedString.
Here the steps:
- Launch Xcode and create a new view-based iPad project. Name it FunnyText.
- Add the Core Text framework to your project.
- Import the Core Text header in this view controller.
Open the FunnyTextViewController.xib and change the Class Name of the View object to CustomView.
Go back to Xcode and generate an Objective-C class, subclass of UIView and name itCustom View. In this way, the view of the view controller FunnyTextViewController is your custom view and you can now use Core Graphics to render what you need (in this case a simple line). Import the Core Text header in this class:
#import <CoreText/CoreText.h>In the CustomView class, create an outlet and its property for an NSAttributedString *attString. Don’t forget to synthesize it. Then, in the CustomView.m edit thedrawRect: method as follows:
[super drawRect:rect];CGContextRef context = UIGraphicsGetCurrentContext(); // 1-1// Flip the coordinate systemCGContextSetTextMatrix(context, CGAffineTransformIdentity); // 2-1CGContextTranslateCTM(context, 0, self.bounds.size.height); // 3-1CGContextScaleCTM(context, 1.0, -1.0); // 4-1CTLineRef line = CTLineCreateWithAttributedString((CFAttributedStringRef)attString); // 5-1// Set text position and draw the line into the graphic contextCGContextSetTextPosition(context, 30.0, 500.0); // 6-1CTLineDraw(line, context); // 7-1CFRelease(line); // 8-1Here, we call the drawRect: on the super class to let it do all the setups. Then, we get a reference to the current graphic context to draw a line on which the text will be displayed.
Now, it is important to know that CoreText uses a reference coordinate system with the origin on the lower-left corner of the screen with the x growing from left to right and the y growing from bottom to top. So, if we just draw some text, it will appear upside down. To avoid that, we need to reverse the coordinate system. This is accomplished by the transformation generated by the lines 2-1, 3-1 and 4-1.
Line 5-1 creates a text line from the attributed string that we will create later. Line 6-1 fixes the text position and finally, we draw the text line and release it.
Now, go to the FunnyTextViewController.m and import the CustomView header:
#import "CustomView.h"Modify the -viewDidLoad method as follows:
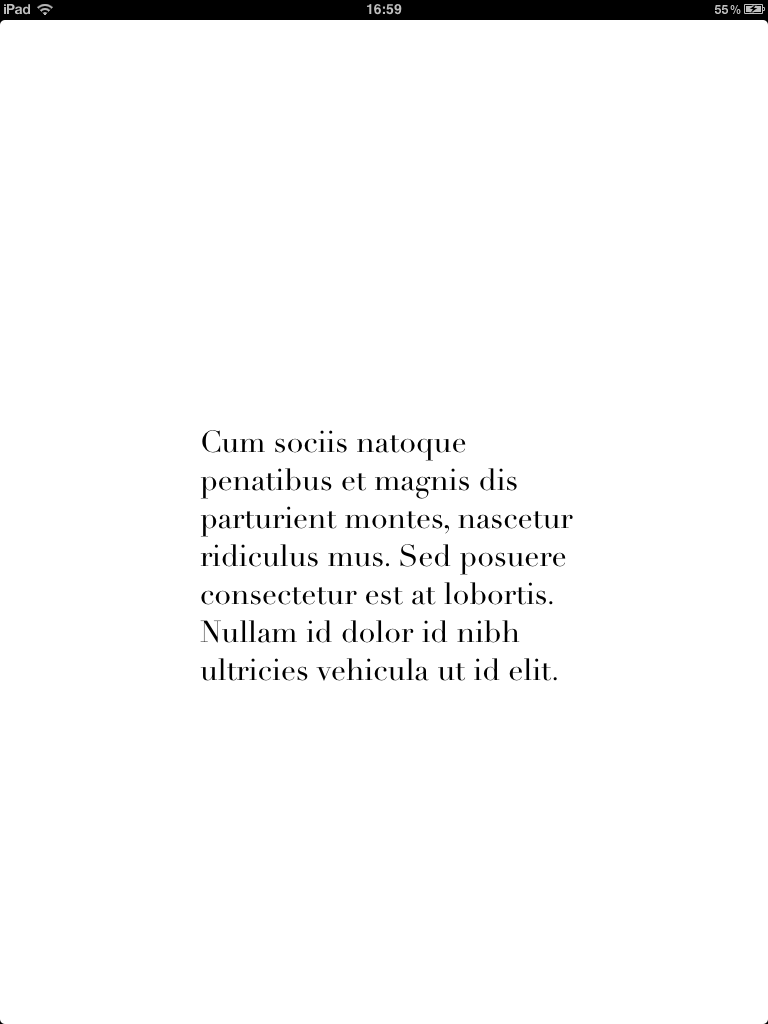
[super viewDidLoad];CTFontRef fontRef = CTFontCreateWithName((CFStringRef)@"Chalkduster", 36.0f, NULL); // 9-1NSDictionary *attrDictionary = [NSDictionary dictionaryWithObjectsAndKeys:(id)fontRef, (NSString *)kCTFontAttributeName, (id)[[UIColor blueColor] CGColor], (NSString *)(kCTForegroundColorAttributeName), (id)[[UIColor redColor] CGColor], (NSString *) kCTStrokeColorAttributeName, (id)[NSNumber numberWithFloat:-3.0], (NSString *)kCTStrokeWidthAttributeName, nil]; // 10-1CFRelease(fontRef); // 11-1NSAttributedString *attString = [[NSAttributedString alloc] initWithString:@"Everybody loves iNVASIVECODE!" attributes:attrDictionary]; // 12-1[(CustomView *)[self view] setAttString:attString]; // 13-1[attString release]; // 14-1Here, we first create a reference to a font. We used the Chalkduster with size 36.0.
Now, we need to create the attributed string. First, we create a dictionary of attributes (Line 10-1). In this particular case, we set the font, the text color, the stroke color and the stroke width. Notice that the stroke width should be negative for stroke and fill and positive only for stroke. Check the Core Text String Attribute Reference, if you want to apply additional customizations. Finally, we apply the attributes to the string using the initWithString:attributes: method (Line 12-1).
Line 13-1 passes the created attributed string to the custom view and line 14-1 releases the attributed string, since we created with a alloc/init pattern.
Wonderful, we are done. Now, just build and go and if you did not make any mistake you should see the following result:

2. Writing on shapes
In the previous chapter, you saw how to create a NSAttributedString object, which is a string with a set of attributes, and draw it in a graphic context. You also noticed that the used method was limited to draw only one text line each time and, depending on the length of the text line, the text could draw outside the graphic context. So, how do we deal with a long text? That’s exactly what we are going to explore here: we are going to draw multiple lines in our graphic context.
Core Text allows you to draw a multi-line paragraph within an arbitrarily sized rectangular area very easily. You have to define again an attributed text string and a rectangle to provide the display area in the current graphic context.
Start a new view-based iPad project and follow the steps described in the previous chapter. The difference is represented by few lines of code we are going to see now.
CUSTOM DRAWING
In the drawRect: method, you get a reference to the current graphic context using the UIGraphicsGetCurrentContext function. Then, you reverse the coordinate system to avoid the text to appear upside down (Lines 1-1 to 4-1 from Part 1 remain the same). After that, replace the rest of the code with the following lines of code:
CGMutablePathRef path = CGPathCreateMutable(); // 5-2CGPathAddRect(path, NULL, CGRectMake(200.0, 300.0, 400.0, 600.0)); // 6-2Here, I just created a mutable path (a rectangle). We need this to define the text frame. Additionally, we need to create a framesetter that uses the attributed string and the path to generate the text frame.
CTFramesetterRef framesetter = CTFramesetterCreateWithAttributedString((CFAttributedStringRef)attString); // 7-2CTFrameRef theFrame = CTFramesetterCreateFrame(framesetter, CFRangeMake(0, [attString length]), path, NULL); // 8-2CFRelease(framesetter); // 9-2CFRelease(path); // 10-2Finally, we draw the text:
CTFrameDraw(theFrame, context); // 11-2CFRelease(theFrame); // 12-2Remember to release all the objects allocated in memory (Lines 9-2, 10-2 and 12-2).
Now, a CTFramesetter is used to generate a text frame. It takes the attributed string object and a shape descriptor object and calls into the typesetter to create line objects that fill that shape. The output is a CTFrame object containing an array of lines. The frame can then draw itself directly into the current graphic context.
IN THE VIEW CONTROLLER
In this viewDidLoad method, we are going to create the attributed string as we did in Core Text Part I. The steps are exactly the same, but I am going to modify a few things:
- To give a sense to this example, you need a long text. Just, copy some text from somewhere. Instead, I used a small Mac OS application named LittleIpsum, which is a Latin Generator Software and works really great for this.
- I changed the attributes associated to the string. I want to use a simpler layout and I like to play with different fonts and sizes.
Let’s write the dictionary containing the attributes, since that’s essentially the only thing that is going to change. The font used is Didot and the size is 30.0f:
CTFontRef fontRef = CTFontCreateWithName((CFStringRef)@"Didot", 30.0f, NULL); // 1-2NSDictionary *attrDictionary = [NSDictionary dictionaryWithObjectsAndKeys: (id)fontRef, (NSString *)kCTFontAttributeName, (id)[[UIColor blackColor] CGColor], (NSString *)(kCTForegroundColorAttributeName), nil]; // 2-2CFRelease(fontRef); // 3-2Then, apply the attributes to the string using the initWithString:attributes:method (Line 12-1 from Part 1), where you should replace the existing text by a longer text. Line 13-1 from Part I passes the created attributed string to the custom view and line 14-1 from Part I releases the attributed string, since we created with a +alloc/-init pattern.
That’s it. Just build and you should see the following result:
I’m guessing that at this point you are not impressed. I know you are thinking: “We wrote a lot of code to obtain something so relatively simple?”. However, do not underestimate this exercise, because with the basic knowledge you acquired and some creativity from your side, you are ready to create things like the ones I’m going to show you here.
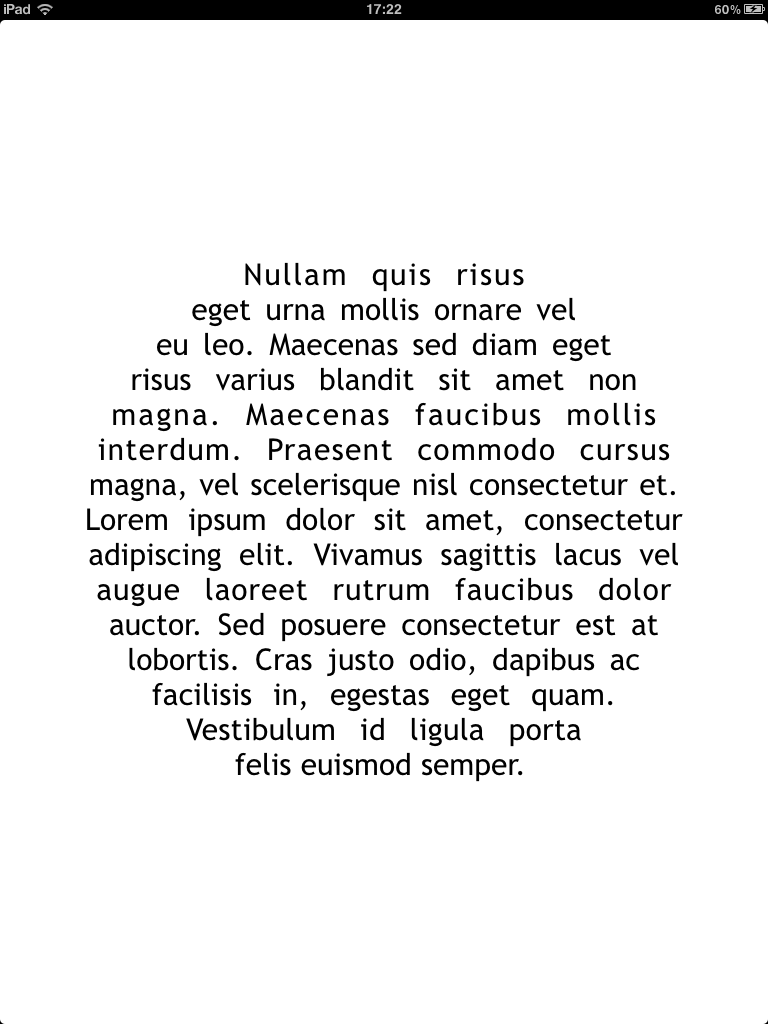
Here, the rectangle was replaced by a circle. Very easy, right? Just append a circle to the mutable graphic path, instead of a rectangle and you are done!
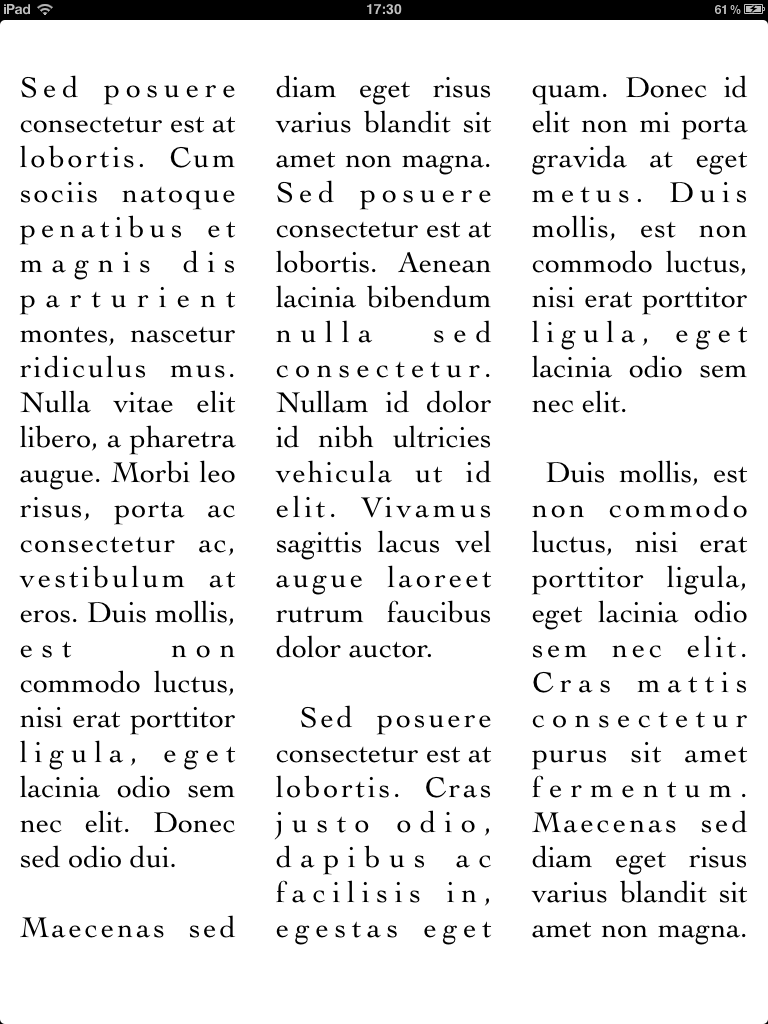
In the next pictures, I defined multiple rectangles to create the well-known newspaper column layout, with as many columns as you like. Note the text is justified.

3. Details in the text
I’m sure you have noticed that in all our examples we have been using a single set of attributes for the whole text, so all the text contained in the shape defined by theCGPath had the same font and color. What happens when we need to edit rich text inside the CGPath? I’m going to show you how you can mix and match fonts and colors!
Open again the Xcode project previously created. Now, we want to create different groups of attributes (font, color, etc.) in the viewDidLoad method in your view controller. Modify that method as follows (see in bold the modifications to the existing method):
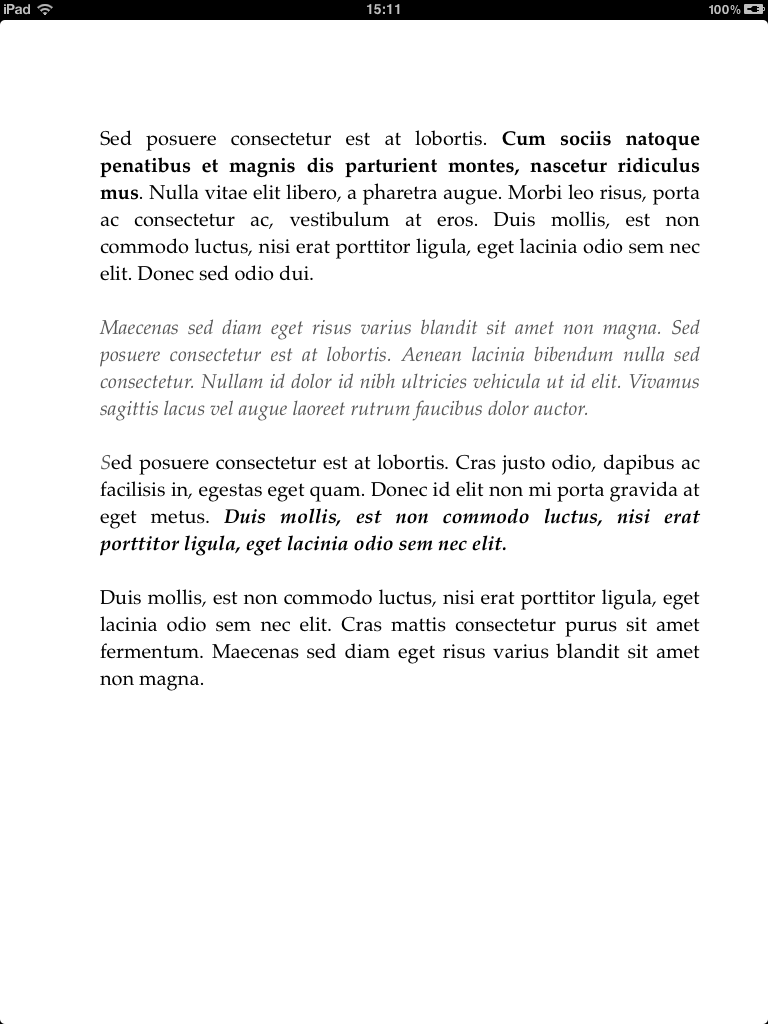
[super viewDidLoad];CTFontRef fontRef = CTFontCreateWithName((CFStringRef)@"Palatino", 20.0f, NULL); // 1-3NSDictionary *attrDictionary = [NSDictionary dictionaryWithObjectsAndKeys:(id)fontRef, (NSString *)kCTFontAttributeName, (id)[[UIColor blackColor] CGColor], (NSString *)(kCTForegroundColorAttributeName), nil];CFRelease(fontRef);NSAttributedString *attString = [[NSAttributedString alloc] initWithString:@"Sed posuere consectetur est at lobortis. Cum sociis natoque penatibus et magnis dis parturient montes, nascetur ridiculus mus. Nulla vitae elit libero, a pharetra augue. Morbi leo risus, porta ac consectetur ac, vestibulum at eros. Duis mollis, est non commodo luctus, nisi erat porttitor ligula, eget lacinia odio sem nec elit. Donec sed odio dui.\r\nMaecenas sed diam eget risus varius blandit sit amet non magna. Sed posuere consectetur est at lobortis. Aenean lacinia bibendum nulla sed consectetur. Nullam id dolor id nibh ultricies vehicula ut id elit. Vivamus sagittis lacus vel augue laoreet rutrum faucibus dolor auctor.\r\n Sed posuere consectetur est at lobortis. Cras justo odio, dapibus ac facilisis in, egestas eget quam. Donec id elit non mi porta gravida at eget metus. Duis mollis, est non commodo luctus, nisi erat porttitor ligula, eget lacinia odio sem nec elit.\r\n Duis mollis, est non commodo luctus, nisi erat porttitor ligula, eget lacinia odio sem nec elit. Cras mattis consectetur purus sit amet fermentum. Maecenas sed diam eget risus varius blandit sit amet non magna." attributes:attrDictionary]; // 2-3CTFontRef fontRefBold = CTFontCreateWithName((CFStringRef)@"Palatino-Bold", 20.0f, NULL); // 3-3NSDictionary *attrDictionaryBold = [NSDictionary dictionaryWithObjectsAndKeys:(id)fontRefBold, (NSString *)kCTFontAttributeName, (id)[[UIColor blackColor] CGColor], (NSString *)(kCTForegroundColorAttributeName), nil]; // 4-3[attString addAttributes:attrDictionaryBold range:NSMakeRange(40,85)]; // 5-3CFRelease(fontRefBold); // 6-3[(CustomView *)[self view] setAttString:attString];[attString release];Line 1-3 and 2-3 are modifications to the existing code. In those two line we are defining that a new font type and size, and we are increasing the length of text.
The following lines should look very familiar to you, because we are starting over the process of creating a reference to a font (“Palatino-Bold”) (Line 3-3) and creating a dictionary of attributes (Line 4-3).
Line 5-3 is what brings some novelty to our code, defining the range of characters inside the string where the new attributes should be applied. Let’s also change the dimensions of the rectangle that will contain our text. In the drawrect: method, change the dimensions as follows:
CGPathAddRect(path, NULL, CGRectmake(100.0, 300.0, 600.0, 600.0));Now, if you build and run, you should get something similar to the following result.
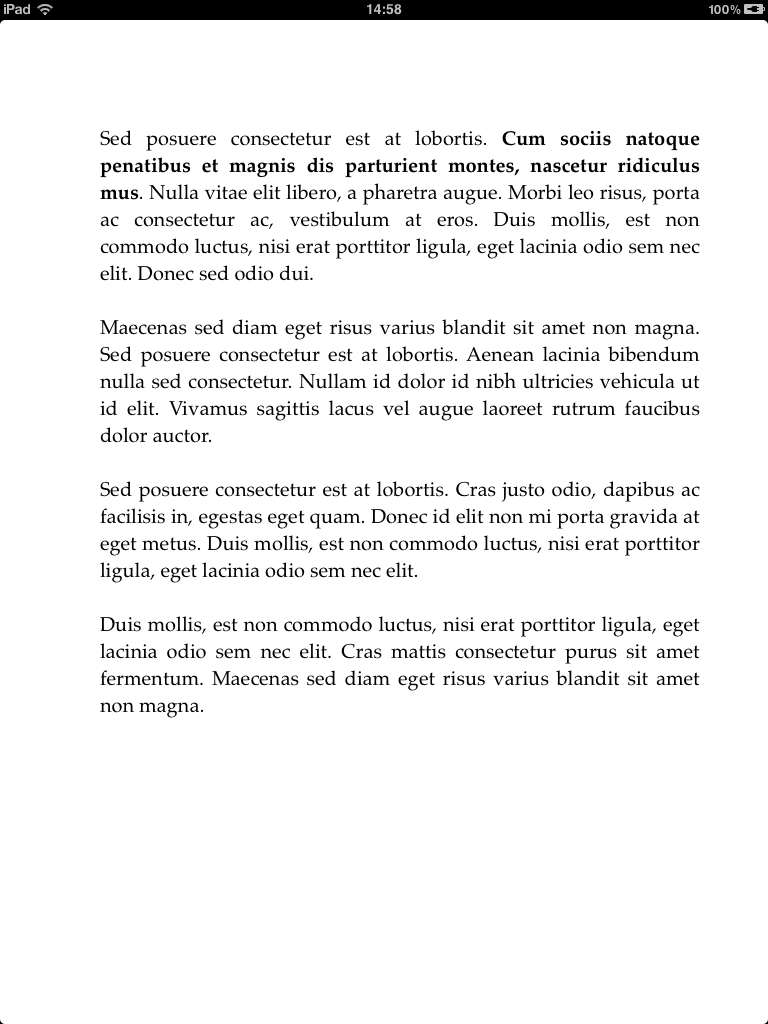
Note that you can repeat the code from lines 3-3 to 6-3 to add as many attributes as you like, creating results as shown below:

I would also like to point out that the method I have shown you is not very practical: counting characters is not something that can be done extensively. But what I have shown you is only one simple method. Depending on the data and how they are structured, you could think about applying other methods too. Take a look at the following method:
(void)appendAttributedString:(NSAttributedString *)attributedStringThis methods would allow to append attributed strings creating a single attributed string.
4. Rendering on a curved shape
Now, let’s explore how to draw our text on a curved shape.
Open the Xcode project created until now. As usual, we are going to modify the existing code, so that we don’t have to repeat the same steps. Let’s define the different attributes groups (font, color, etc.) in the viewDidLoad of the view controller.
Modify the viewDidLoad method as follows (see in bold the modifications to the existing method):
[super viewDidLoad];CTFontRef fontRef = CTFontCreateWithName((CFStringRef)@"Arial Rounded MT Bold", 125.0f, NULL); // 1-4NSDictionary *attrDictionary = [NSDictionary dictionaryWithObjectsAndKeys:(id)fontRef, (NSString *)kCTFontAttributeName, nil];CFRelease(fontRef);NSAttributedString *attString=[[NSAttributedString alloc] initWithString:@"iNVASIVECODE" attributes:attrDictionary]; // 2-4[(CustomView *)[self view] setAttString:attString];[attString release];Line 1-4 and 2-4 are modifications to the existing code. In those two lines, we are defining that a new font type and size, and we are increasing the length of text. Before we can go on, we have to clarify some concept that we are going to need later:
A character is the smallest unit of written language that carries meaning, e.g. uppercase A.
A glyph is a concrete form of a character. In our previous example, the character uppercase A can be drawn with a different size or a different stroke thickness. It can lean or be vertical, and have certain optional variations in form. The following figure represents glyphs of the character A:

Note that characters and glyphs do not have a one-to-one correspondence. In some cases, a character may be represented by multiple glyphs, such as an é, which may be an e glyph combined with an acute accent glyph ´ (accent). In other cases, a single glyph may represent multiple characters, as in the case of a ligature, or joined letter. The following figure represents the ligature case:

A glyph-run is a set of consecutive glyphs sharing the same attributes and direction.
Now, let’s go now to the drawrect: method, where we are going to draw our text along a semi-circle. Since there are many lines of code, I’m going to group them by task.
Line 3-4 calls the drawRect: on the super class to let it do all the setups. Then, line 4-4 gets a reference to the current graphic context. Lines 5-4 to 7-4 flip the coordinate system, so our text doesn’t appear upside down and finally, line 8-4 adds a rotation of 90 degrees counterclockwise.
[super drawRect:rect]; // 3-4CGContextRef context = UIGraphicsGetCurrentContext(); // 4-4CGContextSetTextMatrix(context, CGAffineTransformIdentity); // 5-4CGContextTranslateCTM(context, self.bounds.size.width/2, self.bounds.size.height/2); // 6-4CGContextScaleCTM(context, 1.0, -1.0); // 7-4CGContextRotateCTM(context, M_PI_2); // 8-4Line 9-4 creates a text line from the attributed string. Line 10-4 extracts the number of glyphs and line 11-4 the number of runs. At this point, you should already know the numbers that will come up. Try guessing and see if you understood the concepts previously explained (characters, glyphs and runs): how many glyphs and how many glyph-runs exist in the text “iNVASIVECODE”?
CTLineRef line = CTLineCreateWithAttributedString((CFAttributedStringRef)theString);// 9-4CFIndex glyphCount = CTLineGetGlyphCount(line); // 10-4CFArrayRef runArray = CTLineGetGlyphRuns(line);CFIndex runCount = CFArrayGetCount(runArray); // 11-4Now, we need to create an array to store the width of each glyph. Line 12-4 is where the array is created and then after running through the run glyphs, line 13-4 stores the different widths of each glyph.
NSMutableArray *widthArray = [[NSMutableArray alloc] init]; // 12-4CFIndex glyphOffset = 0;for (CFIndex i = 0; i < runCount; i++) { CTRunRef run = (CTRunRef)CFArrayGetValueAtIndex(runArray, i); CFIndex runGlyphCount = CTRunGetGlyphCount((CTRunRef)run); for (CFIndex runGlyphIndex = 0; runGlyphIndex < runGlyphCount; runGlyphIndex++) { NSNumber *widthValue = [NSNumber numberWithDouble:CTRunGetTypographicBounds((CTRunRef)run, CFRangeMake(runGlyphIndex, 1), NULL, NULL, NULL)]; [widthArray insertObject:widthValue atIndex:(runGlyphIndex + glyphOffset)]; // 13-4 } glyphOffset = runGlyphCount + 1;}We have to divide the length of the line where we are going to draw the text into slices. Each slice has to cover the distance from one glyph’s center to the next. In our case, we are going to store the angles of the semi-circle into an array. Line 14-4 creates a new array and line 15-4 stores the angles.
CGFloat lineLength = CTLineGetTypographicBounds(line, NULL, NULL, NULL);NSMutableArray *angleArray = [[NSMutableArray alloc] init]; // 14-4CGFloat prevHalfWidth = [[widthArray objectAtIndex:0] floatValue] / 2.0;NSNumber *angleValue = [NSNumber numberWithDouble:(prevHalfWidth / lineLength) * M_PI];[angleArray insertObject:angleValue atIndex:0];for (CFIndex lineGlyphIndex = 1; lineGlyphIndex < glyphCount; lineGlyphIndex++) { CGFloat halfWidth = [[widthArray objectAtIndex:lineGlyphIndex] floatValue] / 2.0; CGFloat prevCenterToCenter = prevHalfWidth + halfWidth; NSNumber *angleValue = [NSNumber numberWithDouble:(prevCenterToCenter / lineLength) * M_PI]; [angleArray insertObject:angleValue atIndex:lineGlyphIndex]; // 15-4 prevHalfWidth = halfWidth;}Let’s do the actual drawing. We have previously calculated the angle offset for each glyph relative to the previous glyph, so let’s draw them rotating the context in line 16-4 after each glyph so they appear spread along a semi-circular path. Line 17-4 centers this glyph by moving left by half its width and offset text position leftwards by this glyph’s width in preparation for the next glyph.
CGPoint textPosition = CGPointMake(0.0, 250.0);CGContextSetTextPosition(context, textPosition.x, textPosition.y);glyphOffset = 0;for (CFIndex runIndex = 0; runIndex < runCount; runIndex++) { CTRunRef run = (CTRunRef)CFArrayGetValueAtIndex(runArray, runIndex); CFIndex runGlyphCount = CTRunGetGlyphCount(run); CTFontRef runFont = CFDictionaryGetValue(CTRunGetAttributes(run), kCTFontAttributeName); for (CFIndex runGlyphIndex = 0; runGlyphIndex < runGlyphCount; runGlyphIndex++) { CFRange glyphRange = CFRangeMake(runGlyphIndex, 1); CGContextRotateCTM(context, -[[angleArray objectAtIndex:(runGlyphIndex + glyphOffset)] floatValue]); // 16-4 CGFloat glyphWidth = [[widthArray objectAtIndex:(runGlyphIndex + glyphOffset)] floatValue]; CGFloat halfGlyphWidth = glyphWidth / 2.0; CGPoint positionForThisGlyph = CGPointMake(textPosition.x - halfGlyphWidth, textPosition.y); // 17-4 textPosition.x -= glyphWidth; CGAffineTransform textMatrix = CTRunGetTextMatrix(run); textMatrix.tx = positionForThisGlyph.x; textMatrix.ty = positionForThisGlyph.y; CGContextSetTextMatrix(context, textMatrix); CGFontRef cgFont = CTFontCopyGraphicsFont(runFont, NULL); CGGlyph glyph; CGPoint position; CTRunGetGlyphs(run, glyphRange, &glyph); CTRunGetPositions(run, glyphRange, &position); CGContextSetFont(context, cgFont); CGContextSetFontSize(context, CTFontGetSize(runFont)); CGContextSetRGBFillColor(context, 0.9, 0.9, 0.9, 1.0); CGContextShowGlyphsAtPositions(context, &glyph, &position, 1); CFRelease(cgFont); } glyphOffset += runGlyphCount;}Don’t forget to release the objects.
CFRelease(line);[widthArray release];[angleArray release];Now, if you build and run, you should get something similar to the following result. I set a dark background view in IB. I thought it would look more cool!

I pulled out a screenshot with the glyphs bounding boxes…did you answered correctly to my previous questions? How many glyphs do you find in the text? Here they are:

And another screenshot with the bounding boxes defined by the line metrics.

Go ahead and play with all the parameters that we have set along the code. You can get results like the ones I’m showing you below.


- Core Text Tutorial
- Core Text Tutorial
- Core Text Tutorial
- Core Text Tutorial
- Core Text Tutorial for iOS: Making a Magazine App
- Core Text Tutorial for iOS: Making a Magazine App(中文)
- Core Text Tutorial for iOS: Making a Magazine App
- Core Text Tutorial for iOS: Making a Magazine App(中文)
- Core Text Tutorial for iOS: Making a Magazine App
- Core Text Tutorial for iOS: Making a Magazine App
- Core Text Tutorial for iOS: Making a Magazine App
- Core Text Tutorial for iOS : Making a Magazine App 翻译
- Core Text
- core text
- Core Text
- Core Text
- Core Text
- Core Text
- 派生类对象的构造
- 解释器对小int和很短的字符串的优化
- SQL逐行累加实现
- Hibernate 中 SessionFactory的创建
- /etc/passwd, /etc/group 文件格式
- Core Text Tutorial
- linux inetd
- BlackBerry 10官方支持JQuery Mobile
- Winform导入导出方法总结
- oracle11g导出DMP不能导空表解决方法
- Windows系统CPU内存网络性能统计第一篇 内存
- java实现单链表
- 几种点击连接时不出现虚边框的方法
- Android TextView的字符过滤功能