Try Magento on an Amazon EC2 Instance
来源:互联网 发布:北京凶宅数据库怎么查 编辑:程序博客网 时间:2024/05/22 06:23
Stop Press!
With the introduction of Amazon services local to us, we have created a new AMI - ami-1d45d227 - down here in Sydney, ap-southeast-2. This is a migration to a new, 64 bit platform, based on Amazon Linux 2012.09, using Percona Mysql 5.5, Nginx 1.2.5, PHP - fpm mode - 5.3.19 ( with APC opcode cacher ) as the core stack. It's running Magento 1.7.0.2 with the example store installed out of the box, and was last updated on the 10th December 2012. The rest *should* be as described below...
Overview
Although an impressively featured e-Commerce platform, Magento is extremely hard on the platform that it runs upon, making very heavy use of the database in particular. As such, it is best not to use shared hosting, where there are usually hundreds of websites running on a single server, but to run it on your own server instead. One simple way to do this is to grab yourself an account on Amazon Web Services ( http://aws.amazon.com ) and set yourself up with a virtual server to run it.
As Magento runs best on a LEMP ( Linux / Nginx / MySQL / PHP ) platform, this may require skills outside those that an e-shopkeeper would ever be expected to posess. To address this, we decided that it would be a good idea to make it as simple as possible by creating an image that you can start up and run with a single click ( well, almost! ).
Recommended tools:
For firefox users, elasticfox makes life a lot easier. I now use an updated version of elasticfox, as the original Amazon version doesn't seem to be maintained that well. For more details, go tohttp://www.eaglegenomics.com/wp-content/uploads/2011/06/elasticfox.xpi . I'll be using this tool throughout.
The quick(ish) version:
Before you get started, it's a good idea to set your Amazon account up ready so that you can see your site once it's up and running. It saves a lot of back and forth between different screens, and ensures the install runs smoothly.
Preparation
The Amazon Firewall
By default, this firewall blocks the outside world from seeing your instance. To ensure that we have all the basic abilities of the site available, you need to click on the “Security Groups” tab, and highlight the 'default group in the left column by clicking on it ( if it's the only group, then it will already be highlit ).NOTE: this example opens up the firewall to everyone. This may well not be what you require!!
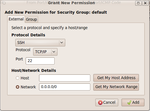
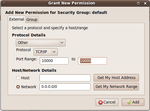
To enable ssh ( console ) access, click on the green tick to add permissions:
Note the 'network' radio button is pressed, and the 0.0.0.0/0 value added. This is 'everyone'. There are alternatives from just you all the way up to everyone, but describing them is outside the scope of this document.
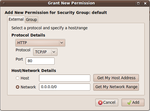
To enable web access use the dropdown menu in the “Protocol Details” field, and select the http option:
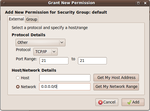
To enable ftp ( including passive ftp, which is used by default with clients such as “FileZilla” ), you need to enable 2 sets of permissions. Note this is made intentionally difficult as ftp is inherently insecure as it passes login credentials in clear text across the internet. If possible look at using sftp ( which uses the ssh port opened above ) instead.
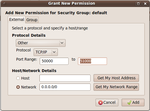
Finally, you need to open port 10000 to enable webmin dashboard access:
Whew!
Execution
We currently have Images available in ap-southeast-1 and us-east-1 that are ready to go ap-southeast-1 is getting a bit out of date as I've not received much interest at all, so look in US-East-1 ( as of 1/1/2012 the current image is ami-5d975634 for Magento 1.5.1.0, ami-3117d558 for 1.6.0.0, and ami-1518cc7c for 1.6.1.0 ). However, I'll use Singapore as the example as there are less matches to confuse the images.
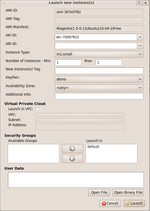
So, fire up elasticfox, click on the “Images” tab, and put magento into the select box:

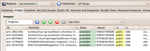
Here, our image Is ami-307e0762, last on the list - identified by our catchy ID of 859714128294. Click on the entry to highlight the row, then right click and select the “Launch” option from the menu that appears.
In the new window that appears, you only need to select the instance type ( we recommend s1.small if you're just getting familiar or setting up a small shop, or m1.medium if you need something larger ), and a keypair ( if you have none, click cancel, then use the “KeyPair” tab to the right of “Images” to create one – make sure you don't lose the accompanying file! - and then repeat the above process ), then hit “Launch”.
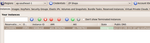
Next up, click on the 'Instances' tab. After a minute or so, the state of your Instance should change to “Running”,
Yahoo! It's running.
Connecting to your new server

Next up, it's time to actually use it... The easiest way to get started is to click on the “Instances” tab, then highlight the running instance and right click:

The View Details window will allow you to highlight and copy the 'Public DNS Name'.
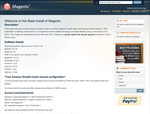
Next stop is to paste that hostname this into your browser, as the front page provides you with all of the account details that you need to connect to the server, along with general details for this AMI.
Sit back and enjoy Magento!
Background and a detailed version:
Ok, now that the server is up and running, here's a bit more of a detailed description of the server you're running.
I have chosen The latest Ubuntu LTS Linux server to run this image on. This is for a number of reasons, the important ones being that it's fully supported until April 2015, and that stability is immensely important for any server platform. It's also pretty mature now, but also uses pretty up-to-date versions of the required toolset – Apache 2.2.14 and PHP 5.3.2 being the most important from a security point of view. Mysql 5.1 is important too, behind the scenes.
On top of that, we've installed the latest version of the Webmin dashboard to simplify administration.
Because of the heavy use that Magento makes of the database, I've installed a non-standard version of APC – the alternative PHP Cacher – as the standard one dumps horrible error messages into the logs, enough to scare anyone! The product makes an enormous difference to the performance of the server as a whole. I've also reconfigured the MySQL server from standard, to make much better use of the available memory, providing a major performance improvement.
I have also installed, but not configured a fully featured mail server. More on this later.
The gotchas:
If you're intending to use this AMI in production, then there are a few wrinkles that you need to know, and some stuff needs to be disabled.
- The ftp server, proftpd, needs to know the external IP address of the server, and it needs to be coded into the config file. Because of this, every time you reboot the server, the script
/usr/local/bin/FixProftpdMasq.shis run – called from the file/etc/rc.localThis does no harm, and can be left in place. - To get Magento to work automatically straight out of the box, the script
/usr/local/bin/FixBaseURL.shis also run on bootup. This reconfigures the magento database to use the “Public DNS Name” ( eg http://ec2-122-248-224-167.ap-southeast-1.compute.amazonaws.com/ ) above. This is more significant, as it always uses this value, even if you've reset it to your own domain – eg http://www.example.com/ - which can be frustrating! Once you've changed this ( using the Magento backend configuration menus, followed by a cache refresh ), this script needs to be disabled. The easiest way is to comment out the line./usr/local/bin/FixBaseURL.shin /etc/rc.local by adding a '#' at the beginning of the line ( webmin->others->file manager if you're not familiar with editing system files in linux ).
Note: the easiest way to get magento working again after an IP address change ( eg assigning an Elastic IP address ) is to reboot it, and this script will kick in.
- One of the quirks of Ubuntu is that you can't log in as root on the server. You need to use the ubuntu account instead, so you need to
ssh -i Key_Pair_identity_file.pem ubuntu@server.nameand you then use sudo to run anything that requires heightened access rights.
Security:
There are two aspects to be addressed here. Firstly, change all of the passwords as soon as possible. The default ones are in the public domain, so there will be enough people out there trying to hack in, and abure your server. This is especially important ( ie more than monetary cost – you pay for your bandwidth after all ) once you have sensitive information on your server.
On recommendation from Amazon, we have replaced this approach. See the next section for current practices
(Old) Secondly, we have intentionally left a public key on the server so that we can easily support any customers. To disable this, remove the first line ( ssh-rsa AAAAB3NzaC1yc2EAAAABIwAAAQEAmoxz+MU4S75CaoEOuSq+nDA44HGsmZ2gBu6nnHacxlYN ) from the file /root/.ssh/authorized_keys
2soNdx8xE7laRwKJjenchUiz/oKfDE9lXBPpyqbRzMIfEH3jPakDltpogvtvq5MOAXqkFvdFq7W5mw2S
1yevSFAKc9WxC4CHwjhBrzKIxi2I0jCy6CjaHMZAq9bLKm4we4oVUQFEjEGP8mSvAATuiewnB+HxoGtL
UnWW960HBcQKLLiumBu5QuDCYFYRywLwxJdQNZnNwe23DRutqjwJcKNj7U/2nhcsopEI8GgZFTSrX96+
WoNLHv6wQh0hKfOTkjV1SJOIIOP0owIquXyER/xReYJG4mqrb4iG2gt0OQ== root@xpc
(New) We have added a couple of custom commands to the Webmin interface so that it is a simple matter to provide 'under the hood' access to Green Gecko Global Ltd if you should require it.
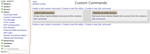
Start up the Webmin interface on https://server.name:10000and Open up the 'Others' Menu block on the LHS. Click on custom commands. From there, you can select either the Enable or Disable access buttons.
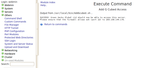
Here's the success message. Green Gecko Global ltd can now get in and work on your server.
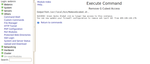
Here's the success message. Green Gecko Global ltd can no longer get in and work on your server.
Unfortunately, sending mail from an Amazon server is unlikely to be reliable, as so many of them have been marked as sending spam in a previous life – many of the major players just delete it as a matter of course. There are ways to get around it ( a common one is to send via a google account – the raw bones of the method is described at http://serverfault.com/questions/90161/how-to-configure-sendmail-to-send... ), but that's a bit outside the scope of this document.
The mail server installed is sendmail, and we've preconfigured it to use greylisting ( ask incoming email to come back in half an hour if you don't know them ), Realtime Blackhole Listing at spamhaus.org ( drops mail from known spammers ), and malware protection provided by clamav.
Once you've got your server set up and running on your own domain ( eg example.net ), then the server needs to be configured for this. This is best performed using the Webmin dashboard on eg.https://www.example.com:10000
First time that you log in to Webmin, select the “refresh modules” option, near the bottom of the menu on the left-hand side. Then install any package updates ( if there are any, use the hyperlink on the last line of the welcome screen ).
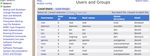
Before setting up email accounts, you'll need to add some mail users to the server. Select “users and groups” from the System menu on the left hand side.
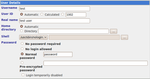
The important parts of the 'create user' form are in the User Details section, where the Username, Real Name, Shell and Password need to be changed.
Then hit the 'Create' button at the foot of the page.
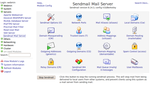
To manage sendmail, select the sendmail option from the servers menu on the left hand side:
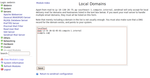
First, ensure your domain is a Local Domain ( ie the server is configured to accept incoming mail for example.com ). Click on the icon, and add then click on save.
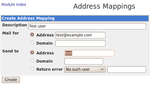
Back in the sendmail main menu, select the 'Address Mappings (virtuser)' option, and fill in as follows:
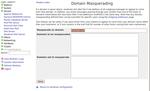
That's the incoming mail configured and delivered to user mailboxes. Just to be sure all of your outgoing mail is addressed correctly, you can 'masquerade' them using the Domain Masquerading (CM) option:
Once you've added all of the email addresses and users, you need to restart sendmail, using the stop and start sendmail buttons at the base of the Sendmail Mail Server main configuration page ( start button appears once you've stopped it ).
That's the server configured. However, there are a few other things that need to be done.
- Open ports 25, 110 and 143 in the Amazon firewall using the method described above ( options SMTP, POP3 and IMAP from the dropdown list ).
- Update your DNS MX to allow for mail delivery to this server
- Add a CNAME ( eg mail.example.com ) for your users to connect their email clients to.
Well, if you've got this far, then you should have a functioning Magento site, supported by a secure mail server.
Enjoy!
转自:http://www.greengecko.co.nz/magento_on_amazon_ec2
- Try Magento on an Amazon EC2 Instance
- 为Amazon EC2 Instance 设置允许ping
- Remote connect to Amazon EC2 instance
- Amazon EC2 Instance Express API配置HTTPS
- On Amazon EC2's Underlying Architecture
- Deploy Django app on amazon ec2
- Steps of starting an AWS EC2 instance
- Running Hadoop MapReduce on Amazon EC2 and Amazon S3
- Amazon Elastic Compute Cloud(EC2) Local Instance Store Volumes
- Amazon EC2
- amazon ec2
- Amazon EC2
- Running MySQL on Amazon EC2 with EBS (Elastic Block
- Setting up OpenVPN 2.x on Amazon’s EC2
- Allowing MySQL on Amazon’s EC2 to accept remote connections
- CREATING AND INSTALLING A SSL CERTIFICATE ON AMAZON EC2.
- Installing R packages on to your EC2 RStudio instance
- Install Apache, PHP, APC, & MySQL on Amazon EC2 with Amazon Linux AMI
- 安装findbugs(MyEclipse8.5)
- linux性能监控(cpu 内存 磁盘IO 网络)
- C# 实现类似SMSS的执行脚本的功能
- MyEclipse优化---编程时更流畅
- Llinux进程间通信-AF_UNIX 套接字编程
- Try Magento on an Amazon EC2 Instance
- extjs在myeclipse提示
- CodeSmith 使用教程(8): CodeTemplate对象
- Windows界面编程第五篇 静态控件背景透明化
- xml基本语法
- MyEclipse连接到数据库解决了
- POJ 2388 (堆排序求中位数)
- java.lang.OutOfMemoryError: PermGen space及其解决方法--myeclipse中配置tomcat的jvm
- 【转】Windows 任务管理器 PF使用率 总数 核心内存 物理内存