编译BOOST库(Visual Studio 2010/GCC)
来源:互联网 发布:淘宝助理没有手机版吗 编辑:程序博客网 时间:2024/06/05 16:28
1.
Windows 7 64bit和Visual Studio 2010下安装及使用Boost 1.47.0
Boost库是一个经过千锤百炼、可移植、提供源代码的C++库,作为标准库的后备,是C++标准化进程的发动机之一。 Boost库由C++标准委员会库工作组成员发起,在C++社区中影响甚大,其成员已近2000人。本文主要介绍了如何安装及使用Boost 1.47.0。
参考网页:http://tech.ddvip.com/2009-05/1242887529120322.html
Boost_Test.cpp代码
// Boost_Test.cpp : Defines the entry point for the console application.
//
#include "stdafx.h"
#include <iostream>
#include <boost/shared_ptr.hpp>
#include <boost/regex.hpp>
using namespace std;
struct Hello
{
};
int _tmain(int argc, _TCHAR* argv[])
{
}
2.如何用Visual Studio 2010编译boost库
出处:http://www.cnblogs.com/LinuxHunter/archive/2010/11/28/1890603.html
1.启动Visual Studio 2010命令行提示
2.进入boost根目录,进入其子目录\tools\jam\src
3.输入命令build vc10
根据不同编译器可输入如下:
>>BCC5.5/BCB6/BCB2006/CB2009用户输入build borland
>>VC用户依据其版本输入build vc7或vc8或vc9或vc10
>>Mingw用户输入build mingw
4.将生成的bjam.exe拷贝到boost根目录
5. 将命令行回退到boost根目录,输入如上命令
bjam --toolset=msvc stage 注:--toolset=borland(对应BCB) =msvc(对应VC) =gcc(对应Mingw)bjam参数
--build-dir=<builddir>
编译的临时文件会放在builddir里(这样比较好管理,编译完就可以把它删除了)
--stagedir=<stagedir>
存放编译后库文件的路径,默认是stage
--build-type=complete
编译所有版本,否则只会编译一小部分版本(确切地说是相当于:variant=release, threading=multi;link=shared|static;runtime-link=shared)
variant=debug|release
决定编译什么版本(Debug or Release?)
link=static|shared
决定使用静态库还是动态库。
threading=single|multi
决定使用单线程还是多线程库。
runtime-link=static|shared
决定是静态还是动态链接C/C++标准库。
--with-<library>
只编译指定的库,如输入--with-regex就只编译regex库了。
--show-libraries
显示需要编译的库名称
6.若要用到python库且有多个python版本时添加如下命令参数,路径视情况自定:
"-sPYTHON_ROOT=D:\Python" "-sPYTHON_VERSION=2.6"
3.vs2010设置boost开发环境
<1>. 编译boost类库
前面一篇文章介绍了如何在linux下建立boost的开发环境,并且编写了一个测试程序,这里将试着在windows下编译boost,同时设置vs2010的开发环境,使用vs来作为开发的ide。
1. 下载bjam.exe
/Files/xuqiang/bjam.rar
2. 编译boost
将下载的bjam.exe放置在boost源代码的目录下,简单的编译的话,直接双击bjam.exe即可,开始编译,这个过程可能持续时间比较长。
3. 编译完成之后,安装boost,下面的命令将boost安装到e:\boost目录下。
之后将boost安装到 e:\boost中,包含相关头文件和lib文件
<2>. 设置vs2010的环境
1. 新建一个vc控制台工程,编写代码

#include <iostream>
#include <string>
int main()
{
std::string line;
boost::regex pat( "^Subject: (Re: |Aw: )*(.*)" );
while (std::cin)
{
std::getline(std::cin, line);
boost::smatch matches;
if (boost::regex_match(line, matches, pat))
std::cout << matches[2] << std::endl;
}
}
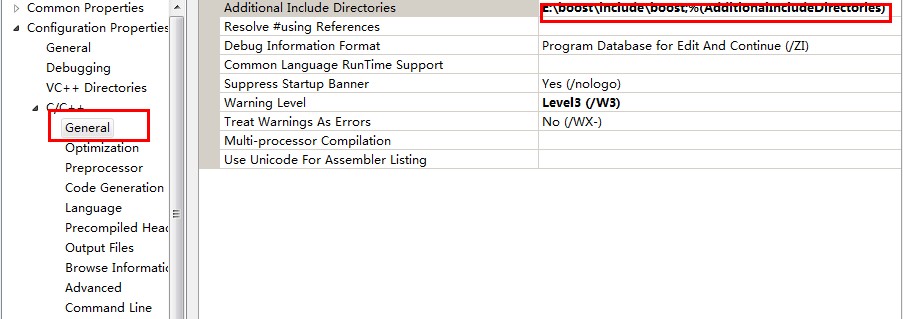
2. 设置工程属性
设置header file路径:
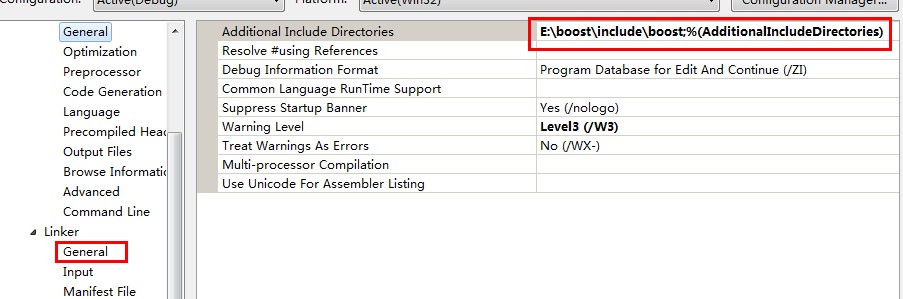
设置lib路径:
4.linux下boost开发环境建立
1. 下载boost c++库(http://www.boost.org/),这里使用的是1.46.1版本的。
2. 在linux下进行简单编译。
2.1 解压该文件,解压完成后目录如下:
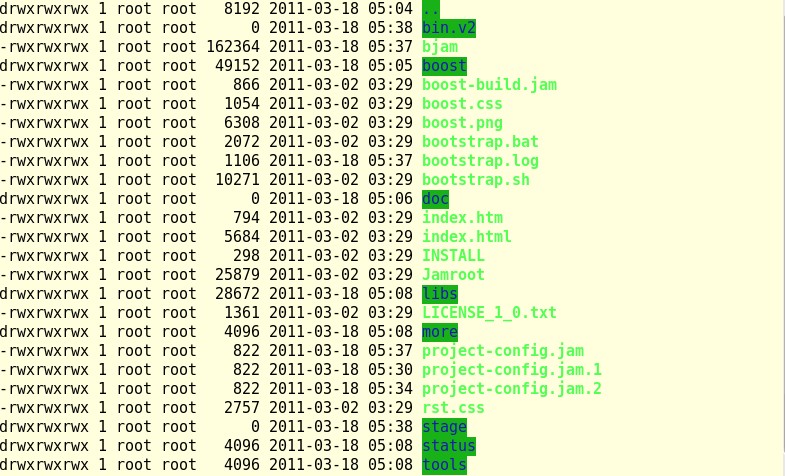
2.2 在boost的跟目录执行如下命令开始配置:
![]()
2.3 上面的过程完成之后,开始编译boost库:
![]()
2.4 经过漫长的过程(如果按照山谜案的默认的配置的话,时间真的很长),完成boost的编译。其中可能出现的错误:
1. error: bzlib.h: No such file or directory boost ,解决方法,boost编译时需要依赖libbz2库:sudo apt-get install libbz2-dev
安装boost:
![]()
3. 测试一下
下面就是用一个简单的例子来体验一下boost的威力。
编译程序:
![]()
运行结果:

- 编译BOOST库(Visual Studio 2010/GCC)
- visual studio 编译boost库
- Visual Studio 2010 和 Boost库编译、开发
- Visual Studio 2010 和 Boost库编译、开发
- Visual Studio 2010 和 Boost库编译、开发
- visual studio 2005 & visual studio 2008下编译boost库
- (2356)Vista下使用Visual Studio 2008(VC)独立编译Boost.Regex库
- Visual Studio 2013 编译 boost-1_56_0_b1
- Visual Studio 2010 下 Boost.Regex 库的使用笔记
- Visual Studio 2010 下 Boost.Regex 库的使用笔记
- Visual Studio 2010 编译ICU库
- Visual Studio 2010 编译ICU库
- 转载:在Visual Studio 2005下编译使用C++扩展库boost
- boost 1.35.0 Visual Studio 2008编译指南
- windows 下编译 Boost 1.50 + Visual Studio 2008
- boost 1.35.0 Visual Studio 2008编译指南
- boost 1.35.0 Visual Studio 2008编译指南
- windows 下编译 Boost 1.50 + Visual Studio 2008
- fvi0-7gqg-rylm
- linux下Ctrl组合键的应用
- ASM和OCFS2下载地址
- 树状结构的设计
- 相亲时候遇到的92年妹子,老衲想下手了
- 编译BOOST库(Visual Studio 2010/GCC)
- easyUI属性汇总
- 运行shell脚本
- Read-only file system
- [RTT例程练习] 1.5 优先级相同线程轮转调度
- 银融金贷《资本运营》精华班
- 依赖 关联 聚合 组合 说明最清晰的一文
- 一步一学Linux与Windows 共享文件Samba
- Python正则表达式指南