AndroidICS4.0---->LockScreen锁屏流程【Android源码解析九】
来源:互联网 发布:禁止 网络医疗平台 编辑:程序博客网 时间:2024/04/30 04:34
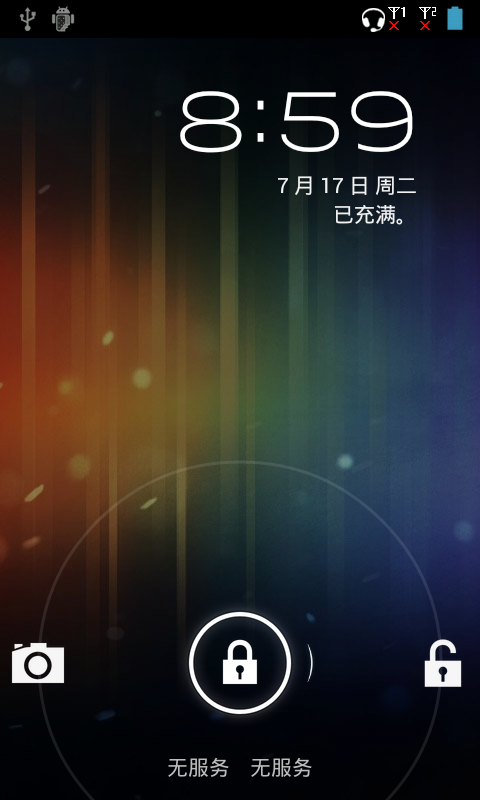
先来说说LockScreen分类;
一、无锁屏;
二、锁屏:
1、UnLockScreen:
图案锁、 PIN锁, 密码锁;
2、LockScreen:
波纹锁;
转载请表明出处:http://blog.csdn.net/wdaming1986/article/details/7753206
有图有真相------>
接着我们来看看LockScreen的时序图:
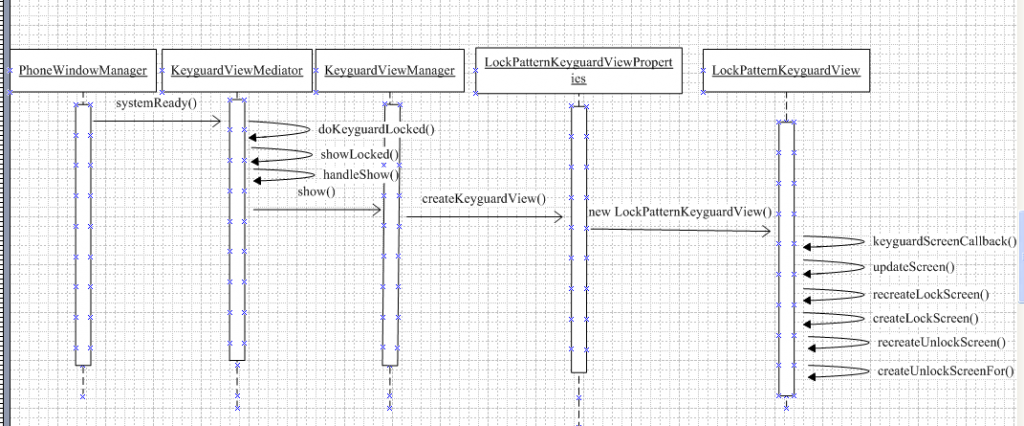
综上所述:
1、createUnlockScreenFor()方法创建的是UnLockScreen界面,代码如下:
[java] view plaincopyprint?
View createUnlockScreenFor(UnlockMode unlockMode) {
View unlockView = null;
if (DEBUG) Log.d(TAG,
"createUnlockScreenFor(" + unlockMode + "): mEnableFallback=" + mEnableFallback);
if (unlockMode == UnlockMode.Pattern) {
PatternUnlockScreen view = new PatternUnlockScreen(
mContext,
mConfiguration,
mLockPatternUtils,
mUpdateMonitor,
mKeyguardScreenCallback,
mUpdateMonitor.getFailedAttempts());
view.setEnableFallback(mEnableFallback);
unlockView = view;
} else if (unlockMode == UnlockMode.SimPuk) {
unlockView = new SimPukUnlockScreen(
mContext,
mConfiguration,
mUpdateMonitor,
mKeyguardScreenCallback,
mLockPatternUtils, MSimTelephonyManager.getDefault().getDefaultSubscription());
} else if (unlockMode == UnlockMode.SimPin) {
unlockView = new SimUnlockScreen(
mContext,
mConfiguration,
mUpdateMonitor,
mKeyguardScreenCallback,
mLockPatternUtils);
} else if (unlockMode == UnlockMode.Account) {
try {
unlockView = new AccountUnlockScreen(
mContext,
mConfiguration,
mUpdateMonitor,
mKeyguardScreenCallback,
mLockPatternUtils);
} catch (IllegalStateException e) {
Log.i(TAG, "Couldn't instantiate AccountUnlockScreen"
+ " (IAccountsService isn't available)");
// TODO: Need a more general way to provide a
// platform-specific fallback UI here.
// For now, if we can't display the account login
// unlock UI, just bring back the regular "Pattern" unlock mode.
// (We do this by simply returning a regular UnlockScreen
// here. This means that the user will still see the
// regular pattern unlock UI, regardless of the value of
// mUnlockScreenMode or whether or not we're in the
// "permanently locked" state.)
return createUnlockScreenFor(UnlockMode.Pattern);
}
} else if (unlockMode == UnlockMode.Password) {
unlockView = new PasswordUnlockScreen(
mContext,
mConfiguration,
mLockPatternUtils,
mUpdateMonitor,
mKeyguardScreenCallback);
} else {
throw new IllegalArgumentException("unknown unlock mode " + unlockMode);
}
initializeTransportControlView(unlockView);
initializeFaceLockAreaView(unlockView); // Only shows view if FaceLock is enabled
mUnlockScreenMode = unlockMode;
return unlockView;
}
2、createLockScreen()就是创建LockScreen界面:
[java] view plaincopyprint?
View createLockScreen() {
/*View lockView = new LockScreen(
mContext,
mConfiguration,
mLockPatternUtils,
mUpdateMonitor,
mKeyguardScreenCallback);
initializeTransportControlView(lockView);
return lockView;*/
long lockscreenType = 0;
try{
lockscreenType = android.provider.Settings.Secure.
getLong(mContext.getContentResolver(), "lockscreen.disabled");
}catch(Exception e){
e.printStackTrace();
}
View lockView = null;
lockView = new LockScreen(
mContext,
mConfiguration,
mLockPatternUtils,
mUpdateMonitor,
mKeyguardScreenCallback);
initializeTransportControlView(lockView);
return lockView;
}
我们来看看锁屏界面的流程:
step 1:创建LockScreen.java类——>先看看构造函数:
[java] view plaincopyprint?
LockScreen(Context context, Configuration configuration, LockPatternUtils lockPatternUtils,
KeyguardUpdateMonitor updateMonitor,
KeyguardScreenCallback callback) {
super(context);
mLockPatternUtils = lockPatternUtils;
mUpdateMonitor = updateMonitor;
mCallback = callback;
mEnableMenuKeyInLockScreen = shouldEnableMenuKey();
mCreationOrientation = configuration.orientation;
mKeyboardHidden = configuration.hardKeyboardHidden;
if (LockPatternKeyguardView.DEBUG_CONFIGURATION) {
Log.v(TAG, "***** CREATING LOCK SCREEN", new RuntimeException());
Log.v(TAG, "Cur orient=" + mCreationOrientation
+ " res orient=" + context.getResources().getConfiguration().orientation);
}
final LayoutInflater inflater = LayoutInflater.from(context);
if (DBG) Log.v(TAG, "Creation orientation = " + mCreationOrientation);
if (mCreationOrientation != Configuration.ORIENTATION_LANDSCAPE) {
inflater.inflate(R.layout.keyguard_screen_tab_unlock, this, true);
} else {
inflater.inflate(R.layout.keyguard_screen_tab_unlock_land, this, true);
}
if (TelephonyManager.getDefault().isMultiSimEnabled()) {
mStatusViewManager = new MSimKeyguardStatusViewManager(this, mUpdateMonitor,
mLockPatternUtils, mCallback, false);
} else {
mStatusViewManager = new KeyguardStatusViewManager(this, mUpdateMonitor,
mLockPatternUtils, mCallback, false);
}
setFocusable(true);
setFocusableInTouchMode(true);
setDescendantFocusability(ViewGroup.FOCUS_BLOCK_DESCENDANTS);
mAudioManager = (AudioManager) mContext.getSystemService(Context.AUDIO_SERVICE);
// modify by wangxianming in 2012-06-22
if (mAudioManager != null) {
mSilentMode = isSilentMode();
}
mUnlockWidget = findViewById(R.id.unlock_widget);
if (mUnlockWidget instanceof SlidingTab) {
SlidingTab slidingTabView = (SlidingTab) mUnlockWidget;
slidingTabView.setHoldAfterTrigger(true, false);
slidingTabView.setLeftHintText(R.string.lockscreen_unlock_label);
slidingTabView.setLeftTabResources(
R.drawable.ic_jog_dial_unlock,
R.drawable.jog_tab_target_green,
R.drawable.jog_tab_bar_left_unlock,
R.drawable.jog_tab_left_unlock);
SlidingTabMethods slidingTabMethods = new SlidingTabMethods(slidingTabView);
slidingTabView.setOnTriggerListener(slidingTabMethods);
mUnlockWidgetMethods = slidingTabMethods;
} else if (mUnlockWidget instanceof WaveView) {
WaveView waveView = (WaveView) mUnlockWidget;
WaveViewMethods waveViewMethods = new WaveViewMethods(waveView);
waveView.setOnTriggerListener(waveViewMethods);
mUnlockWidgetMethods = waveViewMethods;
} else if (mUnlockWidget instanceof MultiWaveView) {
MultiWaveView multiWaveView = (MultiWaveView) mUnlockWidget;
MultiWaveViewMethods multiWaveViewMethods = new MultiWaveViewMethods(multiWaveView);
multiWaveView.setOnTriggerListener(multiWaveViewMethods);
mUnlockWidgetMethods = multiWaveViewMethods;
} else {
throw new IllegalStateException("Unrecognized unlock widget: " + mUnlockWidget);
}
// Update widget with initial ring state
mUnlockWidgetMethods.updateResources();
if (DBG) Log.v(TAG, "*** LockScreen accel is "
+ (mUnlockWidget.isHardwareAccelerated() ? "on":"off"));
}
Step 2:在Step 1步骤中根据横竖屏来加载横竖屏的布局:
[java] view plaincopyprint?
if (mCreationOrientation != Configuration.ORIENTATION_LANDSCAPE) {
inflater.inflate(R.layout.keyguard_screen_tab_unlock, this, true);
} else {
inflater.inflate(R.layout.keyguard_screen_tab_unlock_land, this, true);
}
Step 3:来看看竖屏的布局文件的代码:
[java] view plaincopyprint?
<GridLayout
xmlns:android="http://schemas.android.com/apk/res/android"
android:orientation="vertical"
android:layout_width="match_parent"
android:layout_height="match_parent"
android:gravity="center_horizontal">
<!-- 锁屏界面加载数字时钟 -->
<com.android.internal.widget.DigitalClock android:id="@+id/time"
android:layout_marginTop="@dimen/keyguard_lockscreen_status_line_clockfont_top_margin"
android:layout_marginBottom="12dip"
android:layout_marginRight="@dimen/keyguard_lockscreen_status_line_font_right_margin"
android:layout_gravity="right">
<!-- Because we can't have multi-tone fonts, we render two TextViews, one on
top of the other. Hence the redundant layout... -->
<TextView android:id="@+id/timeDisplayBackground"
android:layout_width="wrap_content"
android:layout_height="wrap_content"
android:singleLine="true"
android:ellipsize="none"
android:textSize="@dimen/keyguard_lockscreen_clock_font_size"
android:textAppearance="?android:attr/textAppearanceMedium"
android:layout_marginBottom="6dip"
android:textColor="@color/lockscreen_clock_background"
/>
<TextView android:id="@+id/timeDisplayForeground"
android:layout_width="wrap_content"
android:layout_height="wrap_content"
android:singleLine="true"
android:ellipsize="none"
android:textSize="@dimen/keyguard_lockscreen_clock_font_size"
android:textAppearance="?android:attr/textAppearanceMedium"
android:layout_marginBottom="6dip"
android:textColor="@color/lockscreen_clock_foreground"
android:layout_alignLeft="@id/timeDisplayBackground"
android:layout_alignTop="@id/timeDisplayBackground"
/>
</com.android.internal.widget.DigitalClock>
<LinearLayout
android:orientation="horizontal"
android:layout_gravity="right"
android:layout_marginRight="@dimen/keyguard_lockscreen_status_line_font_right_margin">
<!-- 锁屏界面加载日期 -->
<TextView
android:id="@+id/date"
android:layout_width="wrap_content"
android:layout_height="wrap_content"
android:singleLine="true"
android:ellipsize="marquee"
android:textAppearance="?android:attr/textAppearanceMedium"
android:textSize="@dimen/keyguard_lockscreen_status_line_font_size"
/>
<!-- 锁屏界面加载闹钟状态 -->
<TextView
android:id="@+id/alarm_status"
android:layout_width="wrap_content"
android:layout_height="wrap_content"
android:layout_marginLeft="16dip"
android:singleLine="true"
android:ellipsize="marquee"
android:textAppearance="?android:attr/textAppearanceMedium"
android:textSize="@dimen/keyguard_lockscreen_status_line_font_size"
android:drawablePadding="4dip"
/>
</LinearLayout>
<!-- 锁屏界面加载充电状态 -->
<TextView
android:id="@+id/status1"
android:layout_gravity="right"
android:layout_marginRight="@dimen/keyguard_lockscreen_status_line_font_right_margin"
android:singleLine="true"
android:ellipsize="marquee"
android:textAppearance="?android:attr/textAppearanceMedium"
android:textSize="@dimen/keyguard_lockscreen_status_line_font_size"
android:drawablePadding="4dip"
/>
<Space android:layout_gravity="fill" />
<RelativeLayout
android:layout_width="match_parent"
android:layout_height="302dip">
<!-- 锁屏界面加载波纹的锁屏 -->
<com.android.internal.widget.multiwaveview.MultiWaveView
android:id="@+id/unlock_widget"
android:orientation="horizontal"
android:layout_width="match_parent"
android:layout_height="match_parent"
android:layout_alignParentBottom="true"
android:targetDrawables="@array/lockscreen_targets_with_camera"
android:targetDescriptions="@array/lockscreen_target_descriptions_with_camera"
android:directionDescriptions="@array/lockscreen_direction_descriptions"
android:handleDrawable="@drawable/ic_lockscreen_handle"
android:waveDrawable="@drawable/ic_lockscreen_outerring"
android:outerRadius="@dimen/multiwaveview_target_placement_radius"
android:snapMargin="@dimen/multiwaveview_snap_margin"
android:hitRadius="@dimen/multiwaveview_hit_radius"
android:rightChevronDrawable="@drawable/ic_lockscreen_chevron_right"
android:horizontalOffset="0dip"
android:verticalOffset="60dip"
android:feedbackCount="3"
android:vibrationDuration="20"
/>
<!-- 锁屏界面加载运营商状态 -->
<TextView
android:id="@+id/carrier"
android:layout_width="fill_parent"
android:layout_height="wrap_content"
android:layout_alignParentBottom="true"
android:layout_marginBottom="12dip"
android:gravity="center_horizontal"
android:singleLine="true"
android:ellipsize="marquee"
android:textAppearance="?android:attr/textAppearanceMedium"
android:textSize="@dimen/keyguard_lockscreen_status_line_font_size"
android:textColor="?android:attr/textColorSecondary"
/>
</RelativeLayout>
<LinearLayout
android:orientation="horizontal"
android:layout_width="match_parent"
style="?android:attr/buttonBarStyle"
android:gravity="center"
android:weightSum="2">
<!-- 锁屏界面加载紧急拨号按钮 -->
<Button android:id="@+id/emergencyCallButton"
android:layout_gravity="center_horizontal"
android:layout_width="0dip"
android:layout_height="wrap_content"
android:layout_weight="1"
style="?android:attr/buttonBarButtonStyle"
android:textSize="@dimen/keyguard_lockscreen_status_line_font_size"
android:text="@*android:string/lockscreen_emergency_call"
android:drawableLeft="@*android:drawable/lockscreen_emergency_button"
android:drawablePadding="0dip"
android:visibility="gone"
/>
</LinearLayout>
</GridLayout>
Step 4:在Step 3中重点看com.android.internal.widget.multiwaveview.MultiWaveView这个自定义的view,这个view是处理ICS4.0锁屏的拖拽的功能,具体代码如下:
[java] view plaincopyprint?
public MultiWaveView(Context context, AttributeSet attrs) {
super(context, attrs);
Resources res = context.getResources();
。。。 。。。
加载资源
。。。 。。。
}
通过onMeasure()来计算自定义view的大小:
[java] view plaincopyprint?
protected void onMeasure(int widthMeasureSpec, int heightMeasureSpec) {
final int minimumWidth = getSuggestedMinimumWidth();
final int minimumHeight = getSuggestedMinimumHeight();
int viewWidth = resolveMeasured(widthMeasureSpec, minimumWidth);
int viewHeight = resolveMeasured(heightMeasureSpec, minimumHeight);
setMeasuredDimension(viewWidth, viewHeight);
}
通过onLayout()来加载布局:
[java] view plaincopyprint?
protected void onLayout(boolean changed, int left, int top, int right, int bottom) {
super.onLayout(changed, left, top, right, bottom);
final int width = right - left;
final int height = bottom - top;
float newWaveCenterX = mHorizontalOffset + Math.max(width, mOuterRing.getWidth() ) / 2;
float newWaveCenterY = mVerticalOffset + Math.max(height, mOuterRing.getHeight()) / 2;
if (newWaveCenterX != mWaveCenterX || newWaveCenterY != mWaveCenterY) {
if (mWaveCenterX == 0 && mWaveCenterY == 0) {
performInitialLayout(newWaveCenterX, newWaveCenterY);
}
mWaveCenterX = newWaveCenterX;
mWaveCenterY = newWaveCenterY;
mOuterRing.setX(mWaveCenterX);
mOuterRing.setY(Math.max(mWaveCenterY, mWaveCenterY));
updateTargetPositions();
}
if (DEBUG) dump();
}
Step 5:来看看触摸屏幕时的事件处理onTouchEvent()代码如下:
[java] view plaincopyprint?
@Override
public boolean onTouchEvent(MotionEvent event) {
final int action = event.getAction();
boolean handled = false;
switch (action) {
case MotionEvent.ACTION_DOWN:
handleDown(event);
handled = true;
break;
case MotionEvent.ACTION_MOVE:
handleMove(event);
handled = true;
break;
case MotionEvent.ACTION_UP:
handleMove(event);
handleUp(event);
handled = true;
break;
case MotionEvent.ACTION_CANCEL:
handleMove(event);
handled = true;
break;
}
invalidate();
return handled ? true : super.onTouchEvent(event);
}
通过handleMove()来处理移动事件:
[java] view plaincopyprint?
private void handleMove(MotionEvent event) {
if (!mDragging) {
trySwitchToFirstTouchState(event);
return;
}
int activeTarget = -1;
final int historySize = event.getHistorySize();
for (int k = 0; k < historySize + 1; k++) {
float x = k < historySize ? event.getHistoricalX(k) : event.getX();
float y = k < historySize ? event.getHistoricalY(k) : event.getY();
float tx = x - mWaveCenterX;
float ty = y - mWaveCenterY;
float touchRadius = (float) Math.sqrt(dist2(tx, ty));
final float scale = touchRadius > mOuterRadius ? mOuterRadius / touchRadius : 1.0f;
float limitX = mWaveCenterX + tx * scale;
float limitY = mWaveCenterY + ty * scale;
boolean singleTarget = mTargetDrawables.size() == 1;
if (singleTarget) {
// Snap to outer ring if there's only one target
float snapRadius = mOuterRadius - mSnapMargin;
if (touchRadius > snapRadius) {
activeTarget = 0;
x = limitX;
y = limitY;
}
} else {
// If there's more than one target, snap to the closest one less than hitRadius away.
float best = Float.MAX_VALUE;
final float hitRadius2 = mHitRadius * mHitRadius;
for (int i = 0; i < mTargetDrawables.size(); i++) {
// Snap to the first target in range
TargetDrawable target = mTargetDrawables.get(i);
float dx = limitX - target.getX();
float dy = limitY - target.getY();
float dist2 = dx*dx + dy*dy;
if (target.isValid() && dist2 < hitRadius2 && dist2 < best) {
activeTarget = i;
best = dist2;
}
}
x = limitX;
y = limitY;
}
if (activeTarget != -1) {
switchToState(STATE_SNAP, x,y);
float newX = singleTarget ? limitX : mTargetDrawables.get(activeTarget).getX();
float newY = singleTarget ? limitY : mTargetDrawables.get(activeTarget).getY();
moveHandleTo(newX, newY, false);
TargetDrawable currentTarget = mTargetDrawables.get(activeTarget);
if (currentTarget.hasState(TargetDrawable.STATE_FOCUSED)) {
currentTarget.setState(TargetDrawable.STATE_FOCUSED);
mHandleDrawable.setAlpha(0.0f);
}
} else {
switchToState(STATE_TRACKING, x, y);
moveHandleTo(x, y, false);
mHandleDrawable.setAlpha(1.0f);
}
}
// Draw handle outside parent's bounds
invalidateGlobalRegion(mHandleDrawable);
if (mActiveTarget != activeTarget && activeTarget != -1) {
dispatchGrabbedEvent(activeTarget);
if (AccessibilityManager.getInstance(mContext).isEnabled()) {
String targetContentDescription = getTargetDescription(activeTarget);
announceText(targetContentDescription);
}
}
mActiveTarget = activeTarget;
}
以上主要工作是绘制拖拽的参数以及绘制出来。通过invalidate()来主动刷屏幕;
在onDraw()方法中实现绘制图形,代码如下:
[java] view plaincopyprint?
@Override
protected void onDraw(Canvas canvas) {
mOuterRing.draw(canvas);
for (TargetDrawable target : mTargetDrawables) {
if (target != null) {
target.draw(canvas);
}
}
for (TargetDrawable target : mChevronDrawables) {
if (target != null) {
target.draw(canvas);
}
}
mHandleDrawable.draw(canvas);
}
在handleMove()方法中——>trySwitchToFirstTouchState(event);——>switchToState()——>doFinish();
——>setGrabbedState() ————> mOnTriggerListener.onGrabbedStateChange(this, mGrabbedState);
设置回调。
Step 6: LockScreen.java中有个内部类,监听这个移动事件的状态,——> 代码如下:
[java] view plaincopyprint?
class MultiWaveViewMethods implements MultiWaveView.OnTriggerListener,
UnlockWidgetCommonMethods {
private final MultiWaveView mMultiWaveView;
private boolean mCameraDisabled;
MultiWaveViewMethods(MultiWaveView multiWaveView) {
mMultiWaveView = multiWaveView;
final boolean cameraDisabled = mLockPatternUtils.getDevicePolicyManager()
.getCameraDisabled(null);
if (cameraDisabled) {
Log.v(TAG, "Camera disabled by Device Policy");
mCameraDisabled = true;
} else {
// Camera is enabled if resource is initially defined for MultiWaveView
// in the lockscreen layout file
mCameraDisabled = mMultiWaveView.getTargetResourceId()
!= R.array.lockscreen_targets_with_camera;
}
}
public void updateResources() {
int resId;
if (mCameraDisabled) {
// Fall back to showing ring/silence if camera is disabled by DPM...
resId = mSilentMode ? R.array.lockscreen_targets_when_silent
: R.array.lockscreen_targets_when_soundon;
} else {
resId = R.array.lockscreen_targets_with_camera;
}
mMultiWaveView.setTargetResources(resId);
}
public void onGrabbed(View v, int handle) {
}
public void onReleased(View v, int handle) {
}
public void onTrigger(View v, int target) {
if (target == 0 || target == 1) { // 0 = unlock/portrait, 1 = unlock/landscape
mCallback.goToUnlockScreen();
} else if (target == 2 || target == 3) { // 2 = alt/portrait, 3 = alt/landscape
if (!mCameraDisabled) {
// Start the Camera
Intent intent = new Intent(MediaStore.INTENT_ACTION_STILL_IMAGE_CAMERA);
intent.setFlags(Intent.FLAG_ACTIVITY_NEW_TASK);
mContext.startActivity(intent);
mCallback.goToUnlockScreen();
} else {
toggleRingMode();
mUnlockWidgetMethods.updateResources();
mCallback.pokeWakelock();
}
}
}
public void onGrabbedStateChange(View v, int handle) {
// Don't poke the wake lock when returning to a state where the handle is
// not grabbed since that can happen when the system (instead of the user)
// cancels the grab.
if (handle != MultiWaveView.OnTriggerListener.NO_HANDLE) {
mCallback.pokeWakelock();
}
}
public View getView() {
return mMultiWaveView;
}
public void reset(boolean animate) {
mMultiWaveView.reset(animate);
}
public void ping() {
mMultiWaveView.ping();
}
}
重点看public void onTrigger()这个方法,用于处理拖拽启动那个activity,一个启动camera,一个正常解锁。
锁屏的大概这个流程就是这个样子了,大家应该会一目了然了。由于时间仓促,难免有点纰漏,希望大家指正错误,如有不解的地方,欢迎留言探讨!!!
一、无锁屏;
二、锁屏:
1、UnLockScreen:
图案锁、 PIN锁, 密码锁;
2、LockScreen:
波纹锁;
转载请表明出处:http://blog.csdn.net/wdaming1986/article/details/7753206
有图有真相------>
接着我们来看看LockScreen的时序图:
综上所述:
1、createUnlockScreenFor()方法创建的是UnLockScreen界面,代码如下:
[java] view plaincopyprint?
View createUnlockScreenFor(UnlockMode unlockMode) {
View unlockView = null;
if (DEBUG) Log.d(TAG,
"createUnlockScreenFor(" + unlockMode + "): mEnableFallback=" + mEnableFallback);
if (unlockMode == UnlockMode.Pattern) {
PatternUnlockScreen view = new PatternUnlockScreen(
mContext,
mConfiguration,
mLockPatternUtils,
mUpdateMonitor,
mKeyguardScreenCallback,
mUpdateMonitor.getFailedAttempts());
view.setEnableFallback(mEnableFallback);
unlockView = view;
} else if (unlockMode == UnlockMode.SimPuk) {
unlockView = new SimPukUnlockScreen(
mContext,
mConfiguration,
mUpdateMonitor,
mKeyguardScreenCallback,
mLockPatternUtils, MSimTelephonyManager.getDefault().getDefaultSubscription());
} else if (unlockMode == UnlockMode.SimPin) {
unlockView = new SimUnlockScreen(
mContext,
mConfiguration,
mUpdateMonitor,
mKeyguardScreenCallback,
mLockPatternUtils);
} else if (unlockMode == UnlockMode.Account) {
try {
unlockView = new AccountUnlockScreen(
mContext,
mConfiguration,
mUpdateMonitor,
mKeyguardScreenCallback,
mLockPatternUtils);
} catch (IllegalStateException e) {
Log.i(TAG, "Couldn't instantiate AccountUnlockScreen"
+ " (IAccountsService isn't available)");
// TODO: Need a more general way to provide a
// platform-specific fallback UI here.
// For now, if we can't display the account login
// unlock UI, just bring back the regular "Pattern" unlock mode.
// (We do this by simply returning a regular UnlockScreen
// here. This means that the user will still see the
// regular pattern unlock UI, regardless of the value of
// mUnlockScreenMode or whether or not we're in the
// "permanently locked" state.)
return createUnlockScreenFor(UnlockMode.Pattern);
}
} else if (unlockMode == UnlockMode.Password) {
unlockView = new PasswordUnlockScreen(
mContext,
mConfiguration,
mLockPatternUtils,
mUpdateMonitor,
mKeyguardScreenCallback);
} else {
throw new IllegalArgumentException("unknown unlock mode " + unlockMode);
}
initializeTransportControlView(unlockView);
initializeFaceLockAreaView(unlockView); // Only shows view if FaceLock is enabled
mUnlockScreenMode = unlockMode;
return unlockView;
}
2、createLockScreen()就是创建LockScreen界面:
[java] view plaincopyprint?
View createLockScreen() {
/*View lockView = new LockScreen(
mContext,
mConfiguration,
mLockPatternUtils,
mUpdateMonitor,
mKeyguardScreenCallback);
initializeTransportControlView(lockView);
return lockView;*/
long lockscreenType = 0;
try{
lockscreenType = android.provider.Settings.Secure.
getLong(mContext.getContentResolver(), "lockscreen.disabled");
}catch(Exception e){
e.printStackTrace();
}
View lockView = null;
lockView = new LockScreen(
mContext,
mConfiguration,
mLockPatternUtils,
mUpdateMonitor,
mKeyguardScreenCallback);
initializeTransportControlView(lockView);
return lockView;
}
我们来看看锁屏界面的流程:
step 1:创建LockScreen.java类——>先看看构造函数:
[java] view plaincopyprint?
LockScreen(Context context, Configuration configuration, LockPatternUtils lockPatternUtils,
KeyguardUpdateMonitor updateMonitor,
KeyguardScreenCallback callback) {
super(context);
mLockPatternUtils = lockPatternUtils;
mUpdateMonitor = updateMonitor;
mCallback = callback;
mEnableMenuKeyInLockScreen = shouldEnableMenuKey();
mCreationOrientation = configuration.orientation;
mKeyboardHidden = configuration.hardKeyboardHidden;
if (LockPatternKeyguardView.DEBUG_CONFIGURATION) {
Log.v(TAG, "***** CREATING LOCK SCREEN", new RuntimeException());
Log.v(TAG, "Cur orient=" + mCreationOrientation
+ " res orient=" + context.getResources().getConfiguration().orientation);
}
final LayoutInflater inflater = LayoutInflater.from(context);
if (DBG) Log.v(TAG, "Creation orientation = " + mCreationOrientation);
if (mCreationOrientation != Configuration.ORIENTATION_LANDSCAPE) {
inflater.inflate(R.layout.keyguard_screen_tab_unlock, this, true);
} else {
inflater.inflate(R.layout.keyguard_screen_tab_unlock_land, this, true);
}
if (TelephonyManager.getDefault().isMultiSimEnabled()) {
mStatusViewManager = new MSimKeyguardStatusViewManager(this, mUpdateMonitor,
mLockPatternUtils, mCallback, false);
} else {
mStatusViewManager = new KeyguardStatusViewManager(this, mUpdateMonitor,
mLockPatternUtils, mCallback, false);
}
setFocusable(true);
setFocusableInTouchMode(true);
setDescendantFocusability(ViewGroup.FOCUS_BLOCK_DESCENDANTS);
mAudioManager = (AudioManager) mContext.getSystemService(Context.AUDIO_SERVICE);
// modify by wangxianming in 2012-06-22
if (mAudioManager != null) {
mSilentMode = isSilentMode();
}
mUnlockWidget = findViewById(R.id.unlock_widget);
if (mUnlockWidget instanceof SlidingTab) {
SlidingTab slidingTabView = (SlidingTab) mUnlockWidget;
slidingTabView.setHoldAfterTrigger(true, false);
slidingTabView.setLeftHintText(R.string.lockscreen_unlock_label);
slidingTabView.setLeftTabResources(
R.drawable.ic_jog_dial_unlock,
R.drawable.jog_tab_target_green,
R.drawable.jog_tab_bar_left_unlock,
R.drawable.jog_tab_left_unlock);
SlidingTabMethods slidingTabMethods = new SlidingTabMethods(slidingTabView);
slidingTabView.setOnTriggerListener(slidingTabMethods);
mUnlockWidgetMethods = slidingTabMethods;
} else if (mUnlockWidget instanceof WaveView) {
WaveView waveView = (WaveView) mUnlockWidget;
WaveViewMethods waveViewMethods = new WaveViewMethods(waveView);
waveView.setOnTriggerListener(waveViewMethods);
mUnlockWidgetMethods = waveViewMethods;
} else if (mUnlockWidget instanceof MultiWaveView) {
MultiWaveView multiWaveView = (MultiWaveView) mUnlockWidget;
MultiWaveViewMethods multiWaveViewMethods = new MultiWaveViewMethods(multiWaveView);
multiWaveView.setOnTriggerListener(multiWaveViewMethods);
mUnlockWidgetMethods = multiWaveViewMethods;
} else {
throw new IllegalStateException("Unrecognized unlock widget: " + mUnlockWidget);
}
// Update widget with initial ring state
mUnlockWidgetMethods.updateResources();
if (DBG) Log.v(TAG, "*** LockScreen accel is "
+ (mUnlockWidget.isHardwareAccelerated() ? "on":"off"));
}
Step 2:在Step 1步骤中根据横竖屏来加载横竖屏的布局:
[java] view plaincopyprint?
if (mCreationOrientation != Configuration.ORIENTATION_LANDSCAPE) {
inflater.inflate(R.layout.keyguard_screen_tab_unlock, this, true);
} else {
inflater.inflate(R.layout.keyguard_screen_tab_unlock_land, this, true);
}
Step 3:来看看竖屏的布局文件的代码:
[java] view plaincopyprint?
<GridLayout
xmlns:android="http://schemas.android.com/apk/res/android"
android:orientation="vertical"
android:layout_width="match_parent"
android:layout_height="match_parent"
android:gravity="center_horizontal">
<!-- 锁屏界面加载数字时钟 -->
<com.android.internal.widget.DigitalClock android:id="@+id/time"
android:layout_marginTop="@dimen/keyguard_lockscreen_status_line_clockfont_top_margin"
android:layout_marginBottom="12dip"
android:layout_marginRight="@dimen/keyguard_lockscreen_status_line_font_right_margin"
android:layout_gravity="right">
<!-- Because we can't have multi-tone fonts, we render two TextViews, one on
top of the other. Hence the redundant layout... -->
<TextView android:id="@+id/timeDisplayBackground"
android:layout_width="wrap_content"
android:layout_height="wrap_content"
android:singleLine="true"
android:ellipsize="none"
android:textSize="@dimen/keyguard_lockscreen_clock_font_size"
android:textAppearance="?android:attr/textAppearanceMedium"
android:layout_marginBottom="6dip"
android:textColor="@color/lockscreen_clock_background"
/>
<TextView android:id="@+id/timeDisplayForeground"
android:layout_width="wrap_content"
android:layout_height="wrap_content"
android:singleLine="true"
android:ellipsize="none"
android:textSize="@dimen/keyguard_lockscreen_clock_font_size"
android:textAppearance="?android:attr/textAppearanceMedium"
android:layout_marginBottom="6dip"
android:textColor="@color/lockscreen_clock_foreground"
android:layout_alignLeft="@id/timeDisplayBackground"
android:layout_alignTop="@id/timeDisplayBackground"
/>
</com.android.internal.widget.DigitalClock>
<LinearLayout
android:orientation="horizontal"
android:layout_gravity="right"
android:layout_marginRight="@dimen/keyguard_lockscreen_status_line_font_right_margin">
<!-- 锁屏界面加载日期 -->
<TextView
android:id="@+id/date"
android:layout_width="wrap_content"
android:layout_height="wrap_content"
android:singleLine="true"
android:ellipsize="marquee"
android:textAppearance="?android:attr/textAppearanceMedium"
android:textSize="@dimen/keyguard_lockscreen_status_line_font_size"
/>
<!-- 锁屏界面加载闹钟状态 -->
<TextView
android:id="@+id/alarm_status"
android:layout_width="wrap_content"
android:layout_height="wrap_content"
android:layout_marginLeft="16dip"
android:singleLine="true"
android:ellipsize="marquee"
android:textAppearance="?android:attr/textAppearanceMedium"
android:textSize="@dimen/keyguard_lockscreen_status_line_font_size"
android:drawablePadding="4dip"
/>
</LinearLayout>
<!-- 锁屏界面加载充电状态 -->
<TextView
android:id="@+id/status1"
android:layout_gravity="right"
android:layout_marginRight="@dimen/keyguard_lockscreen_status_line_font_right_margin"
android:singleLine="true"
android:ellipsize="marquee"
android:textAppearance="?android:attr/textAppearanceMedium"
android:textSize="@dimen/keyguard_lockscreen_status_line_font_size"
android:drawablePadding="4dip"
/>
<Space android:layout_gravity="fill" />
<RelativeLayout
android:layout_width="match_parent"
android:layout_height="302dip">
<!-- 锁屏界面加载波纹的锁屏 -->
<com.android.internal.widget.multiwaveview.MultiWaveView
android:id="@+id/unlock_widget"
android:orientation="horizontal"
android:layout_width="match_parent"
android:layout_height="match_parent"
android:layout_alignParentBottom="true"
android:targetDrawables="@array/lockscreen_targets_with_camera"
android:targetDescriptions="@array/lockscreen_target_descriptions_with_camera"
android:directionDescriptions="@array/lockscreen_direction_descriptions"
android:handleDrawable="@drawable/ic_lockscreen_handle"
android:waveDrawable="@drawable/ic_lockscreen_outerring"
android:outerRadius="@dimen/multiwaveview_target_placement_radius"
android:snapMargin="@dimen/multiwaveview_snap_margin"
android:hitRadius="@dimen/multiwaveview_hit_radius"
android:rightChevronDrawable="@drawable/ic_lockscreen_chevron_right"
android:horizontalOffset="0dip"
android:verticalOffset="60dip"
android:feedbackCount="3"
android:vibrationDuration="20"
/>
<!-- 锁屏界面加载运营商状态 -->
<TextView
android:id="@+id/carrier"
android:layout_width="fill_parent"
android:layout_height="wrap_content"
android:layout_alignParentBottom="true"
android:layout_marginBottom="12dip"
android:gravity="center_horizontal"
android:singleLine="true"
android:ellipsize="marquee"
android:textAppearance="?android:attr/textAppearanceMedium"
android:textSize="@dimen/keyguard_lockscreen_status_line_font_size"
android:textColor="?android:attr/textColorSecondary"
/>
</RelativeLayout>
<LinearLayout
android:orientation="horizontal"
android:layout_width="match_parent"
style="?android:attr/buttonBarStyle"
android:gravity="center"
android:weightSum="2">
<!-- 锁屏界面加载紧急拨号按钮 -->
<Button android:id="@+id/emergencyCallButton"
android:layout_gravity="center_horizontal"
android:layout_width="0dip"
android:layout_height="wrap_content"
android:layout_weight="1"
style="?android:attr/buttonBarButtonStyle"
android:textSize="@dimen/keyguard_lockscreen_status_line_font_size"
android:text="@*android:string/lockscreen_emergency_call"
android:drawableLeft="@*android:drawable/lockscreen_emergency_button"
android:drawablePadding="0dip"
android:visibility="gone"
/>
</LinearLayout>
</GridLayout>
Step 4:在Step 3中重点看com.android.internal.widget.multiwaveview.MultiWaveView这个自定义的view,这个view是处理ICS4.0锁屏的拖拽的功能,具体代码如下:
[java] view plaincopyprint?
public MultiWaveView(Context context, AttributeSet attrs) {
super(context, attrs);
Resources res = context.getResources();
。。。 。。。
加载资源
。。。 。。。
}
通过onMeasure()来计算自定义view的大小:
[java] view plaincopyprint?
protected void onMeasure(int widthMeasureSpec, int heightMeasureSpec) {
final int minimumWidth = getSuggestedMinimumWidth();
final int minimumHeight = getSuggestedMinimumHeight();
int viewWidth = resolveMeasured(widthMeasureSpec, minimumWidth);
int viewHeight = resolveMeasured(heightMeasureSpec, minimumHeight);
setMeasuredDimension(viewWidth, viewHeight);
}
通过onLayout()来加载布局:
[java] view plaincopyprint?
protected void onLayout(boolean changed, int left, int top, int right, int bottom) {
super.onLayout(changed, left, top, right, bottom);
final int width = right - left;
final int height = bottom - top;
float newWaveCenterX = mHorizontalOffset + Math.max(width, mOuterRing.getWidth() ) / 2;
float newWaveCenterY = mVerticalOffset + Math.max(height, mOuterRing.getHeight()) / 2;
if (newWaveCenterX != mWaveCenterX || newWaveCenterY != mWaveCenterY) {
if (mWaveCenterX == 0 && mWaveCenterY == 0) {
performInitialLayout(newWaveCenterX, newWaveCenterY);
}
mWaveCenterX = newWaveCenterX;
mWaveCenterY = newWaveCenterY;
mOuterRing.setX(mWaveCenterX);
mOuterRing.setY(Math.max(mWaveCenterY, mWaveCenterY));
updateTargetPositions();
}
if (DEBUG) dump();
}
Step 5:来看看触摸屏幕时的事件处理onTouchEvent()代码如下:
[java] view plaincopyprint?
@Override
public boolean onTouchEvent(MotionEvent event) {
final int action = event.getAction();
boolean handled = false;
switch (action) {
case MotionEvent.ACTION_DOWN:
handleDown(event);
handled = true;
break;
case MotionEvent.ACTION_MOVE:
handleMove(event);
handled = true;
break;
case MotionEvent.ACTION_UP:
handleMove(event);
handleUp(event);
handled = true;
break;
case MotionEvent.ACTION_CANCEL:
handleMove(event);
handled = true;
break;
}
invalidate();
return handled ? true : super.onTouchEvent(event);
}
通过handleMove()来处理移动事件:
[java] view plaincopyprint?
private void handleMove(MotionEvent event) {
if (!mDragging) {
trySwitchToFirstTouchState(event);
return;
}
int activeTarget = -1;
final int historySize = event.getHistorySize();
for (int k = 0; k < historySize + 1; k++) {
float x = k < historySize ? event.getHistoricalX(k) : event.getX();
float y = k < historySize ? event.getHistoricalY(k) : event.getY();
float tx = x - mWaveCenterX;
float ty = y - mWaveCenterY;
float touchRadius = (float) Math.sqrt(dist2(tx, ty));
final float scale = touchRadius > mOuterRadius ? mOuterRadius / touchRadius : 1.0f;
float limitX = mWaveCenterX + tx * scale;
float limitY = mWaveCenterY + ty * scale;
boolean singleTarget = mTargetDrawables.size() == 1;
if (singleTarget) {
// Snap to outer ring if there's only one target
float snapRadius = mOuterRadius - mSnapMargin;
if (touchRadius > snapRadius) {
activeTarget = 0;
x = limitX;
y = limitY;
}
} else {
// If there's more than one target, snap to the closest one less than hitRadius away.
float best = Float.MAX_VALUE;
final float hitRadius2 = mHitRadius * mHitRadius;
for (int i = 0; i < mTargetDrawables.size(); i++) {
// Snap to the first target in range
TargetDrawable target = mTargetDrawables.get(i);
float dx = limitX - target.getX();
float dy = limitY - target.getY();
float dist2 = dx*dx + dy*dy;
if (target.isValid() && dist2 < hitRadius2 && dist2 < best) {
activeTarget = i;
best = dist2;
}
}
x = limitX;
y = limitY;
}
if (activeTarget != -1) {
switchToState(STATE_SNAP, x,y);
float newX = singleTarget ? limitX : mTargetDrawables.get(activeTarget).getX();
float newY = singleTarget ? limitY : mTargetDrawables.get(activeTarget).getY();
moveHandleTo(newX, newY, false);
TargetDrawable currentTarget = mTargetDrawables.get(activeTarget);
if (currentTarget.hasState(TargetDrawable.STATE_FOCUSED)) {
currentTarget.setState(TargetDrawable.STATE_FOCUSED);
mHandleDrawable.setAlpha(0.0f);
}
} else {
switchToState(STATE_TRACKING, x, y);
moveHandleTo(x, y, false);
mHandleDrawable.setAlpha(1.0f);
}
}
// Draw handle outside parent's bounds
invalidateGlobalRegion(mHandleDrawable);
if (mActiveTarget != activeTarget && activeTarget != -1) {
dispatchGrabbedEvent(activeTarget);
if (AccessibilityManager.getInstance(mContext).isEnabled()) {
String targetContentDescription = getTargetDescription(activeTarget);
announceText(targetContentDescription);
}
}
mActiveTarget = activeTarget;
}
以上主要工作是绘制拖拽的参数以及绘制出来。通过invalidate()来主动刷屏幕;
在onDraw()方法中实现绘制图形,代码如下:
[java] view plaincopyprint?
@Override
protected void onDraw(Canvas canvas) {
mOuterRing.draw(canvas);
for (TargetDrawable target : mTargetDrawables) {
if (target != null) {
target.draw(canvas);
}
}
for (TargetDrawable target : mChevronDrawables) {
if (target != null) {
target.draw(canvas);
}
}
mHandleDrawable.draw(canvas);
}
在handleMove()方法中——>trySwitchToFirstTouchState(event);——>switchToState()——>doFinish();
——>setGrabbedState() ————> mOnTriggerListener.onGrabbedStateChange(this, mGrabbedState);
设置回调。
Step 6: LockScreen.java中有个内部类,监听这个移动事件的状态,——> 代码如下:
[java] view plaincopyprint?
class MultiWaveViewMethods implements MultiWaveView.OnTriggerListener,
UnlockWidgetCommonMethods {
private final MultiWaveView mMultiWaveView;
private boolean mCameraDisabled;
MultiWaveViewMethods(MultiWaveView multiWaveView) {
mMultiWaveView = multiWaveView;
final boolean cameraDisabled = mLockPatternUtils.getDevicePolicyManager()
.getCameraDisabled(null);
if (cameraDisabled) {
Log.v(TAG, "Camera disabled by Device Policy");
mCameraDisabled = true;
} else {
// Camera is enabled if resource is initially defined for MultiWaveView
// in the lockscreen layout file
mCameraDisabled = mMultiWaveView.getTargetResourceId()
!= R.array.lockscreen_targets_with_camera;
}
}
public void updateResources() {
int resId;
if (mCameraDisabled) {
// Fall back to showing ring/silence if camera is disabled by DPM...
resId = mSilentMode ? R.array.lockscreen_targets_when_silent
: R.array.lockscreen_targets_when_soundon;
} else {
resId = R.array.lockscreen_targets_with_camera;
}
mMultiWaveView.setTargetResources(resId);
}
public void onGrabbed(View v, int handle) {
}
public void onReleased(View v, int handle) {
}
public void onTrigger(View v, int target) {
if (target == 0 || target == 1) { // 0 = unlock/portrait, 1 = unlock/landscape
mCallback.goToUnlockScreen();
} else if (target == 2 || target == 3) { // 2 = alt/portrait, 3 = alt/landscape
if (!mCameraDisabled) {
// Start the Camera
Intent intent = new Intent(MediaStore.INTENT_ACTION_STILL_IMAGE_CAMERA);
intent.setFlags(Intent.FLAG_ACTIVITY_NEW_TASK);
mContext.startActivity(intent);
mCallback.goToUnlockScreen();
} else {
toggleRingMode();
mUnlockWidgetMethods.updateResources();
mCallback.pokeWakelock();
}
}
}
public void onGrabbedStateChange(View v, int handle) {
// Don't poke the wake lock when returning to a state where the handle is
// not grabbed since that can happen when the system (instead of the user)
// cancels the grab.
if (handle != MultiWaveView.OnTriggerListener.NO_HANDLE) {
mCallback.pokeWakelock();
}
}
public View getView() {
return mMultiWaveView;
}
public void reset(boolean animate) {
mMultiWaveView.reset(animate);
}
public void ping() {
mMultiWaveView.ping();
}
}
重点看public void onTrigger()这个方法,用于处理拖拽启动那个activity,一个启动camera,一个正常解锁。
锁屏的大概这个流程就是这个样子了,大家应该会一目了然了。由于时间仓促,难免有点纰漏,希望大家指正错误,如有不解的地方,欢迎留言探讨!!!
- AndroidICS4.0---->LockScreen锁屏流程【Android源码解析九】
- AndroidICS4.0---->LockScreen锁屏流程【Android源码解析九】
- AndroidICS4.0---->LockScreen锁屏流程【Android源码解析九】
- AndroidICS4.0---->LockScreen锁屏流程【Android源码解析九】
- android开机启动LockScreen流程
- Android源码解析之(九)-->SystemServer进程启动流程
- Android源码解析之(九)-->SystemServer进程启动流程
- Android 4.2.2 LockScreen&Keyguard 锁屏分析
- Android LockScreen
- Android LockScreen .
- Android LockScreen
- Android LockScreen
- android LockScreen
- Android---->Allapps加载流程详解【AndroidICS4.0——>Launcher系列五】
- Android---->Allapps加载流程详解【AndroidICS4.0——>Launcher系列五】
- Android---->Allapps加载流程详解【AndroidICS4.0——>Launcher系列五】
- Android---->Allapps加载流程详解【AndroidICS4.0——>Launcher系列五】
- 插件化系列开发之九--Android 全面插件化 RePlugin 流程与源码解析
- 多态和多态转型
- 较为复杂的动态规划整理
- 笔试中遇到的题
- hdu 2503
- 详解IOS SDK兼容性引导
- AndroidICS4.0---->LockScreen锁屏流程【Android源码解析九】
- 如何优化sencha性能
- telnet远程登入centos系统
- 算法策略的总结
- 正确使用PresentModalViewController
- Android的全局键(home键/长按耳机键)详解【android源码解析八】
- java 访问 Wcf利用 HttpClient
- Tomcat 系统架构与设计模式,第 1 部分: 工作原理
- Tomcat 系统架构与设计模式,第 2 部分: 设计模式分析