Linux中的常用数据结构详解
来源:互联网 发布:双喇叭营销软件 编辑:程序博客网 时间:2024/06/01 09:14
Linux内核 hlist_head/hlist_node结构解析
内核中的定义:
struct hlist_head {
};
struct hlist_node {
};
这个数据结构与一般的hash-list数据结构定义有以下的区别:
1)首先,hash的头节点仅存放一个指针,也就是first指针,指向的是list的头结点,没有tail指针也就是指向list尾节点的指针,这样的考虑是为了节省空间——尤其在hashbucket很大的情况下可以节省一半的指针空间.
2)list的节点有两个指针,但是需要注意的是pprev是指针的指针,它指向的是前一个节点的next指针;其中首元素的pprev指向链表头的fist字段,末元素的next为NULL.(见下图).

现在疑问来了:为什么pprev不是prev也就是一个指针,用于简单的指向list的前一个指针呢?这样即使对于first而言,它可以将prev指针指向list的尾结点.
主要是基于以下几个考虑:
1)hash-list中的list一般元素不多(如果太多了一般是设计出现了问题),即使遍历也不需要太大的代价,同时需要得到尾结点的需求也不多.
2)如果对于一般节点而言,prev指向的是前一个指针,而对于first也就是hash的第一个元素而言prev指向的是list的尾结点,那么在删除一个元素的时候还需要判断该节点是不是first节点进行处理.而在hlist提供的删除节点的API中,并没有带上hlist_head这个参数,因此做这个判断存在难度.
3)以上两点说明了为什么不使用prev,现在来说明为什么需要的是pprev,也就是一个指向指针的指针来保存前一个节点的next指针--因为这样做即使在删除的节点是first节点时也可以通过*pprev =next;直接修改指针的指向.来看删除一个节点和修改list头结点的两个API:
{
}
static
{
}
深入浅出linux内核源代码之双向链表list_head
转自:http://blog.csdn.net/fjb2080/article/details/5457609
前言:在linux源代码中有个头文件为list.h。很多linux下的源代码都会使用这个头文件,它里面定义了一个结构,以及定义了和其相关的一组函数,这个结构是这样的:
structlist_head{
structlist_head *next, *prev;
};
那么这个头文件又是有什么样的作用呢,这篇文章就是用来解释它的作用,虽然这是linux下的源代码,但对于学习C语言的人来说,这是算法和平台没有什么关系。
一、双向链表
学习计算机的人都会开一门课程《数据结构》,里面都会有讲解双向链表的内容。
什么是双向链表,它看起来是这样的:
structdlist
{
intno;
void*data;
structdlist *prev, *next;
};
它的图形结构图如下:

如果是双向循环链表,那么就加上虚线所示。
现在有几个结构体,它们是:
表示人的:
structperson
{
intage;
int weight;
};
表示动物的:
structanimal
{
intage;
int weight;
};
如果有一组filename变量和filedata变量,把它们存起来,我们会怎么做,当然就用数组了,但我们想使用双向链表,让它们链接起来,那该怎么做,唯一可以做的就是给每个结构加如两个成员,如下:
表示人的:
structperson
{
intage;
int weight;
structperson *next, *prev;
};
表示动物的:
structanimal
{
intage;
int weight;
structanimal *next, *prev;
};
现在有一个人的一个链表的链头指针person_head(循环双向链表)和动物的链表的链头指针ainimal_head,我们要获得特定年龄和特定体重的人或动物(假设不考虑重叠),那么代码看起来可能是这样:
structperson * get_percent(int age, int weight)
{
…....
structperson *p;
for(p= person_head->next; p != person_head; p=p->next)
{
if(p->age== age && p->weight == weight)
returnp;
}
…...
}
那同理,要获得一个特定年龄和重量的动物的函数get_animal(intage, int weight)的代码也是和上面的类似。
如果我们定义这样的两个函数,它们基本一样,会不会觉得有点冗余,如果是c++就好了,但这里只说c。
如果我们仔细观察一下这两个结构,我们会发现它们出了类型名字不一样外,其它的都一样。那么我们考虑用一个宏来实现,这个宏看起来可能是这样的。
#defineget_one(list, age, weight, type, one) /
do /
{/
type*p;/
for(p= ((type*)list)->next; p != (type*)list; p=p->next)/
if(p->age == age && p->weight == weight)/
{/
one= p;/
break;/
}/
}while(0)
那么我们获得一个年龄50,体重60的人可以这样:
structperson *one = NULL;
get_one(person_head,50, 60, struct person, one);
if(one)
{
//get it
…...
}
同样获得一个年龄20,体重130的动物可以这样:
structanimal *one = NULL;
get_one(animal_head,50, 60, struct animal, one);
if(one)
{
//get it
…...
}
我们再回过头来看这两个结构,它们的指向前和指向后的指针其实都差不多,那把它们综合起来吧,所以看起来如下面:
structlist_head{
structlist_head *next, *prev;
};
表示人的:
structperson
{
intage;
int weight;
structlist_head list;
};
表示动物的:
structanimal
{
intage;
int weight;
structlist_head list;
};
现在这个两个结构看起来就更差不多一样了。现在为了方便,我们去掉那些暂时不用的数据,如下:
structperson
{
structlist_head list;
};
表示动物的:
structanimal
{
structlist_head list;
};
可能又会有些人会问了,structlist_head都不是structpersion和structanimal类型,怎么可以做链表的指针呢?其实,无论是什么样的指针,它的大小都是一样的,32位的系统中,指针的大小都是32位(即4个字节),只是不同类型的指针在解释的时候不一样而已,那么这个structlist_head又是怎么去做这些结构的链表指针呢,那么就请看下一节吧:)。
二、structlist_head结构的操作
首先,让我们来看下和structlist_head有关的两个宏,它们定义在list.h文件中。
#defineLIST_HEAD_INIT(name) { &(name), &(name) }
#defineLIST_HEAD(name) struct list_head name = LIST_HEAD_INIT(name)
#defineINIT_LIST_HEAD(ptr) do { /
(ptr)->next= (ptr); (ptr)->prev = (ptr); /
}while (0)
这两个宏是用了定义双向链表的头节点的,定义一个双向链表的头节点,我们可以这样:
structlist_head head;
LIST_HEAD_INIT(head);
又或者直接这样:
LIST_HEAD(head);
这样,我们就定义并初始化了一个头节点。
#defineLIST_HEAD_INIT(name) { &(name), &(name) }
就是用head的地址初始化其两个成员next和prev,使其都指向自己。
我们再看下和其相关的几个函数,这些函数都作为内联函数也都定义list.h中,这里要说明一下linux源码的一个风格,在下面的这些函数中以下划线开始的函数是给内部调用的函数,而以符开始的函数就是对外使用的函数,这些函数一般都是调用以下划线开始的函数,或是说是对下划线开始的函数的封装。
2.1增加节点的函数
staticinline void __list_add();
staticinline void list_add();
staticinline void list_add_tail();
其实看源代码是最好的讲解了,这里我再简单的讲一下。
/**
*__list_add - Insert a new entry between two known consecutiveentries.
*@new:
*@prev:
*@next:
*
*This is only for internal list manipulation where we know theprev/next
*entries already!
*/
static__inline__ void __list_add(struct list_head * new,
structlist_head * prev, struct list_head * next)
{
next->prev= new;
new->next= next;
new->prev= prev;
prev->next= new;
}
这个函数在prev和next间插入一个节点new。
/**
*list_add - add a new entry
*@new: new entry to be added
*@head: list head to add it after
*
*Insert a new entry after the specified head.
*This is good for implementing stacks.
*/
static__inline__ void list_add(struct list_head *new, struct list_head*head)
{
__list_add(new,head, head->next);
}
这个函数在head节点后面插入new节点。
/**
*list_add_tail - add a new entry
*@new: new entry to be added
*@head: list head to add it before
*
*Insert a new entry before the specified head.
*This is useful for implementing queues.
*/
static__inline__ void list_add_tail(struct list_head *new, struct list_head*head)
{
__list_add(new,head->prev, head);
}
这个函数和上面的那个函数相反,它在head节点的前面插入new节点。
2.2从链表中删除节点的函数
/**
*__list_del -
*@prev:
*@next:
*
*Delete a list entry by making the prev/next entries point to eachother.
*
*This is only for internal list manipulation where we know theprev/next
*entries already!
*/
static__inline__ void __list_del(struct list_head * prev,
structlist_head * next)
{
next->prev= prev;
prev->next= next;
}
/**
*list_del - deletes entry from list.
*@entry: the element to delete from the list.
*
*Note: list_empty on entry does not return true after this, the entryis in
*an undefined state.
*/
static__inline__ void list_del(struct list_head *entry)
{
__list_del(entry->prev,entry->next);
}
/**
*list_del_init - deletes entry from list and reinitialize it.
*@entry: the element to delete from the list.
*/
static__inline__ void list_del_init(struct list_head *entry)
{
__list_del(entry->prev,entry->next);
INIT_LIST_HEAD(entry);
}
这里简单说一下,list_del(structlist_head *entry)是从链表中删除entry节点。list_del_init(structlist_head *entry) 不但从链表中删除节点,还把这个节点的向前向后指针都指向自己,即初始化。
那么,我们怎么判断这个链表是不是空的呢!上面我说了,这里的双向链表都是有一个头节点,而我们上面看到,定义一个头节点时我们就初始化了,即它的prev和next指针都指向自己。所以这个函数是这样的。
/**
*list_empty - tests whether a list is empty
*@head: the list to test.
*/
static__inline__ int list_empty(struct list_head *head)
{
returnhead->next == head;
}
讲了这几个函数后,这又到了关键了,下面讲解的一个宏的定义就是对第一节中,我们所要说的为什么在一个结构中加入structlist_head变量就把这个结构变成了双向链表呢,这其中的关键就是怎么通过这个structlist_head变量来获取整个结构的变量,下面这个宏就为你解开答案:
/**
*list_entry - get the struct for this entry
*@ptr: the &struct list_head pointer.
*@type: the type of the struct this is embedded in.
*@member: the name of the list_struct within the struct.
*/
#definelist_entry(ptr, type, member) /
((type*)((char *)(ptr)-(unsigned long)(&((type *)0)->member)))
乍一看下,不知道这个宏在说什么,没关系,我举个例子来为你一一解答:)
首先,我们还是用上面的结构:
structperson
{
intage;
int weight;
structlist_head list;
};
我们一看到这样的结构就应该知道它定义了一个双向链表,下面来看下。
我们有一个指针:
structlist_head *pos;
现在有这个指针,我们怎么去获得这个指针所在的结构的变量(即是structperson变量,其实是structperson指针)呢?看下面这样使用:
structperson *one = list_entry(pos, struct person, list);
不明白是吧,展开一下list_entry结构如下:
((structperson *)((char *)(pos) - (unsigned long)(&((struct person*)0)->list)))
我慢慢的分解,首先分成两部分(char*)(pos)减去(unsignedlong)(&((struct person *)0)->list)然后转换成(structperson *)类型的指针。
(char*)(pos):是将pos由structlist_head*转换成char*,这个好理解。
(unsignedlong)(&((struct person *)0)->list):先看最里面的(structperson *)0),它是把0地址转换成structperson指针,然后(structperson *)0)->list就是指向list变量,之后是&((structperson *)0)->list是取这个变量的地址,最后是(unsignedlong)(&((struct person *)0)->list)把这个变量的地址值变成一个整形数!
这么复杂啊,其实说白了,这个(unsignedlong)(&((struct person *)0)->list)的意思就是取list变量在structperson结构中的偏移量。
用个图形来说(unsignedlong)(&((struct person *)0)->list,如下:
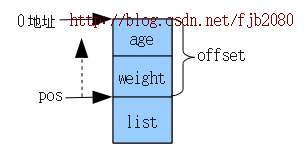
而(unsignedlong)(&((struct person *)0)->list就是获取这个offset的值。
((char*)(pos) - (unsigned long)(&((struct person *)0)->list))
就是将pos指针往前移动offset位置,即是本来pos是structlist_head类型,它即是list。即是把pos指针往structperson结构的头地址位置移动过去,如上图的pos和虚箭头。
当pos移到structperson结构头后就转换成(structperson *)指针,这样就可以得到structperson *变量了。
所以我们再回到前面的句子
structperson *one = list_entry(pos, struct person, list);
就是由pos得到pos所在的结构的指针,动物就可以这样:
structanimal *one = list_entry(pos, struct animal, list);
下面我们再来看下和structlist_head相关的最后一个宏。
2.3list_head的遍历的宏
/**
*list_for_each - iterate over a list
*@pos: the &struct list_head to use as a loop counter.
*@head: the head for your list.
*/
#definelist_for_each(pos, head) /
for(pos = (head)->next; pos != (head); pos = pos->next)
/**
*list_for_each_safe - iterate over a list safe against removal of listentry
*@pos: the &struct list_head to use as a loop counter.
*@n: another &struct list_head to use as temporary storage
*@head: the head for your list.
*/
#definelist_for_each_safe(pos, n, head) /
for(pos = (head)->next, n = pos->next; pos != (head); /
pos= n, n = pos->next)
list_for_each(pos,head)是遍历整个head链表中的每个元素,每个元素都用pos指向。
list_for_each_safe(pos,n,head)是用于删除链表head中的元素,不是上面有删除链表元素的函数了吗,为什么这里又要定义一个这样的宏呢。看下这个宏后面有个safe字,就是说用这个宏来删除是安全的,直接用前面的那些删除函数是不安全的。这个怎么说呢,我们看下下面这个图,有三个元素a,b,c。

现在,我们要删除b元素,下面是删除的算法(先只用删除函数):
structlist_head *pos;
list_for_each(pos,myhead)
{
if(pos == b)
{
list_del_init(pos);
//break;
}
。。。
}
上面的算法是不安全的,因为当我们删除b后,如下图这样:

上删除pos即b后,list_for_each要移到下一个元素,还需要用pos来取得下一个元素,但pos的指向已经改变,如果不直接退出而是在继续操作的话,就会出错了。
而list_for_each_safe就不一样了,如果上面的代码改成这样:
structlist_head *pos, *n;
list_for_each_safe(pos,n, myhead)
{
if(pos == b)
{
list_del_init(pos);
//break;
}
。。。
}
这里我们使用了n作为一个临时的指针,当pos被删除后,还可以用n来获得下一个元素的位置。
我用一个程序来说明在structperson中增加了structlist_head变量后怎么来操作这样的双向链表。
- #include <stdio.h>
- #include "list.h"
- struct person
- {
- int age;
- int weight;
- struct list_head list;
- };
- int main(int argc, char* argv[])
- {
- struct person *tmp;
- struct list_head *pos, *n;
- int age_i, weight_j;
- // 定义并初始化一个链表头
- struct person person_head;
- INIT_LIST_HEAD(&person_head.list);
- for(age_i = 10, weight_j = 35; age_i < 40; age_i += 5, weight_j += 5)
- {
- tmp =(struct person*)malloc(sizeof(struct person));
- tmp->age = age_i;
- tmp->weight = weight_j;
- // 把这个节点链接到链表后面
- // 这里因为每次的节点都是加在person_head的后面,所以先加进来的节点就在链表里的最后面
- // 打印的时候看到的顺序就是先加进来的就在最后面打印
- list_add(&(tmp->list), &(person_head.list));
- }
- // 下面把这个链表中各个节点的值打印出来
- printf("/n");
- printf("=========== print the list ===============/n");
- list_for_each(pos, &person_head.list)
- {
- // 这里我们用list_entry来取得pos所在的结构的指针
- tmp = list_entry(pos, struct person, list);
- printf("age:%d, weight: %d /n", tmp->age, tmp->weight);
- }
- printf("/n");
- // 下面删除一个节点中,age为20的节点
- printf("========== print list after delete a node which age is 20 ==========/n");
- list_for_each_safe(pos, n, &person_head.list)
- {
- tmp = list_entry(pos, struct person, list);
- if(tmp->age == 20)
- {
- list_del_init(pos);
- free(tmp);
- }
- }
- list_for_each(pos, &person_head.list)
- {
- tmp = list_entry(pos, struct person, list);
- printf("age:%d, weight: %d /n", tmp->age, tmp->weight);
- }
- // 释放资源
- list_for_each_safe(pos, n, &person_head.list)
- {
- tmp = list_entry(pos, struct person, list);
- list_del_init(pos);
- free(tmp);
- }
- return 0;
- }
编译:
linux下的可以:gcc -g -Wall main.c -otest
windows下的可以建一个控制台工程,把main.c和list.h加到工程中编译。
运行test后的输出如下:
===========print the list ===============
age:35, weight: 60
age:30, weight: 55
age:25, weight: 50
age:20, weight: 45
age:15, weight: 40
age:10, weight: 35
==========print list after delete a node which age is 20 ==========
age:35, weight: 60
age:30, weight: 55
age:25, weight: 50
age:15, weight: 40
age:10, weight: 35
我们看到,这就是一个非常好和有效的双向链表,我们不需要为每一种结构去定义相关的函数,如遍历、增加和删除等函数,我们只需要简单的在结构中增加structlist_head的一个变量,我们的结构立马就变成了一个双向链表,而且,我们对链表的操作也不用自己写,直接调用已经定义好的函数和宏,一切就那么简单和有效。
文章写到这里是不是应该结束了呢,没有,我还不想结束,还想在继续说。
四、一个结构多个链表
在上面,我们看到人的结构是这样的:
structperson
{
intage;
intweight;
structlist_head list;
};
它的链表图形看起来如下图所示:

但我们知道,一个人,他的熟悉还有很多,例如他有各种各样的衣服,各种不同的鞋子等。所以,我定义了两个这样的结构:
structclothes
{
int size; //衣服有各种大小
Colorcolor; //衣服有各种颜色,这里假设有一种Color的类型
};
structshoot
{
Kind kind; //鞋子有各种类型,秋、冬、运动、休闲等,同样假设已经定义过Kind这样的类型
Colorcolor; //鞋子也有各种颜色
};
那么这个人的定义可能就是这样的:
structperson
{
intage;
intweight;
structclothes clo;
structshoot sht;
};
在这里,我有意clo和sht这两个变量放在list后面,其实,代表链表的list在结构中的位置在哪里是没什么关系的,list_entry也一样可以将结构的指针找出来。
这里有一个问题是,一个人不止一件衣服,也不止一双鞋子,所以我们应该把他拥有的衣服和鞋子应该加上,那么怎么加呢?这里应该把衣服和鞋子的结构也变成链表,这不就解决了。
把结构改一下,变成了这样:
structclothes
{
structlist_head list;
int size; //衣服有各种大小
Colorcolor; //衣服有各种颜色,这里假设有一种Color的类型
};
structshoot
{
structlist_head list;
Kind kind; //鞋子有各种类型,秋、冬、运动、休闲等,同样假设已经定义过Kind这样的类型
Colorcolor; //鞋子也有各种颜色
};
现在鞋子和衣服都是链表了,都可以把它们连接起来。那我们的结构是不是还应该这样定义:
structperson
{
intage;
intweight;
structclothes clo;
structshoot sht;
};
如果是,那么我们应该怎么定义这个头节点。在前面我们看到,定义一个person_head的头节点是这样的:
//定义并初始化一个链表头
structperson person_head;
INIT_LIST_HEAD(&person_head.list);
难道我们应该这样定义吗?
//定义并初始化一个链表头
structperson person_head;
INIT_LIST_HEAD(&person_head.list);
INIT_LIST_HEAD(&person_head.col.list);
INIT_LIST_HEAD(&person_head.sht.list);
那么增加一件衣服进去呢,代码看起来是这样的:
structclothes tmp =(struct clothes*)malloc(sizeof(struct clothes));
…...
list_add(&(tmp->list),&(person_head.clo.list));
这样会不会有点麻烦,其实,如果我们可以认真想一想,我们会发现,既然structperon是一个含有list_head的结构,它可以把它的类型节点链接在后面,那么structclothes也是一个含有list_head的结构,它们本质也没什么区别,应该也可以链接在它后面的。所以我们的structperson的结构应该变成这样:
structperson
{
intage;
intweight;
structlist_head clo;
structlist_head sht;
};
那么我们链接节点后的图形如下图所示:

<!--@page { margin: 2cm }P { margin-bottom: 0.21cm }-->
由上面,我们可以知道,有了structlist_head结构,我们可以为我们的结构体增加多个子节点链表。
这篇文章的pdf版和代码可以在下面的连接上下载:
详解Linux内核红黑树算法的实现
平衡二叉树(BalancedBinary Tree或Height-Balanced Tree)又称AVL树。它或者是一棵空树,或者是具有下列性质的二叉树:它的左子树和右子树都是平衡二叉树,且左子树和右子树的深度之差的绝对值不超过1。若将二叉树上结点的平衡因子BF(BalanceFactor)定义为该结点的左子树的深度减去它的右子树的深度,则平衡二叉树上所有结点的平衡因子只可能是-1、0和1。(此段定义来自严蔚敏的《数据结构(C语言版)》)
红黑树是一种在插入或删除结点时都需要维持平衡的二叉查找树,并且每个结点都具有颜色属性:
(1)、一个结点要么是红色的,要么是黑色的。
(2)、根结点是黑色的。
(3)、如果一个结点是红色的,那么它的子结点必须是黑色的,也就是说在沿着从根结点出发的任何路径上都不会出现两个连续的红色结点。
(4)、从一个结点到一个NULL指针的每条路径上必须包含相同数目的黑色结点。
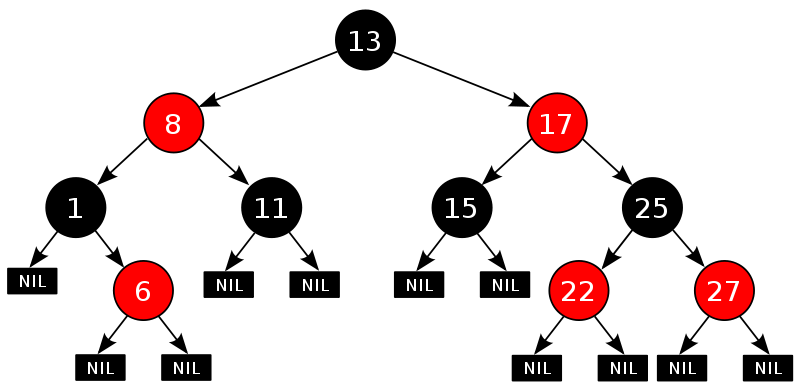
(此图片来自维基百科)
Linux内核红黑树的算法都定义在linux-2.6.38.8/include/linux/rbtree.h和linux-2.6.38.8/lib/rbtree.c两个文件中。
1、结构体
- struct rb_node
- {
- unsigned long rb_parent_color;
- #define RB_RED 0
- #define RB_BLACK 1
- struct rb_node *rb_right;
- struct rb_node *rb_left;
- } __attribute__((aligned(sizeof(long))));
这里的巧妙之处是使用成员rb_parent_color同时存储两种数据,一是其双亲结点的地址,另一是此结点的着色。__attribute__((aligned(sizeof(long))))属性保证了红黑树中的每个结点的首地址都是32位对齐的(在32位机上),也就是说每个结点首地址的bit[1]和bit[0]都是0,因此就可以使用bit[0]来存储结点的颜色属性而不干扰到其双亲结点首地址的存储。
操作rb_parent_color的函数:
- #define rb_parent(r) ((struct rb_node *)((r)->rb_parent_color & ~3)) //获得其双亲结点的首地址
- #define rb_color(r) ((r)->rb_parent_color & 1) //获得颜色属性
- #define rb_is_red(r) (!rb_color(r)) //判断颜色属性是否为红
- #define rb_is_black(r) rb_color(r) //判断颜色属性是否为黑
- #define rb_set_red(r) do { (r)->rb_parent_color &= ~1; } while (0) //设置红色属性
- #define rb_set_black(r) do { (r)->rb_parent_color |= 1; } while (0) //设置黑色属性
- static inline void rb_set_parent(struct rb_node *rb, struct rb_node *p) //设置其双亲结点首地址的函数
- {
- rb->rb_parent_color = (rb->rb_parent_color & 3) | (unsigned long)p;
- }
- static inline void rb_set_color(struct rb_node *rb, int color) //设置结点颜色属性的函数
- {
- rb->rb_parent_color = (rb->rb_parent_color & ~1) | color;
- }
初始化新结点:
- static inline void rb_link_node(struct rb_node * node, struct rb_node * parent,
- struct rb_node ** rb_link)
- {
- node->rb_parent_color = (unsigned long )parent; //设置其双亲结点的首地址(根结点的双亲结点为NULL),且颜色属性设为黑色
- node->rb_left = node->rb_right = NULL; //初始化新结点的左右子树
- *rb_link = node; //指向新结点
- }
指向红黑树根结点的指针:
- struct rb_root
- {
- struct rb_node *rb_node;
- };
- #define RB_ROOT (struct rb_root) { NULL, } //初始化指向红黑树根结点的指针
- #define rb_entry(ptr, type, member) container_of(ptr, type, member) //用来获得包含struct rb_node的结构体的首地址
- #define RB_EMPTY_ROOT(root) ((root)->rb_node == NULL) //判断树是否为空
- #define RB_EMPTY_NODE(node) (rb_parent(node) == node) //判断node的双亲结点是否为自身
- #define RB_CLEAR_NODE(node) (rb_set_parent(node, node)) //设置双亲结点为自身
2、插入
首先像二叉查找树一样插入一个新结点,然后根据情况作出相应的调整,以使其满足红黑树的颜色属性(其实质是维持红黑树的平衡)。
函数rb_insert_color使用while循环不断地判断双亲结点是否存在,且颜色属性为红色。
若判断条件为真,则分成两部分执行后续的操作:
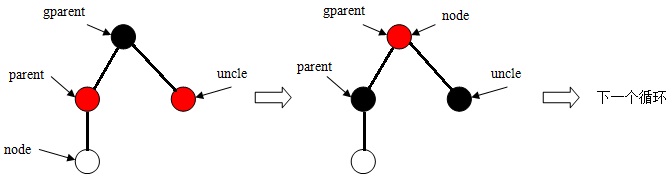
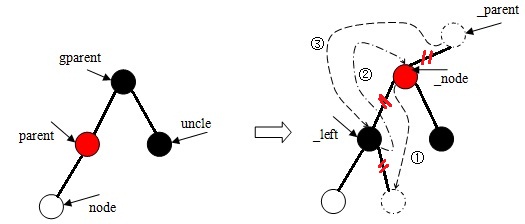
(1)、当双亲结点是祖父结点左子树的根时,则:
a、存在叔父结点,且颜色属性为红色。
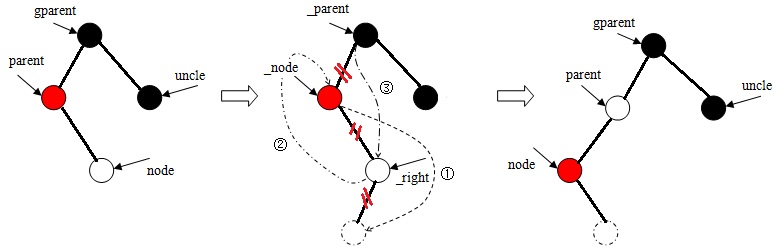
b、当node是其双亲结点右子树的根时,则左旋,然后执行第c步。
c、当node是其双亲结点左子树的根时。
(2)、当双亲结点是祖父结点右子树的根时的操作与第(1)步大致相同,这里略过不谈。
若为假,则始终设置根结点的颜色属性为黑色。
- void rb_insert_color(struct rb_node *node, struct rb_root *root)
- {
- struct rb_node *parent, *gparent;
- while ((parent = rb_parent(node)) && rb_is_red(parent)) //双亲结点不为NULL,且颜色属性为红色
- {
- gparent = rb_parent(parent); //获得祖父结点
- if (parent == gparent->rb_left) //双亲结点是祖父结点左子树的根
- {
- {
- register struct rb_node *uncle = gparent->rb_right; //获得叔父结点
- if (uncle && rb_is_red(uncle)) //叔父结点存在,且颜色属性为红色
- {
- rb_set_black(uncle); //设置叔父结点为黑色
- rb_set_black(parent); //设置双亲结点为黑色
- rb_set_red(gparent); //设置祖父结点为红色
- node = gparent; //node指向祖父结点
- continue; //继续下一个while循环
- }
- }
- if (parent->rb_right == node) //当node是其双亲结点右子树的根时
- {
- register struct rb_node *tmp;
- __rb_rotate_left(parent, root); //左旋
- tmp = parent; //调整parent和node指针的指向
- parent = node;
- node = tmp;
- }
- rb_set_black(parent); //设置双亲结点为黑色
- rb_set_red(gparent); //设置祖父结点为红色
- __rb_rotate_right(gparent, root); //右旋
- } else { // !(parent == gparent->rb_left)
- {
- register struct rb_node *uncle = gparent->rb_left;
- if (uncle && rb_is_red(uncle))
- {
- rb_set_black(uncle);
- rb_set_black(parent);
- rb_set_red(gparent);
- node = gparent;
- continue;
- }
- }
- if (parent->rb_left == node)
- {
- register struct rb_node *tmp;
- __rb_rotate_right(parent, root);
- tmp = parent;
- parent = node;
- node = tmp;
- }
- rb_set_black(parent);
- rb_set_red(gparent);
- __rb_rotate_left(gparent, root);
- } //end if (parent == gparent->rb_left)
- } //end while ((parent = rb_parent(node)) && rb_is_red(parent))
- rb_set_black(root->rb_node);
- }
3、删除
像二叉查找树的删除操作一样,首先需要找到所需删除的结点,然后根据该结点左右子树的有无分为三种情形:

若node结点的颜色属性为黑色,则需要调用__rb_erase_color函数来进行调整。
- void rb_erase(struct rb_node *node, struct rb_root *root)
- {
- struct rb_node *child, *parent;
- int color;
- if (!node->rb_left) //删除结点无左子树
- child = node->rb_right;
- else if (!node->rb_right) //删除结点无右子树
- child = node->rb_left;
- else //左右子树都有
- {
- struct rb_node *old = node, *left;
- node = node->rb_right;
- while ((left = node->rb_left) != NULL)
- node = left;
- if (rb_parent(old)) {
- if (rb_parent(old)->rb_left == old)
- rb_parent(old)->rb_left = node;
- else
- rb_parent(old)->rb_right = node;
- } else
- root->rb_node = node;
- child = node->rb_right;
- parent = rb_parent(node);
- color = rb_color(node);
- if (parent == old) {
- parent = node;
- } else {
- if (child)
- rb_set_parent(child, parent);
- parent->rb_left = child;
- node->rb_right = old->rb_right;
- rb_set_parent(old->rb_right, node);
- }
- node->rb_parent_color = old->rb_parent_color;
- node->rb_left = old->rb_left;
- rb_set_parent(old->rb_left, node);
- goto color;
- } //end else
- parent = rb_parent(node); //获得删除结点的双亲结点
- color = rb_color(node); //获取删除结点的颜色属性
- if (child)
- rb_set_parent(child, parent);
- if (parent)
- {
- if (parent->rb_left == node)
- parent->rb_left = child;
- else
- parent->rb_right = child;
- }
- else
- root->rb_node = child;
- color:
- if (color == RB_BLACK) //如果删除结点的颜色属性为黑色,则需调用__rb_erase_color函数来进行调整
- __rb_erase_color(child, parent, root);
- }
4、遍历
rb_first和rb_next函数可组成中序遍历,即以升序遍历红黑树中的所有结点。
- struct rb_node *rb_first(const struct rb_root *root)
- {
- struct rb_node *n;
- n = root->rb_node;
- if (!n)
- return NULL;
- while (n->rb_left)
- n = n->rb_left;
- return n;
- }
- struct rb_node *rb_next(const struct rb_node *node)
- {
- struct rb_node *parent;
- if (rb_parent(node) == node)
- return NULL;
- /* If we have a right-hand child, go down and then left as far
- as we can. */
- if (node->rb_right) {
- node = node->rb_right;
- while (node->rb_left)
- node=node->rb_left;
- return (struct rb_node *)node;
- }
- /* No right-hand children. Everything down and left is
- smaller than us, so any 'next' node must be in the general
- direction of our parent. Go up the tree; any time the
- ancestor is a right-hand child of its parent, keep going
- up. First time it's a left-hand child of its parent, said
- parent is our 'next' node. */
- while ((parent = rb_parent(node)) && node == parent->rb_right)
- node = parent;
- return parent;
- }
5、在应用程序中使用
Linux内核中红黑树算法的实现非常通用、巧妙,而且免费又开源,因此完全可以把它运用到自己的应用程序中。
(1)、从内核中拷贝源文件:
- $ mkdir redblack
- $ cd redblack/
- $ cp ../linux-2.6.38.8/lib/rbtree.c .
- $ cp ../linux-2.6.38.8/include/linux/rbtree.h .
(2)、修改源文件:
a、C文件rbtree.c
修改包含头文件的代码
- //删除以下两行代码
- #include <linux/rbtree.h>
- #include <linux/module.h>
- //新增以下代码,即包含当前目录中的头文件rbtree.h
- #include "rbtree.h"
删除所有的EXPORT_SYMBOL宏
- EXPORT_SYMBOL(rb_insert_color);
- EXPORT_SYMBOL(rb_erase);
- EXPORT_SYMBOL(rb_augment_insert);
- EXPORT_SYMBOL(rb_augment_erase_begin);
- EXPORT_SYMBOL(rb_augment_erase_end);
- EXPORT_SYMBOL(rb_first);
- EXPORT_SYMBOL(rb_last);
- EXPORT_SYMBOL(rb_next);
- EXPORT_SYMBOL(rb_prev);
- EXPORT_SYMBOL(rb_replace_node);
b、头文件rbtree.h
删除包含头文件的代码,并添加三个宏定义
- //删除以下两行代码
- #include <linux/kernel.h>
- #include <linux/stddef.h>
- /* linux-2.6.38.8/include/linux/stddef.h */
- #undef NULL
- #if defined(__cplusplus)
- #define NULL 0
- #else
- #define NULL ((void *)0)
- #endif
- /* linux-2.6.38.8/include/linux/stddef.h */
- #define offsetof(TYPE, MEMBER) ((size_t) &((TYPE *)0)->MEMBER)
- /* linux-2.6.38.8/include/linux/kernel.h */
- #define container_of(ptr, type, member) ({ \
- const typeof( ((type *)0)->member ) *__mptr = (ptr); \
- (type *)( (char *)__mptr - offsetof(type,member) );})
(3)、示例代码
Linux内核红黑树的使用方法请参考linux-2.6.38.8/Documentation/rbtree.txt文件。
- /* test.c */
- #include <stdio.h>
- #include <stdlib.h>
- #include "rbtree.h"
- struct mytype {
- struct rb_node my_node;
- int num;
- };
- struct mytype *my_search(struct rb_root *root, int num)
- {
- struct rb_node *node = root->rb_node;
- while (node) {
- struct mytype *data = container_of(node, struct mytype, my_node);
- if (num < data->num)
- node = node->rb_left;
- else if (num > data->num)
- node = node->rb_right;
- else
- return data;
- }
- return NULL;
- }
- int my_insert(struct rb_root *root, struct mytype *data)
- {
- struct rb_node **tmp = &(root->rb_node), *parent = NULL;
- /* Figure out where to put new node */
- while (*tmp) {
- struct mytype *this = container_of(*tmp, struct mytype, my_node);
- parent = *tmp;
- if (data->num < this->num)
- tmp = &((*tmp)->rb_left);
- else if (data->num > this->num)
- tmp = &((*tmp)->rb_right);
- else
- return -1;
- }
- /* Add new node and rebalance tree. */
- rb_link_node(&data->my_node, parent, tmp);
- rb_insert_color(&data->my_node, root);
- return 0;
- }
- void my_delete(struct rb_root *root, int num)
- {
- struct mytype *data = my_search(root, num);
- if (!data) {
- fprintf(stderr, "Not found %d.\n", num);
- return;
- }
- rb_erase(&data->my_node, root);
- free(data);
- }
- void print_rbtree(struct rb_root *tree)
- {
- struct rb_node *node;
- for (node = rb_first(tree); node; node = rb_next(node))
- printf("%d ", rb_entry(node, struct mytype, my_node)->num);
- printf("\n");
- }
- int main(int argc, char *argv[])
- {
- struct rb_root mytree = RB_ROOT;
- int i, ret, num;
- struct mytype *tmp;
- if (argc < 2) {
- fprintf(stderr, "Usage: %s num\n", argv[0]);
- exit(-1);
- }
- num = atoi(argv[1]);
- printf("Please enter %d integers:\n", num);
- for (i = 0; i < num; i++) {
- tmp = malloc(sizeof(struct mytype));
- if (!tmp)
- perror("Allocate dynamic memory");
- scanf("%d", &tmp->num);
- ret = my_insert(&mytree, tmp);
- if (ret < 0) {
- fprintf(stderr, "The %d already exists.\n", tmp->num);
- free(tmp);
- }
- }
- printf("\nthe first test\n");
- print_rbtree(&mytree);
- my_delete(&mytree, 21);
- printf("\nthe second test\n");
- print_rbtree(&mytree);
- return 0;
- }
编译并执行:
- $ gcc rbtree.c test.c -o test
- richard@tanglinux:~/algorithm/redblack$ ./test 10
- Please enter 10 integers:
- 23
- 4
- 56
- 32
- 89
- 122
- 12
- 21
- 45
- 23
- The 23 already exists.
- the first test
- 4 12 21 23 32 45 56 89 122
- the second test
- 4 12 23 32 45 56 89 122
linux内核的 等待队列 使用方法,wait_queue_head_t,进程休眠
当你在用户空间需要读写一大片数据的时候,这个就用上了。
以下来自:http://www.yuanma.org/data/2006/1207/article_1916.htm
interruptible_sleep_on( &wq )是用来将目前的 process,也就是要求写资料到buffer 的 process放到 wq 这个 wait_queue 里。在interruptible_sleep_on 里,则是最后会呼叫 schedule() 来做 schedule的动作,谁调用了schedule谁就趴下,让别人去运行,醒来就原地起来,执行schedule()后的代码。那那个调用了schedule的家伙什么醒过来呢?这时候就需要用到另一个函数了wake_up_interruptible()了。
以下来自:http://tauruspdj.blog.163.com/blog/static/4312500620090794030998/
linux中最简单的休眠方式是下面的宏,
wait_event(queue, condition) /*进程将被置于非中断休眠(uninterruptible sleep)*/
wait_event_interruptible(queue, condition)/*进程可被信号中断休眠,返回非0值表示休眠被信号中断*/
wait_event_timeout(queue, condition, timeout) /*等待限定时间jiffy,condition满足其一返回0*/
wait_event_interruptible_timeout(queue, condition, timeout)
queue是等待队列头,传值方式
condition是任意一个布尔表达式,在休眠前后多次对condition求值,为真则唤醒
唤醒进程的基本函数是wake_up
void wake_up(wait_queue_head_t *queue); /*唤醒等待在给定queue上的所有进程*/
void wake_up_interruptible(wait_queue_head_t *queue);
实践中,一般是wait_event和wake_up,wait_event_interruptible和wake_up_interruptible成对使用。
【补充】其实看了那么多,他们也没有给个立即可用的步骤,写blog嘛,就是分享心得。我基于2.6.24总结一下,希望对大家有帮助:
1、定义:wait_queue_head_t my_queue;
2、初始化 init_waitqueue_head(&my_queue);
3、在一个函数里面等待:wait_event(queue, condition) ;(别在中断里面搞)
4、在另一个函数里面唤醒:wake_up(wait_queue_head_t *queue); (这个可以在中断调用,去唤醒别的进程,特别是dma操作类的)
有好几个等待和唤醒函数,大家可以慢慢试。
- Linux中的常用数据结构详解
- linux内核中常用的数据结构和操作详解
- linux内核中常用的数据结构和操作详解
- linux内核中常用的数据结构和操作详解
- QT中的常用数据结构
- 数据结构中的常用查找
- Linux内核中的常用数据结构-双向链表(1)
- Linux内核常用数据结构
- Linux常用的数据结构
- java中的数据结构详解
- 【数据结构】中的位图详解
- linux内核中的数据结构
- linux----VFS中的数据结构
- Linux内核常用数据结构要点
- Linux内核常用数据结构要点
- Python中的高级数据结构详解
- 常用linux命令详解
- linux 常用目录详解
- 基于.NET 并行库写的对象池
- OpenGL、OpenGL ES、OpenVG、GLX、EGL简介
- MFC处理回车窗口消失
- 题目26: 孪生素数问题
- VS2010 VS2012 的快捷键
- Linux中的常用数据结构详解
- Android点亮屏幕或屏幕解锁和锁定以及其他相关权限实现代码
- Ext中关于GridPanel中的复选框的个数问题
- Oracle 字符集的查看和修改
- Java常用类型定义、转换
- Android中自定义属性的格式详解
- 高强度信息安全平台商业计划书
- asp 文件(夹) 操作
- android权限大全