Opensuse Graphviz,使用DOT代替VISIO
来源:互联网 发布:dd 复制linux系统 编辑:程序博客网 时间:2024/05/22 14:45
开始之前
先安装graphviz安装的方法就比较多了。可以使用一键安装,也可以用。
zypper install graphviz
如果是ubuntu的话,相信用
sudo apt-get install graphviz
就OK了。
(转载请标注:源自;Phodal's Blog)
开始
今天我们要画的便是这个了。
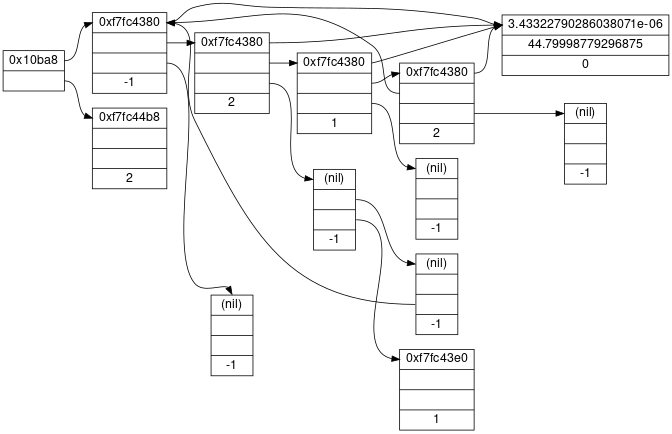
程序如下:
digraph g {graph [rankdir = "LR"];node [fontsize = "16"shape = "ellipse"];edge [];"node0" [label = " 0x10ba8| "shape = "record"];"node1" [label = " 0xf7fc4380| | |-1"shape = "record"];"node2" [label = " 0xf7fc44b8| | |2"shape = "record"];"node3" [label = " 3.43322790286038071e-06|44.79998779296875|0"shape = "record"];"node4" [label = " 0xf7fc4380| | |2"shape = "record"];"node5" [label = " (nil)| | |-1"shape = "record"];"node6" [label = " 0xf7fc4380| | |1"shape = "record"];"node7" [label = " 0xf7fc4380| | |2"shape = "record"];"node8" [label = " (nil)| | |-1"shape = "record"];"node9" [label = " (nil)| | |-1"shape = "record"];"node10" [label = " (nil)| | |-1"shape = "record"];"node11" [label = " (nil)| | |-1"shape = "record"];"node12" [label = " 0xf7fc43e0| | |1"shape = "record"];"node0":f0 -> "node1":f0 [id = 0];"node0":f1 -> "node2":f0 [id = 1];"node1":f0 -> "node3":f0 [id = 2];"node1":f1 -> "node4":f0 [id = 3];"node1":f2 -> "node5":f0 [id = 4];"node4":f0 -> "node3":f0 [id = 5];"node4":f1 -> "node6":f0 [id = 6];"node4":f2 -> "node10":f0 [id = 7];"node6":f0 -> "node3":f0 [id = 8];"node6":f1 -> "node7":f0 [id = 9];"node6":f2 -> "node9":f0 [id = 10];"node7":f0 -> "node3":f0 [id = 11];"node7":f1 -> "node1":f0 [id = 12];"node7":f2 -> "node8":f0 [id = 13];"node10":f1 -> "node11":f0 [id = 14];"node10":f2 -> "node12":f0 [id = 15];"node11":f2 -> "node1":f0 [id = 16];}使用方法
dot -Tps hello.dot -o hello.ps
使用gwenview查看
gwenview hello.ps
- Opensuse Graphviz,使用DOT代替VISIO
- 使用Graphviz Dot绘制类图
- 使用graphviz dot来画图表
- 【转】使用graphviz dot来画图表
- Graphviz dot,使用dot语言快速生成图表
- OpenSUSE Ubuntu,使用OpenSUSE代替UBUNTU的若干理由
- opensuse上使用zypper代替yum
- graphviz dot简介
- graphviz dot简介
- GraphViz的dot绘图
- Dot 与 GraphViz 经验总结
- Emacs 使用graphviz-dot-mode创建架构图
- ZGRViewer, a GraphViz/DOT Viewer
- DOT + graphviz 轻松画图神器
- Data Visualization - Dot Lang & Graphviz
- DOT + graphviz 轻松画图神器
- 利用Graphviz dot画函数调用图
- graphviz dot uml类图绘制笔记
- 用javascript 实现的万年历代码。
- IIs部署虚拟网站
- 第二次作业
- 方块填数
- hdu_1358 kmp 求连续子串
- Opensuse Graphviz,使用DOT代替VISIO
- 65个面试技巧性回答值得收藏
- 每日编程20之用一个数组实现2个和3个栈
- NameValueCollection详解
- Android_Phone源代码来电流程解读
- const限定符和指针
- Js弹窗参数
- 软件项目中qt的使用
- #,%{},%{#}