yocto QEMU
来源:互联网 发布:淘宝律动乐器专营店 编辑:程序博客网 时间:2024/05/22 00:49
yocto 使用pre-built binaries 运行QEMU 仿真器的方法,今天用poky-eglibc-i686-powerpc-toolchain-gmae-1.2.tar.bz2 + vmlinux-qemuppc.bin + core-image-minimal-qemuppc.ext3 亲测可用:
Using Pre-Built Binaries and QEMU
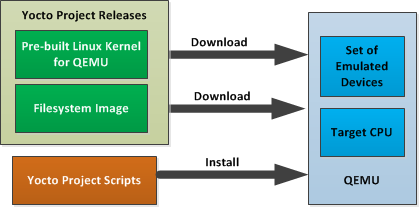
If hardware, libraries and services are stable, you can get started by using a pre-built binary of the filesystem image, kernel, and toolchain and run it using the QEMU emulator. This scenario is useful for developing application software.
Using a Pre-Built Image
For this scenario, you need to do several things:
Install the appropriate stand-alone Yocto toolchain tarball.
Download the pre-built image that will boot with QEMU. You need to be sure to get the QEMU image that matches your target machine’s architecture (e.g. x86, ARM, etc.).
Download the filesystem image for your target machine's architecture.
Set up the environment to emulate the hardware and then start the QEMU emulator.
Installing the Toolchain
You can download the pre-built toolchain, which includes the runqemu script and support files, from the appropriate directory under http://downloads.yoctoproject.org/releases/yocto/yocto-1.2/toolchain/. Toolchains are available for 32-bit and 64-bit development systems from thei686 andx86-64 directories, respectively. Each type of development system supports five target architectures. The tarball files are named such that a string representing the host system appears first in the filename and then is immediately followed by a string representing the target architecture.
poky-eglibc-<host_system>-<arch>-toolchain-gmae-<release>.tar.bz2 Where: <host_system> is a string representing your development system: i686 or x86_64. <arch> is a string representing the target architecture: i586, x86_64, powerpc, mips, or arm. <release> is the version of Yocto Project.
For example, the following toolchain tarball is for a 64-bit development host system and a 32-bit target architecture:
poky-eglibc-x86_64-i586-toolchain-gmae-1.2.tar.bz2
The toolchain tarballs are self-contained and must be installed into /opt/poky. The following commands show how you install the toolchain tarball given a 64-bit development host system and a 32-bit target architecture. The example assumes the toolchain tarball is located in~/toolchains/:
$ cd / $ sudo tar -xvjf ~/toolchains/poky-eglibc-x86_64-i586-toolchain-gmae-1.2.tar.bz2
For more information on how to install tarballs, see the "Using a Cross-Toolchain Tarball" and "Using BitBake and the Yocto Project Build Tree" sections in The Yocto Project Application Development Toolkit (ADT) User's Guide.
Downloading the Pre-Built Linux Kernel
You can download the pre-built Linux kernel suitable for running in the QEMU emulator fromhttp://downloads.yoctoproject.org/releases/yocto/yocto-1.2/machines/qemu. Be sure to use the kernel that matches the architecture you want to simulate. Download areas exist for the five supported machine architectures:qemuarm,qemumips,qemuppc, qemux86, andqemux86-64.
Most kernel files have one of the following forms:
*zImage-qemu<arch>.bin vmlinux-qemu<arch>.bin Where: <arch> is a string representing the target architecture: x86, x86-64, ppc, mips, or arm.
You can learn more about downloading a Yocto Project kernel in the "Linux Yocto Kernel" section of The Yocto Project Development Manual.
Downloading the Filesystem
You can also download the filesystem image suitable for your target architecture fromhttp://downloads.yoctoproject.org/releases/yocto/yocto-1.2/machines/qemu. Again, be sure to use the filesystem that matches the architecture you want to simulate.
The filesystem image has two tarball forms: ext3 andtar. You must use theext3 form when booting an image using the QEMU emulator. Thetar form can be flattened out in your host development system and used for Yocto Project build purposes.
core-image-<profile>-qemu<arch>.ext3 core-image-<profile>-qemu<arch>.tar.bz2 Where: <profile> is the filesystem image's profile: lsb, lsb-dev, lsb-sdk, lsb-qt3, minimal, minimal-dev, sato, sato-dev, or sato-sdk. For information on these types of image profiles, see Reference: Images in the Yocto Project Reference Manual. <arch> is a string representing the target architecture: x86, x86-64, ppc, mips, or arm.
Setting Up the Environment and Starting the QEMU Emulator
Before you start the QEMU emulator, you need to set up the emulation environment. The following command form sets up the emulation environment.
$ source /opt/poky/1.2/environment-setup-<arch>-poky-linux-<if> Where: <arch> is a string representing the target architecture: i586, x86_64, ppc603e, mips, or armv5te. <if> is a string representing an embedded application binary interface. Not all setup scripts include this string.
Finally, this command form invokes the QEMU emulator
$ runqemu <qemuarch> <kernel-image> <filesystem-image> Where: <qemuarch> is a string representing the target architecture: qemux86, qemux86-64, qemuppc, qemumips, or qemuarm. <kernel-image> is the architecture-specific kernel image. <filesystem-image> is the .ext3 filesystem image.
Continuing with the example, the following two commands setup the emulation environment and launch QEMU. This example assumes the root filesystem tarball has been downloaded and expanded, and that the kernel and filesystem are for a 32-bit target architecture.
$ source /opt/poky/1.2/environment-setup-i686-poky-linux $ runqemu qemux86 bzImage-qemux86-1.2.bin \ core-image-sato-qemux86.ext3
The environment in which QEMU launches varies depending on the filesystem image and on the target architecture. For example, if you source the environment for the ARM target architecture and then boot the minimal QEMU image, the emulator comes up in a new shell in command-line mode. However, if you boot the SDK image, QEMU comes up with a GUI.
Note
Booting the PPC image results in QEMU launching in the same shell in command-line mode.- yocto QEMU
- Yocto tips (20): Yocto中qemu模拟器的使用,以zynq Cortex-A9为例
- yocto
- Yocto
- yocto
- yocto
- yocto
- 【yocto】run qemu:Could not initialize SDL(No available video device)
- 结合Yocto Qemu与Eclipse单步调试开发Linux Kernel
- yocto之yocto概述
- QEMU
- QEMU
- QEMU
- qemu
- qemu
- qemu
- QEMU
- QEMU
- 如何安装linux
- BlackBerry 10通讯录上用汉语拼音搜索中文姓名
- C&C++文件操作
- Mark 标记一下 Doxygen
- 浅析C#中异步和多线程的区别
- yocto QEMU
- 端到端时延 抖动率 吞吐量 丢包率
- Android:捕捉触摸屏手势
- ORA-12514 TNS :监听程序当前无法识别连接描述符中请求服务 的解决方法
- 对待工作要怀有敬畏之心
- qtopia 的hello world程序的记录
- S_ISCHR等
- (转)【Android游戏开发十九】(必看篇)SurfaceView运行机制详解—剖析Back与Home按键及切入后台等异常处理!
- CSS实现文字上标、下标