Visual C++ 回调函数示例
来源:互联网 发布:labtool48uxp软件下载 编辑:程序博客网 时间:2024/06/06 06:53
设想你的应用需要加载一个 DLL 库,这个 DLL 可能是你自己开发的或者是第三方的,而且你的应用依赖该 DLL 来获取一些数据。大多数 DLL 都提供了 APIs 用于执行特定的函数并返回相应值。
调用 DLL 的 API 过程是比较占用资源的,你可能需要增加额外的效果来运行某些调度器。此外,无效的返回数据导致无法保证 API 返回正确的值。
为了降低负载,我们可以创建一个回调函数,并注册到 DLL 中。在这个例子中,我们不需要创建调度器来定期调用 DLL 的 API。而是 DLL 在需要的时候调用回调函数并在数据有效时触发应用程序。
该教程将告诉你如何创建一个回调函数并注册到 DLL 中。
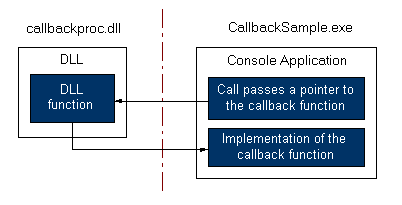
- 创建一个 Win32 控制台应用项目,名称为 “SampleCallback”. 请确认是控制台类型的应用项目
- 添加一个新的 Win32 应用项目到同一个解决方案中,名为 “callbackproc”. 确认应用项目类型是 DLL

callbackproc 项目
- 打开 callbackproc.h 文件,并输入下列代码:
01#include <string>0203#ifdef CALLBACKPROC_EXPORTS04#define CALLBACKPROC_API __declspec(dllexport)05#else06#define CALLBACKPROC_API __declspec(dllimport)07#endif0809// our sample callback will only take 1 string parameter10typedefvoid(CALLBACK * fnCallBackFunc)(std::string value);1112// marked as extern "C" to avoid name mangling issue13extern"C"14{15//this is the export function for subscriber to register the callback function16CALLBACKPROC_APIvoidRegister_Callback(fnCallBackFunc func);17} - 打开 callbackproc.cpp 文件并输入下列代码
01#include "stdafx.h"02#include "callbackproc.h"03#include <sstream>0405// This is an example of an exported function.06CALLBACKPROC_APIvoidRegister_Callback(fnCallBackFunc func)07{08intcount = 0;0910// let's send 10 messages to the subscriber11while(count < 10)12{13// format the message14std::stringstream msg;15msg <<"Message #"<< count;1617// call the callback function18func(msg.str());1920count++;2122// Sleep for 2 seconds23Sleep(2000);24}25} - 打开项目属性界面
- 确认目录名 “..\callbackproc” ,位置:C/C++->General->Additional Include Directories.
- 确认目录名 “..\callbackproc\debug” ,位置:Linker->General->Additional Libraries Directories. 在这个教程中我们使用 Debug 构建,你可根据需要自行修改

- 确认 “callbackproc.lib” 文件,位置:Linker->Input->Additional Dependencies
- 打开 CallbackSample.cpp 文件,并输入如下代码:
01#include "stdafx.h"02#include <windows.h>03#include <string>04#include <windows.h>05#include <string>0607#include "callbackproc.h"0809// Callback function to print message receive from DLL10voidCALLBACK MyCallbackFunc(std::string value)11{12printf("callback: %s\n", value.c_str());13}1415int_tmain(intargc, _TCHAR* argv[])16{17// Register the callback to the DLL18Register_Callback(MyCallbackFunc);1920return0;21} - 当你尝试编译项目时需要注意 callbackproc 项目必须先编译,因为 CallbackSample 依赖于它
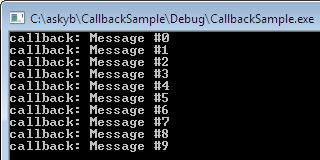
- 编译 CallbackSample 项目并运行,你会看到如下的输出信息
- Visual C++ 回调函数示例
- C语言回调函数用法示例
- 回调函数示例
- 回调函数示例
- 回调函数示例
- 回调函数示例(一)
- C++回调函数示例
- Android 回调函数示例
- Java回调函数示例
- C 回调函数
- 【c++】回调函数
- C 回调函数
- C回调函数
- [C] 回调函数
- C 回调函数
- C回调函数
- [C++]回调函数
- c/c++:回调函数
- LPC2378串口查询发送丢失数据的解决
- 完整/正确配置exim服务器的方法
- android:windowSoftInputMode
- webrtc 编译
- Android应用升级构想和要点总结
- Visual C++ 回调函数示例
- MFC 修改控件的属性
- android学习笔记
- WinSocket编程
- 计算几何模板
- <%@ include file=""%>与<jsp:include page=""/>区别
- C++ fstream文件流读写文件操作详解
- reverse对数字和字符串的倒置
- 在自定义对话框中显示Gallery的效果实现