动态修改ListView文字大小
来源:互联网 发布:装修效果图 设计软件 编辑:程序博客网 时间:2024/05/16 12:11
写了一个MyAdapter(继承了BaseAdapter)去实现数据和UI的显示。通过滑动SeekBar来改变MyAdapter的getView方法中View的字体大小进而实现了改变ListView中文字大小的效果。
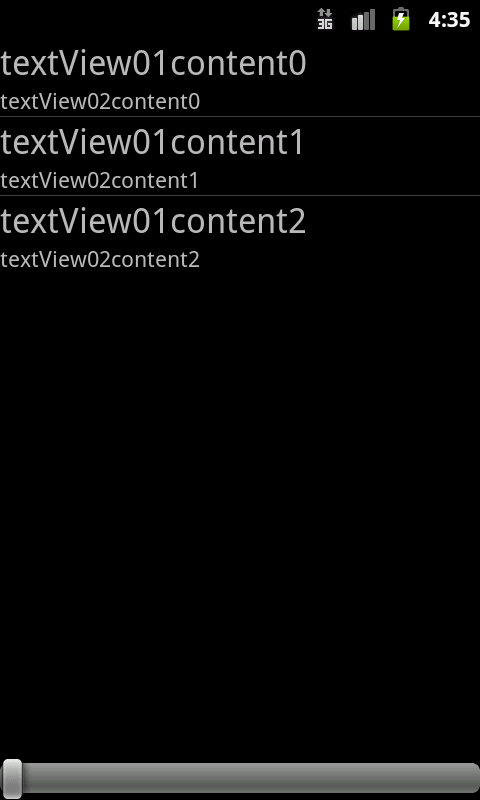
效果图:

1 MainActivity的布局文件main.xml:
- <?xml version="1.0" encoding="utf-8"?>
- <RelativeLayout xmlns:android="http://schemas.android.com/apk/res/android"
- android:layout_width="fill_parent"
- android:layout_height="fill_parent"
- android:orientation="vertical" >
- <ListView
- android:id="@+id/listview01"
- android:layout_width="fill_parent"
- android:layout_height="wrap_content"
- ></ListView>
- <SeekBar
- android:id="@+id/seekbar01"
- android:layout_width="fill_parent"
- android:layout_height="wrap_content"
- android:layout_alignParentBottom="true"
- />
- </RelativeLayout>
2 ListView的item布局文件main_listview01_item.xml
- <?xml version="1.0" encoding="utf-8"?>
- <LinearLayout xmlns:android="http://schemas.android.com/apk/res/android"
- android:layout_width="match_parent"
- android:layout_height="match_parent"
- android:orientation="vertical" >
- <TextView
- android:id="@+id/textView01"
- android:layout_width="fill_parent"
- android:layout_height="wrap_content"
- android:textSize="23sp"
- />
- <TextView
- android:id="@+id/textView02"
- android:layout_width="fill_parent"
- android:layout_height="wrap_content"
- android:textSize="15sp"
- />
- </LinearLayout>
3 MyAdapter源码
- /**
- * 我的适配器
- * @author haozi
- *
- */
- public class MyAdapter extends BaseAdapter {
- public static int PROGRESS;
- private Context context;
- private List<? extends Map<String, ?>> mData;
- private int mResource;
- private String[] mFrom;
- private int[] mTo;
- private LayoutInflater mLayoutInflater;
- /**
- * 我的适配器的构造方法
- * @param context 调用方的上下文
- * @param data 数据
- * @param resource
- * @param from
- * @param to
- */
- public MyAdapter(Context context, List<? extends Map<String, ?>> data, int resource, String[] from, int[] to){
- this.context = context;
- this.mData = data;
- this.mResource = resource;
- this.mFrom = from;
- this.mTo = to;
- this.mLayoutInflater = (LayoutInflater) context.getSystemService(context.LAYOUT_INFLATER_SERVICE);
- }
- /**
- * 系统在绘制ListView之前,将会先调用getCount方法来获取Item的个数
- */
- public int getCount() {
- return this.mData.size();
- }
- public Object getItem(int position) {
- return this.mData.get(position);
- }
- public long getItemId(int position) {
- return position;
- }
- /**
- * 每绘制一个 Item就会调用一次getView方法,
- * 在此方法内就可以引用事先定义好的xml来确定显示的效果并返回一个View对象作为一个Item显示出来。
- * 也 正是在这个过程中完成了适配器的主要转换功能,把数据和资源以开发者想要的效果显示出来。
- * 也正是getView的重复调用,使得ListView的使用更 为简单和灵活。
- * 这两个方法是自定ListView显示效果中最为重要的,同时只要重写好了就两个方法,ListView就能完全按开发者的要求显示。
- * 而 getItem和getItemId方法将会在调用ListView的响应方法的时候被调用到。
- * 所以要保证ListView的各个方法有效的话,这两个方法也得重写。
- */
- public View getView(int position, View contentView, ViewGroup parent) {
- contentView = this.mLayoutInflater.inflate(this.mResource, parent, false);
- // 设置contentView的内容和样式,这里重点是设置contentView中文字的大小
- for(int index=0; index<this.mTo.length; index++){
- TextView textView = (TextView) contentView.findViewById(this.mTo[index]);
- textView.setText(this.mData.get(position).get(this.mFrom[index]).toString());
- if(index == 0){
- textView.setTextSize(23+PROGRESS);
- }else if(index == 1){
- textView.setTextSize(15+PROGRESS);
- }
- }
- return contentView;
- }
- }
4 MainActivity源码
- /**
- * 入口Activity
- * @author haozi
- *
- */
- public class MainActivity extends Activity {
- private ListView mListView;
- private SeekBar mSeekBar;
- private MyAdapter myAdapter;
- private ArrayList<HashMap<String, String>> data;
- @Override
- public void onCreate(Bundle savedInstanceState) {
- super.onCreate(savedInstanceState);
- requestWindowFeature(Window.FEATURE_NO_TITLE);
- setContentView(R.layout.main);
- // 代码和控件绑定
- this.mListView = (ListView) this.findViewById(R.id.listview01);
- this.mSeekBar = (SeekBar) this.findViewById(R.id.seekbar01);
- // 准备数据
- initData();
- // 设置SeekBar变化监听
- this.mSeekBar.setOnSeekBarChangeListener(new MSeekBarOnSeekBarChangeListener());
- }
- /**
- * 准备数据
- */
- private void initData(){
- data = new ArrayList<HashMap<String,String>>();
- for(int index=0; index<5; index++){
- HashMap<String, String> map = new HashMap<String, String>();
- String textView01content = "textView01content" + index;
- String textView02content = "textView02content" + index;
- map.put("textView01", textView01content);
- map.put("textView02", textView02content);
- data.add(map);
- }
- // 创建适配器,并把数据交给适配器
- this.myAdapter = new MyAdapter(this, data, R.layout.main_listview01_item,
- new String[]{"textView01", "textView02"},
- new int[]{R.id.textView01, R.id.textView02});
- // 为listView添加适配器
- this.mListView.setAdapter(this.myAdapter);
- }
- /**
- * mSeekBar的变化监听
- * @author haozi
- *
- */
- class MSeekBarOnSeekBarChangeListener implements SeekBar.OnSeekBarChangeListener{
- public void onProgressChanged(SeekBar seekBar, int progress,
- boolean fromUser) {
- // TODO Auto-generated method stub
- MyAdapter.PROGRESS = progress/10;
- MainActivity.this.mListView.setAdapter(MainActivity.this.myAdapter);
- }
- public void onStartTrackingTouch(SeekBar seekBar) {
- // TODO Auto-generated method stub
- }
- public void onStopTrackingTouch(SeekBar seekBar) {
- // TODO Auto-generated method stub
- }
- }
- }
demo下载链接地址:http://download.csdn.net/detail/hello_haozi/4290909
- 动态修改ListView文字大小
- 动态修改ListView文字大小
- 动态修改ListView
- 动态修改listview
- Eclipse文字大小修改
- Eclipse文字大小修改
- Eclipse文字大小修改
- UIButton修改文字大小问题
- [iOS]修改UIBarButtonItem文字大小
- 修改Toolbar文字大小
- 动态判断文字大小,动态排版
- listView+Combox动态修改字段
- ListView动态修改列宽
- android4.0修改系统文字大小
- 怎么修改PDF中的文字大小
- 如何编辑修改PDF文字大小
- 动态修改ListView 的分割线
- Android开发之动态修改ListView
- 椭圆曲线ECC加密算法入门介绍
- bcp将本地txt文本导入远程sqlserver中,本地未装sqlserver
- Event in Master Page, Content Page and User Control
- IE添加信任站点
- ubuntu下安装Kdevelop和qt4
- 动态修改ListView文字大小
- C#基类库苏飞版--系列教程导航
- 在Android.mk中输出信息
- Layout Tests - 百度手机浏览器T5内核测试实践1
- 世界是数字的
- 将汉字转成拼音,用C++编写
- iconv 文件编码转换
- 从零开始,系统深入学习android
- 第7课 oracle数据库的管理及数据备份,恢复