How to rename the built-in Administrator account in Windows
来源:互联网 发布:python判断字符串相等 编辑:程序博客网 时间:2024/05/17 04:58
The built-in Administrator account is one of the most targeted account names by malicious programs and hackers that are attempting to access your computer without your permission. It is therefore a wise security precaution to rename the Administrator account to another less common name so that it can no longer be targeted. By default, the Administrator account in Windows Vista, Windows 7, and Windows 8 are disabled, while in Windows XP it is enabled. Regardless, of your Windows version, if you choose to use the Administrator account, you can use the following tutorial to rename the account to make it less susceptible to hacking attempts.
A word of caution, if you rename your Administrator account and forget the name or the password, then it can be quite difficult regaining access to the account. Therefore, be sure to write the name and password down and store it somewhere so you can access it if needed. It is also suggested that you rename the account to include the word admin, such as Super-Admin & MyPCAdmin, so if you bring it into a repair shop or consultant, they would have a good idea that it was the renamed account.
Please note that methods 1 and 2 will only work on Windows XP, Windows Vista Professional, Business, Ultimate, or Enterprise, and Windows 7, & Windows 8 Professional, Business, Ultimate, or Enterprise. For users of Windows XP Home, please use Method 3. For users of Windows Vista, Windows 7, & Windows 8 Home and Home Premium, please use method 4.
Method 1: Rename the Administrator account through the Computer Management Console (Windows 7 and Windows Vista only)
- In Windows 8, from the Start Screen type Computer and when the icon appears right-click on it. You should now see some options appear at the bottom of the screen. Left-click on the Manage option and skip to step 2.
For other versions of Windows, right-click on My Computer, if in Windows XP, or Computer, if in Windows 7 or Windows Vista, and selectManage as shown in the image below.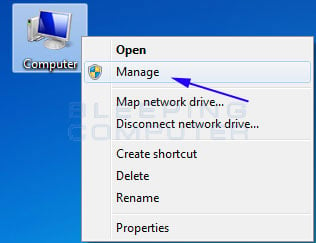
Manage Computer option
- If prompted by a User Account Control screen, click on the Yes button.
- The Computer Management screen will now open. Expand the System Tools folder, then the Local Users and Groups folder, and finally single-click on the Users folder so it becomes highlighted. In the right hand pane you will now see a list of the accounts on your computer, including the Administrator account.
- Right-click on the Administrator account and select Rename as shown in the image below.
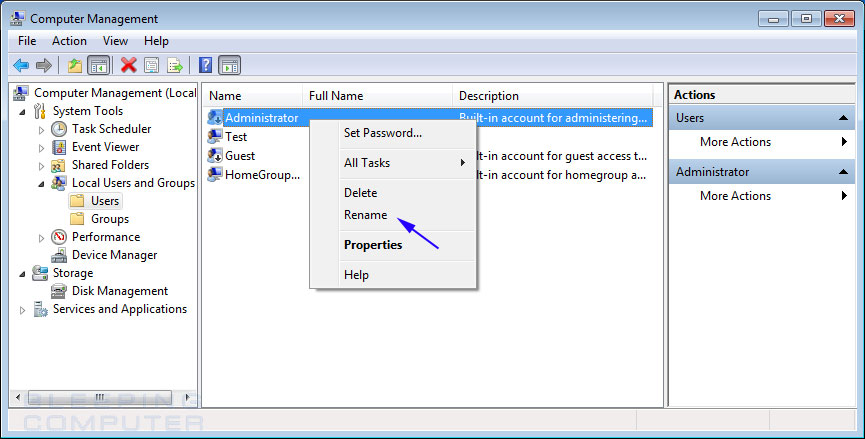
Rename Administrator via the Computer Management screen
Once you click on the Rename option, you will be able to edit the Administrator name. Simply type in the name that you would like to rename the Administrator account to and press Enter on your keyboard.
Your Administrator account has now been renamed to the one you entered.
Method 2: Rename the Administrator account through the Local Policy Editor (Windows 8, Windows 7, Windows Vista, and Windows XP Professional)
- In Windows Vista or Windows 7 click on the Start button and type Local Security Policy and press Enter on your keyboard. In Windows XP, click on the Start button and then Control Panel. When the Control Panel opens, double-click on the Administrative Tools group and double-click on the Local Security Policy icon. Please skip to step 2.
In Windows 8, from the Start Screen type Run and then press Enter on your keyboard. When the Run dialog box opens, type secpol.mscand then press Enter on your your keyboard. Please continue to step 2.
- If prompted by a User Account Control screen, click on the Yes button.
- When the Local Security Policy screen opens, expand the Security Settings folder, then the Local Policies folder, and then click on theSecurity Options folder so it is highlighted. You will now be at a screen showing the local security options for Windows as shown below.

Local Security Policy screen
Scroll through the list and double-click on the policy named Accounts: Rename administrator account as shown in the image above.
- The Accounts: Rename administrator account Properties screen will now open as shown below.
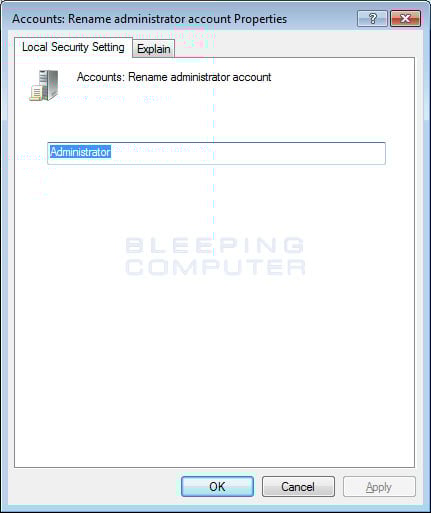
Accounts: Rename administrator account Properties screen
In the field type in the new name for the Administrator account and then press Enter on your keyboard.
Your Administrator account has now been renamed to the one you entered.
Method 3: Rename the Administrator account using the UserPasswords2 Control Panel
This method will work on all versions of Windows XP, including the Home versions.
- Click on the Start Button (
 ) and then select the Run menu option.
- In the Open: field enter control userpasswords2 and then press the OK button. Please note that there is a space between the words control and userpasswords2.
- The User Accounts control panel screen should now open that looks similar to the image below.
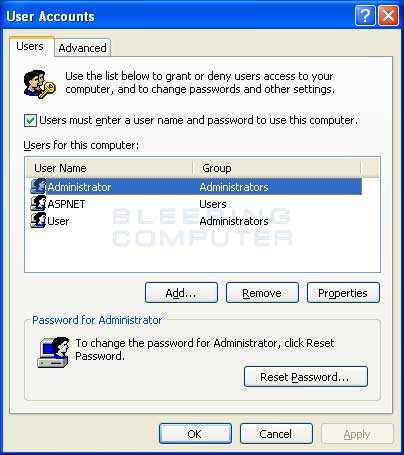
Windows XP User Accounts Control Panel
This control panel lists all of the users on your computer, including the Administrator account, and allows you to manage them. Select theAdministrator account by single left-clicking on it so that it becomes highlighted and then click on the Properties button.
- The properties screen for the Administrator account should now be open as shown in the image below.
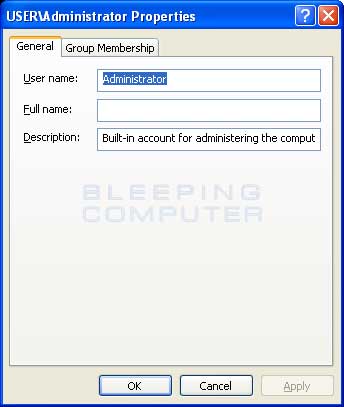
Administrator Properties
In the User name: field, change the user name from Administrator to something of your choice. When done, click on the Apply button and then the OK button.
- You can now close the User Accounts screen as your Administrator account is now renamed.
Method 4: Rename the Administrator account using Renameuser.exe
This method will work on all versions of Windows Vista, Windows 7, and Windows 8, including the Home versions.
- First you need to download SystemTool's RenameUser from the following location:
SystemTools RenameUser Download Link
- Once it is downloaded, extract the zip file and copy the renameuser.exe into the C:\Windows\System32\ folder.
- Now we need to get the name of your PC. To do this, click on the Start button and then right-click on the Computer option and selectProperties as shown in the image below.
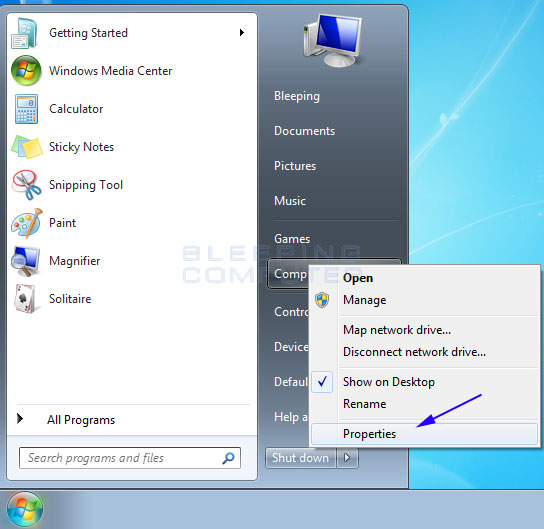
Select Computer Properties - A screen will now open showing information on your computer. Under the Computer name, domain, and workgroup settings categorylook for the information called Computer Name. An example is shown below.
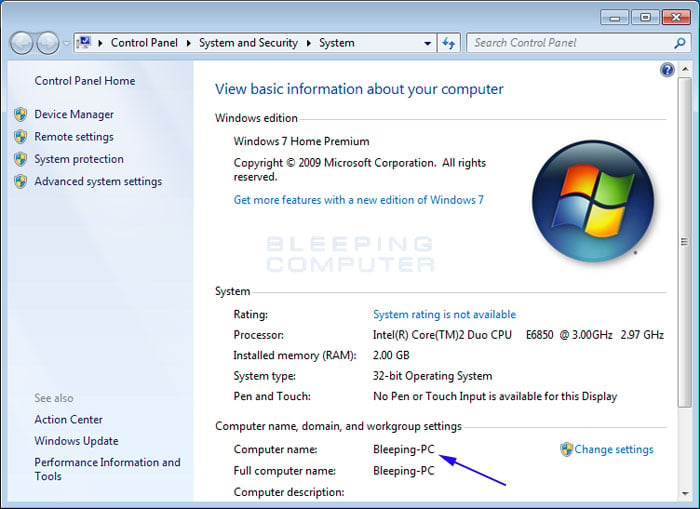
Basic information about your computer screen
Write down your computer name as you will need it in a future step.
- Now open an Elevated Command Prompt.
- When at the elevated command prompt, to rename your Administrator account enter the following commands:
renameuser.exe Administrator
When issuing the command replace with the name of your computer and with the new name for the administrator account.
For example if we are using the computer name from the screen above and wanted to change the Administrator account to Super-Admin, we would type the following and press Enter on the keyboard.
renameuser.exe Bleeping-PC Administrator Super-Admin
An image of what this should look like is: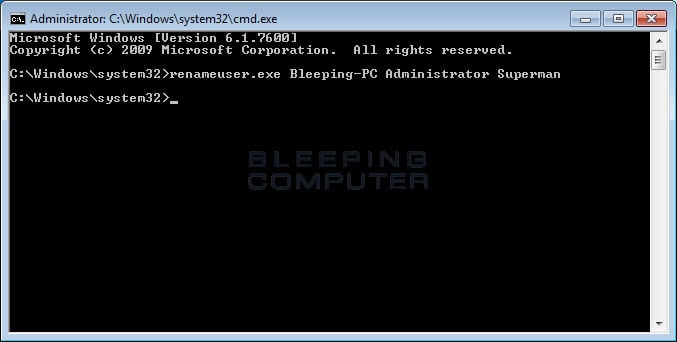
Using the renameuser.exe command
- Once you renamed your Administrator account, you should type Exit to exit the command prompt.
Your Administrator account has now been renamed to the one you entered.
Referenced from: http://www.bleepingcomputer.com/tutorials/rename-administrator-account-in-windows/
- How to rename the built-in Administrator account in Windows
- Windows 8.1 - Fix This app can't open for Built-in Administrator account
- How-to Rename Multiple Photos at Once in Windows
- How to implement the built in effects of DirectX.DirectSound
- How to Rename a View in ClearCase
- How to Rename a View in ClearCase
- How-to rename multiple files in Linux How-to rename multiple files
- How to Run a Program as an Administrator in Windows 7
- How to Run a Program as an Administrator in Windows 7
- How to build the environment of MSYS in the windows?
- How to set the QT Application icon in the windows.
- How to change service accounts and service account passwords in SharePoint Server 2007 and in Windows SharePoint Services 3.0(Se
- How to rename ASM instances in RAC or clustered environment
- how to generate AXI VIP built-in coverage
- How to run application in Qt as administrator?
- How to build the environment of XPCOM in Windows XP
- How to check the Gateway address in Windows
- How to Enable the Linux Bash Shell in Windows 10
- linux下Eclipse连接真机调试Android应用程序
- eclipse 类打包jar文件
- Android基础总结之三:Activity的四种Launcher Mode
- OIS输入系统-1_OIS简介与使用----OIS几个重要的类的使用
- ccnSim-CCN_D(即 Data包)处理机制
- How to rename the built-in Administrator account in Windows
- 基于HTML5的可预览多图片Ajax上传(转)
- LigerUi的1.2.0版本的新BUG!(期待开发者解决)
- linux下vim常用操作技巧和出现问题的解决方案
- 部分IT公司面试流程小结
- VB+PHP实现在线修改Windows服务器的配置文件
- PB10以上版本调用windows API函数的问题
- SQL操作
- Oracle中sys,system,scott,hr用户