View Controller Programming Guide for iOS--(一)
来源:互联网 发布:中国linux公社 编辑:程序博客网 时间:2024/05/17 01:05
一,ViewController基础
1,基础
通过使用不同的View Controller类来控制你的用户界面的各自的部分,你分别实现你的用户界面到更小并且更容易管理的单元中。
2,UIScreen是设备的物理屏幕;UIWindow是提供在屏幕上绘画的对象;一系列的UIView执行实际绘画对象,这些对象附加到window上并在window的要求下绘制内容。

3,类关系图
下图显示了在UIKit中定义的这些类的关系图:
1)一个View(视图)表示一个用户界面元素。每个视图都覆盖一个区域。
2)视图可以包含子视图,子视图相对其父视图定位和描绘。因此,当父视图移动时,子视图也会跟着移动。
3)视图可以动画他们的属性值。更改多个属性值,可以提交为一个单个的动画。
4,View Controller管理Views
每个View Controller都控制着一个View,这个View经常是一个视图层次结构的根视图。
一个View Controller只在需要views时才加载他的view,他还可以在特定的情形下释放view。
一个ViewController很自然地要处理他的views的动作。他相当于他的view的大脑。例如view中的一个按钮不知道被按下时执行什么操作,viewController必须要知道。Controller可能需要更新objects,动画或更改存储在他的views中的属性值,甚至把另外的viewcontroller的内容带入屏幕内。
一些view Controler的要素:
1)每个视图只被一个view Controller控制。当一个view被分配给一个view controller.view属性时,那么这个view controller就拥有他。如果view是一个subview,他可能被不同的view controller控制。
2)每个view controlls与你的一系列app’s data交互。
3)不同的view controllers需要通信,例如通过data controllers或document objects。5,View Controller的分类:
下图显示了View Controller的类结构。例如,UITabBarController对象管理一个UITabBar对象,UITabBar实际上展示tabs—与tab bar interface交互。其他框架定义的附加view Controller没有在这里显示。

View Controller可以被分为两类:content view controller(内容视图控制器)和container view controller(容器视图控制器).
一个content view controller展示内容。例如一个 MFMailComposeViewController 提供了一个界面,允许用户撰写并发送消息。
每个content view controller对象负责管理所有的views—在一个唯一的视图层次中。这种一对一的对应关系是关键设计原则。你不应该使用多个content view controller来管理同一个view层次结构中的不同部分。同样地,你也不能使用一个content view controller来管理多个屏幕的内容。
6,关于Table View Controllers:
7,关于Navigation Controllers:
8,关于Tab Bar Controllers:
9,关于Split View Controllers:UISplitViewController,只适用于iPad这种大屏幕设备。10,关于Modal View Controllers:是一种显示View Controller的方式。
二,Custom View Controllers
1,解析custom view controller:
需要继承UIViewController并重写其方法。view属性。2,需要继承的内容:
1)你可以在controller’s 的视图从屏幕上显示或消失时调整视图结构或应用程序状态。
2)你可以配置navigationController和tab bar controller使用的对象。
3)你可以在界面方向发生更改时调整视图结构。
4)你可以继承event handlers来捕获任何没有被view或其子视图处理的事件,查看 Event Handling Guide for iOS。
5)你可以继承你的view的可编辑版本,查看 Enabling Edit Mode for a View。
3,理解View Management Cycle: two distinct cycles:
1)加载和卸载周期。加载周期发生于你的应用程序要求view controller指向的view不存在于内存中时。当这种情况发生时,view controller加载view到内存中并存储一个指向到这个view的指针在将来使用。
如果你的应用程序接收到一个low-memeory 警告,view Controller很可能尝试unload view。在卸载周期中,view controller尝试release他的view并且恢复到没有view时的状态。如果他能release掉view,view Controller会保持没有view时的状态直到view再次被请求加载。
如果你打算在load的时候对view做一些附加的配置,你可以重载特定的方法来执行额外的任务。
Load view的步骤是:
A) 你的应用程序请求view controller的view。
B) 如果view不在内存中,view controller调用loadview方法
C) loadview方法做下面的事情:
i) 如果你重载了这个方法,你的方法需要负责创建所有必须的views并指定一个非nil值给viewController.view属性。
ii) 如果你没有重载这个方法,默认地,使用viewController的nibName和nibBundle属性尝试加载view,如果nib file没有找到,则查找和viewController名字相同的nib file来加载。
iii) 如果没有nib file可用,这个方法创建一个空的UIView
D) viewController调用viewDidLoad方法来执行任何附加的加载任务。
下图显示了一个可视的加载过程。你可以重载loadView和viewDidLoad方法来帮助你的viewController的行为。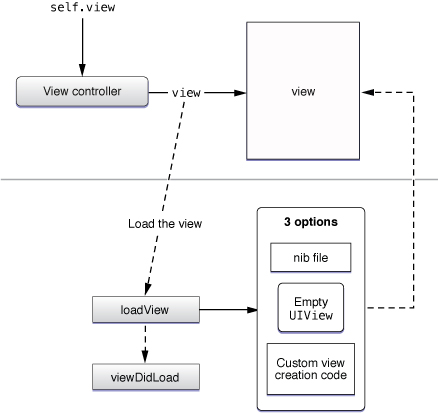
Unload过程的步骤如下:
A)收到一个low-memory warning。
B)每个viewController都调用其didReceiveMemoryWarning方法:
i)如果你重写了这个方法,你应该release 任何你不再需要的数据。你不应该使用他来release 你的view。你必须调用[super …]
ii)默认的实现只有在他决定安全时才release view。
C)如果viewController release了他的view,他调用viewDidUnload方法,你可以重写这个方法来执行额外的清理操作。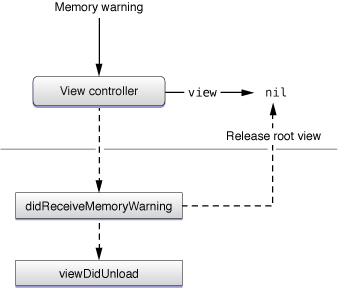
4,定义一个Custom View Controller Class:
5,为你的View Controller创建一个View:
可以通过nib file创建view,也可以通过代码创建。
存储view和view controller在同一个nib file中:如果你的应用程序只有一个屏幕,你可以吧view和view controller包括在一个nib file中。这一般是不被推荐的,因为在low-memory情形时这经常阻止系统unload views。然而,如果view本身永远不会被unload,把他们包括在一起会更加直观。
6,通过代码创建一个View :
在loadView方法中使用代码创建你的view。在这个方法中你应该做下面的事情:
1)创建一个根视图对象充满你的屏幕。你一般声明根视图的frame为application window的大小,window会适应屏幕大小。然而,view controller在需要的时候也会调整frame size使之容纳 混杂的views,如system status bar,navigation bar或tab bar.
2)创建任意附加的subviews并且添加他们到root view中。对每一个view,你应该做下面的事情:
i)创建并初始化view。对于系统views,你使用initWithFrame:方法来初始化大小和位置。
ii)使用rootView的addSubview:方法将他们添加到rootview。
iii)release view。
3)把创建的rootView指定为view Contrller的view属性。
4)release rootView。
下面是示例代码:
- (void)loadView {
self.wantsFullScreenLayout = YES;
...
}
注意:当你重载loadView时,你不应该调用[super loadView].这只会浪费CPU资源。你应该做全部的事情,如创建rootView和Subviews。
如果你retain了view对象,你应该记得在viewDidUnload方法中设置他们为nil。
7,在Unloading a View之后清理:
有两个地方你可以清理references:
1)dealloc 2)viewDidUnload
如果你使用declared property来存储reference,你可以使用self.properties=nil来清理。如果不是,那你必须发送一个release消息。
8,管理内存:
1)在loadView中创建你的view objects
2)在viewDidLoad中分配或加载在view中显示的数据。
3)viewDidUnload和dealloc中release view对象。
4)在viewDidUnload中release 非必须的data(当你的view不被显示时)
5)在didReceiveMemoryWarning响应low-memory notifications,但不要在这里release view,这个工具应该留在viewDidUnload中去做。至于要不要release还要决定一下
6)在dealloc方法中释放关键数据。
9,管理view Controller的interface orientation:
简单的支持multiple interface orientations的做法是:
1)重写 shouldAutorotateToInterfaceOrientation:方法。
2)配置每个view的autoresizing mask。
你也可以在Orientation Changes事件中重新布局。
10,理解Rotation过程:
当设备的方向发生变化时,系统发出一个 UIDeviceOrientationDidChangeNotification通知来让感兴趣的parties知道这个事情发生了。默认地,UIKit框架拦截了这个通知并且自动使用他更新自己的界面方向。这意味着一般你不需要处理这个通知。取而代之的是,你所有要做的是实现恰当的方法来响应orientation changes。
实际的旋转过程取决于view Controller的实现。一般是执行一个one-step旋转,但是view Controller也支持a two-step旋转,在iOS3.0以后one-step rotation process是可用的,而且被选用,因为他更高效于two-step process。使用哪种path取决于你重载哪个方法。如果你重载one-step的方法…
不管使用哪种rotation process,viewController的方法给了你机会来执行附加的操作。你也许会使用这些方法隐藏或显示views,重新摆放位置或调整view的尺寸,或通知应用程序的其他部分Orientation change。因为你的方法在旋转时调用,所以你要避免执行耗时的操作。你还应该避免重新替换整个view结构为另一套views。一般更好的方式是提供唯一的views为不同的方向,例如提供一个新的view Controller modally。
See “Creating an alternate Landscape interface”
See “Responding to Orientation Changes”
11,声明支持的界面方向
- (BOOL)shouldAutorotateToInterfaceOrientation:(UIInterfaceOrientation)orientation{}
12,配置你的Views来支持多方向:
当界面更改方向时,受影响的view的bounds被自动修改,与他们的autoresizing mask一致。autoresizingMask属性拥有常量,指示他们的bounds如何改变。如果autoresizing 不能满足你,你可以在 before,during and after an orientation change的方法中自己修改layout of your views。
13,Responding to Orientation Changes
1)Responding to Orientation Changes in One Step:在iOS3.0以后使用one-step。
A)window检测方向发生更改。
B)viewController是否支持Orientation
C)如果支持新方向,window调用Controller’s willRotateToInterfaceOrientation:duration:方法。一般在这里隐藏view,更改布局
D)window调整Controller’s view的bounds,这会导致每个子视图根据autoresizing mask调整大小。
E) window调用controller’s didRotateFromInterfaceOrientation:方法。在这里显示view,更改布局等。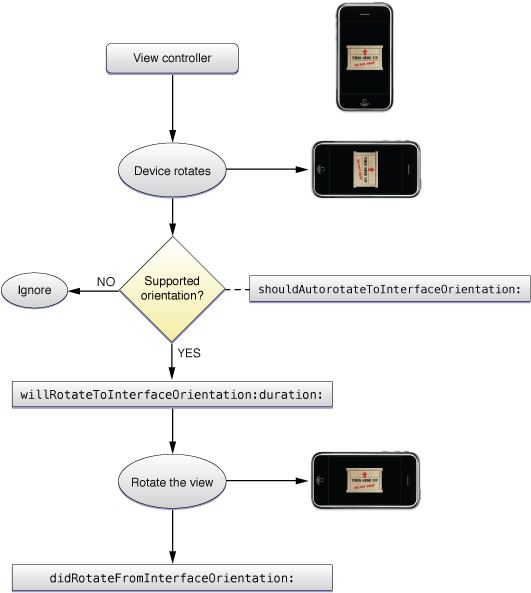
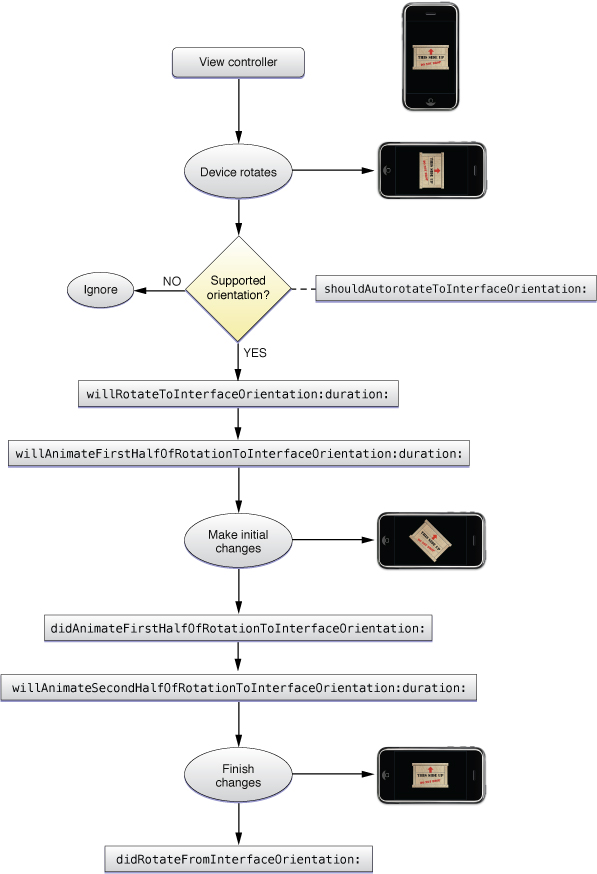
2) 响应方向的更改 in Two Steps:
A)window检测oritentation changes
B)viewController是否支持Orientation
C)如果支持新Orientation,window调用Controller’s willRotateToInterfaceOrientation:duration:方法。一般在这里隐藏view,更改布局
D)window调用Controller’s willAnimateFirstHalfOfRotationToInterfaceOrientation:duration:方法。Container view Controllers forward this message to the currently displayed custom view controller.你可以利用这个方法来隐藏views或更改布局等。
E)window执行the first half of the rotation。这会导致每个subview be resized by autoresizing mask.
F)window 调用 Controller’s didAnimateFirstHalfOfRotationToInterfaceOrientation:方法。Container view Controllers forward this message to the currently displayed custom view controller.
G)window调用 willAnimateSecondHalfOfRotationFromInterfaceOrientation:duration:方法
H)window执行the second half of the rotation。在这个rotation的结尾处,每个views的autoresizing行为都已经被应用并且views处于他们的”final”位置。I)window 调用 didRotateFromInterfaceOrientation:方法。在这里显示view,更改布局等。
14,创建一个Alternate Landscape Interface:
使用连个不同的view Controller。为了支持an alternate landscape interface,你需要做下面的事情:
1)实现两个view controller
2) 注册UIDeviceOrientationDidChangeNotification通知。在你的handler方法中,显示或隐去the alternate view controller.
因为view controller通常在内部管理orientation changes,有需要告诉每个view controller只在一个方向上显示。主view controller的实现然后需要检测设备方向改变并且显示alternate view controller当方向改变时。当方向变回主方向时,primary view controller 应该隐去alternate view controller.
15,Tips for Implementing Your Rotation Code:
16,Createing Custom View Controller Objects at Runtime:
使用代码创建view controller:
定制自己的便捷初始化方法,例如:
17,Presenting a View Controller’s View显示viewController’s view:
1)可以通过window addSubview:controller.view]
2)使用presentModalViewController:animated:
3)在navigation controller中pushView
4)设置tab bar 的root view controller为自己
5)在iPad上,使用popover
18,Responding to Display-Related Notifications响应显示相关通知:
下图展示了当一个controller’s view被添加到一个window中的基本顺序事件(如果view已经在window中但当前被另外一个view隐藏了,一样的事件顺序发生于当view重新显示).方法viewWillAppear:和viewDidAppear:给了子类一个机会执行附加操作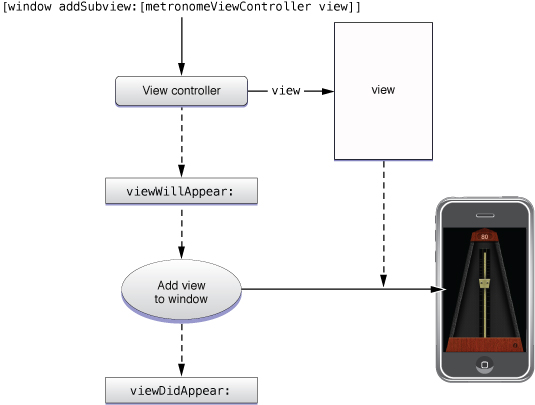
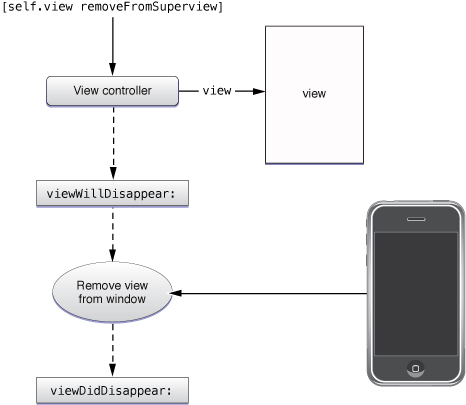
下图显示了一个view被移除出window时的事件(如果这个view完全被另外一个view隐藏,事件顺序一样)。
19,Adopting a Full-Screen Layout for Custom Views
如果你的应用程序显示status bar,UIViewController自动收缩他的view,这样view就不会被status bar遮挡。毕竟,如果Status bar是不透明的,你就不能看到被他遮挡的部分。然而,如果你的应用程序显示一个透明的status bar,你可以设置你的controller’s wantsFullScrrenLayout属性为YES来允许你的view在status bar下面。
Undlerlapping(从下面露出)the status bar是有用的,在你想最大化可用空间来展示你的内容的情况下。 当在status bar下面展示你的数据时,你应该确定你的内容都在一个Scroll View里,使用户可以滚动它到status bar外面。否则你不能与被透明的status bar或其他的view覆盖的部分交互。Navigation bar自动的增加一个scroll content inset to your scroll view;否则你必须修改contentInset属性。
See “Adopting a Full-Screen Layout for Navigation views”
20,Enabling Edit Mode for a View
如果你想使用一样的view controller显示编辑内容,你可以覆盖 setEditing:animated:方法,并使用它toggle between display and edit mode。当被调用时,你的方法实现应该add,hide,and adjust controller’s view以匹配相应的模式。例如,你可能想更改view的内容或显示以使其可编辑。如果你的controller管理一个table,你可以调用table自己的setEditing:animated:方法来使其进入相应的模式。
注意:实际上你应该做出微小的改动而不是更换整个View结构,如果那样最好使用一个新的view Controller.
下图为示例:
通常使用editable view的地方是在一个navigation interface。当实现你的navigation interface时,当你的editable view controller 可见时你可以在navigation bar中包含一个特定的edit button(你可以通过调用你的view Controller的editButtonItem方法获得这个button) 当你点击它时,这个按钮自动toggle between edit and done模式,并且调用你的setEditing:animated:方法。你也可以在你的代码中调用这个方法
21,Handling Events 处理事件
view controllers自己也是UIResponder的后代,因此也可以处理各种事件。通常,如果一个view没有响应一个给定的事件,他将时间传给他的父视图。然而,如果view被一个controller管理,他会先将事件传给controller。这给了controller机会处理任何没有被他的view处理的事件。如果controller没有处理事件,那事件将会正常的继续传送给view的父视图。
下图展示了事件流。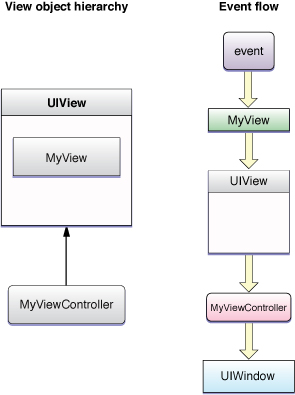
即使你不想处理触摸事件,你也使用他处理手势事件。你也可以使用他处理设置和更改 first responder。
22,Accessing Related View Controller Object访问相关view controller对象
Supporting Objects managed by your custom view controllers
Navigation toolbar items 对应属性toolbarItem
Navigation bar content 对应属性 navigationItem
Tab bar Item 对应属性tabBarItem
- View Controller Programming Guide for iOS--(一)
- 《View Controller Programming Guide for iOS》笔记
- 《View Controller Programming Guide for iOS》笔记
- View Controller Programming Guide for iOS--(二)
- 《View Controller Programming Guide for iOS》笔记
- View Controller Programming Guide for iOS摘要
- view controller programming guide for iOS(1)
- View Programming Guide for iOS
- View Programming Guide for iOS 摘要
- View Programming Guide for iOS读书笔记
- Scroll View Programming Guide for iOS 笔记
- 《View Programming Guide for iOS》笔记
- Scroll View Programming Guide for iOS 笔记
- 《View Programming Guide for iOS》笔记
- View Programming Guide for IOS:Views笔记
- View Programming Guide for iOS 摘要
- Table View Programming Guide for iOS
- View Controller Programming Guid for iOS 笔记
- 我拿树莓派来做什么
- 韩顺平java视频学习记录
- poj 1850 Code
- 连接QC/取消连接QC
- 安装ubuntu12.04LTS卡住以及花屏问题
- View Controller Programming Guide for iOS--(一)
- Shell小技巧
- View Controller Programming Guide for iOS--(二)
- 约瑟夫问题
- nyist-34
- 树莓派搭建 Google TV
- eclipse3.6配置tomcat6.0
- Java提高:你能正确使用String、StringBuffer、StringBuilder吗
- group by后使用rollup子句总结