如何使用UIAutomation进行iOS 自动化测试(Part II)
来源:互联网 发布:淘宝服装店铺模板 编辑:程序博客网 时间:2024/04/29 17:20
接上一篇如何使用UIAutomation进行iOS 自动化测试(Part I)
3、经验分享(让你生活变得更简单)
类库Tune-up介绍
现在你应该基本上知道如何编写测试代码了。但你慢慢地会发现,你会经常写到一些重复的,冗余的,黏糊糊的代码,像下面一样:
var target = UIATarget.localTarget();var app = target.frontMostApp();
var window = app.mainWindow();
这也是为什么我们会用到一个小的Javascript类库来简化我们写的UIAutomation测试的原因。你可以去https://github.com/alexvollmer/tuneup_js获取这个类库,然后将它复制到你的测试目录下面。现在让我们使用Tune-Up类库来重新编写我们的Test1.js:
#import "tuneup/tuneup.js"test("Test 1", function(target, app) {
var window = app.mainWindow();
app.logElementTree();
//-- select the elements
UIALogger.logMessage( "Select the first tab" );
var tabBar = app.tabBar();
var selectedTabName = tabBar.selectedButton().name();
if (selectedTabName != "First") {
tabBar.buttons()["First"].tap();
}
//-- tap on the text fiels
UIALogger.logMessage( "Tap on the text field now" );
var recipeName = "Unusually Long Name for a Recipe";
window.textFields()[0].setValue(recipeName);
target.delay( 2 );
//-- tap on the text fiels
UIALogger.logMessage( "Dismiss the keyboard" );
app.logElementTree();
app.keyboard().buttons()["return"].tap();
var textValue = window.staticTexts()["RecipeName"].value();
assertEquals(recipeName, textValue);
});
Tune-Up可以避免你编写重复的代码,同时还给你提供了各种好用的断言方法:
ssertTrue(expression, message),assertMatch(regExp, expression, message),
assertEquals(expected, received, message),
assertFalse(expression, message),
assertNull(thingie, message),
assertNotNull(thingie, message),
assertNull(thingie, message),
assertNotNull(thingie, message)
等等
你也可以很容易的扩展这个类库:例如,你可以通过将方法加入到uiautomation-ext.js:里面来为UIATarget类加一个logDevice方法:
extend(UIATarget.prototype, {logDevice: function(){
UIALogger.logMessage("Dump Device:");
UIALogger.logMessage(" model: " + UIATarget.localTarget().model());
UIALogger.logMessage(" rect: " + JSON.stringify(UIATarget.localTarget().rect()));
UIALogger.logMessage(" name: "+ UIATarget.localTarget().name());
UIALogger.logMessage(" systemName: "+ UIATarget.localTarget().systemName());
UIALogger.logMessage(" systemVersion: "+ UIATarget.localTarget().systemVersion());
}
});
然后当你调用target.logDevice()就可以看到:
Dump Device:model: iPhone Simulator
rect: {"origin":{"x":0,"y":0},"size":{"width":320,"height":480}}
name: iPhone Simulator
导入外部脚本
你也可以看到如何在一个脚本文件里引用另一个脚本,即通过#import指令。因此,你可以创建多个测试文件,然后将它们通过导入到单个文件的方式来链接并调用它们:
#import "Test1.js"#import "Test2.js"
#import "Test3.js"
#import "Test4.js"
#import "Test5.js"
使用强大的命令行
如果你想让你的测试代码自动的运行起来,你还可以通过命令行来启动测试。其实,我比较推荐这种方式,而不是使用Instruments的图形界面程序。因为,Instruments的图形界面程序比较慢,而且即使你的测试代码跑完了它也还是会一直运行着。而通过命令行来启动和运行测试代码更快,它会在跑完测试后自动的停止。
为了可以在命令行终端运行你的脚本,你需要知道你设备的UDID和类型:
instruments -w your_ios_udid -t/Applications/Xcode.app/Contents/Developer/Platforms/iPhoneOS.platform/Developer/Library/Instruments/PlugIns/AutomationInstrument.bundle/Contents/Resources/Automation.tracetemplate
name_of_your_app -e UIASCRIPT absolute_path_to_the_test_file
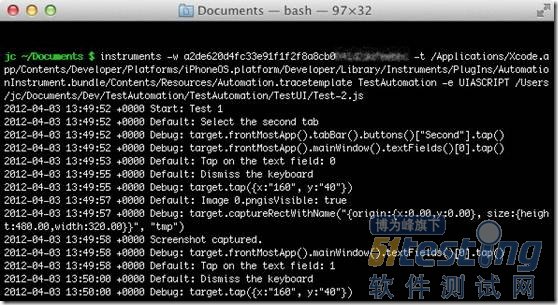
例如,使用我自己的机子,就这么写的:
instruments -w a2de620d4fc33e91f1f2f8a8cb0841d2xxxxxxxx -t/Applications/Xcode.app/Contents/Developer/Platforms/iPhoneOS.platform/Developer/Library/Instruments/PlugIns/AutomationInstrument.bundle/Contents/Resources/Automation.tracetemplate
TestAutomation -e UIASCRIPT
/Users/jc/Documents/Dev/TestAutomation/TestAutomation/TestUI/Test-2.js
如果你使用的Xcode版本低于4.3的话,你需要这样写:
instruments -w your_ios_device_udid -t /Developer/Platforms/iPhoneOS.platform/Developer/Library/Instruments/PlugIns/AutomationInstrument.bundle/Contents/Resources/Automation.tracetemplate TestAutomation -e UIASCRIPT /Users/jc/Documents/Dev/TestAutomation/TestAutomation/TestUI/Test-2.js一个小提示,不要忘了关闭你设备的密码验证,否则你会看到这样的日志信息的:remote exception encountered : ’device locked : Failed to launch process with bundle identifier ’com.manbolo.testautomation’. 的确,因为UIAutomation根本不知道你的密码啊。
命令行终端同样可以在模拟器上使用,但你需要知道待测应用程序在文件系统中的绝对路径。模拟器将目录~/Library/Application Support/iPhone Simulator/5.1/ “模拟”成了设备的文件系统。在这个目录下,你可以找到一个包含装在模拟器上的所有应用程序的沙盒的Applications文件夹。定位到TestAutomation程序的目录,然后:
instruments -t /Applications/Xcode.app/Contents/Developer/Platforms/iPhoneOS.platform/Developer/Library/Instruments/PlugIns/AutomationInstrument.bundle/Contents/Resources/Automation.tracetemplate "/Users/jc/Library/Application Support/iPhone Simulator/5.1/Applications/C28DDC1B-810E-43BD-A0E7-C16A680D8E15/TestAutomation.app" -e UIASCRIPT /Users/jc/Documents/Dev/TestAutomation/TestAutomation/TestUI/Test-2.js最后,如果你没有指定日志输入到哪里的话,你的测试结果会被放到你命令行当前指定(工作)的目录下。你可以通过加入 -e UIARESULTSPATH results_path 参数来指定日志输入目录。
我没有成功的将多个测试脚本并行着在命令行中运行起来。但是你可以将你的测试脚本串连进来,有一整晚去跑它,这样就真正的实现了“在你睡着的时候”,就完成了对应用程序的测试。
使用录制交互功能
除了手动的编写脚本,你还可以直接在设备上或者模拟器上录制脚本,然后替换掉原来的。下面是步骤:
1)启动Instruments (⌘I)
2)创建一个新的脚本
3)选择脚本编辑器
4)在脚本编辑器的底端,你是否看到了一个红色的按钮?点击它!

5)现在,你可以操作你的应用程序;你将看到录制的交互操作出现在脚本窗口(甚至旋转事件)。点击方形按钮来停止录制。
当遇到问题时,加上“UIATarget.delay(1);”
当你在编写脚本的时候,你总是在与时间,动画打交道。UIAutomation有很多方式去获取控件元素,然后等待它们变为可用状态,即使有时候它们还没有显示出来,但根据这篇文档里提到的,最好的建议是:
当遇到问题时,加上UIATarget.delay(1);!
4、高级交互
处理非预期和预期的提示框(alerts)
在写自动化测试过程中,处理提示框是很难的一件事情:你已经很认真的写好了你的测试用例,然后在你准备睡觉之前将它跑起来,然后,到第二天早上,你发现你的测试用例被一个未知消息提示框给毁了。然而,UIAutomation帮助你处理了这种情况。
通过下面代码来实现:
UIATarget.onAlert = function onAlert(alert){var title = alert.name();
UIALogger.logWarning("Alert with title ’" + title + "’ encountered!");
return false; // use default handler
}
它返回一个false,UIAutomation会自动的帮你销毁UIAlertView窗口,因此提示框就不会再影响你的测试了。你的测试脚本就永远不会有提示框弹出了。但是提示框可能是你应用程序的一部分,涉及到你测试的流程,所以,有时候,你不希望它被自动的处理掉。这时,你可以根据提示框的标题来决定,点击某个按钮,然后返回true。通过返回true,你向UIAutomation指定这个提示框必须作为测试的一部分来考虑。
例如,如果你想当提示框的标题为“Add Something”时,点击“Add”按钮,你可以这么写:
UIATarget.onAlert = function onAlert(alert) {var title = alert.name();
UIALogger.logWarning("Alert with title ’" + title + "’ encountered!");
if (title == "Add Something") {
alert.buttons()["Add"].tap();
return true; // bypass default handler
}
return false; // use default handler
}
容易吧?
多任务
测试你的应用程序的多任务是非常容易的事:假设你想测试每次启动一个疯狂的后台进程,将程序放到后台执行,并进入(void)applicationWillEnterForeground:(UIApplication *)application选择器代码段,你可以通过下面的代码来将它推至后台,然后等待10秒后自动返回活动状态。.
UIATarget.localTarget().deactivateAppForDuration(10);
deactivateAppForDuration(duration) 方法会暂停测试脚本的执行,模拟用户点击Home按钮,(即将程序放到后台),等待,然后为你重新激活程序和测试脚本,就这么一行代码而已!
屏幕方向
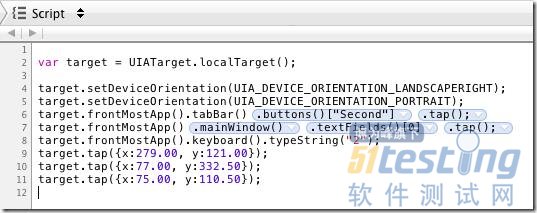
最后,你可以模拟你的iPhone的旋转方向。也是很直观很简单:
var target = UIATarget.localTarget();var app = target.frontMostApp();
// set landscape left
target.setDeviceOrientation(UIA_DEVICE_ORIENTATION_LANDSCAPELEFT);
UIALogger.logMessage("Current orientation is " + app.interfaceOrientation());
// portrait
target.setDeviceOrientation(UIA_DEVICE_ORIENTATION_PORTRAIT);
UIALogger.logMessage("Current orientation is " + app.interfaceOrientation());
5、总结
有用的链接
这篇文章有点儿长,但我希望你们能见识到UIAutomation是很强大的,且你的应用程序是可以得到质量的保障的。网上没有太多的UIAutomation的资料,但我还是列出了很多链接,也许能帮到你。
● http://cocoamanifest.net/articles/2011/05/uiautomation-an-introduction.html,http://cocoamanifest.net/articles/2011/07/ui-automation-part-2-assertions-and-imports.html 和 http://cocoamanifest.net/articles/2011/11/changes-to-ui-automation-in-ios-5.html: 非常好的UIAutomation系列的文章
● http://mobilecoder.wordpress.com/2010/11/08/iphoneipodipad-automation-basics: 非常不错的UIAutomation教程,值得阅读!
● http://www.juddsolutions.com/downloads/UnitAndFunctionalTestingForiOSPlatform.pdf: 很高深的单元测试和UI自动化测试的介绍。第70页里提到的“当遇到问题时,加上UIATarget.delay(1);!”会让你收获很大的。
● http://guerratopia.com/en/introduction-to-automating-ui-testing-in-ios: 非常好的介绍教程
● http://jojitsoriano.wordpress.com/2011/06/03/references-on-unit-testing-ui-automation-for-ios-applications: 很多关于单元测试和UI自动化测试的链接
当然还有:
● Apple documentation on UIAutomation
● UIAutomation in Apple Instruments documentation
● WWDC 2010 - Session 306 - Automating User Interface Testing with Instruments
你需要一个免费的开发者账号去访问这些资源。
- 如何使用UIAutomation进行iOS 自动化测试(Part II)
- 如何使用UIAutomation进行iOS 自动化测试(Part II)
- 如何使用UIAutomation进行iOS自动化测试(Part II)
- 如何使用UIAutomation进行iOS 自动化测试(Part II)
- 如何使用UIAutomation进行iOS 自动化测试(Part I)
- 如何使用UIAutomation进行iOS 自动化测试(Part I)
- 如何使用UIAutomation进行iOS 自动化测试(Part I)
- 如何使用UIAutomation进行iOS自动化测试(Part I)
- 如何使用UIAutomation进行iOS 自动化测试(Part I)
- 如何使用UIAutomation进行iOS 自动化测试(Part I)
- 如何使用UIAutomation进行iOS 自动化测试(Part I)
- 如何使用UIAutomation进行iOS 自动化测试(Part I)
- 如何使用UIAutomation进行iOS 自动化测试(Part I)
- 如何使用UIAutomation进行iOS 自动化测试
- 如何使用UIAutomation进行iOS 自动化测试
- iOS_如何使用UIAutomation进行iOS 自动化测试(Part I)
- 如何使用UIAutomation进行iOS 自动化测试(一)
- 如何使用UIAutomation进行iOS 自动化测试(二)
- 转音频
- The Catalog of Design Patterns 设计模式目录
- JAVA_HOME,CLASSPATH和PATH作用
- 使用strace+pstack利器分析程序性能
- IBM服务器系统安装(随笔/Linux)
- 如何使用UIAutomation进行iOS 自动化测试(Part II)
- ios中如何用一个格式获取多个文件目录中的全部文件
- hehe
- 我们工作到底为了什么
- 使用Windows函数判断键盘大写锁定
- myEclipse(MyEclipse)下VSS的安装和使用
- ralink无线网卡 已连接 有感叹号 受限制或无连接
- 用Java语言实现的各种排序
- unity使用第三方sdk图标问题