Using Github for version control
来源:互联网 发布:仿手绘软件 编辑:程序博客网 时间:2024/05/01 21:12
The git branch command lets you create, list, rename, and delete branches. It doesn't let you switch between branches or put a forked history back together again. For this reason, git branch is tightly integrated with the git checkout and git merge commands.
1. git branch
List all of the branches in your repository.
2. git branch <branch>
Create a new branch called <branch>. This does not check out the new branch.
3. git branch -d <branch>
Delete the specified branch. This is a “safe” operation in that Git prevents you from deleting the branch if it has unmerged changes.
4. git branch -D <branch>
Force delete the specified branch, even if it has unmerged changes. This is the command to use if you want to permanently throw away all of the commits associated with a particular line of development.
5. git branch -m <branch>
Rename the current branch to <branch>.
Application 1: Set up git to push to another user's Github repo
git remote add otherusersorigin http://github.com/user2/user2srepo.git
Then use that alias whenever you need it:
git fetch otherusersorigingit push otherusersoriginYou could also create a new branch in other user's repository:
git checkout -b wangSuch command is short for:
git branch wang
git checkout wangThen, add file, commit and push to the new branch:
Application 2: Using different branches for version control
First, let’s say you’re working on your project and have a couple of commits already (see Figure 3-10).
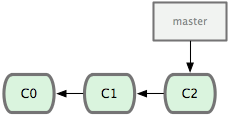
Figure 3-10. A short and simple commit history.
You’ve decided that you’re going to work on issue #53 in whatever issue-tracking system your company uses. To be clear, Git isn’t tied into any particular issue-tracking system; but because issue #53 is a focused topic that you want to work on, you’ll create a new branch in which to work. To create a branch and switch to it at the same time, you can run the git checkout command with the -b switch:
$ git checkout -b iss53Switched to a new branch "iss53"This is shorthand for:
$ git branch iss53$ git checkout iss53Figure 3-11 illustrates the result.
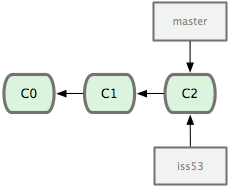
Figure 3-11. Creating a new branch pointer.
You work on your web site and do some commits. Doing so moves the iss53 branch forward, because you have it checked out (that is, your HEAD is pointing to it; see Figure 3-12):
$ vim index.html$ git commit -a -m 'added a new footer [issue 53]'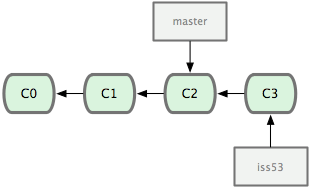
Figure 3-12. The iss53 branch has moved forward with your work.
Now you get the call that there is an issue with the web site, and you need to fix it immediately. With Git, you don’t have to deploy your fix along with the iss53 changes you’ve made, and you don’t have to put a lot of effort into reverting those changes before you can work on applying your fix to what is in production. All you have to do is switch back to your master branch.
However, before you do that, note that if your working directory or staging area has uncommitted changes that conflict with the branch you’re checking out, Git won’t let you switch branches. It’s best to have a clean working state when you switch branches. There are ways to get around this (namely, stashing and commit amending) that we’ll cover later. For now, you’ve committed all your changes, so you can switch back to your master branch:
$ git checkout masterSwitched to branch "master"At this point, your project working directory is exactly the way it was before you started working on issue #53, and you can concentrate on your hotfix. This is an important point to remember: Git resets your working directory to look like the snapshot of the commit that the branch you check out points to. It adds, removes, and modifies files automatically to make sure your working copy is what the branch looked like on your last commit to it.
Next, you have a hotfix to make. Let’s create a hotfix branch on which to work until it’s completed (see Figure 3-13):
$ git checkout -b hotfixSwitched to a new branch "hotfix"$ vim index.html$ git commit -a -m 'fixed the broken email address'[hotfix]: created 3a0874c: "fixed the broken email address" 1 files changed, 0 insertions(+), 1 deletions(-)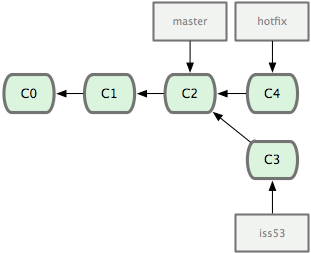
Figure 3-13. hotfix branch based back at your master branch point.
You can run your tests, make sure the hotfix is what you want, and merge it back into your master branch to deploy to production. You do this with the git merge command:
$ git checkout master$ git merge hotfixUpdating f42c576..3a0874cFast forward README | 1 - 1 files changed, 0 insertions(+), 1 deletions(-)You’ll notice the phrase "Fast forward" in that merge. Because the commit pointed to by the branch you merged in was directly upstream of the commit you’re on, Git moves the pointer forward. To phrase that another way, when you try to merge one commit with a commit that can be reached by following the first commit’s history, Git simplifies things by moving the pointer forward because there is no divergent work to merge together — this is called a "fast forward".
Your change is now in the snapshot of the commit pointed to by the master branch, and you can deploy your change (see Figure 3-14).
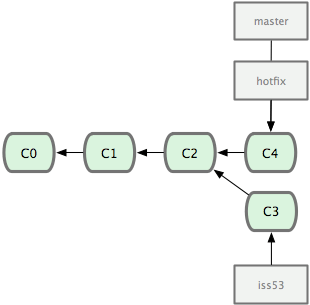
Figure 3-14. Your master branch points to the same place as your hotfix branch after the merge.
After your super-important fix is deployed, you’re ready to switch back to the work you were doing before you were interrupted. However, first you’ll delete the hotfix branch, because you no longer need it — the master branch points at the same place. You can delete it with the -d option to git branch:
$ git branch -d hotfixDeleted branch hotfix (3a0874c).Now you can switch back to your work-in-progress branch on issue #53 and continue working on it (see Figure 3-15):
$ git checkout iss53Switched to branch "iss53"$ vim index.html$ git commit -a -m 'finished the new footer [issue 53]'[iss53]: created ad82d7a: "finished the new footer [issue 53]" 1 files changed, 1 insertions(+), 0 deletions(-)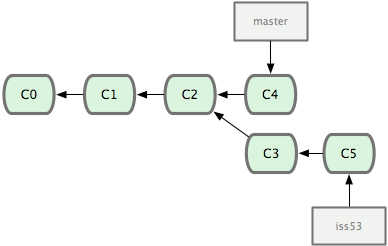
Figure 3-15. Your iss53 branch can move forward independently.
It’s worth noting here that the work you did in your hotfix branch is not contained in the files in your iss53 branch. If you need to pull it in, you can merge your master branch into your iss53branch by running git merge master, or you can wait to integrate those changes until you decide to pull the iss53 branch back into master later.
- Using Github for version control
- Pragmatic Version Control: Using Subversion
- Using Version Control with Unity
- github for windows_English version.
- Using Beyond Compare with Version Control Systems
- Using Beyond Compare with Version Control Systems
- Pragmatic Version Control Using Git(笔记)
- Git: Version Control for Everyone ebook
- Subversion Version Control: Using The Subversion Version Control System in Development Projects
- Control keys for quick using PC
- Using Beyond Compare with Version Control Systems(zt)
- Using Beyond Compare with Version Control Systems(ZZ)
- Using Beyond Compare with Version Control Systems under OSX
- Version Control
- Version Control
- version control
- version control
- Using GitHub for Windows with non-GitHub repositories
- 软RAID磁盘阵列配置
- 黑马程序员-基础知识梳理4
- ZOJ1099-HTML
- ISCSI 存储服务器的配置与管理
- 函数function(重点)
- Using Github for version control
- 3Dshader之球形环境映射(sphere environment mapping)
- 利用vc调用dll
- 老农的计算机笔记(四)关于编程语言
- !!!How to initialize pointer with new objects
- 蒲公英的博客
- php基础知识(2)
- ext2磁盘块分配
- omega论文 译文