JavaSE学习 第十六章 线程
来源:互联网 发布:myfax网络传真机 编辑:程序博客网 时间:2024/06/11 08:12
参考 :http://xiao1227372602.iteye.com/blog/1630840
进程与线程 http://t240178168.iteye.com/blog/1681750
JAVA线程池原理以及几种线程池类型介绍 http://t240178168.iteye.com/blog/1629433
进程通信 http://t240178168.iteye.com/blog/1749312
线程间实现同步互斥的方法 http://t240178168.iteye.com/blog/1749315
由生产者/消费者问题看JAVA多线程 http://yangyushuai.iteye.com/blog/1830034
java锁机制 http://yangyushuai.iteye.com/blog/1830036
java中HashMap在多线程环境下引起CPU100%的问题解决 http://shuaijie506.iteye.com/blog/1815213
进程间通信:Windows下进程间通信的手段 http://t240178168.iteye.com/blog/1749308
synchronized关键字、Callable以及线程池 http://t240178168.iteye.com/blog/1706707
1.什么是线程
线程是一个程序内部的顺序控制流。
线程和进程:
每个进程都有独立的代码和数据空间(进程上下文),进程切换的开销大。
线程: 轻量的进程,同一类线程共享代码和数据空间,每个线程有独立的运行栈和程序计数器(PC),线程切换的开销小。
多进程: 在操作系统中能同时运行多个任务(程序)
多线程:在同一应用程序中有多个顺序流同时执行
2.线程的概念模型
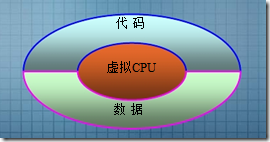
1. 虚拟的CPU,由java.lang.Thread类封装和虚拟;
2. CPU所执行的代码,传递给Thread类对象;
3. CPU所处理的数据,传递给Thread类对象。

Java的线程是通过java.lang.Thread类来实现的。
每个线程都是通过某个特定Thread对象所对应的,方法run( )来完成其操作的,方法run( )称为线程体。
3.创建线程的两种方式的比较
一. 使用Runnable接口创建线程:
可以将CPU(Tread 类)、代码和数据(Runnable接口 run 方法)分开,形成清晰的模型;线程体run()方法所在的类还可以从其他类继承一些有用的属性或方法;
并有利于保持程序风格的一致性。
public class TestTread1{ public static void main(String args[]) { Runner1 r = new Runner1(); Thread t = new Thread(r); t.start(); }}class Runner1 implements Runnable { public void run() { for(int i=0; i<30; i++) { System.out.println("No. " + i); } }}
二. 直接继承Thread类创建线程:
Thread子类无法再从其他类继承,编写简单,run()方法的当前对象就是线程对象,可直接操纵。
public class TestTread2{ public static void main(String args[]){ Thread t = new Runner3(); t.start(); }}class Runner3 extends Thread { public void run() { for(int i=0; i<30; i++) { System.out.println("No. " + i); } }}
4.多线程
Java 中 引 入 线 程 机 制 的 目 的 在 于 实 现 多 线 程 (Multi-Thread),多线程之间可以共享代码和数据。
public class TestTread3{ public static void main(String args[]) { Runner2 r = new Runner2(); Thread t1 = new Thread(r); Thread t2 = new Thread(r); t1.start(); t2.start(); }}class Runner2 implements Runnable { public void run() { for(int i=0; i<10; i++) { String s = Thread.currentThread().getName(); System.out.println(s + ": " + i); } }}
结果:
Thread-0: 0Thread-0: 1Thread-0: 2Thread-0: 3Thread-0: 4Thread-0: 5Thread-0: 6Thread-0: 7Thread-0: 8Thread-0: 9Thread-1: 0Thread-1: 1Thread-1: 2Thread-1: 3Thread-1: 4Thread-1: 5Thread-1: 6Thread-1: 7Thread-1: 8Thread-1: 9

5.后台线程
相关基本概念:
后台处理(Background Processing):让某些程序的运行让步给其他的优先级高的程序
后台线程(Background Thread / Daemon Thread):以后台的方式(往往是服务线程)运行的线程,例如定时器线程
用户线程(User Thread):完成用户指定的任务的线程
主线程(Main Thread):它就是一种主线程
子线程(Sub Thread):在线程中创建的线程就是子线程
Thread类提供的相关方法:
public final boolean isDaemon():判断某个线程是不是一个后台线程
public final void setDaemon(Boolean on):设置某个线程为一个后台线程
举例:
package v512.chap16;public class TestDaemonThread { public static void main(String args[]){ Thread t1 = new MyRunner(10); t1.setName("用户线程t1"); t1.start(); Thread t2 = new MyRunner(50); t2.setDaemon(true); t2.setName("后台线程t2"); t2.start(); for(int i=0;i<10;i++){ System.out.println(Thread.currentThread().getName() + ": " + i); } System.out.println("主线程结束!"); }}class MyRunner extends Thread { private int n; public MyRunner(int n){ this.n = n; } public void run() { for(int i=0; i<n; i++) { System.out.println(this.getName() + ": " + i); } System.out.println(this.getName() + "结束!"); }}
结果:
用户线程t1: 0用户线程t1: 1用户线程t1: 2用户线程t1: 3用户线程t1: 4用户线程t1: 5用户线程t1: 6用户线程t1: 7用户线程t1: 8用户线程t1: 9用户线程t1结束!main: 0main: 1main: 2main: 3main: 4main: 5main: 6main: 7main: 8main: 9主线程结束!后台线程t2: 0后台线程t2: 1后台线程t2: 2后台线程t2: 3后台线程t2: 4后台线程t2: 5后台线程t2: 6后台线程t2: 7后台线程t2: 8后台线程t2: 9后台线程t2: 10后台线程t2: 11后台线程t2: 12后台线程t2: 13后台线程t2: 14后台线程t2: 15后台线程t2: 16后台线程t2: 17后台线程t2: 18后台线程t2: 19后台线程t2: 20后台线程t2: 21后台线程t2: 22后台线程t2: 23后台线程t2: 24后台线程t2: 25后台线程t2: 26后台线程t2: 27后台线程t2: 28后台线程t2: 29后台线程t2: 30后台线程t2: 31后台线程t2: 32后台线程t2: 33后台线程t2: 34后台线程t2: 35后台线程t2: 36后台线程t2: 37后台线程t2: 38后台线程t2: 39后台线程t2: 40后台线程t2: 41后台线程t2: 42后台线程t2: 43后台线程t2: 44后台线程t2: 45后台线程t2: 46后台线程t2: 47后台线程t2: 48后台线程t2: 49后台线程t2结束!
6.GUI线程
GUI程序运行过程中系统会自动创建若干GUI线程
常见GUI线程:
AWT-Windows线程:(windows 系统中)后台线程
AWT-EventQueue-n线程
AWT-Shutdown线程:负责关闭窗体中的抽象窗口工具
DestroyJavaVM线程:不是GUI线程,它是当main线程结束之后系统自动创建的,用于等到所有的线程都死掉了之后销毁jvm
实例:
package v512.chap16;import java.awt.*;import java.awt.event.*;public class TestGUIThread { public static void main(String args[]) throws Exception{ Frame f = new Frame(); Button b = new Button("Press Me!"); MyMonitor mm = new MyMonitor(); b.addActionListener(mm); f.addWindowListener(mm); f.add(b,"Center"); f.setSize(100,60); f.setVisible(true); MyThreadViewer.view(); }}class MyMonitor extends WindowAdapter implements ActionListener{ public void actionPerformed(ActionEvent e){ MyThreadViewer.view(); }}class MyThreadViewer{ public static void view(){ Thread current = Thread.currentThread(); System.out.println("当前线程名称: " + current.getName()); int total = Thread.activeCount(); System.out.println("活动线程总数: " + total + "个"); Thread[] threads = new Thread[total]; current.enumerate(threads); for(Thread t : threads){ String role = t.isDaemon()?"后台线程 ":"用户线程 "; System.out.println(" -" + role + t.getName()); } System.out.println("----------------------------------"); } }
运行之后,在点击一下 button
输出结果:
当前线程名称: main活动线程总数: 4个 -用户线程 main -用户线程 AWT-Shutdown -后台线程 AWT-Windows -用户线程 AWT-EventQueue-0----------------------------------当前线程名称: AWT-EventQueue-0活动线程总数: 4个 -用户线程 AWT-Shutdown -后台线程 AWT-Windows -用户线程 AWT-EventQueue-0 -用户线程 DestroyJavaVM----------------------------------
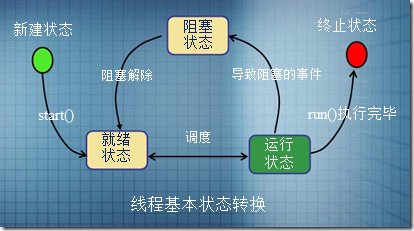
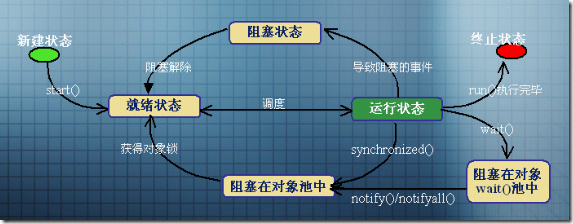
7.线程的生命周期
新建状态
就绪状态:此时不一定马上就开始运行
运行状态:运行状态的线程可能会发生问题(赚到了阻塞状态)
阻塞状态
终止状态

8.线程的优先级
线程的优先级用数字来表示,范围从1到10。主线程的缺省优先级是5,子线程的优先级默认与其父线程相同。
注意:程序中不能依赖线程的优先级来让线程按照我们的要求来执行!
Thread类提供的相关方法:
public final int getPriority();
public final void setPriority(int newPriority);
相关静态整型常量:
Thread.MIN_PRIORITY = 1
Thread.MAX_PRIORITY = 10
Thread.NORM_PRIORITY = 5
用法举例:
package v512.chap16;public class TestPriority { public static void main(String args[]){ System.out.println("线程名\t优先级"); Thread current = Thread.currentThread(); System.out.print(current.getName() + "\t"); System.out.println(current.getPriority()); Thread t1 = new Runner(); Thread t2 = new Runner(); Thread t3 = new Runner(); t1.setName("First"); t2.setName("Second"); t3.setName("Third"); t2.setPriority(Thread.MAX_PRIORITY); t3.setPriority(8); t1.start(); t2.start(); t3.start(); }}class Runner extends Thread { public void run() { System.out.print(this.getName() + "\t"); System.out.println(this.getPriority()); }}
输出结果:
线程名 优先级main 5First 5Second 10Third 8
9.线程的串行化
在多线程程序中,如果在一个线程运行的过程中要用到另一个线程的运行结果,则可进行线程的串型化处理。
Thread类提供的相关方法:
public final void join()
public final void join(long millis) //等待毫秒数
public final void join(long millis,int nanos)
测试 主线程必须要等到子线程运行完成之后才可以运行:
package v512.chap16;public class TestJoin { public static void main(String args[]){ MyRunner2 r = new MyRunner2(); Thread t = new Thread(r); t.start(); try{ t.join(); }catch(InterruptedException e){ e.printStackTrace(); } for(int i=0;i<20;i++){ System.out.println("主线程:" + i); } }}class MyRunner2 implements Runnable { public void run() { for(int i=0;i<20;i++) { System.out.println("SubThread: " + i); } }}
输出结果:
SubThread: 0SubThread: 1SubThread: 2SubThread: 3SubThread: 4SubThread: 5SubThread: 6SubThread: 7SubThread: 8SubThread: 9SubThread: 10SubThread: 11SubThread: 12SubThread: 13SubThread: 14SubThread: 15SubThread: 16SubThread: 17SubThread: 18SubThread: 19主线程:0主线程:1主线程:2主线程:3主线程:4主线程:5主线程:6主线程:7主线程:8主线程:9主线程:10主线程:11主线程:12主线程:13主线程:14主线程:15主线程:16主线程:17主线程:18主线程:19
10.线程休眠
线程休眠——暂停执行当前运行中的线程,使之进入阻塞状态,待经过指定的“延迟时间”后再醒来并转入到就绪状态。
Thread类提供的相关方法:
public static void sleep(long millis)
public static void sleep(long millis, int nanos)
用法举例: 数字时钟
package v512.chap16;import java.util.*;import javax.swing.*;public class DigitalClock{ public static void main(String[] args){ JFrame jf = new JFrame("Clock"); JLabel clock = new JLabel("Clock"); clock.setHorizontalAlignment(JLabel.CENTER); jf.add(clock,"Center"); jf.setSize(140,80); jf.setLocation(500,300); jf.setDefaultCloseOperation(JFrame.EXIT_ON_CLOSE); jf.setVisible(true); while(true){ clock.setText(getTime()); try{ Thread.sleep(1000); //this.sleep(1000); }catch(InterruptedException e){ e.printStackTrace(); } } } public static String getTime(){ Calendar c = new GregorianCalendar(); String time = c.get(Calendar.YEAR) + "-" + (c.get(Calendar.MONTH) + 1) + "-" + c.get(Calendar.DATE) + " " ; int h = c.get(Calendar.HOUR_OF_DAY); int m = c.get(Calendar.MINUTE); int s = c.get(Calendar.SECOND); String ph = h<10 ? "0":""; String pm = m<10 ? "0":""; String ps = s<10 ? "0":""; time += ph + h + ":" + pm + m + ":" + ps + s; return time; } }
显示效果:

11.线程让步
线程让步——让运行中的线程主动放弃当前获得的 CPU 处理机会,但不是使该线程阻塞,而是使之转入就绪状态。
Thread类提供的相关方法:
public static void yield()
用法举例:
package v512.chap16;import java.util.Date;public class TestYield{ public static void main(String[] args){ Thread t1 = new MyThread(false); Thread t2 = new MyThread(true); Thread t3 = new MyThread(false); t1.start(); t2.start(); t3.start(); } }class MyThread extends Thread{ private boolean flag; public MyThread(boolean flag){ this.flag = flag; } public void setFlag(boolean flag){ this.flag = flag; } public void run(){ long start = new Date().getTime(); for(int i=0;i<500;i++){ if(flag) Thread.yield(); System.out.print(this.getName() + ": " + i + "\t"); } long end = new Date().getTime(); System.out.println("\n" + this.getName() + "执行时间: " + (end - start) + "毫秒"); }}
输出结果太多了,不便贴出,可以查看一下执行时间
Thread-0执行时间: 67毫秒
Thread-2执行时间: 84毫秒
Thread-1执行时间: 148毫秒
12.线程的挂起和恢复
线程挂起——暂时停止当前运行中的线程,使之转入阻塞状态,并且不会自动恢复运行。
线程恢复——使得一个已挂起的线程恢复运行。
Thread类提供的相关方法:
public final void suspend()
public final void resume()
用法举例:
package v512.chap16;import java.awt.Color;import java.awt.event.ActionEvent;import java.awt.event.ActionListener;import java.util.Date;import javax.swing.JFrame;import javax.swing.JLabel;import javax.swing.JButton;public class TestSuspend{ public static void main(String[] args){ JFrame jf = new JFrame("Timer"); JButton pause = new JButton("Pause"); JLabel clock = new JLabel("Timer"); clock.setBackground(Color.GREEN); clock.setOpaque(true); clock.setHorizontalAlignment(JLabel.CENTER); jf.add(clock,"Center"); jf.add(pause,"North"); jf.setSize(140,80); jf.setLocation(500,300); jf.setDefaultCloseOperation(JFrame.EXIT_ON_CLOSE); jf.setVisible(true); MyThread3 mt = new MyThread3(clock,10000); mt.start(); MyListener ml = new MyListener(clock,mt); pause.addActionListener(ml); } }class MyThread3 extends Thread{ private JLabel clock; private long time; private long end; public MyThread3(JLabel clock,long time){ this.clock = clock; this.time = time; } public void init(){ long start = new Date().getTime(); end = start + time; } public void run(){ this.init(); while(true){ long now = new Date().getTime(); time = end - now; if(time > 0){ String s = this.convert(time); clock.setText(s); }else{ break; } try{ Thread.sleep(10); }catch(InterruptedException e){ e.printStackTrace(); } } clock.setText("时间到!"); clock.setBackground(Color.RED); } public String convert(long time){ long h = time / 3600000; long m = (time % 3600000) / 60000; long s = (time % 60000) / 1000; long ms = (time % 1000) / 10; String ph = h<10 ? "0":""; String pm = m<10 ? "0":""; String ps = s<10 ? "0":""; String pms = ms<10 ? "0":""; String txt = ph + h + ":" + pm + m + ":" + ps + s + "." + pms + ms; return txt; } }class MyListener implements ActionListener{ private JLabel clock; private MyThread3 mt; private boolean running= true; public MyListener(JLabel clock,MyThread3 mt){ this.clock = clock; this.mt = mt; } public void actionPerformed(ActionEvent e){ if(!mt.isAlive()) return; JButton jb = (JButton)(e.getSource()); if(running){ jb.setText("Replay"); clock.setBackground(Color.YELLOW); mt.suspend(); }else{ jb.setText("Pause"); clock.setBackground(Color.green); mt.init(); mt.resume(); } running = !running; } }
测试结果:


13.终止线程
一种特别优雅的方式终止线程(设置标志 flag)
实例:
public class Test { public static void main(String args[]){ Runner r = new Runner(); Thread t = new Thread(r); t.start(); for(int i=0;i<10;i++){ try{ Thread.sleep(5); System.out.println("\nin thread main i=" + i); }catch(InterruptedException e){ e.printStackTrace(); } } System.out.println("Thread main is over"); r.shutDown(); }}
public class Runner implements Runnable { private boolean flag=true; public void run() { int i = 0; while (flag == true) { System.out.print(" " + i++); } } public void shutDown() { flag = false; }}
main线程结束之后,子线程也就结束了(flag == false)
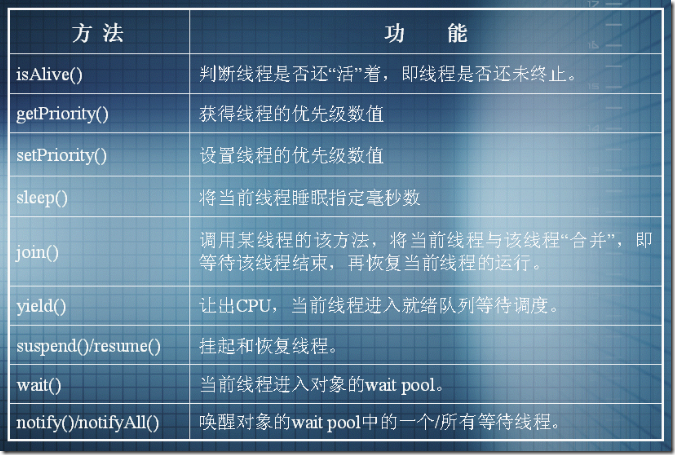
14.线程控制的基本方法

15. 临界资源问题
临界资源问题实例:
两个线程A和B在同时操纵Stack类的同一个实例(栈),A向栈里push一个数据,B则要从堆栈中pop一个数据。
栈的模拟public class Stack{ int idx=0; char[ ] data = new char[6]; public void push(char c){ data[idx] = c; idx++; } public char pop(){ idx--; return data[idx]; } }
可能出现的问题

(4 中 c 应该是不存在的)
16. 互斥锁 和 死锁
在Java语言中,引入了对象互斥锁的概念,来保证共享数据操作的完整性。
每个对象都对应于一个可称为“互斥锁”的标记,这个标记用来保证在任一时刻,只能有一个线程访问该对象。
关键字synchronized 来与对象的互斥锁联系。当某个对象用synchronized修饰时,表明该对象在任一时刻只能由一个线程访问。
synchronized用法
①用于方法声明中,标明整个方法为同步方法:这个时候调用这个方法的对象是处于被当前的线程锁定的状态
public synchronized void push(char c){ data[idx] = c; idx++; }
②用于修饰语句快,标明整个语句块为同步块:这个时候 synchronized 中的对象是被当前的线程锁定了的
public char pop(){ //其它代码 synchronized(this){ idx--; return data[idx]; } //其它代码 }
并发运行的多个线程间彼此等待、都无法运行的状态称为线程死锁。
线程死锁实例一:
package v512.chap16;public class TestDeadLock{ public static void main(String args[]){ StringBuffer sb = new StringBuffer("ABCD"); MyThread4 t = new MyThread4(sb); t.start(); synchronized(sb){ try{ t.join(); }catch(InterruptedException e){ e.printStackTrace(); } System.out.println(sb); } System.out.println("Main thread is over!"); } }class MyThread4 extends Thread{ private StringBuffer sb; public MyThread4(StringBuffer sb){ this.sb = sb; } public void run(){ synchronized(sb){ sb.reverse(); } System.out.println("Sub thread is over!"); } }
控制台什么都没有输出来!
分析:在main方法的同步块中串行插入了子线程t,并锁定了sb对象,然而子线程的run方法中也有一个同步块,它要锁定的对象正是sb对象,
然而sb对象已经被主线程给锁定了,子线程只能等待,另一方面,主线程又必须要等到子线程结束了之后才可以执行,两者就这么一直等待着,
陷入了死锁的状态!
如果删除掉main中的同步,就可以看到结果:
Sub thread is over!DCBAMain thread is over!
实例二:
package v512.chap16;public class TestDeadLock2{ public static void main(String args[]){ char[] a = {'A','B','C'}; char[] b = {'D','E','F'}; MyThread5 t1 = new MyThread5(a,b); MyThread5 t2 = new MyThread5(b,a); t1.start(); t2.start(); } }class MyThread5 extends Thread{ private char[] source; private char[] dest; public MyThread5(char[] source,char[] dest){ this.source = source; this.dest = dest; } public void run(){ synchronized(source){ try{ Thread.sleep(1000); }catch(InterruptedException e){ e.printStackTrace(); } synchronized(dest){ System.arraycopy(source,0,dest,0,source.length); System.out.println(dest); } } } }
假设线程t1先执行run,然后将字符数组a锁定了,接着t1休眠了,线程t2开始执行,并将数组b锁定了,之后线程t2进入休眠,
然后线程t1重新执行,这时候发现数组b已经被线程t2给锁定了,只能等待,休眠之后,线程t2同样发现数组a被线程t1给锁定了,
两者相互之间等待着,就陷入了死锁状态!
17.线程的同步通信
为避免死锁,在线程进入阻塞状态时应尽量释放其锁定的资源,以为其他的线程提供运行的机会。
相关方法:
public final void wait() :会导致当前的线程进入阻塞状态并尽量释放其锁定的资源
public final void notify():将某个线程重新恢复过来,但不是马上就进入到就绪状态,它可能还要等,等到它要使用的对象解除了锁定才行
public final void notifyAll()

生产者 和 消费者 问题:
同步的栈:
package v512.chap16;public class SyncStack { // 支持多线程同步操作的堆栈的实现 private int index = 0; private char[] data = new char[6]; public synchronized void push(char c) { while (index == data.length) { try { this.wait(); } catch (InterruptedException e) { } } this.notify(); data[index] = c; index++; System.out.println("produced:" + c); } public synchronized char pop() { while (index == 0) { try { this.wait(); } catch (InterruptedException e) { } } this.notify(); index--; System.out.println("consumed:" + data[index]); return data[index]; }}
测试类:包括了生产者和消费者
package v512.chap16;public class SyncTest{ public static void main(String args[]){ SyncStack stack = new SyncStack(); Runnable p=new Producer(stack); Runnable c = new Consumer(stack); Thread t1 = new Thread(p); Thread t2 = new Thread(c); t1.start(); t2.start(); }}class Producer implements Runnable{ SyncStack stack; public Producer(SyncStack s){ stack = s; } public void run(){ for(int i=0; i<20; i++){ char c =(char)(Math.random()*26+'A'); stack.push(c); try{ Thread.sleep((int)(Math.random()*300)); }catch(InterruptedException e){ } } }}class Consumer implements Runnable{ SyncStack stack; public Consumer(SyncStack s){ stack = s; } public void run(){ for(int i=0;i<20;i++){ char c = stack.pop(); try{ Thread.sleep((int)(Math.random()*500)); }catch(InterruptedException e){ } } }}
输出结果:
produced:Mconsumed:Mproduced:Nconsumed:Nproduced:Pproduced:Aconsumed:Aconsumed:Pproduced:Zconsumed:Zproduced:Fproduced:Jproduced:Xproduced:Qconsumed:Qproduced:Nproduced:Wproduced:Kconsumed:Kproduced:Iconsumed:Iproduced:Aconsumed:Aproduced:Zconsumed:Zproduced:Mconsumed:Mproduced:Xconsumed:Xproduced:Xconsumed:Xproduced:Pconsumed:Pproduced:Vconsumed:Vconsumed:Wconsumed:Nconsumed:Xconsumed:Jconsumed:F
18.多线程编程专题 (还未仔细看)
线程间数据传输
例16-16 使用管道流实现线程间数据传输
类的同步性与线程安全
例16-17 验证同步类的线程安全性
定时器
例16-18 使用定时器实现数字时钟功能
gc机制
- 博客分类:
- java
垃圾回收机制是放在JVM中,由JVM来负责回收垃圾,我们只需要创建对象来分配空间,当对象无用时则不用担心空间回收的问题。
二、对象什么时候被回收
对象的生命周期与作用域无关,与引用有关。当一个对象被多个引用所指向,当该对象不再有任何引用指向它时,这个对象就被抛弃了,就可以被垃圾回收机制回收。比如当某个对象不存在任何引用时,引用告诉jvm你可以回收这个对象了,它对于我来说没有用了。
当jvm的垃圾回收机制对堆空间做检测时,发现某个对象的引用数为0时,就会把这个对象列入待回收列表中,并不是马上就销毁。
当一个对象被认为没有必要存在了,则会释放它占用的内存,被释放的内存可以再分配。但是并不是立刻就被回收的,jvm进程做空间回收有较大的系统开销,如果一个对象被丢弃就立刻回收它,会使整个应用的运转效率非常低下,jvm的垃圾回收机制有很多算法,除了引用计数法用来判断对象是否被抛弃外,其他算法是用来确定何时与如何做回收。为了提高效率,垃圾回收器通常在满足两个条件才运行:有对象要被回收,系统需要回收。因此运行时系统只在需要的时候才使用它,所以你不知道垃圾回收发生的准确时间。
三、没有引用指向的对象有用么?
没有引用指向的对象是要被回收的,是堆空间里的一个垃圾。但是有个例外,对于一次性使用的对象(临时对象)。可以不用引用变量指向它。例如:System.out.print("I like Java");就是创建了一个字符串对象后,无引用指向,直接传递给println()方法。
四、应用能干预垃圾回收吗?
这是不能的,对于垃圾回收机制来说,应用只有两个途径发消息给JVM,第一个就是指向某对象的引用全部移除了,这个对象不要了;第二个就是调用方法System.gc()。
对于system.gc()来说这也仅仅是个请求,JVM接受这个消息后并不是立即做垃圾回收,而只是对几个垃圾回收算法做了加权,使垃圾回收操作容易发生,或提早发生,或回收较多而已。
Java的垃圾回收机制是为所有java应用进程服务的,而不是为个特定的进程服务的,所以任何进程都不能命令垃圾回收机制做什么、怎么做或做多少。
- JavaSE学习 第十六章 线程
- JavaSE学习 第十六章 线程
- JavaSE学习 第十六章 线程
- 第十六章:线程栈
- javaSE学习笔记之线程
- JAVASE学习(16)线程
- JavaSE学习笔记之多线程
- JavaSE 学习参考:线程生命周期
- JavaSE学习笔记--线程并发库
- 黑马程序员-javaSE学习之多线程
- JavaSE 学习参考:进程和线程
- javase线程
- 《VC++深入详解》学习笔记 第十六章 线程同步与异步套接字编程
- JavaSE 学习参考:Runnable接口实现线程任务
- JavaSE第十六讲:方法重载剖析
- javase--6线程
- JAVASE之多线程
- JAVASE----07----线程
- python routine
- selenium验证页面上的UI元素
- JavaSE学习 第十四章 高级IO编程和对象序列化
- 杭电3335Divisibility(二分图)
- VisionMobile:2013年Q3移动开发者经济报告(七):第六章、开发者如何混搭和适配移动平台
- JavaSE学习 第十六章 线程
- 化妆品护肤DiY的广告界面 简单的jquery 图片无缝滚动
- JavaSE学习 第十七章 Java网络编程
- Trace32 Simulator for ARM工具
- window.location.href"、"location.href"
- [转]eclipse中的两种Jre 及 Jre与Jdk的区别+[原创]在Myeclipse中配置Javadoc的方法
- Android学习系列(16)--App列表之圆角ListView
- 算法竞赛入门经典 第1章 习题解答
- 倒腾(jdbc)


