《Handler: Activity 之间通过 Handler 通信》 & 《通过Handler更新UI》
来源:互联网 发布:东南大学seu网络登录 编辑:程序博客网 时间:2024/04/27 21:26
感谢AndroidBluetooth:
http://blog.csdn.net/androidbluetooth/article/details/6611138
AndroidBluetooth有两篇文章对Android Handler机制讲解比较细致,这是其中一篇,另外一篇见:
http://blog.csdn.net/androidbluetooth/article/details/6384641(Handler:更新UI的方法,活学活用!)
=======================版权分割线,以下内容皆为AndroidBluetooth所有============================
假设你已经明白下面的内容,那么这篇博客很适合您!
<1> Application 的作用及用法
<2> Activity、Task 以及 Application 之间的关系
<3> Handler 的用法
真的很感谢 anhenzhufeng 这位 CSDN 好友,如果不是他的虚心和认真,恐怕这篇文章难以问世!
再次感谢他在我的博客http://blog.csdn.net/androidbluetooth/article/details/6384641#reply的提问,这篇文章送给他以及有需要的朋友们。希望这篇博客能够帮到您!
读这篇博客之前,我们看看 anhenzhufeng 的问题,见截图,如下:

大致说一下我的思路吧!
多个 Activity 之间可以通过 Application 共享数据,在这里我就让两个 Activity 共享 Handler(更新UI,我一般使用 Handler),主 Activity 中更新 UI,另一个 Activity 发送更新UI的消息。这样就达到在主Activity更新UI的目的。好吧,具体看代码!
1. 主 Activity 的 main.xml
- <?xml version="1.0" encoding="utf-8"?>
- <LinearLayout xmlns:android="http://schemas.android.com/apk/res/android"
- android:orientation="vertical"
- android:layout_width="fill_parent"
- android:layout_height="fill_parent"
- >
- <TextView
- android:id="@+id/tv"
- android:layout_width="fill_parent"
- android:layout_height="wrap_content"
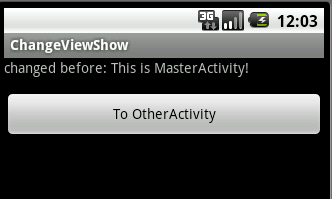
- android:text="changed before: This is MasterActivity!"
- />
- <Button
- android:layout_marginTop="15dip"
- android:id="@+id/btn_to"
- android:layout_width="fill_parent"
- android:layout_height="wrap_content"
- android:text="To OtherActivity"/>
- </LinearLayout>
- package mark.zhang;
- import android.app.Activity;
- import android.content.Intent;
- import android.graphics.Color;
- import android.os.Bundle;
- import android.os.Handler;
- import android.os.Message;
- import android.view.View;
- import android.view.View.OnClickListener;
- import android.widget.Button;
- import android.widget.TextView;
- public class MasterActivity extends Activity {
- // 用于msg.what值
- private static final int CHANGED = 0x0010;
- private Button btn_to = null;
- private TextView tv = null;
- private MyHandler handler = null;
- private MyAPP mAPP = null;
- @Override
- public void onCreate(Bundle savedInstanceState) {
- super.onCreate(savedInstanceState);
- setContentView(R.layout.main);
- mAPP = (MyAPP) getApplication();
- handler = new MyHandler();
- tv = (TextView) findViewById(R.id.tv);
- btn_to = (Button) findViewById(R.id.btn_to);
- // 设置监听器
- btn_to.setOnClickListener(new OnClickListener() {
- @Override
- public void onClick(View v) {
- // 设置共享变量
- mAPP.setHandler(handler);
- // 启动另一个Activity
- Intent intent = new Intent(MasterActivity.this,
- ToChangeViewActivity.class);
- startActivity(intent);
- }
- });
- }
- /**
- * 自己实现 Handler 处理消息更新UI
- *
- * @author mark
- */
- final class MyHandler extends Handler {
- @Override
- public void handleMessage(Message msg) {
- super.handleMessage(msg);
- if(msg.what == CHANGED) { // 更新UI
- tv.setText("changed after: I have be changed by Other Activity!");
- tv.setBackgroundColor(Color.BLUE);
- btn_to.setText("I have been changed!");
- btn_to.setBackgroundColor(Color.RED);
- }
- }
- }
- }
3. 自实现Application
对于Application可以参考sdk api文档。在这里,我就直接使用,不做解释!
- package mark.zhang;
- import mark.zhang.MasterActivity.MyHandler;
- import android.app.Application;
- /**
- * 自己实现Application,实现数据共享
- *
- * @author mark
- *
- */
- public class MyAPP extends Application {
- // 共享变量
- private MyHandler handler = null;
- // set方法
- public void setHandler(MyHandler handler) {
- this.handler = handler;
- }
- // get方法
- public MyHandler getHandler() {
- return handler;
- }
- }
该 Activity 是 ToChangeViewActivity,Java、以及布局文件 show.xml 代码如下。
- package mark.zhang;
- import mark.zhang.MasterActivity.MyHandler;
- import android.app.Activity;
- import android.os.Bundle;
- import android.view.View;
- import android.view.View.OnClickListener;
- public class ToChangeViewActivity extends Activity {
- private static final int CHANGED = 0x0010;
- private MyAPP mAPP = null;
- private MyHandler mHandler = null;
- @Override
- protected void onCreate(Bundle savedInstanceState) {
- super.onCreate(savedInstanceState);
- setContentView(R.layout.show);
- mAPP = (MyAPP) getApplication();
- // 获得该共享变量实例
- mHandler = mAPP.getHandler();
- findViewById(R.id.btn_chang).setOnClickListener(new OnClickListener() {
- @Override
- public void onClick(View v) {
- // 发送消息
- mHandler.sendEmptyMessage(CHANGED);
- ToChangeViewActivity.this.finish();
- }
- });
- }
- }
- <?xml version="1.0" encoding="utf-8"?>
- <LinearLayout
- xmlns:android="http://schemas.android.com/apk/res/android"
- android:orientation="vertical"
- android:layout_width="fill_parent"
- android:layout_height="fill_parent"
- >
- <TextView
- android:id="@+id/tv"
- android:layout_width="fill_parent"
- android:layout_height="wrap_content"
- android:text="hello,MasterActivity!"
- />
- <Button
- android:id="@+id/btn_chang"
- android:layout_width="fill_parent"
- android:layout_height="wrap_content"
- android:text="change the MasterActivityView..."
- />
- </LinearLayout>
这里主要注意两点:
<1> 声明 Application
<2> 注册 ToChangeViewActivity
代码,如下:
- <?xml version="1.0" encoding="utf-8"?>
- <manifest xmlns:android="http://schemas.android.com/apk/res/android"
- package="mark.zhang"
- android:versionCode="1"
- android:versionName="1.0">
- <uses-sdk android:minSdkVersion="7" />
- <application android:name=".MyAPP" android:icon="@drawable/icon" android:label="@string/app_name">
- <activity android:name=".MasterActivity"
- android:label="@string/app_name">
- <intent-filter>
- <action android:name="android.intent.action.MAIN" />
- <category android:name="android.intent.category.LAUNCHER" />
- </intent-filter>
- </activity>
- <activity android:name=".ToChangeViewActivity"></activity>
- </application>
- </manifest>
点击 " To OtherActivity",进入 ToChangeViewActivity
再点击“ change the MasterActivityView...”

改变效果

7. 最后思考
这里只是两个Activity之间交互,多个 Activity 之间需要考虑设置 launchMode 即 Activity 的加载模式,更多关于这方面的知识可以参考:
http://blog.csdn.net/androidbluetooth/article/details/6547670
http://download.csdn.net/source/3368975
本篇博客源码下载地址:http://download.csdn.net/source/3447670
- 《Handler: Activity 之间通过 Handler 通信》 & 《通过Handler更新UI》
- 《Handler: Activity 之间通过 Handler 通信》 & 《通过Handler更新UI》
- Handler: Activity 之间通过 Handler 通信
- Handler: Activity 之间通过 Handler 通信
- Handler: Activity 之间通过 Handler 通信
- Handler应用: Activity 之间通过 Handler 通信
- activity之间通过Handler通信
- 通过handler更新UI的疑问
- Android UDP通信之Handler、Activity、UI更新
- Activity和Service之间通过handler传递数据
- 通过Handler来更新本线程的UI界面
- android学习之通过handler更新UI的例子
- android学习之通过handler更新UI的例子
- Android开发之通过Handler的post方法更新UI
- TimerTask中如何通过Handler交由UIThread更新UI
- handler 通过线程来更新UI 实例60秒倒计时
- Android为什么只能通过Handler机制更新UI
- 使用Handler进行Activity之间的通信
- 导航和状态栏透明
- 水果的正确吃法
- 生成条形码的代码
- js表单验证_用户登录验证
- Codeforces VK Cup 2012 Qualification Round 1 / 158A Next Round(模拟)
- 《Handler: Activity 之间通过 Handler 通信》 & 《通过Handler更新UI》
- hdu 2604 Queuing 矩阵
- JAVA排列组合算法
- JS窗口改变触发事件
- 兔子生兔子
- 推荐一个查看源码的好工具Source Insight
- MapReduce Join联结实现
- “肮脏的”IT工作排行榜
- tkprof各个字段的解释