实战:七步完成Android Webview图片加载
来源:互联网 发布:上海金字塔软件官网 编辑:程序博客网 时间:2024/05/08 14:30
http://hb.qq.com/a/20120717/000066.htm
【IT168技术
】在本教程中,我们将一步步学习如何使用Android中的WebView控件去展现图片,并且进行相关的参数设置,也会学习各种将图片导入到WebView的参数,包括从其他web站点加载图片,以及从移动设备中和应用的目录中加载图片。本文的阅读对象为有初级Android编程经验的开发者,本文的代码可以在如下地址下载:
http://tuts-authors.s3.amazonaws.com/mobile.tutsplus.com/Sue%20Smith/2012/07/05/Android_WebView_Image_Display_Source.zip
步骤1 创建Android工程
首先在eclipse中创建一个Android工程,然后在main Activity类中,或者在想要显示图片的Activity中,增加如下的类库引入:
import android.app.Activity;
import android.content.Intent;
import android.database.Cursor;
import android.net.Uri;
import android.os.Bundle;
import android.provider.MediaStore;
import android.view.View;
import android.view.View.OnClickListener;
import android.webkit.WebView;
import android.widget.Button;
当然,这还取决于如何加载图片的方法,比如要通过网络加载图片的话,则需要设置相关的互联网权限,这在Manifest文件中进行配置就可以了,如下:
步骤2 建立APP界面
我们准备在Linear Layout中使用单一个页面去展示不同的图片,在主界面的布局文件中,添加以下代码:
LinearLayout xmlns:android=http://schemas.android.com/apk/res/android
android:orientation=vertical
android:layout_ width=fill_parent
android:layout_border=1 height=fill_parent>
LinearLayout>
在上面的布局中,首先添加如下的webview控件,代码如下:
WebView android:id=@+id/pic_view
android:layout_ width=fill_parent
android:layout_border=1 height=0dp
android:layout_weight=1 >
WebView>
接下来,我们会使用三个不同的按钮,用来显示三种加载图片的方式,代码如下:
LinearLayout xmlns:android=http://schemas.android.com/apk/res/android
android:orientation=horizontal
android:layout_ width=wrap_content
android:layout_border=1 height=wrap_content
android:padding=3dp>
Button
android:id=@+id/pick_btn
android:layout_ width=wrap_content
android:layout_border=1 height=wrap_content
android:text=@string/pick />
Button
android:id=@+id/load_btn
android:layout_ width=wrap_content
android:layout_border=1 height=wrap_content
android:text=@string/load />
Button
android:id=@+id/app_btn
android:layout_ width=wrap_content
android:layout_border=1 height=wrap_content
android:text=@string/local />
LinearLayout>
同样,需要在res/values目录下,为三个按钮声明一下显示的文字的资源,如下:
string name=pick>Gallerystring>
string name=load>Webstring>
string name=local>Appstring>
步骤三 准备加载图片的代码
下面先来学习如何在webview中加载图片。首先修改PictureViewerActivity类如下,加上webview控件的声明:
public class PictureViewerActivity extends Activity implements OnClickListener
private WebView picView;
@Override
public void onCreate(Bundle savedInstanceState) {
super.onCreate(savedInstanceState);
setContentView(R.layout.main);
接下来获得webview控件的引用,如下:
picView = (WebView)findViewById(R.id.pic_view);
picView.setBackgroundColor(0);
这个将设置webview控件的背景颜色为白色,然后在oncreate方法后,写出onclick的框架代码:
public void onClick(View v) {
我们将在这个onClick方法中,添加分别处理三个按钮的事件代码:
步骤4 从图库中加载图片
下面我们先来学习如何从移动设备的图库中加载图片,首先在类的声明部分,在oncreate方法前,先添加一个实例变量:
private final int IMG_PICK = 1;
这个实例变量的作用,是当用户从移动设备的图库中选择了图片后,返回给主程序时用的标识。同时在oncreate方法中,添加第一个按钮pickBtn,为其绑定onclicklistner事件
Button pickBtn = (Button)findViewById(R.id.pick_btn);
pickBtn.setOnClickListener(this);
然后在onclick方法中,添加其事件的响应代码如下:
if (v.getId() == R.id.pick_btn) {
Intent pickIntent = new Intent();
pickIntent.setType(image/*);
pickIntent.setAction(Intent.ACTION_GET_CONTENT);
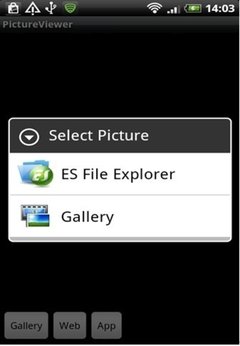
startActivityForResult(Intent.createChooser(pickIntent, Select Picture), IMG_PICK);
这段代码将通过新创建一个Intent的方法,调用移动设备上的读取图片的应用,这取决于用户的设备上安装了什么样的浏览图片的应用,比如下图是其中一种情况:
onActivityResult方法,先添加如下的框架代码:
protected void onActivityResult(int requestCode, int resultCode, Intent data) {
if (resultCode == RESULT_OK) {
在其中的if判断分支中,我们添加如下的代码,
if (requestCode == IMG_PICK) {
在这个分支中,将判断用户是否从我们刚建立的intent中选择图片后返回的,并且添加相关的代码,将返回的图片的物理路径返回给webview控件进行加载,代码如下:
String imagePath = ;
String[] imgData = { MediaStore.Images.Media.DATA };
Cursor imgCursor = managedQuery(pickedUri, imgData, null, null, null);
int index = imgCursor.getColumnIndexOrThrow(MediaStore.Images.Media.DATA);
imgCursor.moveToFirst();
imagePath = imgCursor.getString(index);
else
imagePath = pickedUri.getPath();
其中详细的解析参考:http://tech.it168.com/a2012/0706/1369/000001369061.shtml 一文。现在获得了用户选择的图片的路径的话,则可以在webview中进行加载,代码如下:
picView.loadUrl(file:///+imagePath);
运行应用,则用户可以从移动设备已有的图库中加载图片,并且在webview控件中予以显示,如下图:

步骤5 从web中加载获得图片
我们在第2个按钮中的onclick事件中,写入如下代码,则可以很容易的从互联网中的任意一个地方加载一张图片,并装载到webview控件中去,代码如下:
Button loadBtn = (Button)findViewById(R.id.load_btn);
loadBtn.setOnClickListener(this);
并在onClick事件中添加第二个if分支进行判断,代码如下:
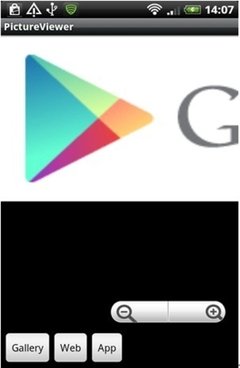
picView.loadUrl(http://developer.android.com/images/brand/google_play_logo_450.png);
这里通过使用webview控件的loarUrl方法,可以很容易地获得互联网中的一张图片。运行程序可以看到能正确加载互联网中的一张图片,如下图:
步骤6 从app应用的目录中加载图片
有的时候,可能需要从已经存在的app应用中加载已经有的图片到webview中去,下面介绍两个方法,首先假设图片是放在android_asset目录下的,则可以依然通过loadUrl方法进行图片加载,如下:
Button appBtn = (Button)findViewById(R.id.app_btn);
appBtn.setOnClickListener(this);
然后在onclick方法中增加第3个if 分支,代码如下:
picView.loadUrl(file:///android_asset/mypicture.jpg);
另外,由于webview控件显示的是html页面,所以也可以先建立一个html页面,然后其中嵌套入一张图片,代码如下:
html>
head>
head>
body>
img src=file:///android_asset/mypicture.jpg/>
body>
html>
然后再通过webview控件加载html页面,如下:
html>
head>
head>
body>
img src=file:///android_asset/mypicture.jpg/>
body>
html>
picView.loadUrl(file:///android_asset/imagepage.html);
步骤7 设置webview中图片加载时的属性
我们还可以设置webview控件中的图片加载时的属性,以加强交互,比如可以在在oncreate事件中,添加如下代码:
picView.getSettings().setBuiltInZoomControls(true);
picView.getSettings().setUseWideViewPort(true);
这将可以设置用户能在webview控件中能使用图片放大器对图片进行放大缩小和水平左右移动的操作,如下图:

小结
本文总结了在Android的webview控件中加载图片的三种方法,分别是通过图片选择器选择,加载互联网中的图片以及加载设备中的资源图片文件。返回腾讯网首页>>
- 实战:七步完成Android Webview图片加载
- 七步完成Android Webview图片加载
- android webView判断是否加载完成
- Android webview加载本地图片
- Android webview加载本地图片
- android Webview加载网络图片
- 监听webview 加载完成
- android- WebView 文字 、图片分开加载
- android- WebView 文字 、图片分开加载
- 转:android- WebView 文字 、图片分开加载
- android WebView 文字 、图片分开加载
- android webview加载图片不显示
- android webView判断是否加载完成的2种办法
- android webView判断是否加载完成的2种办法
- WebView加载完成与显示完成
- Android开发 WebView加载从本地加载图片
- Android WebView先加载网页文字,后加载图片
- Android WebView先加载网页文字,后加载图片
- oracle flashback
- hdu 1395 2^x mod n = 1
- 【珍藏】 2012Android开发热门资料(110个)
- MySQL USING 和 HAVING 用法
- Hadoop+HBase+ MapReduce
- 实战:七步完成Android Webview图片加载
- Android中SMS的接收处理
- 关于读取短信信息——转自小裴同学
- 多参构造器与Builder模式
- Android开发 自制圆形带进度显示的进度条
- 如何面试程序员?
- Hadoop三节点控制数据
- 黑马程序员_面向对象
- Android之Activity的启动模式