OPENCV中的mat学习
来源:互联网 发布:如何查看5s支持网络 编辑:程序博客网 时间:2024/05/18 01:08
主要参考自http://www.opencv.org.cn/opencvdoc/2.3.2/html/doc/tutorials/core/mat%20-%20the%20basic%20image%20container/mat%20-%20the%20basic%20image%20container.html
其中,对Mat中元素的访问则主要是参考点击打开链接
之前我也是开始接触的是IplImage,后来接触的是CvMat,到最后慢慢的发现,Mat才是比较好用的,所以这次自己想仔细的再学习一次Mat。
对Mat的操作:
1.初始化,只拷贝信息头,或者是拷贝原始Mat中的感兴趣区域
一地址而实现。而拷贝构造函数则 只拷贝信息头和矩阵指针 ,而不拷贝矩阵。
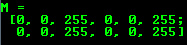
以上代码中的所有Mat对象最终都指向同一个也是唯一一个数据矩阵。虽然它们的信息头不同,但通过任何一个对象所做的改变也会影响其它对象。实际上,不同的对象只是访问相同数据的不同途径而已。这里还要提及一个比较棒的功能:你可以创建只引用部分数据的信息头。比如想要创建一个感兴趣区域( ROI ),你只需要创建包含边界信息的信息头:
现在你也许会问,如果矩阵属于多个 Mat 对象,那么当不再需要它时谁来负责清理?简单的回答是:最后一个使用它的对象。通过引用计数机制来实现。无论什么时候有人拷贝了一个 Mat 对象的信息头,都会增加矩阵的引用次数;反之当一个头被释放之后,这个计数被减一;当计数值为零,矩阵会被清理。但某些时候你仍会想拷贝矩阵本身(不只是信息头和矩阵指针),这时可以使用函数 clone() 或者copyTo() 。
你可以通过 Mat 的运算符 << 来实现,但要记住这只对二维矩阵有效。
Mat 不但是一个很赞的图像容器类,它同时也是一个通用的矩阵类,所以可以用来创建和操作多维矩阵。创建一个Mat对象有多种方法:
Mat() 构造函数
比如 CV_8UC3 表示使用8位的 unsigned char 型,每个像素由三个元素组成三通道。预先定义的通道数可以多达四个。 Scalar是个short型vector。指定这个能够使用指定的定制化值来初始化矩阵。当然,如果你需要更多通道数,你可以使用大写的宏并把通道数放在小括号中,如下所示
在 C\C++ 中通过构造函数进行初始化
上面的例子演示了如何创建一个超过两维的矩阵:指定维数,然后传递一个指向一个数组的指针,这个数组包含每个维度的尺寸;其余的相同
为已存在IplImage指针创建信息头:
Create() function: 函数
这个创建方法不能为矩阵设初值,它只是在改变尺寸时重新为矩阵数据开辟内存。

对于小矩阵你可以用逗号分隔的初始化函数:

使用 clone() 或者 copyTo() 为一个存在的 Mat 对象创建一个新的信息头。
Note
调用函数 randu() 来对一个矩阵使用随机数填充,需要指定随机数的上界和下界:
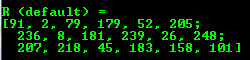
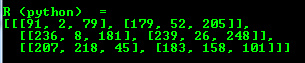
从上面的例子中可以看到默认格式,除此之外,OpenCV还支持以下的输出习惯
默认方式
Python
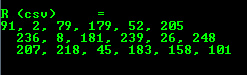
以逗号分隔的数值 (CSV)
Numpy

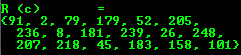
C语言
打印其它常用项目
OpenCV支持使用运算符<<来打印其它常用OpenCV数据结构。
2维点

3维点

基于cv::Mat的std::vector

std::vector点

/***************************************************************** 内容摘要:本例采用8种方法对图像Mat的像素进行扫描,并对像素点的像* 素进行压缩,压缩间隔为div=64,并比较扫描及压缩的效率,效* 率最高的是采用.ptr及减少循环次数来遍历图像,并采用位操* 作来对图像像素进行压缩。* 作 者:Jacky Liu* 完成日期:2012.8.10* 参考资料:《OpenCV 2 computer Vision Application Programming* cookbook》****************************************************************/#include <opencv2/core/core.hpp>#include <opencv2/imgproc/imgproc.hpp>#include <opencv2/highgui/highgui.hpp>#include <iostream>//利用.ptr和数组下标进行图像像素遍历void colorReduce0(cv::Mat &image, int div = 64){ int nl = image.rows; int nc = image.cols * image.channels(); //遍历图像的每个像素 for(int j=0; j<nl ;++j) { uchar *data = image.ptr<uchar>(j); for(int i=0; i<nc; ++i) { data[i] = data[i]/div*div+div/2; //减少图像中颜色总数的关键算法:if div = 64, then the total number of colors is 4x4x4;整数除法时,是向下取整。 } }}//利用.ptr和 *++ 进行图像像素遍历void colorReduce1(cv::Mat &image, int div = 64){ int nl = image.rows; int nc = image.cols * image.channels(); //遍历图像的每个像素 for(int j=0; j<nl ;++j) { uchar *data = image.ptr<uchar>(j); for(int i=0; i<nc; ++i) { *data++ = *data/div*div + div/2; } }}//利用.ptr和数组下标进行图像像素遍历,取模运算用于减少图像颜色总数void colorReduce2(cv::Mat &image, int div = 64){ int nl = image.rows; int nc = image.cols * image.channels(); //遍历图像的每个像素 for(int j=0; j<nl ;++j) { uchar *data = image.ptr<uchar>(j); for(int i=0; i<nc; ++i) { data[i] = data[i]-data[i]%div +div/2; //利用取模运算,速度变慢,因为要读每个像素两次 } }}//利用.ptr和数组下标进行图像像素遍历,位操作运算用于减少图像颜色总数void colorReduce3(cv::Mat &image, int div = 64){ int nl = image.rows; int nc = image.cols * image.channels(); int n = static_cast<int>(log(static_cast<double>(div))/log(2.0)); //div=64, n=6 uchar mask = 0xFF<<n; //e.g. div=64, mask=0xC0 //遍历图像的每个像素 for(int j=0; j<nl ;++j) { uchar *data = image.ptr<uchar>(j); for(int i=0; i<nc; ++i) { *data++ = *data&mask + div/2; } }}//形参传入const conference,故输入图像不会被修改;利用.ptr和数组下标进行图像像素遍历void colorReduce4(const cv::Mat &image, cv::Mat &result,int div = 64){ int nl = image.rows; int nc = image.cols * image.channels(); result.create(image.rows,image.cols,image.type()); //遍历图像的每个像素 for(int j=0; j<nl ;++j) { const uchar *data_in = image.ptr<uchar>(j); uchar *data_out = result.ptr<uchar>(j); for(int i=0; i<nc; ++i) { data_out[i] = data_in[i]/div*div+div/2; //减少图像中颜色总数的关键算法:if div = 64, then the total number of colors is 4x4x4;整数除法时,是向下取整。 } }}//利用.ptr和数组下标进行图像像素遍历,并将nc放入for循环中(比较糟糕的做法)void colorReduce5(cv::Mat &image, int div = 64){ int nl = image.rows; //遍历图像的每个像素 for(int j=0; j<nl ;++j) { uchar *data = image.ptr<uchar>(j); for(int i=0; i<image.cols * image.channels(); ++i) { data[i] = data[i]/div*div+div/2; //减少图像中颜色总数的关键算法:if div = 64, then the total number of colors is 4x4x4;整数除法时,是向下取整。 } }}//利用迭代器 cv::Mat iterator 进行图像像素遍历void colorReduce6(cv::Mat &image, int div = 64){ cv::Mat_<cv::Vec3b>::iterator it = image.begin<cv::Vec3b>(); //由于利用图像迭代器处理图像像素,因此返回类型必须在编译时知道 cv::Mat_<cv::Vec3b>::iterator itend = image.end<cv::Vec3b>(); for(;it != itend; ++it) { (*it)[0] = (*it)[0]/div*div+div/2; //利用operator[]处理每个通道的像素 (*it)[1] = (*it)[1]/div*div+div/2; (*it)[2] = (*it)[2]/div*div+div/2; }}//利用.at<cv::Vec3b>(j,i)进行图像像素遍历void colorReduce7(cv::Mat &image, int div = 64){ int nl = image.rows; int nc = image.cols; //遍历图像的每个像素 for(int j=0; j<nl ;++j) { for(int i=0; i<nc; ++i) { image.at<cv::Vec3b>(j,i)[0] = image.at<cv::Vec3b>(j,i)[0]/div*div + div/2; image.at<cv::Vec3b>(j,i)[1] = image.at<cv::Vec3b>(j,i)[1]/div*div + div/2; image.at<cv::Vec3b>(j,i)[2] = image.at<cv::Vec3b>(j,i)[2]/div*div + div/2; } }}//减少循环次数,进行图像像素遍历,调用函数较少,效率最高。void colorReduce8(cv::Mat &image, int div = 64){ int nl = image.rows; int nc = image.cols; //判断是否是连续图像,即是否有像素填充 if(image.isContinuous()) { nc = nc*nl; nl = 1; } int n = static_cast<int>(log(static_cast<double>(div))/log(2.0)); uchar mask = 0xFF<<n; //遍历图像的每个像素 for(int j=0; j<nl ;++j) { uchar *data = image.ptr<uchar>(j); for(int i=0; i<nc; ++i) { *data++ = *data & mask +div/2; *data++ = *data & mask +div/2; *data++ = *data & mask +div/2; } }}const int NumTests = 9; //测试算法的数量const int NumIteration = 20; //迭代次数int main(int argc, char* argv[]){ int64 t[NumTests],tinit; cv::Mat image1; cv::Mat image2; //数组初始化 int i=0; while(i<NumTests) { t[i++] = 0; } int n = NumIteration; //迭代n次,取平均数 for(int i=0; i<n; ++i) { image1 = cv::imread("../boldt.jpg"); if(!image1.data) { std::cout<<"read image failue!"<<std::endl; return -1; } // using .ptr and [] tinit = cv::getTickCount(); colorReduce0(image1); t[0] += cv::getTickCount() - tinit; // using .ptr and *++ image1 = cv::imread("../boldt.jpg"); tinit = cv::getTickCount(); colorReduce1(image1); t[1] += cv::getTickCount() - tinit; // using .ptr and [] and modulo image1 = cv::imread("../boldt.jpg"); tinit = cv::getTickCount(); colorReduce2(image1); t[2] += cv::getTickCount() - tinit; // using .ptr and *++ and bitwise image1 = cv::imread("../boldt.jpg"); tinit = cv::getTickCount(); colorReduce3(image1); t[3] += cv::getTickCount() - tinit; //using input and output image image1 = cv::imread("../boldt.jpg"); tinit = cv::getTickCount(); colorReduce4(image1,image2); t[4] += cv::getTickCount() - tinit; // using .ptr and [] with image.cols * image.channels() image1 = cv::imread("../boldt.jpg"); tinit = cv::getTickCount(); colorReduce5(image1); t[5] += cv::getTickCount() - tinit; // using .ptr and *++ and iterator image1 = cv::imread("../boldt.jpg"); tinit = cv::getTickCount(); colorReduce6(image1); t[6] += cv::getTickCount() - tinit; //using at image1 = cv::imread("../boldt.jpg"); tinit = cv::getTickCount(); colorReduce7(image1); t[7] += cv::getTickCount() - tinit; //using .ptr and * ++ and bitwise (continuous+channels) image1 = cv::imread("../boldt.jpg"); tinit = cv::getTickCount(); colorReduce8(image1); t[8] += cv::getTickCount() - tinit; } cv::namedWindow("Result"); cv::imshow("Result",image1); cv::namedWindow("Result Image"); cv::imshow("Result Image",image2); std::cout<<std::endl<<"-------------------------------------------------------------------------"<<std::endl<<std::endl; std::cout<<"using .ptr and [] = "<<1000*t[0]/cv::getTickFrequency()/n<<"ms"<<std::endl; std::cout<<"using .ptr and *++ = "<<1000*t[1]/cv::getTickFrequency()/n<<"ms"<<std::endl; std::cout<<"using .ptr and [] and modulo = "<<1000*t[2]/cv::getTickFrequency()/n<<"ms"<<std::endl; std::cout<<"using .ptr and *++ and bitwise = "<<1000*t[3]/cv::getTickFrequency()/n<<"ms"<<std::endl; std::cout<<"using input and output image = "<<1000*t[4]/cv::getTickFrequency()/n<<"ms"<<std::endl; std::cout<<"using .ptr and [] with image.cols * image.channels() = "<<1000*t[5]/cv::getTickFrequency()/n<<"ms"<<std::endl; std::cout<<"using .ptr and *++ and iterator = "<<1000*t[6]/cv::getTickFrequency()/n<<"ms"<<std::endl; std::cout<<"using at = "<<1000*t[7]/cv::getTickFrequency()/n<<"ms"<<std::endl; std::cout<<"using .ptr and * ++ and bitwise (continuous+channels) = "<<1000*t[8]/cv::getTickFrequency()/n<<"ms"<<std::endl; std::cout<<std::endl<<"-------------------------------------------------------------------------"<<std::endl<<std::endl; cv::waitKey(); return 0;}- OPENCV中的mat学习
- opencv中的Mat
- OpenCV中的Mat
- opencv中的Mat类型
- opencv中的Mat
- OpenCV中的Mat函数
- OpenCV学习:Mat类
- Opencv Mat数据结构学习
- OpenCV学习笔记-Mat
- opencv学习(3)关于Mat类中的Scalar()
- opencv学习(3)关于Mat类中的Scalar()
- OpenCV中的Mat, cvMat, IplImage
- (转)OpenCV中的Mat
- OpenCV中的Mat阵列操作
- opencv中的Mat结构操作
- openCV中的MAT的详解
- opencv中的Mat矩阵运算
- OpenCV学习——Mat
- javascript实用小函数
- mac下安装eclipse以及python
- PL/SQL Developer连接本地Oracle 11g 64位数据库
- 云计算在科研和教学中的应用
- LINUX内核设计与实现模块
- OPENCV中的mat学习
- yii 中render 和renderpartial的使用
- 解决 Eclips 中文注释 乱码
- Mahout 系列之--canopy 算法
- javascript中的settimeout、setInnterval和jquery的delay的区别
- 飞机大战改进篇
- C# SQl2008读取图片
- 个人转载类文章收录
- iOS系统网络抓包方法