在Mac上创建octopress博客
来源:互联网 发布:手机淘宝历史版本好用 编辑:程序博客网 时间:2024/05/16 01:21
惯例,第一篇献给octopress,并感谢github创始人Tom Preston Werner,没有他放弃30W美元的年薪,便不会有github。
看到这篇文章,你已经访问到我的octopress博客了(这不是废话么),如果有想法也创建一个独立的个人博客,可以参看我创建博客的一些经验。
我是站在巨人的肩头上完成博客创建的,有:
阮一峰的搭建一个免费的,无限流量的Blog----github Pages和Jekyll入门
唐巧的象写程序一样写博客:搭建基于github的博客
*biaobiaoqi的在github上 搭建octopress博客 Mac版
首先,你要有一台可以上网的电脑,(又是废话,正用着呢,点这发现自己的幸运)。然后了解你的电脑,要知道操作系统版本等(最好有用一种语言写过代码的经历),博主用的是Mac电脑,windows和linux的同学不建议参考本文。
网上有很有搭环境的博文,但建议看官网的步骤,因为Octopress一直在更新,很多网上的博文都是旧版本的搭建步骤,耽误事。
搭建环境
工欲善其事,必先利其器:
- Github(官网下载,后面新建项目用) 下载地址:https://help.github.com/articles/set-up-git
- iTerm2(可替代mac终端的,比较强大) 下载地址:http://www.iterm2.com/#/section/home
- ruby 安装包 (下载 ruby-1.9.3-p362.tar.gz 这个) 下载地址:http://ruby.taobao.org/mirrors/ruby/
- Mou (Markdown编辑软件,这个强,可用于后期发布博客文章) 下载地址:http://mouapp.com/
- Xcode(它将帮你安装好 Unix 环境需要的开发包) 下载地址:官网或百度吧,比较大⋯⋯
让子弹飞一会,这些都是后面要用到的工具软件,先去下载,不要安装。
这时候,忽略一个问题,就是每个人的Mac电脑是不一样的,最大的不同是操作系统版本,我的OS系统是Version 10.9,巨人们的写博客时,还没有出呢,可能你的Mac是更新的电脑,所以要想好如何check这些。
想想我们要做什么
看官网的步骤之前,需要有点大致的概念,这样能帮助更快的理解。
1 假设我们需要自己搭建一个独立博客网站,需要什么?首先要有台连接到英特网服务器,要有前端的页面,要后端的数据库,要有域名等。 2 github可以提供给我们的是,github一个免费的代码托管仓库,它支持用户html页面的显示,也就是用户可以上传HTML文件,然后在远程像访问网页一样访问它。 3 按照我们的设想1,我们这时候还缺网站的后台,数据库这些,github并不提供这些,数据库的作用是提高管理能力,对于个人博客这种数据规模很小,便可返璞归真,用回静态页面。 对于计算机和一切能被用来改造这个世界的事物的使用都不应受到任何限制, 任何试图隐藏系统的复杂性的行为都只会得到一个更为复杂的系统。 4 静态页面用起来很复杂,我们需要Octopress这样的引擎来帮我们干“重活”,我们可以关注于自己博客中的内容,用过HTML的都知道,内容需要写的标记,我们要把这些工作也简化,便有了Markdown,我们使用Markdown来描述我们的内容,然后由引擎“翻译”为HTML页面。
现在需要什么环境
- 既然要托管到github,那么便要有github的环境. check本机的git环境,在命令行输入
git --version - Octopress是基于Jekyll的,需要ruby的环境编译。 check ruby
ruby -vruby的version 1.9.3以上,新版的Mac,这些都是有装的。 - gcc和make,ruby的环境需要gcc,这个我们通过安装xcode的command line tool来完成安装 check gcc
gcc -v
跟着官方文档设置Octopress
Setup Octopress git clone git://github.com/imathis/octopress.git octopress cd octopress Next, install dependencies. gem install bundler rbenv rehash # If you use rbenv, rehash to be able to run the bundle command bundle install Install the default Octopress theme. rake install
建立username.github.io的gibhub page
看到这里,你应该在啃官方的文档,这个很重要,需要继续啃,里面的步骤我就不再翻译了。
这需要花费一些时间,因为全是新知识,不要怕放弃。
继续努力,直到在浏览器中,输入username.github.io,可以看到自己的页面
个性化定制
看到了自己的页面,是不是很兴奋,先别开香槟,接着还有任务。
git相关的命令
git是一个Linux开发的版本控制工具,它svn不同的是,它是分布式的,可以不用常联server。对于学习git,推荐的还是官方文档,(中文版)。 还记得,安装Octopress的第一步操作么?git clone git://github.com/imathis/octopress.git octopress 我们从github克隆了一份octopress的代码到本地。这时候相当于在本地有了一份octopess的代码库,使用 git remote -v 会看到远程代码仓库的配置信息 origin git://github.com/imathis/octopress.git (fetch) origin git://github.com/imathis/octopress.git (push) 下面是一张我的octopress文件夹里的内容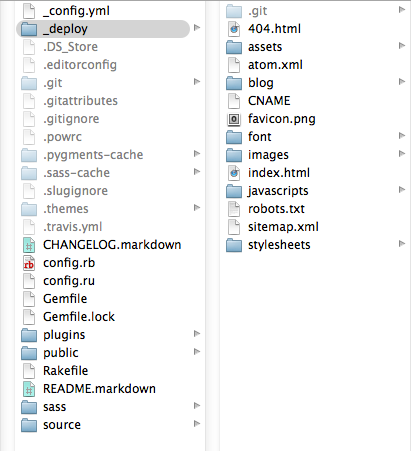
其中sass和source,这是我们博客的源代码文件目录。
我们需要把源代码也上传到github上,这样便可以多台机写博客了。
_deploy是通过octopress生成的静态页面的博客文件夹,我们可以看到它的里面也有.git的文件。
cd进到该目录,使用git remote -v查看 origin http://github.com/xunyn/xunyn.github.io (fetch) origin http://github.com/xunyn/xunyn.github.io (push) 它会在我们使用rake deploy时自动push到我们的路径下。这时候我们不需要在自已去push。但是博客源代码是需要我们自己push到github的server的.
使用多台电脑的同时写博客
需要先拿把source code拿下来 git pull origin source 然后在更改了source后,check in更新,将本地source update github的代码仓库上 git add . git commit -m 'your message' git push origin source
个性化设置自己的博客
个性化设置这块,参考了biaobiaoqi的定制Octopress, 安装第三方主题 $ cd octopress$ git clone git://github.com/tommy351/Octopress-Theme-Slash.git .themes/slash$ rake install['slash’] 添加评论 Disqus ```
Disqus Comments
disqus_short_name:xunyngithubio disqus_show_comment_count:false ```
*添加分享 注册加网后,从加网获得模板 在post下创建jiathis.html 将加网的模板,拷贝到jiathis.html 在_config.xml创建新的标记
# sharejiathis_share: ture在source/_includes/post/sharing.html添加下面的代码。 {% if site.jiathis_share %} {% include post/jiathis.html %} {% endif %}
Q&A
1.Xcode 5 command line 未安装解决方法 xuns-MacBook-Pro:~ xunyanan$ xcode-select --install xcode-select: note: install requested for command line developer tools xuns-MacBook-Pro:~ xunyanan$ 2.无权限问题解决方法 使用sudo sudo gem install bundler sudo bundle install
3.bundle install安装成功的log,这个需要网络访问,要等较长时间。 xuns-MacBook-Pro:octopress1 xunyanan$ sudo bundle install Password: Fetching gem metadata from https://rubygems.org/....... Fetching gem metadata from https://rubygems.org/.. Using rake (0.9.2.2) Using RedCloth (4.2.9) Using chunky_png (1.2.5) Using fast-stemmer (1.0.1) Using classifier (1.3.3) Using fssm (0.2.9) Using sass (3.2.9) Using compass (0.12.2) Installing directory_watcher (1.4.1) Installing haml (3.1.7) Installing kramdown (0.13.8) Installing liquid (2.3.0) Installing syntax (1.0.0) Installing maruku (0.6.1) Installing posix-spawn (0.3.6) Installing yajl-ruby (1.1.0) Installing pygments.rb (0.3.4) Installing jekyll (0.12.0) Installing rack (1.5.2) Installing rack-protection (1.5.0) Installing rb-fsevent (0.9.1) Installing rdiscount (2.0.7.3) Installing rubypants (0.2.0) Installing sass-globbing (1.0.0) Installing tilt (1.3.7) Installing sinatra (1.4.2) Installing stringex (1.4.0) Using bundler (1.3.5) Your bundle is complete! Use `bundle show [gemname]` to see where a bundled gem is installed. 出现绿色的两行,说明安装成功。
4.git clone some branch git clone git://github.com/xunyn/xunyn.github.io -b 'source' temp remember brach name use ‘'
5.rake preview的使用 我的Mac机开启preview功能时,使用Chrome访问localhost:4000可以正常预览,使用Safari不行,(解决方法,可参考https://github.com/imathis/octopress/issues/1395)。其次,preview支持页面改动预览,也就是可以边写边看效果,但开启preview功能前,一定要确保浏览器为占用4000的端口,否则会无法使用preview功能,好的方法是预览完,随手关闭页面。
- 在Mac上创建octopress博客
- 在github上搭建octopress博客 Mac
- 在github上搭建octopress博客 Mac
- 在Mac上从零开始搭建基于Github的Octopress博客
- 用 Octopress 在 Github 上搭建博客
- 在github上用octopress搭建博客过程纪要
- 在github Pages上部署octopress搭建个人博客系统
- 使用Octopress在Github上搭建博客系统
- 博客搬家到Octopress(Mac)
- 新电脑上不熟octopress博客
- github Pages上部署octopress个人博客
- Mac下使用Octopress搭建博客详细教程-芒果iOS
- 利用octopress在github搭建博客时遇到的若干问题
- 在Octopress中修改我们的博客配置
- 教程(转):在Win下搭建Octopress博客.
- Octopress+Github博客搭建
- Octopress博客搭建
- 在mac上创建svn服务
- C++ const 总结
- iOS基础面试题(四)
- C语言总结之解读C的声明
- 单链表的基本操作
- WCF 服务IIS部署 SvcUtil.exe 工具文件地址 及 生成代理类命令
- 在Mac上创建octopress博客
- 内核request_mem_region 和 ioremap的理解
- 算法练习之水题
- c标签遍历集合嵌套的List集合
- 有时候需要VS重新生成解决方案
- UVA - 11292 Dragon of Loowater
- oracle的基本语法1
- csdn高校俱乐部全体会议
- 常用正则表达式