虚拟机+linux+nginx环境+php+mysql+magento安装 lanmp
来源:互联网 发布:yap—yum的体位 编辑:程序博客网 时间:2024/05/22 00:29
1.
安装虚拟机。
版本:VirtualBox-4.2.12-84980-Win.exe
2.
虚拟机安装成功后,安装linux,
点击新建,在类型中选择linux,版本选择red hat(64bit)
基本都是下一步,完成后,在虚拟机右侧出来一个您刚才新建的主机,点击常规,弹出设置框
在弹出框中点击网络,在网卡1下面点击启用网络连接,连接方式选择“桥接网卡”
usb设置,把usb控制器关闭就行,一般不用
点击存储,选择linux的安装文件的路径,我这里用的版本是CentOS-5.9-x86_64-bin-DVD-1of2.iso
选择后,点击确定,选择刚创建的虚拟机,点击启动,弹出安装框
在安装过程中,如果想跳出这个安装页面,点击右ctrl键,
然后等待安装......
2.1 CD FOUND
选择skip,等一段时间出现图形化界面
点击next,语言next,下一步还是选择默认键盘输入方式next(弹出框选择yes),下一步还是next
2.2
到了network devices界面
这里需要设置了
点击edit,弹出框中点击manual configuration, 填写您的ip address,我本地是:
192.168.1.214,prefix(netmask)填写255.255.255.0,然后点击OK
然后再manually填写主机名字,这个随便填写
gateway:192.168.1.1
primary DNS 8.8.8.8
secondary dns,这个可以不填写
点击next
选择时区,next
填写root密码,next
下一步就是设置的重要部分了,选择列表框,把desktop - Gnome的勾去掉,server的框选择勾选customize now,点击next
进入下一步,点击左边的servers,把除了server configuration Tools 和web server之外的勾都去掉,
然后点击选择server configuration Tools, 点击optional packages,在弹框中,吧第三行(5:system-config-httpd-1.3.3.3-1.el5.noarch)的勾去掉,点击close
点击next,继续点击next,就开始了对linux的安装了,这个过程都是自动进行的
3
linux、安装好,就可以安装环境了
3.1
yum update
3.2按装系统组件
yum install ntp vim-enhanced gcc gcc-c++ gcc-g77 flex bison autoconf automake glibc glibc-devel glib2 glib2-devel bzip2 bzip2-devel ncurses ncurses-devel libtool* zlib-devel libxml2-devel libjpeg-devel libpng-devel libtiff-devel fontconfig-devel freetype-devel libXpm-devel gettext-devel curl curl-devel pam-devel e2fsprogs e2fsprogs-devel krb5 krb5-devel libidn libidn-devel openssl openssl-devel openldap openldap-devel nss_ldap openldap-clients openldap-servers gzip make bzip2bzip2-devel pcre-devel wget ncurses-devel cmake make perl
3.3下载lanmp集成包。
下载地址:http://wdlinux.cn/lanmp/install.html
下载后,解压tar zxvf 解压 然后运行 sh install.sh
这个安装过程中基本都是一键安装,时间漫长,等待吧
wget http://dl.wdlinux.cn:5180/lanmp_laster.tar.gz
tar zxvf lanmp_laster.tar.gz
sh install.sh(或sh in.sh) (默认会安装wdcp,如果只要web环境,而不想安装wdcp,这里改为 sh lanmp.sh即可)
4个可选安装,如下图
1,2,3 是安装独立的环境,不可自由切换nginx,apache,nginx+apache应用环境
4 是安装所有,即可在后台里自由切换nginx,apache,nginx+apache的应用环境
3.4
安装成功后,需要设置nginx的参数
nginx的位置在:
/www/wdlinux/nginx/conf/nginx.conf
这个文件的编写为:
# nginx conf conf/nginx.conf
# Created by http://www.wdlinux.cn
# Last Updated 2010.06.01
user www www;
worker_processes 3;
error_log logs/error.log notice;
pid logs/nginx.pid;
worker_rlimit_nofile 5120;
events {
use epoll;
worker_connections 5120;
}
http {
include mime.types;
default_type application/octet-stream;
server_names_hash_bucket_size 128;
client_header_buffer_size 32k;
large_client_header_buffers 4 32k;
client_max_body_size 8m;
limit_conn_zone $binary_remote_addr zone=one:32k;
sendfile on;
tcp_nopush on;
keepalive_timeout 60;
tcp_nodelay on;
gzip on;
gzip_min_length 1k;
gzip_buffers 4 16k;
gzip_http_version 1.0;
gzip_comp_level 2;
gzip_types text/plain application/x-javascript text/css application/xml;
gzip_vary on;
log_format wwwlogs '$remote_addr - $remote_user [$time_local] $request $status $body_bytes_sent $http_referer $http_user_agent $http_x_forwarded_for';
#include default.conf;
include vhost/*.conf;
}
新建一个none.conf放到和nginx.conf同一个目录。
内容为:
location / {
index index.html index.php; ## Allow a static html file to be shown first
try_files $uri $uri/ @handler; ## If missing pass the URI to Magento's front handler
expires 30d; ## Assume all files are cachable
}
## These locations would be hidden by .htaccess normally
location /app/ { deny all; }
location /includes/ { deny all; }
location /lib/ { deny all; }
location /media/downloadable/ { deny all; }
location /pkginfo/ { deny all; }
location /report/config.xml { deny all; }
location /var/ { deny all; }
location /var/email/ {allow all;}
location /var/export/ { ## Allow admins only to view export folder
auth_basic "Restricted"; ## Message shown in login window
auth_basic_user_file htpasswd; ## See /etc/nginx/htpassword
autoindex on;
}
location /. { ## Disable .htaccess and other hidden files
return 404;
}
location @handler { ## Magento uses a common front handler
rewrite / /index.php;
}
location ~ .php/ { ## Forward paths like /js/index.php/x.js to relevant handler
rewrite ^(.*.php)/ $1 last;
}
在vhosts文件夹中新建一个文件come.conf,内容为:
server {
listen 80;
server_name 192.168.1.214; #需要修改您的ip
root /www/web/test/magento; #需要修改您的magento目录
server_tokens off;
include none.conf;
index index.php index.html index.htm;
access_log /www/web_logs/comebuyerp_access.log wwwlogs;
error_log /www/web_logs/comebuyerp_error.log notice;
location ~ \.php$ {
fastcgi_pass 127.0.0.1:9000;
fastcgi_index index.php;
include fcgi.conf;
}
location /picdown/ {
charset gbk,gb2312,utf-8;
autoindex on;
autoindex_exact_size off;
autoindex_localtime on;
auth_basic "Restricted"; ## Message shown in login window
auth_basic_user_file /www/wdlinux/nginx/htpasswd;
}
location ~ .*\.(gif|jpg|jpeg|png|bmp|swf)$ {
expires 30d;
}
location ~ .*\.(js|css)?$ {
expires 12h;
}
}
其中需要修改的,已经备注,只有come.conf需要修改,其余的2个直接复制就行
执行:/www/wdlinux/nginx-1.2.9/sbin/nginx
关闭防火墙:service iptables stop
访问wdcp,ip:8080,root 密码:wdlinux.cn,打开phpmyadmin
补装innodb引擎方法:
然后在phpmyadmin变量里面查看 show variables like 'plugin_dir';
这个应该可以找到,然后再sql里执行:show engines;会看到4行变量,然后再sql里面执行:INSTALL PLUGIN InnoDB SONAME 'ha_innodb.so';
然后再sql中重新执行:show engines;
就会发现出来的innodb出来了,
大功告成了,您可以上传magento了,然后修改文件权限,访问执行就可以安装了。
数据库升级到5.5
wget http://down.wdlinux.cn/in/mysql_up55.sh
sh mysql_up55.sh
关于mysql升级到5.5报错问题
sh mysql_up55.sh
安装日志错误部分
Shutting down MySQL. SUCCESS!
scripts/mysql_install_db.sh: line 325: @HOSTNAME@: command not found
WARNING: The host '' could not be looked up with resolveip.
This probably means that your libc libraries are not 100 % compatible
with this binary MySQL version. The MySQL daemon, mysqld, should work
normally with the exception that host name resolving will not work.
This means that you should use IP addresses instead of hostnames
when specifying MySQL privileges !
Installing MySQL system tables...
OK
Filling help tables...
OK
To start mysqld at boot time you have to copy
support-files/mysql.server to the right place for your system
PLEASE REMEMBER TO SET A PASSWORD FOR THE MySQL root USER !
To do so, start the server, then issue the following commands:
/www/wdlinux/mysql/bin/mysqladmin -u root password 'new-password'
/www/wdlinux/mysql/bin/mysqladmin -u root -h password 'new-password'
Alternatively you can run:
/www/wdlinux/mysql/bin/mysql_secure_installation
which will also give you the option of removing the test
databases and anonymous user created by default. This is
strongly recommended for production servers.
See the manual for more instructions.
You can start the MySQL daemon with:
cd /www/wdlinux/mysql ; /www/wdlinux/mysql/bin/mysqld_safe &
You can test the MySQL daemon with mysql-test-run.pl
cd /www/wdlinux/mysql/mysql-test ; perlmysql-test-run.pl
Please report any problems with the /www/wdlinux/mysql/scripts/mysqlbug script!
ERROR! MySQL server PID file could not be found!
Starting MySQL. ERROR! The server quit without updating PID file (/www/wdlinux/mysql-5.5.27/data/localhost.localdomain.pid).
Running..., Please Wait...
err
mysql update is OK
错误情况
http://www.wdlinux.cn/bbs/viewthread.php?tid=5137
安装完后提示

重启mysql时提示,后台登陆不了。

解决办法

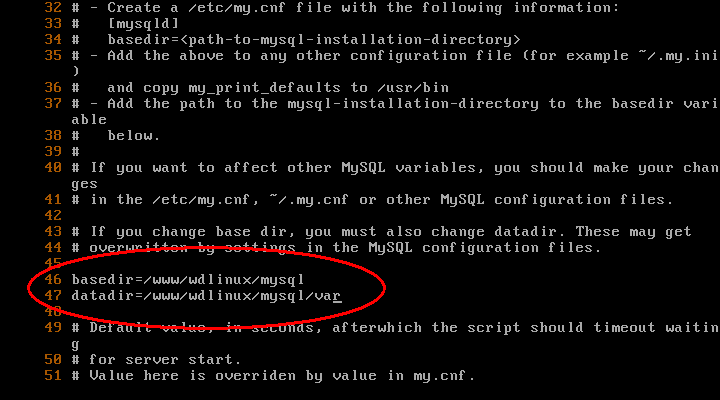
vi /www/wdlinux/init.d/mysqld
修改46 47行的目录为安装目录与数据库目录

nginx 升级成 tengine 的代码
http://blog.csdn.net/terry_water/article/details/19646571php升级成5.4
http://www.wdlinux.cn/bbs/viewthread.php?tid=7138&highlight=php%C9%FD%BC%B6
- 虚拟机+linux+nginx环境+php+mysql+magento安装 lanmp
- 安装lnmp nginx php mysql环境 -magento
- LANMP 环境安装Nginx安装配置
- linux的php环境安装php+mysql+nginx
- PHP+mysql+Nginx环境安装
- lnmp (linux+nginx+mysql+php) 环境安装脚本
- Linux下安装配置nginx+php+mysql环境
- lnmp 环境搭建 源代码包安装 linux,nginx,mysql,php
- Linux+Nginx+Mysql+PHP服务器运行环境安装
- LNMP(linux+nginx+mysql+php)环境的编译安装
- 源码编译安装,搭建LNMP环境(Linux+Nginx+MySQL+PHP)
- 全新Linux服务器安装Nginx&PHP&MySQL环境
- 在linux+nginx+mysql+php环境下安装 phpmyadmin
- linux 自行安装lanmp
- centos7虚拟机中安装nginx+php+mysql
- Linux安装Nginx + MySQL + PHP
- linux 安装nginx php mysql
- Linux安装nginx,php,mysql
- ubuntu tomcat 自启动
- IOS之【ios程序的生命周期】
- C语言中printf格式化输出函数
- There are no datanodes in the cluster
- 求二进制数中的1的个数
- 虚拟机+linux+nginx环境+php+mysql+magento安装 lanmp
- LightOJ 1096 nth Term (构造矩阵)
- 转:30岁以下创业新贵:我们是这样带队伍的
- 干干净净的傅雷
- Linux编程经典书籍
- PDO防注入原理分析以及使用PDO的注意事项
- Struts2+Jquery实现ajax并返回json类型数据
- 2.3.3.2:内容过滤选择器
- POJ - 1964 City Game