Android 之 ServiceManager与服务管理, 以及SystemServer核心进程
来源:互联网 发布:淘宝深度流量互踩 编辑:程序博客网 时间:2024/05/19 12:28
在init.rc中servicemanager是作为服务启动的,而且是在zygote启动之前
- int main(int argc, char **argv)
- {
- struct binder_state *bs;
- void *svcmgr = BINDER_SERVICE_MANAGER;
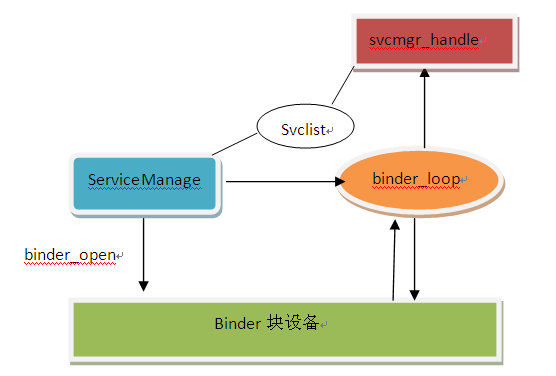
- bs = binder_open(128*1024);
- if (binder_become_context_manager(bs)) {
- LOGE("cannot become context manager (%s)\n", strerror(errno));
- return -1;
- }
- svcmgr_handle = svcmgr;
- binder_loop(bs, svcmgr_handler);
- return 0;
- }
- 打开/dev/binder设备,并在内存中映射128K的空间。
- 通知Binder设备,把自己变成context_manager
- 进入循环,不停的去读Binder设备,看是否有对service的请求,如果有的话,就去调用svcmgr_handler函数回调处理请求。
服务注册
再来看看ServiceManager中是怎么样去注册服务的。先来看先,当有对service的请求时,调用的回调函数svcmgr_handler:
- int svcmgr_handler(struct binder_state *bs,
- struct binder_txn *txn,
- struct binder_io *msg,
- struct binder_io *reply)
- {
- struct svcinfo *si;
- uint16_t *s;
- unsigned len;
- void *ptr;
- uint32_t strict_policy;
- // LOGI("target=%p code=%d pid=%d uid=%d\n",
- // txn->target, txn->code, txn->sender_pid, txn->sender_euid);
- if (txn->target != svcmgr_handle)
- return -1;
- // Equivalent to Parcel::enforceInterface(), reading the RPC
- // header with the strict mode policy mask and the interface name.
- // Note that we ignore the strict_policy and don't propagate it
- // further (since we do no outbound RPCs anyway).
- strict_policy = bio_get_uint32(msg);
- s = bio_get_string16(msg, &len);
- if ((len != (sizeof(svcmgr_id) / 2)) ||
- memcmp(svcmgr_id, s, sizeof(svcmgr_id))) {
- fprintf(stderr,"invalid id %s\n", str8(s));
- return -1;
- }
- switch(txn->code) {
- case SVC_MGR_GET_SERVICE:
- case SVC_MGR_CHECK_SERVICE:
- s = bio_get_string16(msg, &len);
- ptr = do_find_service(bs, s, len);
- if (!ptr)
- break;
- bio_put_ref(reply, ptr);
- return 0;
- case SVC_MGR_ADD_SERVICE:
- s = bio_get_string16(msg, &len);
- ptr = bio_get_ref(msg);
- if (do_add_service(bs, s, len, ptr, txn->sender_euid))
- return -1;
- break;
- case SVC_MGR_LIST_SERVICES: {
- unsigned n = bio_get_uint32(msg);
- si = svclist;
- while ((n-- > 0) && si)
- si = si->next;
- if (si) {
- bio_put_string16(reply, si->name);
- return 0;
- }
- return -1;
- }
- default:
- LOGE("unknown code %d\n", txn->code);
- return -1;
- }
- bio_put_uint32(reply, 0);
- return 0;
- }
在该回调函数中会判断Service有什么需要,如果是请求注册service,那么久执行:
- case SVC_MGR_ADD_SERVICE:
- s = bio_get_string16(msg, &len);
- ptr = bio_get_ref(msg);
- if (do_add_service(bs, s, len, ptr, txn->sender_euid))
- return -1;
- break;
我们再来看看do_add_service中做了什么事情:
- int do_add_service(struct binder_state *bs,
- uint16_t *s, unsigned len,
- void *ptr, unsigned uid)
- {
- struct svcinfo *si;
- // LOGI("add_service('%s',%p) uid=%d\n", str8(s), ptr, uid);
- if (!ptr || (len == 0) || (len > 127))
- return -1;
- if (!svc_can_register(uid, s)) {
- LOGE("add_service('%s',%p) uid=%d - PERMISSION DENIED\n",
- str8(s), ptr, uid);
- return -1;
- }
- si = find_svc(s, len);
- if (si) {
- if (si->ptr) {
- LOGE("add_service('%s',%p) uid=%d - ALREADY REGISTERED\n",
- str8(s), ptr, uid);
- return -1;
- }
- si->ptr = ptr;
- } else {
- si = malloc(sizeof(*si) + (len + 1) * sizeof(uint16_t));
- if (!si) {
- LOGE("add_service('%s',%p) uid=%d - OUT OF MEMORY\n",
- str8(s), ptr, uid);
- return -1;
- }
- si->ptr = ptr;
- si->len = len;
- memcpy(si->name, s, (len + 1) * sizeof(uint16_t));
- si->name[len] = '\0';
- si->death.func = svcinfo_death;
- si->death.ptr = si;
- si->next = svclist;
- svclist = si;
- }
- binder_acquire(bs, ptr);
- binder_link_to_death(bs, ptr, &si->death);
- return 0;
- }
在该函数中,首先会去检查是否有权限注册service,如果没有权限就直接返回,不能注册。
- if (!svc_can_register(uid, s)) {
- LOGE("add_service('%s',%p) uid=%d - PERMISSION DENIED\n",
- str8(s), ptr, uid);
- return -1;
- }
然后会去检查该service是否已经注册过了,如果已经注册过,那么就不能再注册了:
- si = find_svc(s, len);
- if (si) {
- if (si->ptr) {
- LOGE("add_service('%s',%p) uid=%d - ALREADY REGISTERED\n",
- str8(s), ptr, uid);
- return -1;
- }
- si->ptr = ptr;
- }
再判断内存是否足够:
- si = malloc(sizeof(*si) + (len + 1) * sizeof(uint16_t));
- if (!si) {
- LOGE("add_service('%s',%p) uid=%d - OUT OF MEMORY\n",
- str8(s), ptr, uid);
- return -1;
- }
如果都没什么问题,会注册该service,加入到svcList中来。注意,在ServiceManager中维护service信息的地方就是svclist。里面存了service的name和handler。
服务获取
通过以上几个步骤,service就算注册成功了。那么当要获得该service的时候又是怎么去处理的。还是来看下回调函数中的判断:
- case SVC_MGR_CHECK_SERVICE:
- s = bio_get_string16(msg, &len);
- ptr = do_find_service(bs, s, len);
- if (!ptr)
- break;
- bio_put_ref(reply, ptr);
- return 0;
如果是获取service,那么执行SVC_MGR_CHECK_SERVICE,并把返回的数据写入reply,返回给客户端。
do_find_service函数中主要执行service的查找。
- void *do_find_service(struct binder_state *bs, uint16_t *s, unsigned len)
- {
- struct svcinfo *si;
- si = find_svc(s, len);
- // LOGI("check_service('%s') ptr = %p\n", str8(s), si ? si->ptr : 0);
- if (si && si->ptr) {
- return si->ptr;
- } else {
- return 0;
- }
- }
这样在ServiceManager中就完成了服务的注册和查找。来看下ServiceManager的功能图:
SystemServer是Android系统的一个核心进程,它是由zygote进程创建的,因此在android的启动过程中位于zygote之后。android的所有服务循环都是建立在 SystemServer之上的。在SystemServer中,将可以看到它建立了android中的大部分服务,并通过ServerManager的add_service方法把这些服务加入到了ServiceManager的svclist中。从而完成ServcieManager对服务的管理。
先看下SystemServer的main函数:
- native public static void init1(String[]args);
- public static void main(String[] args) {
- if(SamplingProfilerIntegration.isEnabled()) {
- SamplingProfilerIntegration.start();
- timer = new Timer();
- timer.schedule(new TimerTask() {
- @Override
- public void run() {
- SamplingProfilerIntegration.writeSnapshot("system_server");
- }
- }, SNAPSHOT_INTERVAL,SNAPSHOT_INTERVAL);
- }
- // The system server has to run all ofthe time, so it needs to be
- // as efficient as possible with itsmemory usage.
- VMRuntime.getRuntime().setTargetHeapUtilization(0.8f);
- System.loadLibrary("android_servers"); //加载本地库android_servers
- init1(args);
- }
在main函数中主要是调用了本地方法init1(args), 他的实现位于../base/services/jni/com_android_server_SystemService.cpp中
- static voidandroid_server_SystemServer_init1(JNIEnv* env, jobject clazz)
- {
- system_init();
- }
进一步来看system_init,在这里面看到了闭合循环管理框架:
- runtime->callStatic("com/android/server/SystemServer","init2");//回调了SystemServer.java中的init2方法
- if (proc->supportsProcesses()) {
- LOGI("System server: enteringthread pool.\n");
- ProcessState::self()->startThreadPool();
- IPCThreadState::self()->joinThreadPool();
- LOGI("System server: exitingthread pool.\n");
- }
通过调用com/android/server/SystemServer.java中的init2方法完成service的注册。在init2方法中主要建立了以ServerThread线程,然后启动线程来完成service的注册。
- public static final void init2() {
- Slog.i(TAG, "Entered the Androidsystem server!");
- Thread thr = new ServerThread();
- thr.setName("android.server.ServerThread");
- thr.start();
- }
具体实现service的注册在ServerThread的run方法中:
- try {
- Slog.i(TAG, "EntropyService");
- ServiceManager.addService("entropy", new EntropyService());
- Slog.i(TAG, "PowerManager");
- power = new PowerManagerService();
- ServiceManager.addService(Context.POWER_SERVICE, power);
- Slog.i(TAG, "ActivityManager");
- context =ActivityManagerService.main(factoryTest);
- Slog.i(TAG, "TelephonyRegistry");
- ServiceManager.addService("telephony.registry", newTelephonyRegistry(context));
- }
ServiceMananger是android中比较重要的一个进程,它是在init进程启动之后启动,从名字上就可以看出来它是用来管理系统中的service。比如:InputMethodService、ActivityManagerService等。在ServiceManager中有两个比较重要的方法:add_service、check_service。系统的service需要通过add_service把自己的信息注册到ServiceManager中,当需要使用时,通过check_service检查该service是否存在。
主函数
从它的主函数代码开始:
从main函数中可以看出,它主要做了三件事情:
- Android 之 ServiceManager与服务管理, 以及SystemServer核心进程
- Android 之 ServiceManager与服务管理
- Android 之 ServiceManager与服务管理
- Android 之 ServiceManager与服务管理
- Android 之 ServiceManager与服务管理
- Android 之 ServiceManager与服务管理
- Android 之 ServiceManager与服务管理
- Android 之 ServiceManager与服务管理
- Android 之 ServiceManager与服务管理
- Android笔记 - Binder之守护进程servicemanager
- SystemServer vs ServiceManager
- SystemServer vs ServiceManager
- ServiceManager管理的服务——《android内核剖析》笔记
- Android入门进阶教程(13)-ServiceManager服务管理详解
- 【Android进阶】Android Binder之ServiceManager注册服务解析1
- android (一)、SystemServer与系统服务启动
- Android源码解析之(九)-->SystemServer进程启动流程
- Android源码解析之(九)-->SystemServer进程启动流程
- Android HttpClient介绍
- 物理DG与逻辑DG的区别与逻辑DG同步异常处理方法
- 浅谈Java批处理实现的10个关键点
- Android native线程
- svn的安装与配置
- Android 之 ServiceManager与服务管理, 以及SystemServer核心进程
- 第十六周上级项目3--填空学指针
- 指针篇之四 借你一双慧眼,把它类型看个清楚明白
- EasyUI 之datagrid 使用
- c语言静态变量和静态函数
- 类中的函数指针和函数对象
- SIFT算法的c++实现(VS2010+OpenCV2.3.1)
- 插入排序(JAVA)
- statusbar--通知栏运营商显示(一)