通过U盘安装freenas(新增的简单方法)
来源:互联网 发布:如何用c语言做贪吃蛇 编辑:程序博客网 时间:2024/06/05 02:47
英文原文:http://www.codeproject.com/Articles/678649/Installing-FreeNAS-to-USB-stick-new-and-simpler-wa
This is the current article that describes the simplest way of installing FreeNAS on USB stick in Windows without burning installation CD first.
There is an old post about installing FreeNAS on USB stick which is availablehere but it is more complicated and I encourage you to use this one instead.
Here is how it works:
这篇文章描述了一个简单的方法通过u盘来安装FreeNAS,不需要刻录启动光盘。
- Download 7-zip and install it. If you have another programinstalled that can work with compressed files you may want to use it instead of 7-zip.(下载7-zip,并安装。如果你有其它解压程序,你可能不需要使用7-zip,rar支持解压7zip格式。)
- Download Image Writer for Windows. Make sure to get the file that ends in binary.zip. I copied the file to C:\Temp and extracted the files intoC:\Temp\win32diskimager-binary.(下载Image Writer for Windows,保证下载的是二进制文件。拷贝到一个地方....。)
- Download the FreeNAS from SourceForge The latest stable version at the moment of writing is 8.0.4. I however decided to go with the 8.2 BETA 3 which is the latest available at the moment. You need the file ending in.img.xz(从sf上面下载最新稳定版本,写这篇文章时是8.0.4,然而我打算下载最新的版本8.2 BETA 3,选择文件后缀名位.img.gz下载。)

FreeNAS files
I downloaded the file and placed it in C:\Temp
我把他下载到C:\Temp目录。
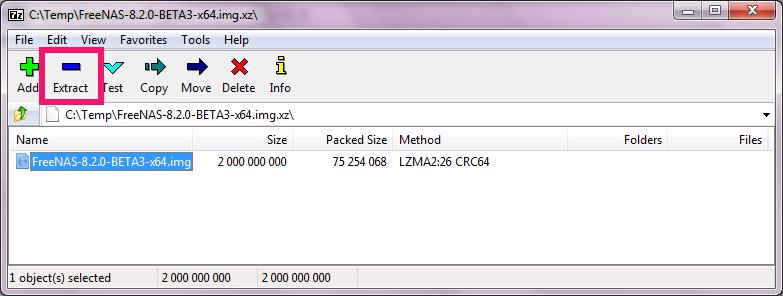
- Open the file you downloaded in the previous step with 7-zip and extract its content:(使用7-zip或者其它程序解压下载的文件。)

It produced a file named FreeNAS-8.2.0-BETA3-x64.img
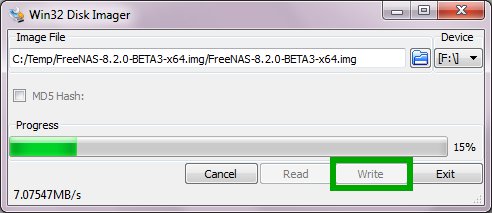
- Write the .img file to your USB stick using theImage Writer:(通过Image Writer把.img文件写到u盘。)
Note: You need 2GB USB stick or bigger.(你需要2G或者更大的u盘)

That’s all. Reboot your computer and make sure the boot from USB is the first choice in the BIOS.
完成后,插上u盘,重启电脑,在BIOS中更改启动顺序,确保是从U盘启动。
Here is the FreeNAS Documentation Project page that gives you additional information about how toinstall FreeNAS onUSB stick in Linux or OS X:
- 通过U盘安装freenas(新增的简单方法)
- FreeNAS的安装
- 最简单的U盘安装windows 7的方法
- U盘安装RHEL6.1的极其简单的方法
- U盘安装win7最简单的方法
- Linux_用U盘安装Linux系统的简单方法
- 用U盘安装Linux系统的简单方法
- 用U盘安装Linux系统的简单方法
- 用U盘安装Linux系统的简单方法
- 最简单的win7基础上安装ubuntu方法__EasyBCD硬盘安装(免U盘)
- U盘装系统的最简单方法(转载)
- 用U盘或移动硬盘安装Windows7 (超简单制作Win7安装U盘方法)
- 用U盘或移动硬盘安装Windows7 (超简单制作Win7安装U盘方法)
- 用U盘或移动硬盘安装Windows7 (超简单制作Win7安装U盘方法)
- 用U盘或移动硬盘安装Windows7 (超简单制作Win7安装U盘方法)
- bt安装u盘最简单方法,其他都若爆了
- U盘安装XP操作系统最简单、最安全方法
- bt4的U盘安装方法
- poj 2965
- poj 1035
- poj 3080
- poj 3259 最短路(带负环)
- poj 1860 最短路
- 通过U盘安装freenas(新增的简单方法)
- poj 1062 最短路
- 匈牙利算法
- scanf和cin的区别 (效率的差距)
- 解决Y450安装ubuntu12.04之后亮度无法调节
- poj 3041二分匹配
- poj 1469
- http://kb.cnblogs.com/page/130970/ -http协议
- poj 1789 最小生成树


